neck shaping, sanding.
neck shaping, sanding.
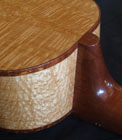
hi to all, its come time for the sanding stage of the neck of the first build. this building bug has certainly taken a beating with the thought of sanding (i hate sanding). did i mention how much sanding sucks? any tips on making the sanding of the volute, heel and other tricky parts a little less painful would be much appreciated.

I use a good sharp chisel to take the transitions into the shaft and to establish the cheeks of the heel. I refine with a sharp scraper and sandpaper and use a sharp chisel, japanese saw rasp, a sharp 12mm Ibex plane and sandpaper to shape the shaft and blend everything in. Doing things this way creates minimal dust.
It does seem to be a daunting task when ur standing back looking at the neck blank with a chisel in ur hand, but it seems to go quite easy once you make a start and is a most enjoyable and satisfying part of the build. If you feel a little intimidated, glue up some radiata pine blanks and have a go. You will soon realise it ain't that hard.
Did you notice the word 'sharp'?
Cheers and good luck.
Kim
I've just completed the neck on my first build & am really happy with the results. Of course with absolutely no prior woodworking experience, you're talking to a bloody expert here!
I used a cheap Bunnings rasp & small plane - rasped the head & heel ends roughly to shape, then planed out between.]
If you have a truss rod in there, make sure you check regularly while you are rasping away!
For the "smiley" volute I used a really good (& expensive) curved chisel - absolutely couldn't have done it without this tool.
I know sanding sucks, but you have to take the time to do it properly. Put it away & come back tomorrow if you are frustrated.
Just putting an oil/wax finish on mine.
good luck,
PJ

Sanding sucks but once you understand it, it becomes fun as you see the great finish you are producing.
Tip: Make sure your using the correct grits from start to finish.
I use Aluminum oxide papers and these make good work of sanding.
Good tip that walk away when frustrated
Cheers
Tim
I use a linisher, rasp plane, various files, chisels and sand paper to shape my tiny Uke necks.
Tip: Make sure your using the correct grits from start to finish.
I use Aluminum oxide papers and these make good work of sanding.
Good tip that walk away when frustrated
Cheers
Tim
I use a linisher, rasp plane, various files, chisels and sand paper to shape my tiny Uke necks.
[img]http://i4.photobucket.com/albums/y116/ImBroken8/annoyingbug.gif[/img]
http://holeshotnitro.com/
http://holeshotnitro.com/

Shaping necks and heel blocks is made easier if you work with facets. Run lines down your neck outlining the facets and spokeshave to same. See Campiano and Natelsons book for carving a heel block using facets.
As far as rasps go......I use a Dragon brand rasp with randomly cut teeth (available from Stewmac). On the neck I use a spokeshave and then finish off with a length of 80 and then 120 grit sandpaper used shoe shine style across the neck.
As far as rasps go......I use a Dragon brand rasp with randomly cut teeth (available from Stewmac). On the neck I use a spokeshave and then finish off with a length of 80 and then 120 grit sandpaper used shoe shine style across the neck.
-
J.F. Custom

- Blackwood
- Posts: 778
- Joined: Fri May 01, 2009 9:13 pm
- Location: Brisbane
- Contact:
This is how I learned to do it all those years ago - it's good advice and gives accurate controllable results.kiwigeo wrote:Shaping necks and heel blocks is made easier if you work with facets. Run lines down your neck outlining the facets and spokeshave to same...
I use a combo of spokeshaves, files, carving chisels, rasps, rifflers, scrapers and sandpaper. The exact combo and particular sizes of each tool depends on the instrument being crafted.
As far as 'rasps or surforms' go, I use the Microplane range from USA. If you haven't tried one, I highly recommend them. I used to use a Stanley surform when I first started for initial roughing out - what a difference the Microplanes make! They cut faster, easier and leave a much smoother finish then their similar counterparts. Get one! Note that the small round ones are quite fragile and care must be taken in use.
All this said however, it sounds as though you are passed all the profiling stages and only need to 'clean up' the surface. Sandpaper will take a lot of time if you are going from too coarse a surface to start with. If you have deeper gouges still or uneven surfaces, scrapers are very useful to reduce this to finer finish quickly, without risk.
Once on to sandpaper, these are the only 'tips' I can think of currently. You can 'spot' sand a particular bump etc by laying some cloth or paper backed sandpaper over the area and placing a finger on the 'spot'. Then with your other hand, pull/slide the sandpaper beneath your finger held on the offending area to level it without affecting the surrounding surface - if this makes sense. Try rolling your sandpaper into various diameter circles/ovals to make it easier to sand those curvy volutes or wrap the sandpaper around a form such as dowel to get into the flow of shapes.
Patience is the key though - as it is with all aspects of guitar making. You can't rush this or any other step. As mentioned previously, if you are getting frustrated, walk away and come back later.
Good luck,
Jeremy
-
Bob Connor

- Admin
- Posts: 3115
- Joined: Mon Jul 09, 2007 9:43 pm
- Location: Geelong, Australia
- Contact:
-
J.F. Custom
- Blackwood
- Posts: 778
- Joined: Fri May 01, 2009 9:13 pm
- Location: Brisbane
- Contact:
Strewth Bob!! That's a serious bit of kit for a neck 
Not sure if I should have you arrested for assaulting and abusing an otherwise fine piece of guitar timber; or if I should congratulate you on your evident dexterity!
If I was to take to a neck with that... lets just say it would be 'sculptural' at best...
Do you carve your archtop backs with a chainsaw and clean up with the leaf blower in reverse mulching mode too?
-
Bob Connor
- Admin
- Posts: 3115
- Joined: Mon Jul 09, 2007 9:43 pm
- Location: Geelong, Australia
- Contact:
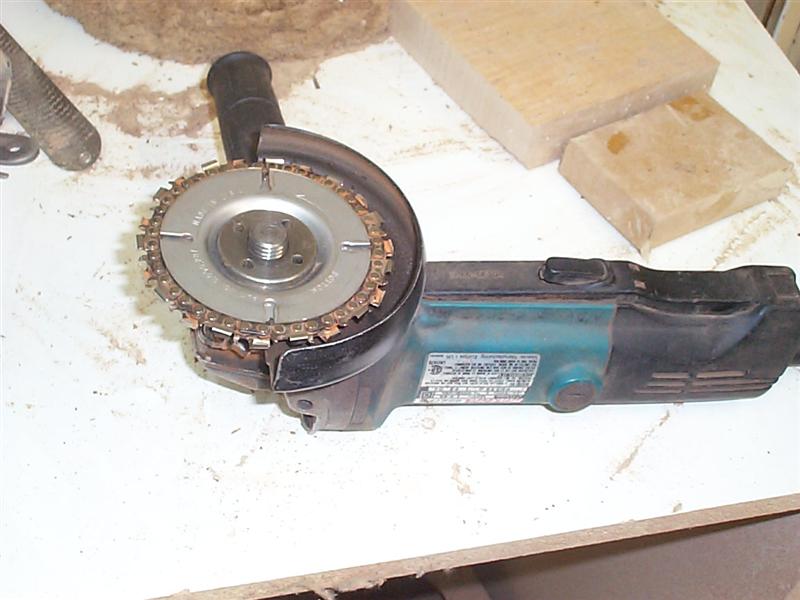
Just about. That's what the Arbortech and angle grinder are for. It's virtually a chainsaw. Makes me a bit nervous using it actually. But it's quick and quite accurate if you use a light touch.J.F. Custom wrote:Do you carve your archtop backs with a chainsaw and clean up with the leaf blower in reverse mulching mode too?
Graham MacDonald uses the same as does Mario Proulx (Canadian Luthier) except his is called a Lancelot.
This is what Mario's Lancelot looks like.
-
J.F. Custom
- Blackwood
- Posts: 778
- Joined: Fri May 01, 2009 9:13 pm
- Location: Brisbane
- Contact:
I should just clarify - I am joking
I am quite familiar with both the individual Arbortech blades and complete grinder/carver set ups they have. I know of several luthiers who rough out their archtops in a similar manner to you Bob.
They certainly make quick work of it, should you have steady hands and nerves to match.
Cheers,
Jeremy.
-
graham mcdonald
- Blackwood
- Posts: 473
- Joined: Thu Oct 25, 2007 11:57 am
- Location: Canberra
- Contact:
-
Nick

- Blackwood
- Posts: 3628
- Joined: Thu Feb 26, 2009 11:20 am
- Location: Christchurch, New Zealand
- Contact:
And a large pair of brass ones! That thing looks like it could fell a tree in a flash, so if it ever ran rampant over an archtop...J.F. Custom wrote:They certainly make quick work of it, should you have steady hands and nerves to match.
I'm more of your average chicken variety and rough shape with bandsaw and rasp
"Jesus Loves You."
Nice to hear in church but not in a Mexican prison.
Nice to hear in church but not in a Mexican prison.
-
Bob Connor
- Admin
- Posts: 3115
- Joined: Mon Jul 09, 2007 9:43 pm
- Location: Geelong, Australia
- Contact:

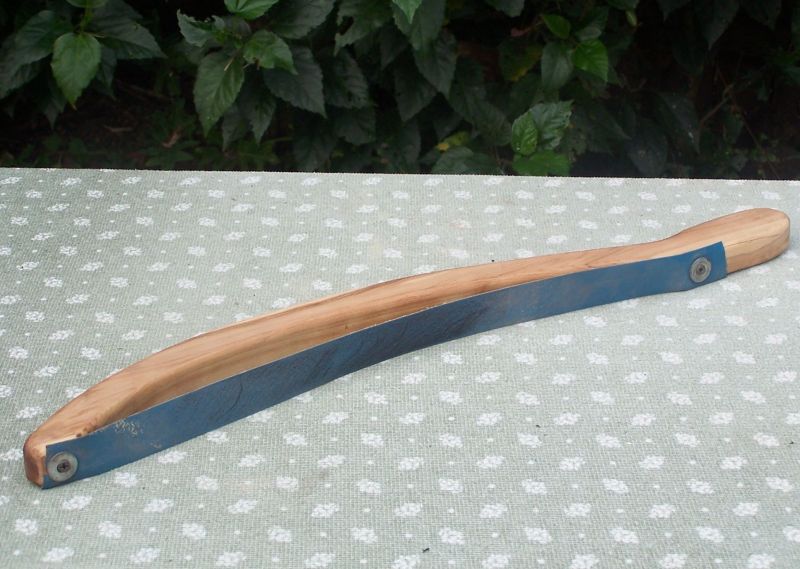
Hey, I have been using thin 30-40mm wide strips for sanding the curves around the heal and headstock and the shaft.
Use good quality cloth backed 60 grit as paper will rip. I get the blue cloth backed stuff from Bunnings, lasts for ages and is very sharp. All other papers are rubbish by comparison.
Stretch it out between your hands and work the area like shining shoes. If you want to focus on one small area pull it tighter.
No block you come up with can conform to the complex shapes in the heal but the sanding strip can. Use wider bits to run across grain on the neck then up and down the shaft to even out the lumps and sanding marks.
These are similar sanding techniques I used when making surfboards and found it easy to cross over. I love shaping the neck. It is a very intimate part of the guitar.
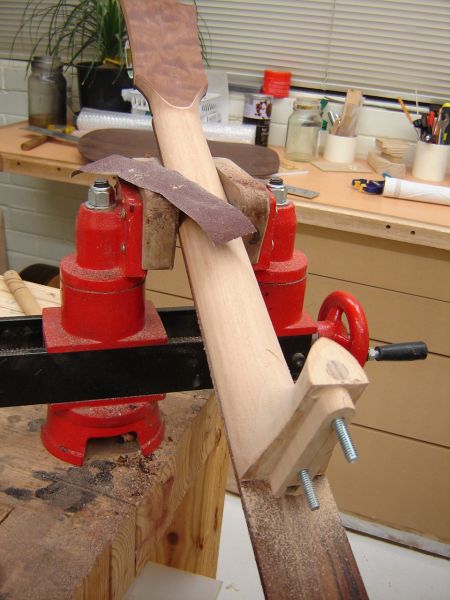
Here is a neck I am finishing now with my neck sanding strip. Just needs a final sand.
Dom
Use good quality cloth backed 60 grit as paper will rip. I get the blue cloth backed stuff from Bunnings, lasts for ages and is very sharp. All other papers are rubbish by comparison.
Stretch it out between your hands and work the area like shining shoes. If you want to focus on one small area pull it tighter.
No block you come up with can conform to the complex shapes in the heal but the sanding strip can. Use wider bits to run across grain on the neck then up and down the shaft to even out the lumps and sanding marks.
These are similar sanding techniques I used when making surfboards and found it easy to cross over. I love shaping the neck. It is a very intimate part of the guitar.
Here is a neck I am finishing now with my neck sanding strip. Just needs a final sand.
Dom
You can bomb the world to pieces,
but you can't bomb the world to peace!
but you can't bomb the world to peace!
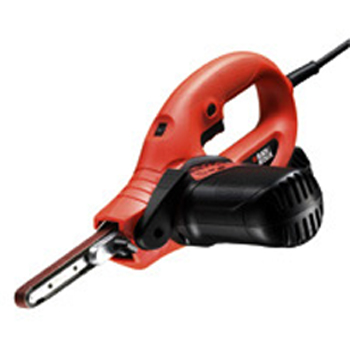
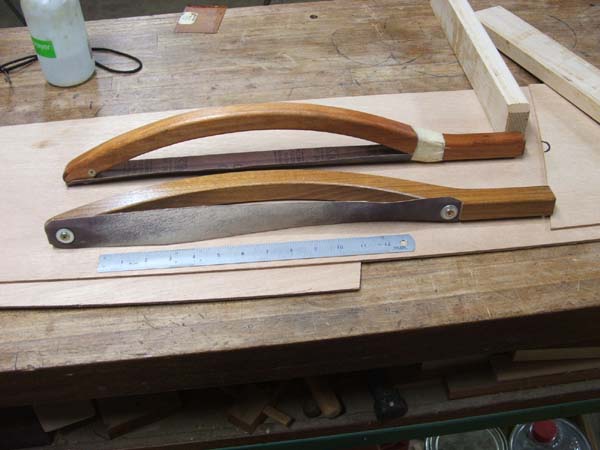
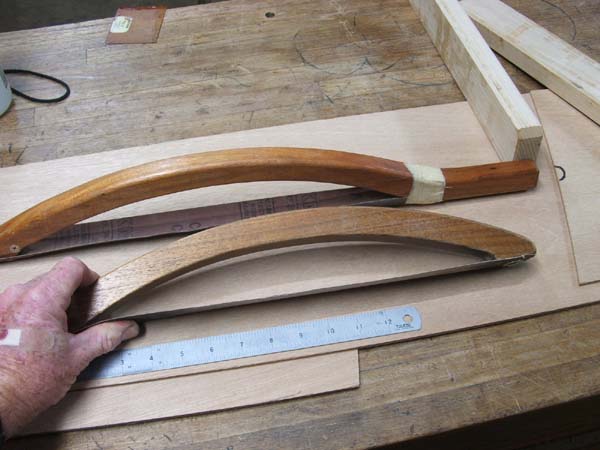
Here is another version of Bob's rasp. This one is cordless and much more refined.Sanding belt is a little slack for curves and can be tightened with a finger for more control.Great on cabriolet legs and guitar necks.I use one with 80 grit and one with 120 grit.
And speaking of shaping surfboards Dom, I've got a couple of hollow bodies on the go at the moment.Going to be skinned with Paulownia and no Glass.The almost green surfboard.
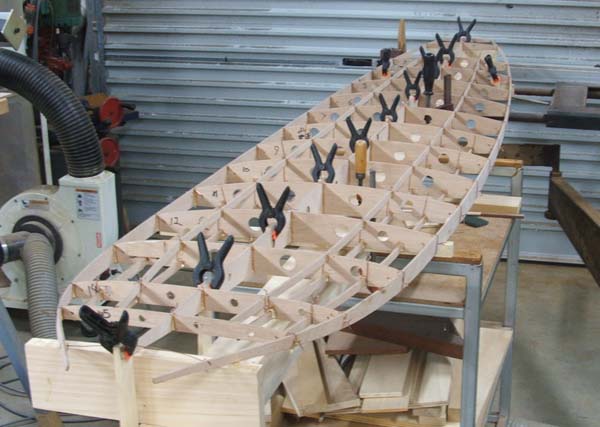
And speaking of shaping surfboards Dom, I've got a couple of hollow bodies on the go at the moment.Going to be skinned with Paulownia and no Glass.The almost green surfboard.
Cheers from Micheal.
Remember the "5P Rule".
Preparation Prevents Piss Poor Performance.
Remember the "5P Rule".
Preparation Prevents Piss Poor Performance.
-
J.F. Custom
- Blackwood
- Posts: 778
- Joined: Fri May 01, 2009 9:13 pm
- Location: Brisbane
- Contact:

I saw Micheal's when I was at his place back in March. I came home and made one for myself right away, and it works an absolute charm on necks. I had a picture all set to go, but waited to see if Micheal would let you all into his brilliance.
I even made mine out of camphor laural in honor of the man that gave me the inspiration.
I even made mine out of camphor laural in honor of the man that gave me the inspiration.

-
Bob Connor
- Admin
- Posts: 3115
- Joined: Mon Jul 09, 2007 9:43 pm
- Location: Geelong, Australia
- Contact:
Who is online
Users browsing this forum: No registered users and 103 guests