Good morning everyone,
Ive been watching the sander threads with interest. Id like one but dont have $1500 to throw that way. So Im thinking of making one. I know Tim S. has made one and Im assuming others have as well. Ive found plans and a well laid out build diary here http://www.rockslide.org/drum%20sander.html
Its probably going to collect a lot of dust as Im a hobbyist so I dont need super reliability, just good reliability, read "I dont want to overbuild". The questions, how wide do people recommend? tricks and traps? What do you wish you had / hadnt got in the way of features?
Thanks,
Sebastiaan
Home made drum sander
-
sebastiaan56

- Blackwood
- Posts: 1274
- Joined: Sun Oct 28, 2007 5:23 am
- Location: Blue Mountains
Home made drum sander
make mine fifths........
-
Dennis Leahy

- Blackwood
- Posts: 872
- Joined: Wed Oct 10, 2007 12:32 am
- Location: Duluth, MN, US
- Contact:
I wish I could be more helpful, Sebastiaan, but my home-built sander is still a pile of parts and some CAD drawings.
I'm creating a 6" diameter (152mm) drum from MDF circles, stacked and epoxied together. I have read (somewhere) that the bigger diameter helps prevent burning the wood. I will use Velcro (hook-n-loop) material on the drum. I have watched my friend Grant sand a lot of wood with his homebuilt sander, and he feels that the very slight "give" that the hook-n-loop provides is the key to the sandpaper not getting easily gummed up. He sands a lot of Cocobolo (and about 40 to 50 other species of wood.)
If you make the drum a few inches wider than the maximum width you'll ever use (say 20" to 22" wide, instead of 16" wide), then you can feed some gummy wood species through at an angle, and that is supposed to minimize burning and sandpaper gumming.
Dennis
Another damn Yank!
The biggest source of the paper prematurely getting loaded up is heat.
As you can imagine heat can be reduced with a number of methods. Less friction (taking shallower cuts at once since we can't control the drum speed (usually)).
But what has worked best for me in conjunction with shallow passes is great dust collection which also serves to cool the drum and paper. Use masking tape to tape up every nook and cranny on your sander that can leak the suction of the dust collection system.
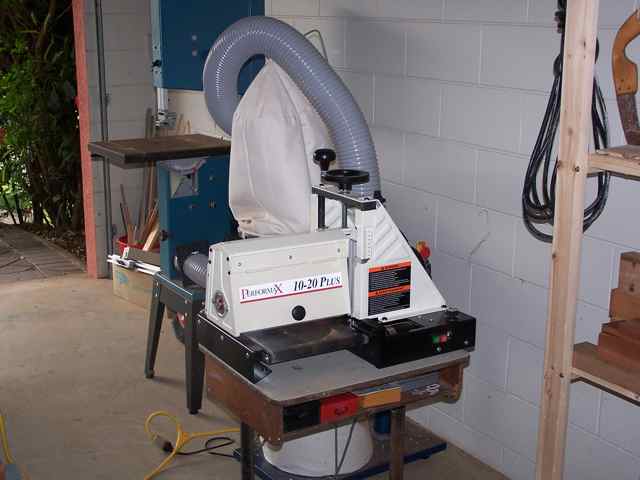
Consider the little Performax 10-20 - I have one and it is great and it is also probably the most accurate of the hobby sanders on the market. I get variances of no more than .002 any where on the plate. It is also around $500 which when you consider the costs of building one plus the time etc. is not unreasonable.
As you can imagine heat can be reduced with a number of methods. Less friction (taking shallower cuts at once since we can't control the drum speed (usually)).
But what has worked best for me in conjunction with shallow passes is great dust collection which also serves to cool the drum and paper. Use masking tape to tape up every nook and cranny on your sander that can leak the suction of the dust collection system.
Consider the little Performax 10-20 - I have one and it is great and it is also probably the most accurate of the hobby sanders on the market. I get variances of no more than .002 any where on the plate. It is also around $500 which when you consider the costs of building one plus the time etc. is not unreasonable.
-
Ron Wisdom

- Blackwood
- Posts: 420
- Joined: Sat Sep 29, 2007 1:18 am
- Location: Arkansas, USA
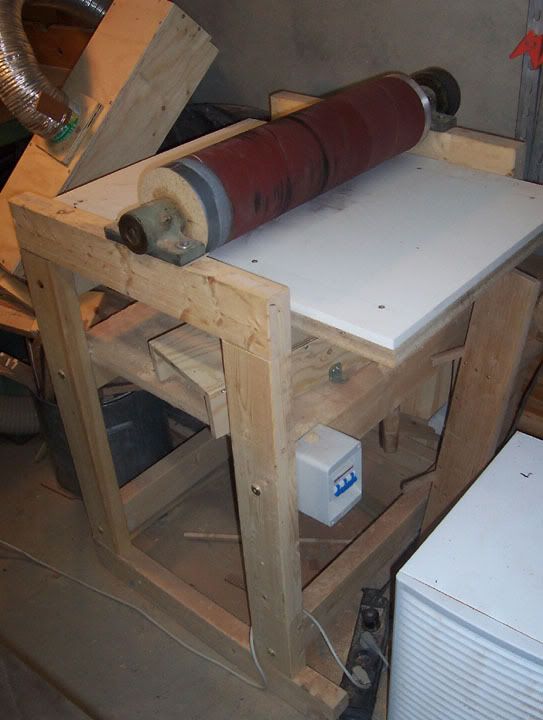
I built mine and it works very well. My drum is 4" in diameter by 22" long and I also use the velcro backed sandpaper. It has a 1 1/2hp motor and is hand fed. I really wouldn't change anything. I only build a couple a year and will never wear it out. Plenty accurate. Feed at an angle using 60 grit for gummy wood. For most woods I use 100 grit.
Ron
Ron

If only we could get the Performax for $500 Hesh. I just bought the 10/20 on yours and others great reviews, and am picking it up tomorrow. I managed to find a fellow that would sell me one for $900 here and shipping was free because the fellow is coming to Cairns anyway. Other places were as much as $1000.
I had thought of building my own sander, but by the time I added up the cost of the various pieces, as I don't have any on hand, it just started to get to be a bit much, without knowing if it was going to really work at all the way I wanted. Then there was the issue of feeding the stock through the sander. Is it going to be manually, or are you going to rig up a power feed. From some of the accounts of people that have gone the manual route, it got old very fast, and they were looking for alternatives. I also looked at how much time and effort was going to go into building a sander and thought that I'd rather build guitars.
Don't get me wrong, I don't want this to sound like I'm discouraging you from building one, just some of my observations as food for thought. Have you watched eBay for drum sanders. They come up quite regularly and if I had lived closer to civilization, I would have bought one, but by the time one gets shipped from Melbourne or Sydney I'm back up to buying a new one. Might be an option if its just across town for you.
While I do like the idea of being able to sand something wide in one go, I studied what I use the drum sander for the most, and day in and day out its for small stuff. Making bindings, sanding brace stock, thinning tops, sides and backs. The only time that I would need more than the 10" is when I wanted to pass the joined plates through. If the machine is set up accurately, then it's really a non issue to flip it around and run the other side through. The shorter drum also reduces the cost of sandpaper considerably as well.
On another note, there is nothing stopping you from using velcro backed paper on the Performax for the cushioning effect.
Just got a performax 10/20 from Gary Pye in Brisbane
http://gpwoodturning.yahoostore.com.au/ ... 1107219321
$775 plus $68 shipping to me in Newcastle.
Was going to build one but the cost of parts etc....
Jeff
http://gpwoodturning.yahoostore.com.au/ ... 1107219321
$775 plus $68 shipping to me in Newcastle.
Was going to build one but the cost of parts etc....
Jeff

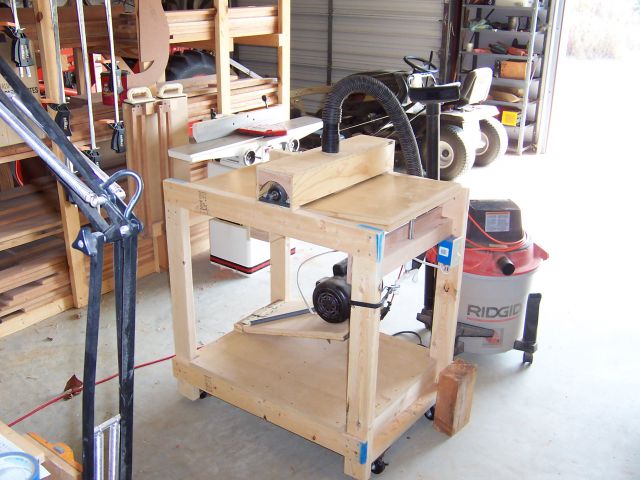
Here's mine. Pretty much identical to Ron's , except the drum is O=150 mm and I use a 3 phase motor. I also use the velcro backed paper, and I hook the thing up to my 2 HP DC with a 100 mm hose. Accuracy and dust collection is fine, but the armstrong feed method gets old, so I'm planning on upgrading to a commercial model with a power feed one of these days.
Here in Europe, you can sometimes find used industrial wide belt sanders for not much more than a new Jet drum sander (which is about triple of what the US guys are paying for it!) so I'm considering that option as well. Most of them are 1200 mm wide, but the smallest ones I have seen are 600 mm and would be perfect. I don't know the situation where you are located, but it could be worth looking into.
Anyways, here's my current setup. No beauty prices for this one, but the thing works.
Arnt Rian,
Norway
Norway
-
Paul B
Mine looks so much like Ron's and Arnt's that I won't even bother to post a pic. 
It's about 18 - 22 inches wide - ok, I can't remember exactly. My in feed and out feed tables are too long at about 20" each side. Ron's and Arnt's both look about right to me.
I wish I used some diagonal braces on mine cause there's a bit of vibration that could be reduced if there was less twisting of the frame. Gonna have to go back and do something about that once the new shop is built.
If you're down in Sydney you can pop in and have a squiz at mine, but it'd be a long way to travel and not much to look at.
-
sebastiaan56
- Blackwood
- Posts: 1274
- Joined: Sun Oct 28, 2007 5:23 am
- Location: Blue Mountains
Many thanks for all of the feedback. I didnt think I would be paddy on this one.
Dennis, there is a risk that it will sit as a plan, but there is always that risk Cash is a real issue at the moment as business is not good. We are working much harder just to stay afloat. There is a recession on here. Sometimes I wish I was an employee again, nah.... kidding....
Hesh / Allen / Jeff, The unit from Gary Pye is the cheapest I have been able to find in Aus ($886 + GST + freight), so I reckon a build will be much cheaper, particularly if the motor is second hand and I have the stand timber laying around. Blue Mountains people are great recyclers! That said I am watching EBay, it is a great resource. Point taken about heat Hesh, thanks.
Ron / Arnt / Paul, Im glad you showed me those pictures and made those comments. It looks simpler than the websites I have been cruising. The Armstrong method you describe, is there a risk of nipped fingers?, apart from gloves how do you get around it, do you walk around the machine?
My other issue is the DC, but Im sure the tip's recycling centre will have a plethora of old vacumn cleaners that can be modified.
My other alternative is to find someone local who has one and find a way to get going without ruining a friendship. You offer will be taken up one day Paul but Como is a 2 hr drive!
Sebastiaan
make mine fifths........
Have you check around for a local woodworkers group. Many towns have one with all sorts of equipment. I've been a member of the Cairns Woodworkers Guild for the past year and have been using their drum sander for all my needs. I did get a bit tired of having to drive into town every time that I felt like using it, so that's why I purchased my own. As a cost effective measure though, you can't beat it.
The “armstrongâ€sebastiaan56 wrote:The Armstrong method you describe, is there a risk of nipped fingers?, apart from gloves how do you get around it, do you walk around the machine?
My other issue is the DC, but Im sure the tip's recycling centre will have a plethora of old vacumn cleaners that can be modified.
Arnt Rian,
Norway
Norway
-
Ron Wisdom
- Blackwood
- Posts: 420
- Joined: Sat Sep 29, 2007 1:18 am
- Location: Arkansas, USA
I operate from the side exactly as Arnt described. (He's a smart man). Feeding by hand isn't hard unless you try to take off too much at a time. It is slow, but not too slow for a hobby builder. I use mine to thickness the back side of my peghead, too. My picture above shows a shop vac hooked up, but I have since increased it to a 4" port hooked to my central cycloneish unit.
Ron
Ron
I just took delivery of my new Performax 10/20 today and boy I'm stoked. 
Out of the box it was set up about as good as I think you are ever going to get it. All I had to do was attach the hand wheel for the depth adjustment. That's about a 30 second job.
My digital calipers don't register a difference of even .01 mm across 10 inches. I had a back that was glued up and I wanted to take down a bit more. A couple of run throughs flipping it around to get both sides and its perfect. No ridge down the center and dead even from side to side.
Highly recommend this one.
Congrats Allen I have the same machine and love it.
Here are some tips for you if you want them.
First mine was dead on right out of the box too - I checked it and decided that it was too close to even attempt to improve. I see about .002 variance across a plate - tough to beat and why bother?
I use 80 grit for hard woods and 120 for soft woods with good results.
I never crank the handle down more than 1/8th of a turn at once and this is typically .004 - -008 of material removal.
I have noticed that if you run the plate through again with out turning the knob at all you can see around .002 - .004 more reduction.
The circuit breaker on mine is to sensitive and trips prematurely so I plug my machine into a circuit that my dust extractor and dehumidifier are not on and the problem is solved.
The feed belts are notorious for wanting to track to the right. Even when you adjust them perfectly after a few minutes of use the feed belt is again all the way on the right side.
But not only does this not hurt anything I have also noticed that when I center the feed belt and sand, before it moves to the right I do see the slight ridge in the center that some complain about. Once the belt returns to where it wants to naturally live, the right side, the ridge is not there. When you think about this the ridges appear on the left most edge of the belt when they show up. When the belt is not in this position, the left most side, no ridge. So I actually think that we are getting lucky when our belts track to the right because it also cures the ridge thing too.
I used masking tape to tape the cracks and spaces in the hood and this improves the dust collection and also the cooling of the drum.
These machines can get off balance when the fins inside the drum fills up with saw dust. So I cut a nozzle on my vac to 45 degrees and place it against the side of the drum and spin the drum slowly by hand to vac all the dust out of the center of the drum. Please unplug the machine first.
I set the speed control on 30% for all tasks and it works well.
Enjoy!
I think that you are right Allen - mine looks very well made to me too and I have used it for around 10 guitars now with no issues.
Probably the only irritating thing to me is that the paper can load up pretty easy with oily woods like BRW. I have heard that oven cleaner can clean the paper pretty well but I have yet to try this favoring to be wasteful and lazy and just install a new roll.
Probably the only irritating thing to me is that the paper can load up pretty easy with oily woods like BRW. I have heard that oven cleaner can clean the paper pretty well but I have yet to try this favoring to be wasteful and lazy and just install a new roll.
The fellows at the Cairns Woodworkers Guild just drop the gummed up paper in a bucket of water and let it sit and soak for a few weeks. This seems to soften up most of it and just a light scrub with a nylon bristle brush like you would use on your hands to get stubborn grime off seems to do the trick.
Who is online
Users browsing this forum: No registered users and 64 guests