Hi guys,
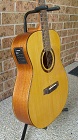
I have an opportunity to cut some large pieces of burl from some eucalypts on my parents property. I want to keep some of it for use on rosettes, headstocks etc. To store it for drying (there is no hurry) how thick should I leave the pieces? And what should I do about finishing some/all (?) of the surfaces?
Thanks,
Shane
Question about cutting and storing burl
-
Shane Woonton
- Blackwood
- Posts: 112
- Joined: Thu Jul 28, 2011 1:23 pm
-
Trevor Gore

- Blackwood
- Posts: 1643
- Joined: Mon Jun 20, 2011 8:11 pm
Re: Question about cutting and storing burl
I've bought burl bowl blanks in the past to use for rosettes. If you slice it early for that use (early being ~12% MC) the slices will just shrivel, crack and fall apart, virtually no matter what you do.
So, for bowl blank size pieces, I wax them all over and put them in a plastic bag in the bottom of a dark cupboard and forget about them for ~2 years. Then I move the plastic bag into the dry room and leave them for about another 2 years. After that, I can slice them and they mostly behave.
So, for bowl blank size pieces, I wax them all over and put them in a plastic bag in the bottom of a dark cupboard and forget about them for ~2 years. Then I move the plastic bag into the dry room and leave them for about another 2 years. After that, I can slice them and they mostly behave.
Fine classical and steel string guitars
Trevor Gore, Luthier. Australian hand made acoustic guitars, classical guitars; custom guitar design and build; guitar design instruction.
Trevor Gore, Luthier. Australian hand made acoustic guitars, classical guitars; custom guitar design and build; guitar design instruction.
-
Tod Gilding
- Blackwood
- Posts: 838
- Joined: Thu Mar 10, 2011 7:32 pm
- Location: South West Rocks NSW
Re: Question about cutting and storing burl
Tod
Music is everyone's posession. It's only publishers who think that people own it.
John Lennon
Music is everyone's posession. It's only publishers who think that people own it.
John Lennon
Re: Question about cutting and storing burl
Quicker still cut at least 3 to 4 mm thicker than required finshed thickness, wrap in cling wrap after resawing every now and then on cool overcast days leave it out, if it curls or warps turn it over in opposite direction at night wrap in cling wrap again, it will dry in no time bugger waiting years for it to dry.
Jo
Jo
-
Trevor Gore
- Blackwood
- Posts: 1643
- Joined: Mon Jun 20, 2011 8:11 pm
Re: Question about cutting and storing burl
OK. I'll have a dozen slices please. 1.50mm thick, dead flat, no cracks, 7% MC, delivered.
For Christmas.
Fine classical and steel string guitars
Trevor Gore, Luthier. Australian hand made acoustic guitars, classical guitars; custom guitar design and build; guitar design instruction.
Trevor Gore, Luthier. Australian hand made acoustic guitars, classical guitars; custom guitar design and build; guitar design instruction.
Re: Question about cutting and storing burl
Just like a sandwich Trevor,........................................lightly toasted and wraped in gladwrap !
Paul .
Re: Question about cutting and storing burl
Over time milling Burl I've tried , failed , tried different tracks , had some success , persisted , failed , learnt a bit more , got some better successes and on it goes .
So a bit of what I've learn't . Firstly , obviously the movement issues of burl will change with the species . Difficult to dry timbers such as the "Ash" type Eucalypts are in kind difficult to dry as burl . Arid zone Eucalypts such as the various "Box" ( for which I would include Coolabah )are comparitively easy or should I say possible to dry . The drying differences of timbers is a conversation that could go on forever but what I would say is start with the movement stats listed in Bootle .
So starting with the green burl cut off the living tree , as it comes off the saw , seal the cut face . A good wax emulsion is ideal , lots of paint will do for tight grained burl . Don't remove the bark preferably . Get the burl out of the sun .Do not ever leave the timber exposed . Don't transport it on an open ute or truck . I wrap all fresh burl in pallet wrap , basically heavy glad wrap . From here if you want to attempt to dry the burl in caps or in the round , the key is slow . Minimal air flow and no sunshine is what you are aiming at . We have buried burl in band saw dust off the mill and dried them well . We have filled timber crates with end sealed burl stashed them in a shady protected spot and had good results . Though mostly the strategy is to saw them close to the final size and dry them .
Burl will generally be sawn off a band saw . I've done it off a band resaw as well as off a band mill with a water lubricated blade . My preference is for the lubricated band as gumming up of bands is a common problem sawing green timber off unlubricated blades . This can be alleviated to some extent by regularly scraping the sides of the running band whilst carefully ! staying back from the teeth .Common guides won't do this .
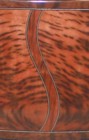
To obtain sawn veneer off burl I will run off say 5mm slices , accurate is important . If your boards are wobbly you will have hell drying them true . The problem with sawn burl is you will end up with a stack of very odd shaped pieces . It's important with any timber drying to build neat even stacks with the stickers or drying sticks aligned vertically above each other . The tendency is to build stacks that replicate the shape of the burl only with drying sticks between . Don't do this . Trim the slices down into a regular size , or sizes so that the stack will be a box shape , not a pyramid . Keep your end use in mind , say headplates and rosette stock .
Take your even stack of sized timber somewhere suitable , inside a shed is good though stay well away from that dehumidified workshop .Onto a solid , flat base lay out small , clean dry stickers out to even with the ends of your slices ( which are re endsealed after the resizing you have done ). For difficult timbers I prefer 5mm x 10mm stickers on 50mm spacings . My preference is for durable sortwood stickers such as cypress or california redwood .For easier timbers I use 10mm x 10mm stickers . Lay out your stickers , lay a burl sheet , lay out more stickers perfectly ! above the last lot , lay out another sheet , and so on . When you reach the end of your stack , put a course of stickers on top , then top the stack with a dead flat dry board . To keep downward pressure I will either bind the stack with straps made of inner tube or weight the stack . Weighting is easier , binding allows you to move the stack into more agressive drying environments as they get closer to dry .For really radical timbers I'll then cover the stack for a good while , say three months , with canvas . I always start by covering the stack with hessian or shadecloth for at least that sort of time .
Next thing , patience .
If there is much interest on the topic I'd happily take some photos and follow the topic through some more .
Pete
So a bit of what I've learn't . Firstly , obviously the movement issues of burl will change with the species . Difficult to dry timbers such as the "Ash" type Eucalypts are in kind difficult to dry as burl . Arid zone Eucalypts such as the various "Box" ( for which I would include Coolabah )are comparitively easy or should I say possible to dry . The drying differences of timbers is a conversation that could go on forever but what I would say is start with the movement stats listed in Bootle .
So starting with the green burl cut off the living tree , as it comes off the saw , seal the cut face . A good wax emulsion is ideal , lots of paint will do for tight grained burl . Don't remove the bark preferably . Get the burl out of the sun .Do not ever leave the timber exposed . Don't transport it on an open ute or truck . I wrap all fresh burl in pallet wrap , basically heavy glad wrap . From here if you want to attempt to dry the burl in caps or in the round , the key is slow . Minimal air flow and no sunshine is what you are aiming at . We have buried burl in band saw dust off the mill and dried them well . We have filled timber crates with end sealed burl stashed them in a shady protected spot and had good results . Though mostly the strategy is to saw them close to the final size and dry them .
Burl will generally be sawn off a band saw . I've done it off a band resaw as well as off a band mill with a water lubricated blade . My preference is for the lubricated band as gumming up of bands is a common problem sawing green timber off unlubricated blades . This can be alleviated to some extent by regularly scraping the sides of the running band whilst carefully ! staying back from the teeth .Common guides won't do this .
To obtain sawn veneer off burl I will run off say 5mm slices , accurate is important . If your boards are wobbly you will have hell drying them true . The problem with sawn burl is you will end up with a stack of very odd shaped pieces . It's important with any timber drying to build neat even stacks with the stickers or drying sticks aligned vertically above each other . The tendency is to build stacks that replicate the shape of the burl only with drying sticks between . Don't do this . Trim the slices down into a regular size , or sizes so that the stack will be a box shape , not a pyramid . Keep your end use in mind , say headplates and rosette stock .
Take your even stack of sized timber somewhere suitable , inside a shed is good though stay well away from that dehumidified workshop .Onto a solid , flat base lay out small , clean dry stickers out to even with the ends of your slices ( which are re endsealed after the resizing you have done ). For difficult timbers I prefer 5mm x 10mm stickers on 50mm spacings . My preference is for durable sortwood stickers such as cypress or california redwood .For easier timbers I use 10mm x 10mm stickers . Lay out your stickers , lay a burl sheet , lay out more stickers perfectly ! above the last lot , lay out another sheet , and so on . When you reach the end of your stack , put a course of stickers on top , then top the stack with a dead flat dry board . To keep downward pressure I will either bind the stack with straps made of inner tube or weight the stack . Weighting is easier , binding allows you to move the stack into more agressive drying environments as they get closer to dry .For really radical timbers I'll then cover the stack for a good while , say three months , with canvas . I always start by covering the stack with hessian or shadecloth for at least that sort of time .
Next thing , patience .
If there is much interest on the topic I'd happily take some photos and follow the topic through some more .
Pete
-
Shane Woonton
- Blackwood
- Posts: 112
- Joined: Thu Jul 28, 2011 1:23 pm
Re: Question about cutting and storing burl
Thanks Pete. Great information. The more I read about it the more it seems that some trial and error will be involved and patience is the key ingredient. Will have a chance to cut some later this week. I'll see what we can get off the tree before deciding on a suitable dark place to store them.
Cheers,
Shane
Cheers,
Shane
Who is online
Users browsing this forum: No registered users and 89 guests