I'm well underway with 5th build and I'm following the Gore/Gilet books for this one, it will be a medium sized SS.
I was thinking about binding the rosewood fretboard with the offcuts from the blank,as this will be my first attempt at binding a fretboard I have done a bit of reading and research,but just wondered if anyone here could offer any advice or techniques that could help.
Thanks in advance
Tod
Fretboard Binding
-
Tod Gilding
- Blackwood
- Posts: 838
- Joined: Thu Mar 10, 2011 7:32 pm
- Location: South West Rocks NSW
Fretboard Binding
Tod
Music is everyone's posession. It's only publishers who think that people own it.
John Lennon
Music is everyone's posession. It's only publishers who think that people own it.
John Lennon
-
Trevor Gore

- Blackwood
- Posts: 1646
- Joined: Mon Jun 20, 2011 8:11 pm
Re: Fretboard Binding
There's a brief note on how I do "blind" bound fretboards on p 4-124. (Design book).
Fine classical and steel string guitars
Trevor Gore, Luthier. Australian hand made acoustic guitars, classical guitars; custom guitar design and build; guitar design instruction.
Trevor Gore, Luthier. Australian hand made acoustic guitars, classical guitars; custom guitar design and build; guitar design instruction.
Re: Fretboard Binding
Hew Tod,
I'm in the middle of doing bound fretboard. Pink Gidgee with Blackwood binding. Here's what I did.
1: make the fretboard to 1mm over each side, and cut the fret slots.
2: radius the fretboard--I went 12".
3. re-cut the fret slots to match the radius, and knock the corners off the tops of the fret slots.
4. trim the fretboard 1mm thinner on each side.
5. glue on the bindings, .5mm oversize, and with 1mm over on the top and bottom.
6. sand the back flush.
7. sand the top flush using a radiused block.
8. sand the sides on a shooting board, until I got the widths right.
9. dither a bit until I got up the balls to do the frets.
10. watched Robbie O'Brien's video on fretting.
11. stopped dithering.
12. ground my sidecutters to a slight crown at the cutting edge, and cut the tangs off the frets and bashed in the frets. 28oz Estwing framing hammer
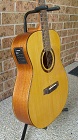
13. gonna put the side markers in tomorrow and glue the bugger on the guitar, but this is what it looks like today....
Actually, I've trimmed the end of the fretboard, and sanded it, but you get the idea....
Edit: this is my second, but I'm trying some new things
I'm in the middle of doing bound fretboard. Pink Gidgee with Blackwood binding. Here's what I did.
1: make the fretboard to 1mm over each side, and cut the fret slots.
2: radius the fretboard--I went 12".
3. re-cut the fret slots to match the radius, and knock the corners off the tops of the fret slots.
4. trim the fretboard 1mm thinner on each side.
5. glue on the bindings, .5mm oversize, and with 1mm over on the top and bottom.
6. sand the back flush.
7. sand the top flush using a radiused block.
8. sand the sides on a shooting board, until I got the widths right.
9. dither a bit until I got up the balls to do the frets.
10. watched Robbie O'Brien's video on fretting.
11. stopped dithering.
12. ground my sidecutters to a slight crown at the cutting edge, and cut the tangs off the frets and bashed in the frets. 28oz Estwing framing hammer
13. gonna put the side markers in tomorrow and glue the bugger on the guitar, but this is what it looks like today....
Edit: this is my second, but I'm trying some new things
I wish I was half the man my dog thinks I am....
Cheers,
Nick
https://www.facebook.com/pages/DMI-hand ... 744?ref=hl
Cheers,
Nick
https://www.facebook.com/pages/DMI-hand ... 744?ref=hl
-
Tod Gilding
- Blackwood
- Posts: 838
- Joined: Thu Mar 10, 2011 7:32 pm
- Location: South West Rocks NSW
Re: Fretboard Binding
Thanks Trevor, I did read your section on blind binding, that was where I got the idea ,I particularly liked your descriptions “elegance and simplicity “ and “plain is good” which is exactly what I am looking for in this build.
I don’t recall seeing blind binding previously, or maybe I have, but just didn’t notice it.
Your details are very good, however I thought I would just put it out to the ANZLF’s as I find someone here can sometimes come up with a little Gem that can be very helpful.
And thankyou Nick your step by step process was also helpful,I can't really tell from your picture ,but have you bound the soundhole end and nut end of the board or just the sides ?
Cheers Tod
Tod
Music is everyone's posession. It's only publishers who think that people own it.
John Lennon
Music is everyone's posession. It's only publishers who think that people own it.
John Lennon
Re: Fretboard Binding
Hi Tod,
No. I didn't bind the sound hole end. I thougt about it, but the pink gidgee looks pretty cool on the endgrain. If I was going to, I'd do the end first oversize, and trim it off with a craft kife and mitre the sides into that.
I also left the nut clear. I've left the fretboard long, even though the zero fret is cut, because I have a small hole dead centre of the fretboard, and I'll tack it to the guitar with that to keep it from moving during glueing up, and cut the whole lot off when it's set.
I wish I was half the man my dog thinks I am....
Cheers,
Nick
https://www.facebook.com/pages/DMI-hand ... 744?ref=hl
Cheers,
Nick
https://www.facebook.com/pages/DMI-hand ... 744?ref=hl
-
Nick

- Blackwood
- Posts: 3628
- Joined: Thu Feb 26, 2009 11:20 am
- Location: Christchurch, New Zealand
- Contact:
Re: Fretboard Binding
I haven't gotten through Trevor & Gerrard's books yet Tod so forgive me if I'm doubling up on what may already be in the book but the way I do it is to work out the widest width my Fingerboard will end up so I then cut/square up my blank that width plus 1.5mm and a little longer also, this excess length will get trimmed off later in the process. I then use the same table saw blade that stewmac sell for cutting the fret slots which is 0.023" wide (hence my +1.5mm). It's just a simple matter of cutting a strip 2mm wide from each side of the blank (making sure I mark which side of the blank each strip came from so my grain is matched as best as possible),I then proceed to cut my fret slots with the same blade (but set at a different cutting height!  )while the board is still rectangular & I have a reference face and then finish by cutting the fingerboard taper, also I then cut the Fingerboard to length at this stage. I apply several strips of masking tape on the rear of the board ('un'fretted side) down the length & then sit it masking tape side down on my table saw bench (only because I know this is a flat surface, can't trust my ropey old bench!). Once that's done I'll apply a small amount of titebond onto my 'binding', I don't want to fill the fret slots up too much with glue that I've just carefully cut! and put the correct binding strip on the side it was cut from lining them both up with the nut end of the board (you should still have excess length on the binding strips so should overhang at the wider end) & then pull the tape up and over, pulling the tape in tight to 'clamp' the strips against each side of the board, remove any excess squeeze out with my damp cloth, front and back. Once the glue's had about twenty minutes to dry (but isn't fully hard) I'll remove any stray bits of glue from the slots with a pick or blade/knife, any slots that are covered by tape I'll peel it back, clean up, then pull the tape back down. Once all is well & dry I remove the tape, trim the excess off the bindings & radius the fingerboard as per usual.
That's how I do mine anyway, you may find a very slight variance with grain lines/patterns but it's fairly unnoticeable I've found.
That's how I do mine anyway, you may find a very slight variance with grain lines/patterns but it's fairly unnoticeable I've found.
"Jesus Loves You."
Nice to hear in church but not in a Mexican prison.
Nice to hear in church but not in a Mexican prison.

Re: Fretboard Binding
It depends on what you are wanting to accomplish with a bound fret board. Is it just to hide the ends of the fret wire? If so then you can just nip a bit of them off so when you hammer them in there is a little gap left where the tang normally would be visible. In dark woods it's pretty easy to fill them with a bit of sanding dust and CA. In ebony they will be invisible, other woods you may be able to just barely see them.
If you are wanting to add some purfling to the board but still have the same binding on the outside as the main fret board, then you can set up your table saw with a thin slitting blade the thickness of your inlay, (or a touch thinner and just adjust the fence to widen it). Set the depth and run the board over the blade making a channel for the inlay. On the sound hole end you will need to make a little piece with a ledge for the inlay and bind the end.
It's how this fret board was done.
-
Tod Gilding
- Blackwood
- Posts: 838
- Joined: Thu Mar 10, 2011 7:32 pm
- Location: South West Rocks NSW
Re: Fretboard Binding
Thanks Nick, I did get some good tips from that, however I was wondering how you go with the radius after tapering, I have noticed that Trevor points out in his build volume at 15.5. “Tapering the fret board” that it can be difficult to maintain an even thickness if the board is tapered first and you maintain a constant edge thickness, have you found any problems with this?
And Thankyou Allen, yes I was only looking to hide the tangs and reduce any possibility of the tangs protruding due to humidy you may have come up with one of those wise Gems that I mentioned earlier, I am struggling to think of any reason that this would not work as well, except possibly that a future refret may be difficult with the frets CA’ed in, do you think this could be a problem? As a steel string would be more likely to require a refret at some stage sooner than a Uke with nylons fitted
It seems that Trevor has designed everything around longevity , so I am hoping to produce an instrument that will be around a lot longer than I will, so a refret at some stage could be a possibility.
Thanks Tod
Tod
Music is everyone's posession. It's only publishers who think that people own it.
John Lennon
Music is everyone's posession. It's only publishers who think that people own it.
John Lennon
-
Nick
- Blackwood
- Posts: 3628
- Joined: Thu Feb 26, 2009 11:20 am
- Location: Christchurch, New Zealand
- Contact:
Re: Fretboard Binding
It's just the way I do it & wouldn't call it a problem as such Tod, I radius using a 12" Stewmac radius block and as the fingerboard gets wider it does indeed take the edge height down lower than it is at the nut but I don't feel it's that much of a difference, I've never actually measured it but also never had a customer notice any noticeable difference or mention it as it's probably only a matter of less than half a millimeter at most. If I used electric type radius's (6-7.5") it maybe more evident but on the 12 it's not so much. Its an even, straight bed for the frets to sit on I'm looking for.Tod Gilding wrote:Thanks Nick, I did get some good tips from that, however I was wondering how you go with the radius after tapering, I have noticed that Trevor points out in his build volume at 15.5. “Tapering the fret board” that it can be difficult to maintain an even thickness if the board is tapered first and you maintain a constant edge thickness, have you found any problems with this?
"Jesus Loves You."
Nice to hear in church but not in a Mexican prison.
Nice to hear in church but not in a Mexican prison.
-
Tod Gilding
- Blackwood
- Posts: 838
- Joined: Thu Mar 10, 2011 7:32 pm
- Location: South West Rocks NSW
Re: Fretboard Binding
Thanks Nick, I can see from the pic's of your instruments ,that you don't have too much trouble. I just thought there may be a trick too it  I think that in my case, it could be the easier way to go.
Thanks again
Thanks again
Tod
Music is everyone's posession. It's only publishers who think that people own it.
John Lennon
Music is everyone's posession. It's only publishers who think that people own it.
John Lennon
Re: Fretboard Binding
Many builders wick CA down the fret slot to hold the fret in firmer. I've not run into a problem with it as yet. I seem to recall one of StewMac's workshop videos going over the procedure of fixing up the issue you are talking about. Essentially the same process as hiding them in the first place.
-
Tod Gilding
- Blackwood
- Posts: 838
- Joined: Thu Mar 10, 2011 7:32 pm
- Location: South West Rocks NSW
Re: Fretboard Binding
Thanks for bearing with me Allen, this will be my #5 build and up until now I have some nice instruments but not one that I would give top marks to all round, so that said ,I’m really trying hard with this one to get everything spot on, I apologise if I’m being pedantic.
Tod
Music is everyone's posession. It's only publishers who think that people own it.
John Lennon
Music is everyone's posession. It's only publishers who think that people own it.
John Lennon
Who is online
Users browsing this forum: No registered users and 31 guests