I've been using an improvised rosette cutter....well it's actually just a blade from my LMI gramil that I inserted into a block of wood with various pivot points drilled into the body with some rough adjustment with a lock nob that was nothing more than a 8mm cap head bolt. It did a nice job of scribing the line that I would then use my dremel with a StewMac base to then clean out the channel. Lot's of pissing about, and the visibility on the StewMac unit is not that great. Especially when you modify it to work on ukelele size sound holes.
So when Micheal and I had a bit of time at the end of each day over a beer or two, during my Easter break in NSW, we started to improve on my very agricultural design, and well to be honest we wanted to make the best damn one available. Keeping in mind that when others saw it a possibility of selling some would be an option. Pricing is still under review.
The design brief went as follows.
- 1. Be compatible with StewMac type router base
2. Able to accomodate instruments from ukulele through to guitar
3. Cut and route out the inlay channel
4. Work as a gramil (that is what that brass fence is for)
5. Have a course adjustment for quick positioning, and then a precision fine adjustment
6. Made from quality components (Brass and Stainless Steel)
7. Easy to use on even the kitchen table if required.
After working out what we wanted to accomplish with it there was some prototyping that nutted out a few issues. Back to the drawing pad and then right back to the mill and lathe. From those 10 days and some more work by Micheal since then, we've now got to a very serviceable prototype.
There are still some modifications that will be done to improve its ease of use such as a left hand thread for the fine adjustment, but I'll post our working model here for all to see, since it was mentioned by Bill in another thread.
Installed in the cutter is a blade for cutting one side of the inlay channel. We have two and they both can be installed to cut the inside and outside edge at the same time. Also in the picture is the 3mm wide chipper. We have a 2mm and 1mm one as well.
Liam was over yesterday and he got to have a quick play with it. Took a piece of NGR and cut a quick rosette channel in it. It would have been less than 5 minutes on his first go....and we were drinking a beer at the time.

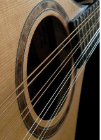
And during the day I was installing a rosette for a new commission. This would certainly rank up there with one of the more difficult rosettes to inlay, especially when you consider its in Western Red Cedar.
Not all of this rosette was done with the new tool. We designed it around the ability to swap it out for the StewMac or similar base as it uses the same 3/16" pivot dowel. So the fine channel for the red line and the inner black line were done with the dremel. Everything else was done with the new tool, including cutting the inlay material and routing out the stopped channels for it. I've scribed the sound hole but will wait until I have the reinforcement on the back side before cutting out the sound hole.