Well I have finally decided to show the side press I made last winter,
I sat down after reading every Press thread I could find here at ANZLF , WWF and OLF with that knowledge and the knowledge I have as a Cabinet Maker with Blacksmithing as a past hobby I sketched up ideas for a Press that could
Press two sides at a time.
From soprano uke up to dreadnought guitar over a form.
Work with the electric blanket hot for solid sides.
Or apply tremendous pressure for laminating cold.
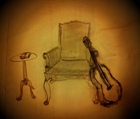
I have started off with a few pictures of another method of getting wood to do what you want using steel, its an 19th century Press/clamp method used in the construction off ladies and gents chairs, its a remarkable tool in the way it does such a complex job with ease, and power. We use the clamp now for the restoration of these chairs, how could we do without it? I don't know, a lot more time and mucking around with an average outcome.
This tool and other Cabinet methods that I have read and used were the reason for pressing with a steel strap , Not my idea, I just have not seen it for guitar sides yet, like this. I think all those Japanese laminated jobs must have been done on something like this? never seen how though.
The Press, Rob Brown Style.
The Press, Rob Brown Style.
- Attachments
-
-

Re: The Press, Rob Brown Style.
Rob, that is essentially what my setup looks like if you use your imagination a bit. I have holes in the ends of my slats to which I attach turn buckles. bend with the heat blanket then turn up the buckles and it pulls it all tight. I've used it for laminating cold sides as well. Works great.
Dom
Dom
You can bomb the world to pieces,
but you can't bomb the world to peace!
but you can't bomb the world to peace!
Re: The Press, Rob Brown Style.
In these pictures it's not yet finished,I have those pictures on my computer at work, it stands over six feet tall 1828mm and has a foot print of 700 x 700 mm
It now has a tool tray around it and a flat screw press in the base with cauls, the upper section is 30 x 30 and the base is 50 x 50 , hooks and pins forged from 1/2" rod pull the straps down.
It now has a tool tray around it and a flat screw press in the base with cauls, the upper section is 30 x 30 and the base is 50 x 50 , hooks and pins forged from 1/2" rod pull the straps down.
- Attachments
-
- IMG_100000014.JPG (109.2 KiB) Viewed 14290 times
-
- IMG_100000015.JPG (100.53 KiB) Viewed 14290 times
-
- IMG_100000016.JPG (150.83 KiB) Viewed 14290 times
-
- IMG_100000017.JPG (160 KiB) Viewed 14290 times
-
- IMG_100000018.JPG (97.35 KiB) Viewed 14290 times
Re: The Press, Rob Brown Style.
This thing grew Dom ,
from wanting to use it on a bench top ,then when I figured out the lever arms .and stoped using chain and hooks to pull and went to hooks and pins ,I decided on a stand.
Then if its going to be on a stand ,I may as well do a flat press in that,
Its way over built I know, it could be scaled back in parts [ The MK 2 version ]
the pressure is HUGE if I want it to be, I was snapping Oxywelds in my hook eye's for a bit,when I first started testing it,they would go PING and hit the roof.
Had to cut them up and mig weld them
But I was thinking with such pressure I could do 19mm thick laminated test bodies to hold a top on and string up ?
The Strapp is .5 mm [ I think ] mild steel Galvanised , I went through a few versions of making up the ends of those too.
Ive only had the time to test on one solid and one veneered uke side so far, I went through our old chipboard collection and have laminated up enough forms for about ten different Body sizes.
I will put up more pictures later.

Re: The Press, Rob Brown Style.
Holy cow Rob..you must've worked in a medieval torture chamber in a past life!! 
As for Japanese bending methods. Being married to a Japanese girl I can tell you that the Japanese method of making wood bend is simply to tell it to bend........ or else.
As for Japanese bending methods. Being married to a Japanese girl I can tell you that the Japanese method of making wood bend is simply to tell it to bend........ or else.
Martin
Re: The Press, Rob Brown Style.
Bloody hell, thats some serious jig there. Where does the wood and blanket go? As you lift you tensioners, does the slat on top go loose so you can insert your side and heat blanket?
I like the idea of all being tight, wood can't break when it is under tension like that. I've seen the Tailor Guitars vid of them bending sides in something like yours but all automatic.
I work on the same principle but much smaller scale. I use slat/wood/slat/heat blanket/slat with all the slats joined at the tail end and free at the head end. And then I just attach my tensioners to all 3 slats at the tail and to the top slat at the head so it can all slide around when put into shape. I've just done 4 tight cutaways using this setup recently and the all came out fine. But I am looking to make some mods.
I really like your one sided crank. Easier to get wood and bending forms in and out. I have a new setup in my head waiting to get built, I might use a tensioner silimar to yours although nowhere near as large.
Cheers
Dom
You can bomb the world to pieces,
but you can't bomb the world to peace!
but you can't bomb the world to peace!
Re: The Press, Rob Brown Style.
kiwigeo wrote:Holy cow Rob..you must've worked in a medieval torture chamber in a past life!!
As for Japanese bending methods. Being married to a Japanese girl I can tell you that the Japanese method of making wood bend is simply to tell it to bend........ or else.
-
J.F. Custom

- Blackwood
- Posts: 778
- Joined: Fri May 01, 2009 9:13 pm
- Location: Brisbane
- Contact:
Re: The Press, Rob Brown Style.
Well I say... 
And I thought the freight charge on the Fox style bender was exorbitant! If it does not bottom out your wallet, the "Robert Brown" model may just sink the boat!
Then there is customs... "No sir, I SWEAR it is for building ukuleles - you know, those wee little guitars?!"
In any case, heck of a contraption.
Jeremy.
Re: The Press, Rob Brown Style.
Dom ,
First time I tried it I went Blanket ,wood ,steel slat, then a little pressure down at the waist just to keep in position.
Lengths and positions get set up before that though,
I have tried it a few ways so far,
I think the best was
Set up the wood ,turn on blanket when right ,press waist all the way,
with the right tension on the nut the arms sit up ,erect , holding the hook at the right height.
grab the end of the slat, pull around the bouts and place the hook through the loop on the end of the slat.
Push the arms down so that threaded rod goes through the forks on the frame,
the height of the Red T handles with enclosed nuts is set close before hand, they push up on a pipe that engages with the fork, if its set up well a few turns brings the strap down tight. In the pictures the long threads are imperial I changed them to 5/8 square thread like on a clamp, it doubled the speed to get it from A to B.
the T handle can be turned with ease till something gives, there is no feedback that huge pressure is happening through the handle, and that is how I was breaking ½ “ welded rod . Hardly any pressure is needed with the heat blanket, and its nice to have to much for laminating
I made this using a mig welder, Oxy set ,drill press, angle grinders ,4 5 and 9 "and a cut off saw.and a drill press I could have done it without 3 grinders .
It could be done without Oxy and there would be no hooks and pins these would be changed for chain and U shackle . I tried it this way first but it was a fair bit of a fiddle getting it to work, Hooks and pins are a fair bit better. But I had to forge them.
-
needsmorecowbel

- Blackwood
- Posts: 974
- Joined: Sun Oct 04, 2009 7:48 pm
- Location: Melbourne
Re: The Press, Rob Brown Style.
Just Awesome!.....
-
charangohabsburg

- Blackwood
- Posts: 1818
- Joined: Sat Oct 16, 2010 1:25 am
- Location: Switzerland
Re: The Press, Rob Brown Style.
That looks scary, indeed.
Glad it works. Probably you even could make laminated archtop tops with this machine.
Great job, and the weight makes sure it will never get stolen.
But I don't get it why you want to use heat blankets with this bender. I'd just put the sides in the bender, tighten down the steel slats and then, while still in the bender let the splintered sides suck up plenty CA (by the capillary force provided by the tiny gaps between the splinters), and let cure. For special figure one could use coloured CA.
Markus
To be stupid is like to be dead. Oneself will not be aware of it.
It's only the others who suffer.
To be stupid is like to be dead. Oneself will not be aware of it.
It's only the others who suffer.
Re: The Press, Rob Brown Style.
Great suggestion Markuscharangohabsburg wrote:
But I don't get it why you want to use heat blankets with this bender. I'd just put the sides in the bender, tighten down the steel slats and then, while still in the bender let the splintered sides suck up plenty CA (by the capillary force provided by the tiny gaps between the splinters), and let cure. For special figure one could use coloured CA.
Who will lend me the sides to try it on?
Can you PM Martin and ask him for me ?
Re: The Press, Rob Brown Style.
Some more pictures,
The cranks up top come out if needed, there is a pin through the post, being two sided and having one on each side works well because one counter acts against the other,and that keeps things straight.
I did long slats and short slats ,same with hooks,that covers all options.
The two test sides have been sitting around for a few months, the solid one has sprung back a fair bit , the veneered one has kept its shape,its just three layers all going in the same direction
The "Hot shot" is making rings
I have been thinking of a few ways for doing cutaways to be done on it, possibly a clamp that fits to the end of the form.
I had the help of three others with this at times, I stopped counting the hours at 100 and kept at it till it was finished,three weeks later it was done.
I sort of had it all drawn up and made things one way ,then it turned out not to work so well so cut it up and do it a different way till it worked well and strong
If any one wants details I'm happy to pass on any, ask here or in a pm.
now I better get my act together and build some guitars,
I can still see another machine and a jig or two though. will it never end?
- Attachments
-
-
-
-
-
-
Re: The Press, Rob Brown Style.
Rob prepares for a bending session in the workshop......
- Attachments
-
- crimsonexecutioner5.jpg (14.63 KiB) Viewed 14139 times
Martin
Re: The Press, Rob Brown Style.
Agreed, very impressive
-
charangohabsburg
- Blackwood
- Posts: 1818
- Joined: Sat Oct 16, 2010 1:25 am
- Location: Switzerland
Re: The Press, Rob Brown Style.
Done.auscab wrote: Great suggestion Markus
Who will lend me the sides to try it on?
Can you PM Martin and ask him for me ?
Martin prepares now for giving me an answer:
kiwigeo wrote:
No.auscab wrote:I can still see another machine and a jig or two though. will it never end?
Markus
To be stupid is like to be dead. Oneself will not be aware of it.
It's only the others who suffer.
To be stupid is like to be dead. Oneself will not be aware of it.
It's only the others who suffer.
Who is online
Users browsing this forum: No registered users and 105 guests