Then I had a “eureka” moment about other ways to fool the ears for these low notes – on my hollow arm harp guitars and hollow necked acoustic lap-slide guitars the bass notes are really deep and resonant, more so than on normal guitars. The extra length and body volume of the hollow neck/arm adds resonance and reverberation. So I got to thinking – what would happen if you made a baritone with a hollow arm? Prior to the server crash Pete Howlet posted a video here of a guitar with a hollow arm (though not a baritone) that he had made to enhance bass response so great minds think alike - honest guv, I had been thinking about a baritone with hollow arm for many months before I saw that video. I also started thinking about the long scale length of baritones and that this was really there for the lowest note so wouldn’t a multi-scale make great sense here? This has been done on baritones by many makers. Having a hollow arm without any sub-bass strings seems a bit of a waste and I noticed on my other hollow arm harp guitars that the addition of sub bass strings helps the fretted bass notes even more via the sympathetic vibrations – another trick on the ear. The multi-scale approach now makes even more sense as the transition to lower sub-bass strings calls for longer scale length string by string and with a multi-scale this means that the bridge design and the way it drives the top is much more efficient as the slanted bridge stays more on the central active area of the lower bout.
OK – I was sold on the idea and it’s time to see if it works. First I need a name – easy, my baritones are called “Treebeard” so this has to be “Fangorn”, older and deeper! Next is scale lengths – I’ve found that a 30mm difference between scales with the ninth fret as the orthogonal one works well so 705-735mm it will be. Then it’s the playability of such a large beast – the biggest influence on my harp guitar designs has been Stephen Sedgwick whose instruments are smaller and more compact than most, so applying this to my “Treebeard” model results in a guitar that is probably still more compact than a Dyer, and in addition I will use a Manzer/Cumpiano type wedge with the treble side deeper than the bass side. I thought about a cutaway but I want maximum body depth here (widdley notes above the 15th fret are probably not going to feature much in the repertoire of this instrument) and beveled arm rests are out for the same reason as well as that to my eyes they look butt ugly!! So this just leaves the question of how may sub-bass strings and the wood choices. After considering tunings, playability and string load on the top I’ve settled on four sub bass strings. The main strings are probably going to be in AEADEA or BbFBbEbFBb tunings and this would give the option of something like EFGD with the first and EFGA or FGAEb with the second that will hopefully work wit 0.070” as the fattest string. For woods I have a nice Lutz spruce Weissenborn top from Shane Neifer that can be made to work with some creative wood inlay on the hollow arm, and I have a large slab of African wood that was bought over 30 years ago by a local wood turner that I think will work - I think it might be Ovangkol.
Baritone harp guitars aren’t that common and I haven’t managed to find any with a hollow arm so this could be new territory. So it’s on with the build!! First it’s the plan – just the outline and main string positions for now, the bracing and sub-bass string details will go on soon – and templates:

Next I made a dowel mould. I recently bought a bigger bandsaw that I can use to re-saw and this is part of the packing case - I never throw anything useful away:

This time I’ve drilled the dowel holes all of the way through the base so the mold is “reversible” – I just flip it over and push the dowels through when I want to work on the back. I can also set the dowels at different heights which will be useful when it comes to doing the “wedge”:

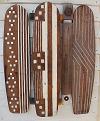
I used the new bandsaw to slice the “African wood" and here are the back pieces having been thicknessed joined using hot hide glue and the “tent” method:

Here’s the back after the glue has dried and clean-up: