Two Om's Progress Build

Talk about musical instrument construction, setup and repair.

Moderators: kiwigeo, Jeremy D

vandenboom
Blackwood
Posts: 414
Joined: Sun Oct 26, 2008 2:27 pm
Location: Melbourne (Ringwood), Australia

Re: fretwork

Post by vandenboom » Thu Jul 16, 2009 8:06 am

xray wrote:can anyone suggest what the best book/dvd is for fretting?
xray - it looks like you have the Cumpiano and Williams books. I think the procedures in these are pretty good, particularly in Cumpiano. This applies to fret levelling and setup as well.
I bought Kent Everett's DVD earlier in the year on steel string acoustic setup. He doesn't cover fretting at all, but I found it helpful for other aspects of setup.
Frank

User avatar
xray
Blackwood
Posts: 148
Joined: Sun Aug 24, 2008 5:01 pm

om

Post by xray » Fri Jul 17, 2009 7:25 am

Thankyou for your kind offer lillian. Its great to have our american friends helping out when things seem complicated. I may just take you up on that offer lillian. ill PM you beforehand though.

User avatar
Lillian
Blackwood
Posts: 1702
Joined: Fri Sep 28, 2007 10:31 pm
Location: New Mexico, USA
Contact:

Post by Lillian » Fri Jul 17, 2009 10:58 am

That's fine. I don't mind and I promise not to play with any of your toys. You can ask Bob. His Festool sander arrived without me taking it for a test run. I was sorely tempted mind you, but I sent it along as it arrived.

Kim's experience was a tad bit different. The container that it arrived in wouldn't fit in any of the boxes, so I had to use a gallon size apple juice container. I was surprised to find out that gallons come in different volumes. There was about 3/4 of a cup of the SSII that didn't make it to Kim. It is in the shop if he ever wants to claim it though.

User avatar
m0e74
Gidgee
Posts: 2
Joined: Mon Jul 13, 2009 8:07 pm
Location: Brisbane

Post by m0e74 » Fri Jul 17, 2009 7:26 pm

Hi all,
thought I'd pop out of the shadows and share this guys vids:
http://www.youtube.com/user/bobloblaw1701


he documents a build and does it without a radius dish. The videos are all about 10 minutes long each so you don't get a huge amount of detail but it demonstrates some of the things that were mentioned in this thread. I found it very informative in any case.

User avatar
Allen
Blackwood
Posts: 5259
Joined: Thu Oct 11, 2007 5:39 pm
Location: Cairns, Australia
Contact:

Post by Allen » Fri Jul 17, 2009 7:34 pm

Welcome to the forum, and thanks so much for jumping in and contributing.

Many of us have been on the forum for years, and know each other, but it is really nice to have a name to address you with besides you're login. Lets us all get to know at least a little about you. You can set a signature in your preferences if you like.

Cheers, and I'm sure that you'll find this forum a friendly and helpful place, full of inspiration and advice.
Allen R. McFarlen
https://www.brguitars.com
Facebook
Cairns, Australia

User avatar
m0e74
Gidgee
Posts: 2
Joined: Mon Jul 13, 2009 8:07 pm
Location: Brisbane

Post by m0e74 » Fri Jul 17, 2009 9:09 pm

Thanks Allen.

My name is Greg.
I am in the process of hot rodding a cheap but very much loved electric that I have had for about 20 years. I plan to build at least 1 electric or hollow body electric after this one. If I don't stuff that up too badly I will try my hand at an acoustic.
I am very much at the information gathering stage. I also do not have ANY real wood working skills or experience...(I sit in front or a monitor most days) but at least of all the projects in my life this one does not have a deadline so I am confident that with time and the internet on my side I will stumble my through it. I have no doubt that I will enjoy it.


Thanks again for the welcome.

User avatar
ozziebluesman
Blackwood
Posts: 1550
Joined: Wed Oct 10, 2007 9:12 am
Location: Townsville
Contact:

Post by ozziebluesman » Fri Jul 17, 2009 10:05 pm

G'day Greg, welcome to the forum. I discovered Steve Dickies vids sometime ago. They are excellent and have been very useful to me. Like you I spent twelve months gathering and reading information found on the internet regard guitar building. Once I had a set of stages in my head of to go about building a guitar it was head down and into it. There is a wealth of experienced woodworkers here and a very friendly atmosphere. Enjoy!

Cheers

Alan
"Play to express, not to impress"

Alan Hamley

http://www.hamleyfineguitars.com/

User avatar
Austen
Beefwood
Posts: 22
Joined: Sat Aug 16, 2008 5:30 pm

Post by Austen » Sat Jul 18, 2009 2:18 am

x-ray there seems to be a neck blank of blackwood in one of your pics that looks strangely familiar....

User avatar
xray
Blackwood
Posts: 148
Joined: Sun Aug 24, 2008 5:01 pm

om

Post by xray » Sun Jul 19, 2009 11:08 am

ha ha ha, :lol: It comes in handy because it is the straightest piece of wood in the shed. when im done with it ill probably cut it up for brace wood or kindling. :twisted:

User avatar
xray
Blackwood
Posts: 148
Joined: Sun Aug 24, 2008 5:01 pm

om

Post by xray » Sun Jul 19, 2009 10:18 pm

sorry for no pics recently guys. Ive been hit by a bad bout of the flue for the third time in a month. It just had to happen in the f?*kn holidays. ARRRGH! :x

User avatar
Austen
Beefwood
Posts: 22
Joined: Sat Aug 16, 2008 5:30 pm

Post by Austen » Mon Jul 20, 2009 2:13 am

Leave the neck blank for the fire wood., just use some of that QLD Maple that is lyin around in the back ground. I may be wrong, but i heard the more figure in a piece the easier it takes to a flame, so start with the REAL good stuff swiney. Thought any more about the radius dish?

User avatar
xray
Blackwood
Posts: 148
Joined: Sun Aug 24, 2008 5:01 pm

om

Post by xray » Tue Jul 21, 2009 7:06 pm

i took your advice and it burns like shit. There must be a better use for it, maybe packing crate material or something, i dont know. Geese the portrait looks strangly like ron burgundy, the resemblance is uncanny! do you get that alot from people?
Any hoo, the dishes are out because the lillian method works just fine. I tried it and im not really happy with the radius that resulted. I thought it would be ample but you can only just tell its there. Oh well not to worry its all practise before i go destroying quality tonewood that actually would reduce me to tears after a stuff up.

I made the school boy error of taking too much off the overhang with the router and bearing bit today and 1 section splintered off just into the kerfed lining. I am going to have a larger than planed binding to cover it up and it should be sweet. pics will be here tomorrow.
stay classy san diago!

User avatar
Kim
Admin
Posts: 4372
Joined: Wed Sep 26, 2007 8:32 pm
Location: South of Perth WA

Re: om

Post by Kim » Tue Jul 21, 2009 7:21 pm

xray wrote: I made the school boy error of taking too much off the overhang with the router and bearing bit today and 1 section splintered off just into the kerfed lining. I am going to have a larger than planed binding to cover it up and it should be sweet. stay classy san diago!
Hey Andrew,

The only thing separating a pro from an novice is how well their errors are covered up. Your solution is very professional, big bindings look cool :wink:

Coming along well mate ur doing well. 8)

Cheers

Kim

User avatar
xray
Blackwood
Posts: 148
Joined: Sun Aug 24, 2008 5:01 pm

om pics

Post by xray » Wed Jul 22, 2009 8:27 pm

hey guys just a few more pics and good news its not swine flue! :!: :!:
Ive been feeling and still am feeling like death warmed up but you'd need a wrecking ball through my shed before i decide to hang up the tools on holidays. Anyway only a bit of progress this week so far but im now waiting on supplies before i start building again so here it is. Feel free to sledge or comment, its always good to see what people think.

Image
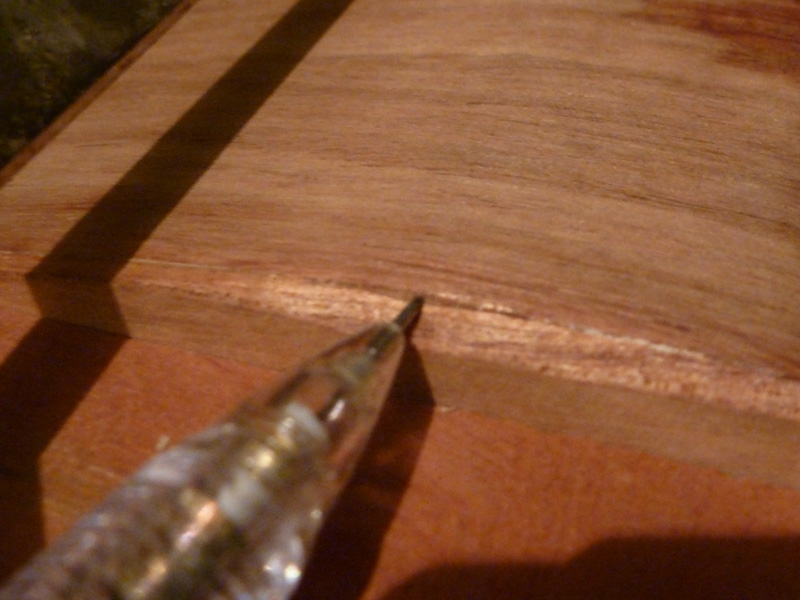
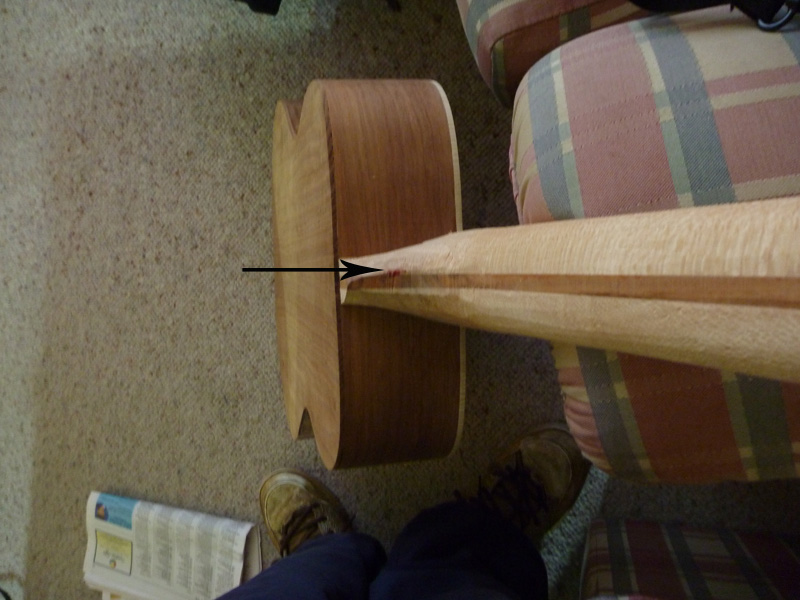
this is the chipout that i referred to last post, very fixable with binding.
Image
This is not as good as the rubber stretching method but i havn't had a puncture lately so it will do.
Image
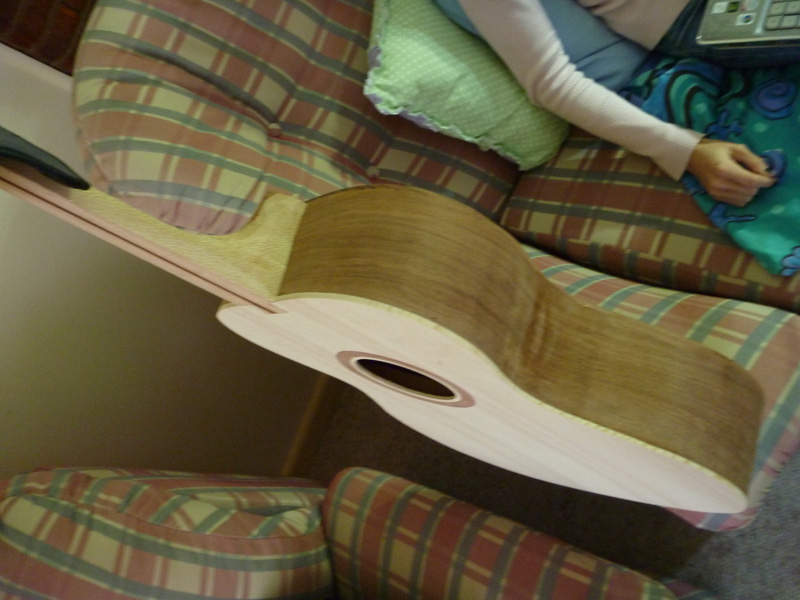
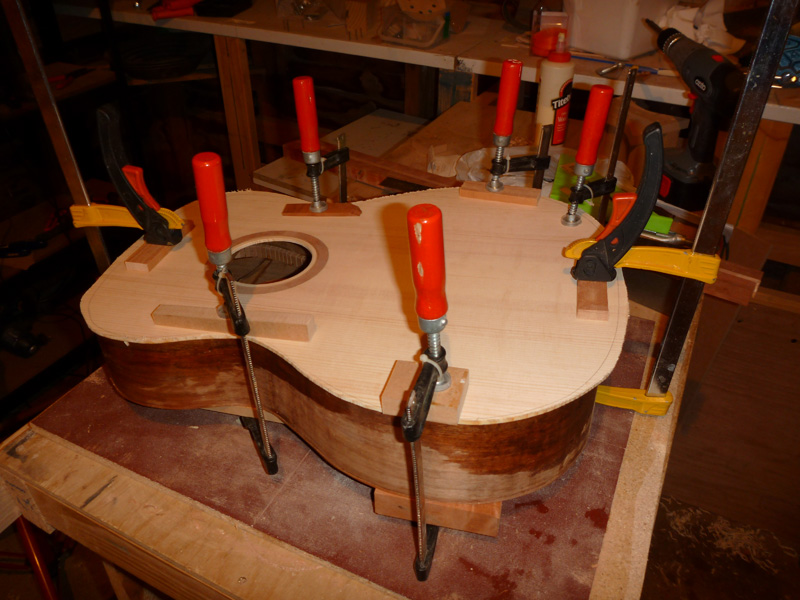
This is the first guitar ive built where there have been no gaps on the soundboard join to the sides and kerfing. Im as proud as punch with this one.
Image
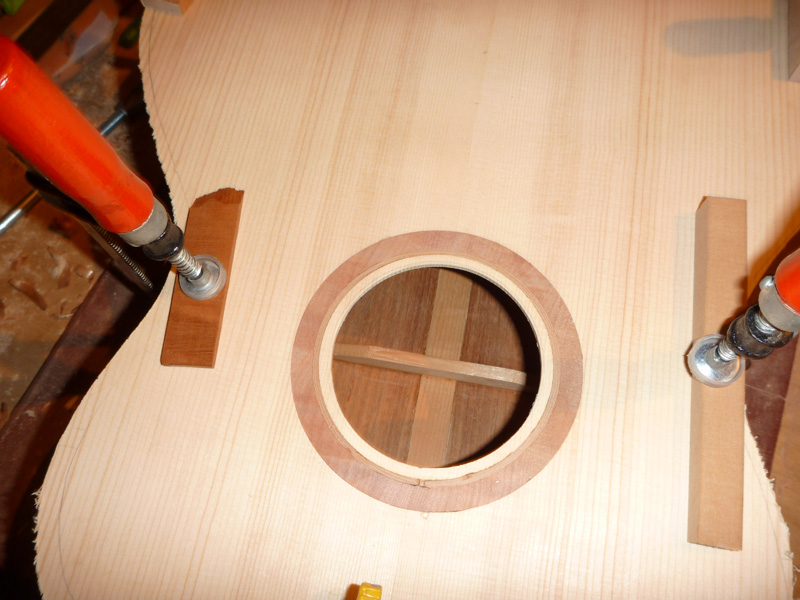
i didn't really sand the corners off the bracing here because i saw some cole clark bracing not long ago and i think it kinda looks tough. i may change my mind here what do you think?
Image
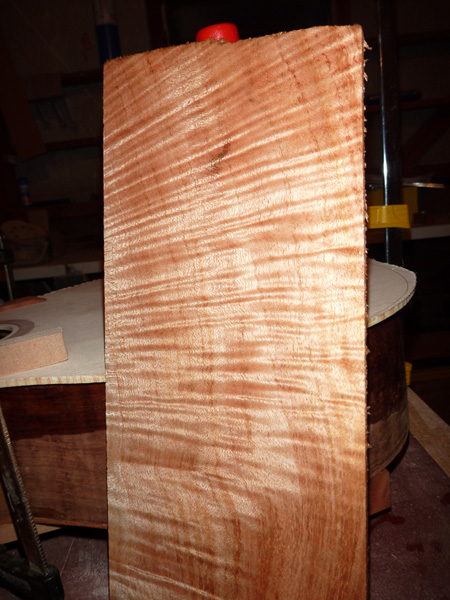
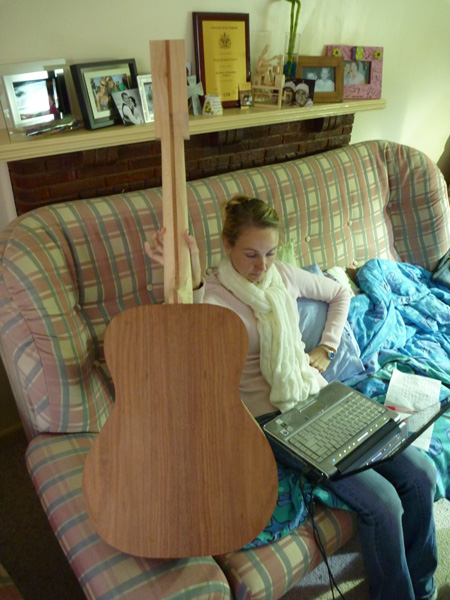
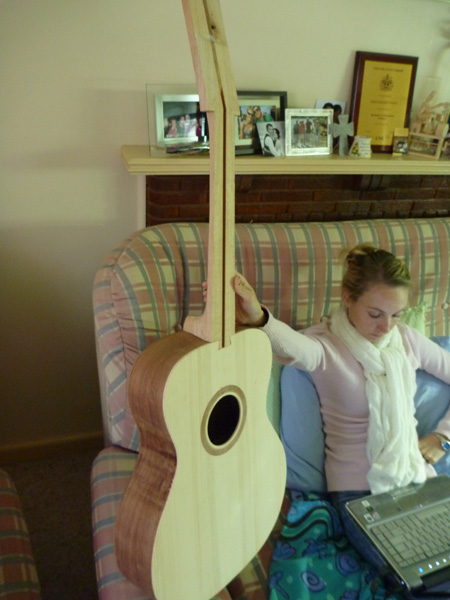
This is going to be the headstock material that i am using, it is some of my fiddleback qld maple that austen wants me to burn because it is not any good.
Image
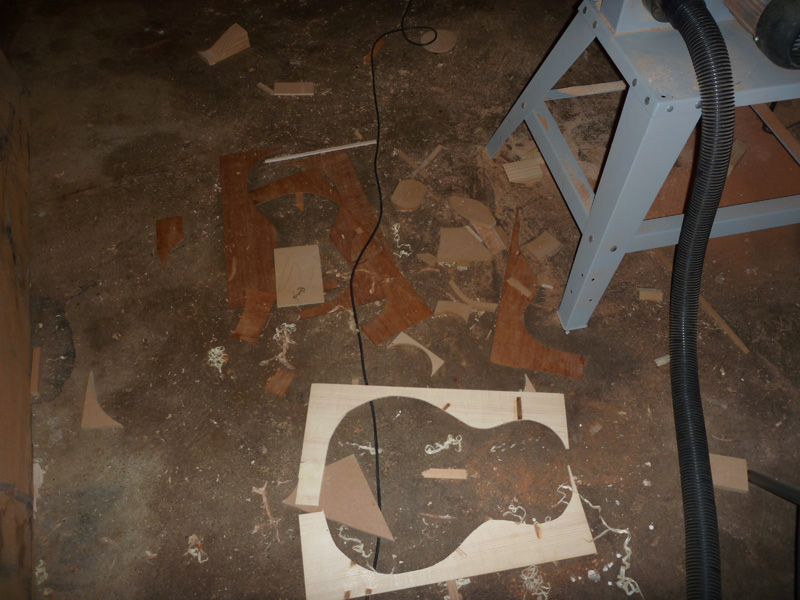
This one is for our friend Hesh. I call this photo "can hardly breathe at the moment so f?*k it, ill do it later". This is the worst my shed has looked ever. That makes me think how often do you clean the scraps and dust up in your shed hesh? Also if you have any spare leaves can i have one out of your book? :D

Image
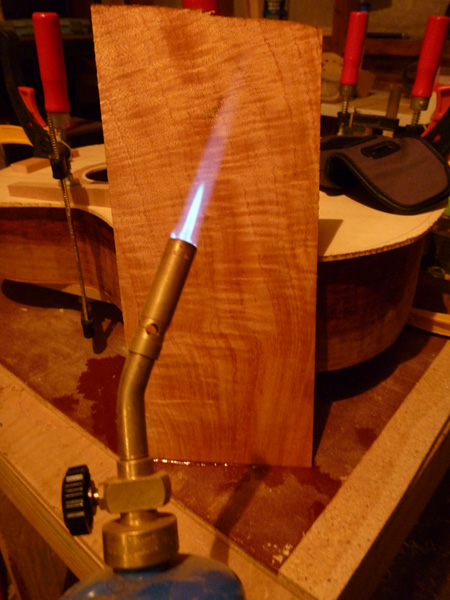
This one is for my jerk friend who may need cheering up at the moment. I told you i tried but it just didnt burn. so what now? hope yopu feel better soon buddy. Untill next time hoo roo xray.

Joe Sustaire
Myrtle
Posts: 92
Joined: Sun Nov 23, 2008 1:23 am
Location: Talihina Oklahoma
Contact:

Post by Joe Sustaire » Wed Jul 22, 2009 10:14 pm

Looking like a mighty fine guitar under way to me! Looks like my shop floor, except I do nab the larger bits for patching up my mistakes.

Joe
The only safe thing to do, is to take a chance! Mike Nichols

User avatar
Allen
Blackwood
Posts: 5259
Joined: Thu Oct 11, 2007 5:39 pm
Location: Cairns, Australia
Contact:

Post by Allen » Thu Jul 23, 2009 5:23 am

The only thing that I'd recommend in your method to attach to top is a few more clamps to apply a more even pressure, or use a caul that follows the perimeter and is a bit stiffer, so it does the same thing.
Allen R. McFarlen
https://www.brguitars.com
Facebook
Cairns, Australia

jeffhigh
Blackwood
Posts: 1536
Joined: Thu Feb 07, 2008 5:50 am
Location: Caves Beach, NSW
Contact:

Post by jeffhigh » Thu Jul 23, 2009 6:36 am

Hi X ray, Allen just beat me to it on the clamping of the top.
Too many areas unsupported.

You have a go bar deck now, why not use that to glueup of top and back?

I just use shorter go bars about 20 of them around the edge

re the unrounded braces, I think the major problem with them is perception, they look unfinished or cheap to some eyes.
I have a weissenborn near finished with absolutely unrounded braces and I like it.
I do not believe there is any structural or acoustic reason not to go with a PROPERLY SIZED rectangular brace rather than a vee shaped or heavily rounded shape. This does not mean that they are the same shape as the starting crossection before carving to a Vee. You would start slightly narrower and slightly shallower.

User avatar
xray
Blackwood
Posts: 148
Joined: Sun Aug 24, 2008 5:01 pm

om

Post by xray » Thu Jul 23, 2009 8:08 am

i find that my biggest building dissadvantage is taking a she'll be right attitude. The best part about the forum is suggestions and "could be betters" resonate in my head for future builds. so thanks jeoff and allen. im starting to appreciate my decision of using my 2nds tonewood now!!!!

User avatar
Austen
Beefwood
Posts: 22
Joined: Sat Aug 16, 2008 5:30 pm

Post by Austen » Thu Jul 23, 2009 4:13 pm

Gee that maple is nice xray. Looks unreal mate. I can't wait till you are using that stuff.
The smallest deed is far greater than the greatest intention.

User avatar
xray
Blackwood
Posts: 148
Joined: Sun Aug 24, 2008 5:01 pm

om

Post by xray » Fri Jul 24, 2009 5:16 pm

some more pics after todays romp. I have been really sick and have gone through feverish moments so ive spent no more than an hour here and there. A real bummer. Anyway here are some more pics. Im very happy with how tight and clean my dovetail joint is which makes 2 from 2 so far. As i understand they are easy to stuff up, but there is alot of satisfaction out of completing one hassle free, so until i bugger up these will be the joint of choice. So far no mistakes to write home about and the colour combinations i think are just, well, sexy. What do you guys reckon. No comments on paula please, she's my assistant.
Image
back view of the first om
Image
front view
Image
bad picture but anyway you get the idea here
Image
After dropping the guitar and neck from my work bench it almost hit the concrete floor but the only thing i could grab cut my finger to bits on the headstock. I think the neighbours kids would have learnt some new cuss words if it had of been damaged. The blood on the neck i hope dosn't stain the timber but it will be funny if it does, makes for a good story.

User avatar
Austen
Beefwood
Posts: 22
Joined: Sat Aug 16, 2008 5:30 pm

Post by Austen » Fri Jul 24, 2009 5:50 pm

Lookin good brother! Lookin real good. How much more profiling you got to do on the neck?
I like the two (for lack of a better word) dimples on the back. And the strip down the neck looks very smart.
I wanna be there when you string it up!
The smallest deed is far greater than the greatest intention.

User avatar
xray
Blackwood
Posts: 148
Joined: Sun Aug 24, 2008 5:01 pm

om

Post by xray » Fri Jul 24, 2009 6:34 pm

thanks pal, heaps more neck shaping to do however there is now light showing at the end of the tunnel. The dimples i hadn't noticed until you just pointed it out. I hope to get the profile pretty good in the next couple of days so i can get into number two soon

Richardl
Blackwood
Posts: 112
Joined: Sat Oct 27, 2007 4:09 pm
Location: NZ (Palmerston North)

Re:

Post by Richardl » Mon Dec 30, 2013 6:44 pm

vandenboom wrote:The Williams and Cumpiano books/methods both involve installing arched braces without use of a radius dish.
The arch for the brace can be approximated by bending a thin piece of wood or metal between two nails, and tracing the curve onto the wood. I think the arch is more parabolic than spherical - what difference that makes, blowed if I know.
Lillian's point on gluing the brace on from the centre out is also part of their approach.
And finally, Seeaxe's experience with the difficulty in the back meeting the sides due to the lateral arch - Cumpiano deals with that by using a large flat sanding board. I won't try & describe the steps here as you really need to be able to refer to the detail in the book. But it works well.
Frank
Hi All

I'm just picking up on a thread from several years ago. I'm at the stage of making the back braces on my first SS acoustic and I'm using a combination of several books for instruction (Kinkead, Cumpiano and Jim Williams... which is a confusing way to do things!!). I've been a bit perplexed about this step in the Cumpiano book where he sands the sides with a flat board. If I try that, it hits the angled bottom of the head block which is higher than the sides to accommodate the dome of the back. Can someone please explain what I'm missing? I can't see how a flat sanding board would work (Jim Williams uses a curved sanding stick).

Cheers

Richard

User avatar
Nick
Blackwood
Posts: 3640
Joined: Thu Feb 26, 2009 11:20 am
Location: Christchurch, New Zealand
Contact:

Re: Re:

Post by Nick » Wed Jan 01, 2014 12:35 pm

Richardl wrote:
vandenboom wrote:The Williams and Cumpiano books/methods both involve installing arched braces without use of a radius dish.
The arch for the brace can be approximated by bending a thin piece of wood or metal between two nails, and tracing the curve onto the wood. I think the arch is more parabolic than spherical - what difference that makes, blowed if I know.
Lillian's point on gluing the brace on from the centre out is also part of their approach.
And finally, Seeaxe's experience with the difficulty in the back meeting the sides due to the lateral arch - Cumpiano deals with that by using a large flat sanding board. I won't try & describe the steps here as you really need to be able to refer to the detail in the book. But it works well.
Frank
Hi All

I'm just picking up on a thread from several years ago. I'm at the stage of making the back braces on my first SS acoustic and I'm using a combination of several books for instruction (Kinkead, Cumpiano and Jim Williams... which is a confusing way to do things!!). I've been a bit perplexed about this step in the Cumpiano book where he sands the sides with a flat board. If I try that, it hits the angled bottom of the head block which is higher than the sides to accommodate the dome of the back. Can someone please explain what I'm missing? I can't see how a flat sanding board would work (Jim Williams uses a curved sanding stick).

Cheers

Richard
I used to use a flat sanding stick( or also known as a paddle because that's what they look like),all I did was masking taped the appropriate height of packing to the opposite bit of my side so that my paddle was at the correct angle for the dome. I now use radius dishes however, if you plan on building more than one guitar, these are a great addition to your toolkit, I made my own so it was only the cost of a couple of half sheets of MDF that was involved.
"Jesus Loves You."
Nice to hear in church but not in a Mexican prison.

Richardl
Blackwood
Posts: 112
Joined: Sat Oct 27, 2007 4:09 pm
Location: NZ (Palmerston North)

Re: Two Om's Progress Build

Post by Richardl » Sun Jan 12, 2014 6:50 am

Hey Nick, thanks for your reply. I used an arched sanding stick in the end (from Jim William's book). I just can't see how the Cumpiano flat board approach would work. I tried making a dish but didn't do it right. At this stage, I'm not sure whether I'll make another guitar...depends how this one turns out...so didn't want to invest too much time in jigs etc. Its been a bit of a learning curve as I haven't make anything like this before.

Cheers
Richard

Post Reply

Who is online

Users browsing this forum: No registered users and 144 guests