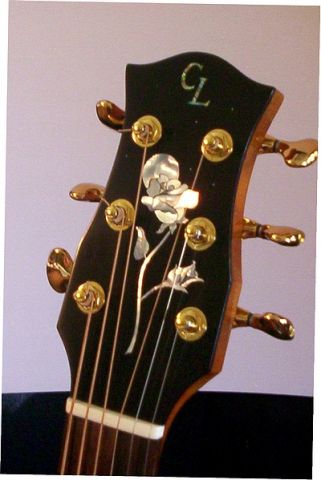
As I don't consider myself to be a full-on inlay artist ,I don't feel qualified to do a full-on tutorial , but rather than 'fob-off " I'll give a brief run-down on how I do it . Not saying it's the best way ,but it seems to suit me O.K.
I advised Kim to first check the archives on some of the American forums for a starter.
First , draw your inlay carefully on white paper. Next trace the individual pieces onto tracing paper. Now cut these pieces out precisely with a scalpel .
You can now place these see through pieces onto your shell to find the right colour /shell movement . Glue these tracing paper cutouts to your shell with rubber glue ( selley's Quick-Grip ) ,others use P.V.A..
Once the glue is dry , cut these pieces a little oversize with a jewelers saw on a jewelers saw table ( pictures on StewMacs site ). After which you can file to their exact outline with needle files . A dremmel with StewMac base clamped upside down to your table , works well with a little drum sander thingy , for larger areas.
Check these pieces on your original master plan for fit . When you are happy with them , Glue them to their respective positions on you headstock or whatever, with a smear of rubber glue on one side only. Wait until the glue dries completely.This is where others prefer P.V.A. , as the rubber glue can move if your not careful.
Scribe around the shells outline with a scalpel or new pointy exacto blade.
Remove the shell piece with either a little turps or gradually lifting by getting the scalpel under an edge.
Excavate the area with a dremmel and downcut spiral bit . Check very closely that you have excavated to the scribed line . In nearly every case ,I find I have missed a bit ! .
Trial fit the piece , but don't push hard to make it fit or you will break the piece when trying to remove it
When you have it fit O.K. ,place the shell in the excavation and prepare some wood dust from scrap of the surrounding wood. Rub this in and around the shell leaving a small ridge of dust around the shell.
Wick some C.A. to these ridges . I use a piece of wound guitar string as a " wicker " . It seems to retain the C.A. but lets go of it when the dust soaks it up
Level and your done . If you have missed a bit ,go over it again with the C.A. and dust.
A word of warning here :
There have been times where I have had such an exact fit that there hasn't been much of a gap between the shell and surrounding wood. The C.A. and dust bridged it leaving me a little pissed off
Epoxy and dust layed into the excavation doesn't do this ,and finds all the tiny gaps to ooze out of . It doesn't give such a good matching colour as the C.A. method however.
If you were to do a multipiece inlay like my 32 piece Rose . It is better to assemble and glue together the shell pieces( on glass with waxpaper underneath) before scribing/excavating.
Hope this helps you a little Kim.

Cheers Craig Lawrence