binding jig of sorts

Talk about musical instrument construction, setup and repair.

Moderators: kiwigeo, Jeremy D

gratay
Blackwood
Posts: 186
Joined: Sat Oct 27, 2007 8:33 pm

binding jig of sorts

Post by gratay » Mon Nov 05, 2007 4:54 pm

I thought I'd introduce myself and introduce my makeshift binding jig as well. ....production costs have blown out to a whopping $4.60 for the 2 bearings.....the rest is what I could find lying around..hopefully it will be stable enough.
Based on the Jim Williams jig with the addition of the washer which I saw on Arnt Rians Jig..Where as Jims jig has a wide footprint gliding on the top I have made this so the only thing that touches the top is the washer...
I haven't tested it yet but have run it around the top unpowered and can't see where it can go to much wrong? but I may be wrong.. time to try it on some scrap and see if it works.

Anyway I'm Grant.
Thanks for looking


Image

User avatar
kiwigeo
Admin
Posts: 10582
Joined: Sat Sep 29, 2007 5:57 pm
Location: Adelaide, Sth Australia

Post by kiwigeo » Mon Nov 05, 2007 5:25 pm

Nice looking jig their Grant. Youre going to get the same result as I will with my soon to arrive $US195 Luthier Tools binding cutter base for a lot less. The washer is a clever addition.

Some tips:

1. Make sure both the bearings are riding against the side of the guitar.
2. Check that youre not tilting the jig forward or back as you make your cut.
3. make your cuts in several passes.
4. watch direction you run the router and jig to minimise tear out. See Stewmacs website and notes on their binding cutting bearing set for guide to direction of cut.
5. ALWAYS do a test cut on scrap and test fit your binding or purfling. Dont ask me how I know this!

Cheers Martin

User avatar
Allen
Blackwood
Posts: 5252
Joined: Thu Oct 11, 2007 5:39 pm
Location: Cairns, Australia
Contact:

Post by Allen » Mon Nov 05, 2007 6:12 pm

Welcome to the forum Grant.

Good looking jig. Hope that it works out as planned. I love to see things people make without have to spend heaps of cash.

As Martin says, watch what direction you are going. When I'm about to route a top I always take some white chalk and draw arrows on the top and back to remind me of the direction to route in. It makes it a no brainer when you are concentrating on getting that ledge just right. The fewer things that you have to think about the better :) .
Allen R. McFarlen
https://www.brguitars.com
Facebook
Cairns, Australia

User avatar
Bob Connor
Admin
Posts: 3132
Joined: Mon Jul 09, 2007 9:43 pm
Location: Geelong, Australia
Contact:

Post by Bob Connor » Mon Nov 05, 2007 6:16 pm

G'day Grant and welcome.

I'll be interested to see the results of the new jig.

How is the OM coming along anyway? Any sneak preview pics?

Bob

User avatar
Arnt
Blackwood
Posts: 134
Joined: Tue Oct 02, 2007 4:13 am
Location: Trondheim, Norway

Post by Arnt » Mon Nov 05, 2007 6:17 pm

Hey, that looks familiar! Good job, your jig should work well.

Martin has some good suggestions, here are a couple of additional thoughts:
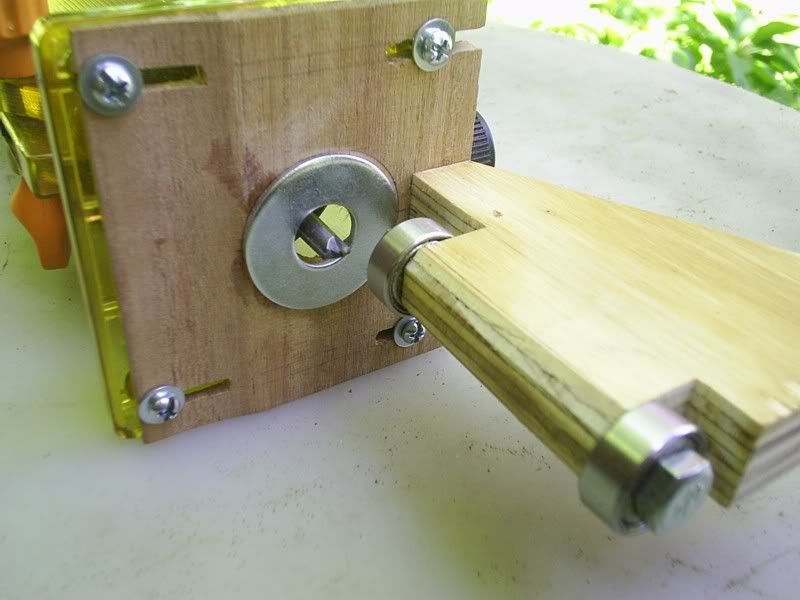
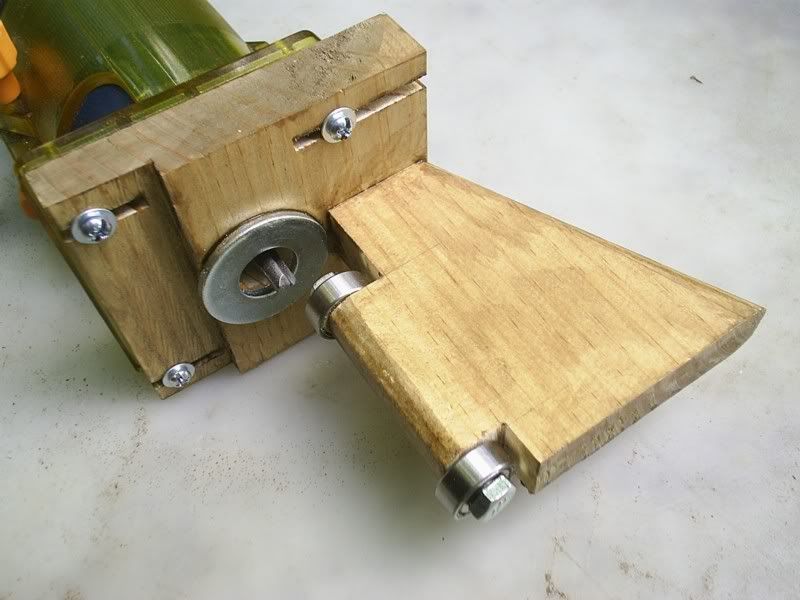
In your jig, the movable 'shoe' (the vertical plywood part that the bearings are attached to) has a pretty small contact area with the horizontal plywood base plate. I would be concerned that this joint might not be rigid enough, and that the two parts could flex a bit and not remain square in relation to each other, possibly leading to an non square binding rabbet.

I prefer to use a down cut spiral bit, I think it cuts cleaner than a straight bit. I use 1/4" carbide down cut bits from LMI, but you may find them less expensively locally.

I have had better luck by placing the jig horizontally in a vise and feeding the guitar to the tool than using it hand held, which feels a bit unstable to me. This may sound scary to some, but this principle is used in many of the big guitar production factories (Martin, Taylor), and I feel it gives better control over the process.

To avoid blowouts, I cut from the widest parts of the bouts towards the waist, then towards the blocks, and finally a single pass around the entire instrument.

Consider recessing those screw heads in your base plate; they could easily ding a soft spruce top should they come in contact with it...

Good luck!
Arnt Rian,
Norway

gratay
Blackwood
Posts: 186
Joined: Sat Oct 27, 2007 8:33 pm

Post by gratay » Mon Nov 05, 2007 7:19 pm

Arnt, You hit the nail on the head ...these are exactly my concerns.. I may even make another where the joint between vertical and horizontal is bigger. And I think I'll make the base a bit thicker also which will allow me to recess the screws...

Bob, The box is all closed up now ..I just have to hardblock the sides a bit before binding..I will post some pics of the body ..I'm pretty happy with it so far and has a nice sustaining deepish note to it when tapped..hopefully that means I'm on the right tram.

Martin, cheers for the tips,. you don't have to elaborate on tip #5 if you don't want.. the washer is all Arnt's genius by the way...thanks Arnt your base looks very nice

Allen, I like the challenge of trying to work out how to make a jig work ...Its quite rewarding...I think this will just be a prototype for another version over the next week or so.....as it only took an hour or 2...
Cheers

Hesh1956
Blackwood
Posts: 1420
Joined: Thu Sep 27, 2007 9:58 am

Post by Hesh1956 » Mon Nov 05, 2007 11:50 pm

Welcome Grant!!!!

That is a great looking jig and the guys here have given you some great advice.

You will need to make something to hold the guitar body firmly in place and it will need to be fairly low so the jig does not hit it but then you will be good to go.

I second the tip on getting Stew-Mac's climb cut diagram and taping it on the wall. I use that thing every time I route for bindings and have never had a blow out.

Good to see you here Grant. :cl :cl :cl

gratay
Blackwood
Posts: 186
Joined: Sat Oct 27, 2007 8:33 pm

Post by gratay » Tue Nov 06, 2007 3:29 pm

thanks Hesh...good to see you here also...and i just noticed you have a website up now which looks very nice...I've just been ogling those beautiful pieces of yours..

as for holding the body..
i was thinking the left elbow might be something good to hold the guitar body with?
no seriously....the first sanding dish I made turned out to be about 23' so it got scrapped and I made another one @28' for the top....but it might come in handy if i drill some holes in it for some dowel to hold the body in place?

I've actually made another router base last night ...Mark2
with all the suggestions talked about earlier....Its a lot more rigid
I'll post some pics ...when i finish it off

gratay
Blackwood
Posts: 186
Joined: Sat Oct 27, 2007 8:33 pm

Post by gratay » Wed Nov 07, 2007 2:12 pm

This one feels more stable.....just needs a few minor adjustments and I need to test it out on some scrap ..

Maybe the front of the washer should be on an angle ?...I'll look at this on the guitar and see if its riding up or tilting with the arch...
and I noticed that because the base is now thicker the locking nut on the collet needs to go into the base a few mm's to get the cutter depth...

Image

User avatar
Serge
Blackwood
Posts: 543
Joined: Thu Sep 27, 2007 10:43 am

Post by Serge » Wed Nov 07, 2007 3:34 pm

Hi Grant, nice to see you here my friemd, long time no see! :D

Sweet jig you got there bud, money well spent too, i can't wait to hear how it will perform, Way to go! :cl :cl :cl

User avatar
BillyT
Blackwood
Posts: 355
Joined: Thu Sep 27, 2007 7:57 pm
Location: Location Location

Post by BillyT » Wed Nov 07, 2007 4:28 pm

Nice Jig Grant! Low budget is my favorite!!

User avatar
Graham W
Kauri
Posts: 30
Joined: Sun Oct 21, 2007 7:33 am
Location: Christchurch, New Zealand
Contact:

binding jig of sorts

Post by Graham W » Thu Nov 08, 2007 7:10 am

Hi Grant

What are you mounting the jig on? - router, laminate trimmer, dremel…?
Or would it work on any of these?

It looks to be a simple solution to what I have found to be one of the most difficult operations in guitar making. I'll be very interested to read how your jig performs.

Please try it on scrap wood first!

Cheers

Graham
Graham Wardrop
PO Box 18 845
Christchurch 8641
New Zealand
guit.art@clear.net.nz

gratay
Blackwood
Posts: 186
Joined: Sat Oct 27, 2007 8:33 pm

Re: binding jig of sorts

Post by gratay » Thu Nov 08, 2007 5:02 pm

Graham W wrote:Hi Grant

What are you mounting the jig on? - router, laminate trimmer, dremel…?
Or would it work on any of these?

It looks to be a simple solution to what I have found to be one of the most difficult operations in guitar making. I'll be very interested to read how your jig performs.

Please try it on scrap wood first!

Cheers

Graham
Graham,
Its mounted to a laminate trimmer....I'll report how its working out..
Grant

Paul B

Post by Paul B » Thu Nov 08, 2007 9:38 pm

How does it feel for balance? I made one for a dremel, but it felt too top heavy. I swapped out the upright timber for some nice heavy Jarrah. That bought the center of gravity closer to my hand and gave me more control.

User avatar
Craig
Admin
Posts: 1090
Joined: Wed Sep 26, 2007 10:08 am
Location: N.S.W. in the bush

Post by Craig » Thu Nov 08, 2007 9:58 pm

I'm with Paul on this one . I have my left hand on the unit as a guide whilst moving it around . Go slow , and keep the concentration going.
Please don't think I am trying to overshadow your thread here with my binding jig thread. Just thought it maybe helpful to yourself and Graham W

Cheers, Craig

User avatar
Arnt
Blackwood
Posts: 134
Joined: Tue Oct 02, 2007 4:13 am
Location: Trondheim, Norway

Post by Arnt » Fri Nov 09, 2007 12:13 am

Like I said before, if you put the jig in vise and feed the guitar to the tool none of this is a problem. Have you guys tried this method?
Arnt Rian,
Norway

Hesh1956
Blackwood
Posts: 1420
Joined: Thu Sep 27, 2007 9:58 am

Post by Hesh1956 » Fri Nov 09, 2007 3:17 am

Graham my friend most builders are generally not pleased with Dremels for cutting binding channels and favor laminate trimmers.

Here is my jig. I am thrilled with it and you can actually cut perfect binding channels blind folded and it's been done too by another builder.

Image

User avatar
Ron Wisdom
Blackwood
Posts: 420
Joined: Sat Sep 29, 2007 1:18 am
Location: Arkansas, USA

Post by Ron Wisdom » Fri Nov 09, 2007 5:07 am

Mine is just like Hesh's, and it does work like a dream.

Ron

User avatar
Graham W
Kauri
Posts: 30
Joined: Sun Oct 21, 2007 7:33 am
Location: Christchurch, New Zealand
Contact:

binding jig of sorts

Post by Graham W » Fri Nov 09, 2007 7:36 am

hi Hesh

That's a very serious looking set up you have there. If you saw my tiny workshop space you'd know why I have to look at something smaller, although ideally I'd have a set up like yours. Did you build it from available plans or did you work it all out yourself?

All the best to you - your work looks fantastic!

Graham
Graham Wardrop
PO Box 18 845
Christchurch 8641
New Zealand
guit.art@clear.net.nz

gratay
Blackwood
Posts: 186
Joined: Sat Oct 27, 2007 8:33 pm

Post by gratay » Fri Nov 09, 2007 11:06 am

Craig L wrote:I'm with Paul on this one . I have my left hand on the unit as a guide whilst moving it around . Go slow , and keep the concentration going.
Please don't think I am trying to overshadow your thread here with my binding jig thread. Just thought it maybe helpful to yourself and Graham W

Cheers, Craig
I really appreciate the help....Its great to see your jig...I really like the way how it adjusts for thickness of binding.

User avatar
Lillian
Blackwood
Posts: 1705
Joined: Fri Sep 28, 2007 10:31 pm
Location: New Mexico, USA
Contact:

Post by Lillian » Fri Nov 09, 2007 1:45 pm

Graham, somewhere in the archives, OLF's I believe, if not, then MIMF's, there is a thread about a wall mounted version of Hesh's binding jig. It might be an answer for you shop situation.

Hesh1956
Blackwood
Posts: 1420
Joined: Thu Sep 27, 2007 9:58 am

Post by Hesh1956 » Fri Nov 09, 2007 2:07 pm

Graham my pal Don Williams built this jig for me and signed it too which makes it priceless to me. I have no wood working skills and never even owned any tools until three years ago when I bought a guitar kit.

User avatar
Allen
Blackwood
Posts: 5252
Joined: Thu Oct 11, 2007 5:39 pm
Location: Cairns, Australia
Contact:

Post by Allen » Fri Nov 09, 2007 5:22 pm

Here's mine. Most of the time it's stored under some of the other clutter. I just dug it out to show you my set up. The guitar is clamped in a cradle and the trimer is run around the perimeter. I use a Cutter with bearings. You could also mount it permanently to the wall if that's an option for you.

It's pretty well a no brainer and changed one of the most frightening parts of building for me into one I look forward to.

It's built from some unknown species of local hardwood that I found in the tip shop. I think that they were slats from a bed frame from under the matress. The pivots are just 1/4" steel rod pounded into a really snug whole. Works for hard wood, but wouldn't be acceptable in soft wood. And then some 1'2" threaded rod for the other bits. Some scrap perspex from the tip shop as well for the trimmer mount. The base plate that I use is some walnut that I knocked together. You could use almost any type of set up for this. If I had of thought of the large steel washer I probably would have done that.

Image
Image

The whole thing didn't cost more than 10 bucks, and that is including the stubbies that it took to lubricate me....I mean wash down the dust. It' gets awfully hot up here :lol:
Allen R. McFarlen
https://www.brguitars.com
Facebook
Cairns, Australia

Hesh1956
Blackwood
Posts: 1420
Joined: Thu Sep 27, 2007 9:58 am

Post by Hesh1956 » Sat Nov 10, 2007 6:32 am

VERY clever Allen!!!! :cl :cl :cl

gratay
Blackwood
Posts: 186
Joined: Sat Oct 27, 2007 8:33 pm

Post by gratay » Sun Nov 11, 2007 10:53 am

Serge wrote:Hi Grant, nice to see you here my friemd, long time no see! :D

Sweet jig you got there bud, money well spent too, i can't wait to hear how it will perform, Way to go! :cl :cl :cl
Yes it has been a while ....Good to see you here Serge, been wondering what you've been up to.

Post Reply

Who is online

Users browsing this forum: Google and 85 guests