
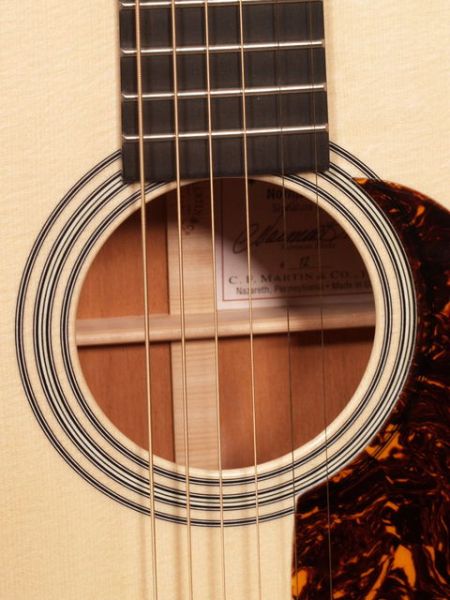
My next build is getting under way and it's a 000 body shape. I was just browsing the Martin site, and see that a "Norman Blake" model is 12 frets to the body, while the others are the somewhat standard 14. It looks to be the same body size, though hard to tell from the pictures. It does appear that the Norman Blake model has the bridge located further from the sound hole as you'd expect with the same body size, with 12 frets to the body.
Has anyone here seen, or played a model like this. Your impressions and thoughts about this style are appreciated.
Norman Blake style 000
-
Bob Connor

- Admin
- Posts: 3115
- Joined: Mon Jul 09, 2007 9:43 pm
- Location: Geelong, Australia
- Contact:
-
Bob Connor
- Admin
- Posts: 3115
- Joined: Mon Jul 09, 2007 9:43 pm
- Location: Geelong, Australia
- Contact:
The braces are pushed forward a fair bit Allen and it looks like the X has been splayed a little more.
There's more pics of the Blake bracing as well as a heap of other Martins on the UMGF forum (Unofficial Martin Guitar Forum)
A great resource as it has a lot of pics of pre-war instruments bracing as well as shots inside the body,
Interestingly they weren't that particular about glue clean up in those days.
-
Bob Connor
- Admin
- Posts: 3115
- Joined: Mon Jul 09, 2007 9:43 pm
- Location: Geelong, Australia
- Contact:
Here's what I've been up to the last couple of days. It's Great to have time off. 
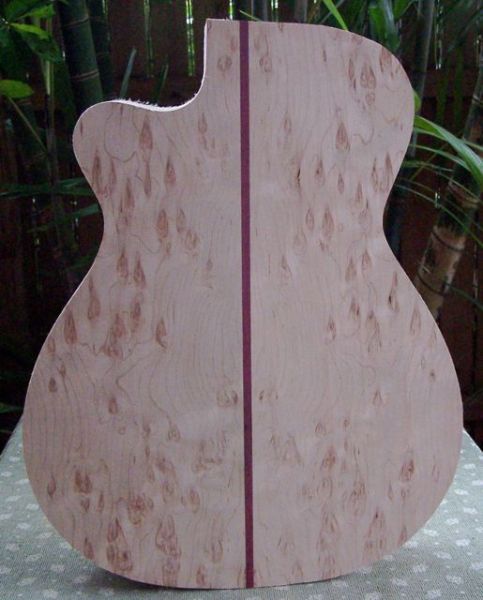
Body is some Birds Eye Maple that I picked up at the last swap meet. I think it was from Bob C. I wanted to get better access to the upper frets, so decided on a cutaway, and as I've never tried a Venetian Cutaway, I thought I'd give it a go.
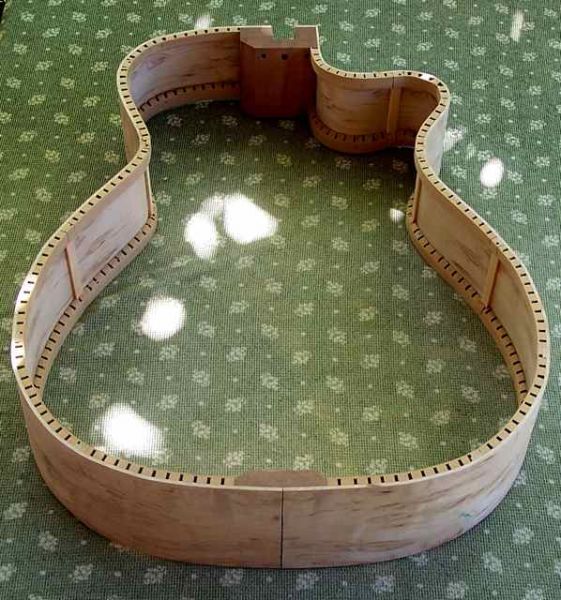
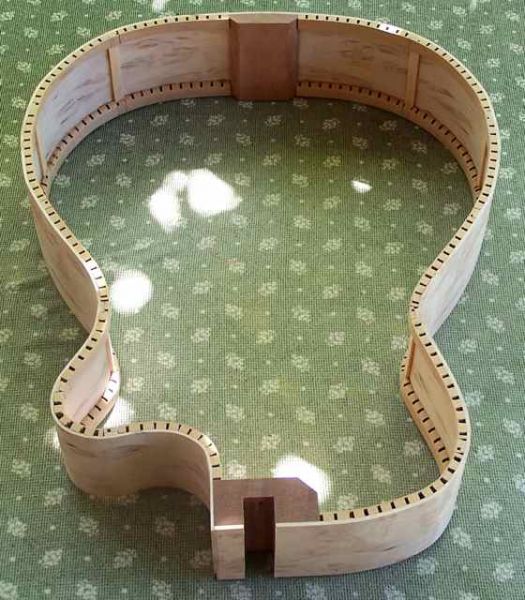
After reading Benedetto's book, I decided that I'd go with side reinforcements that were full depth of the sides. Using shorter lengths of kerfed lining was also easier to handle, especially in the tight bends of the cutaway.
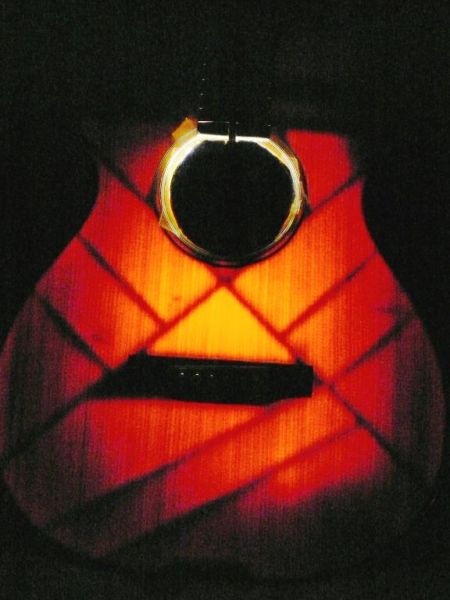
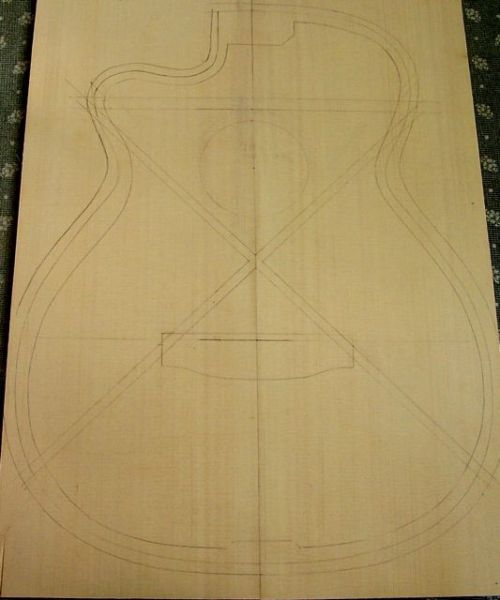
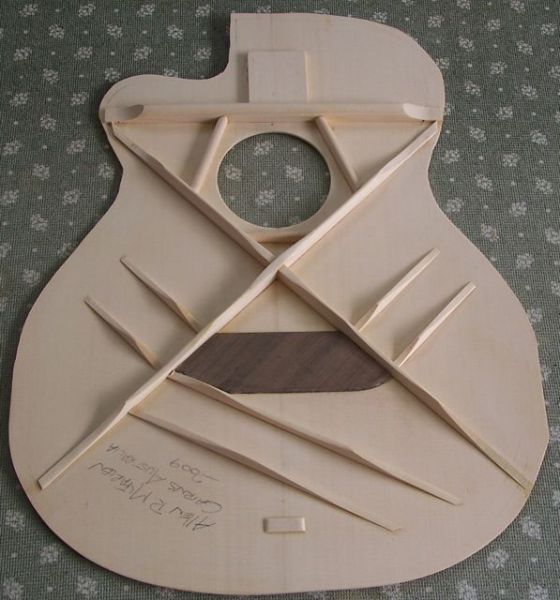
I've got the top and back joined, and I'm starting to lay out the bracing pattern. Bob's picture shows the X-brace to be shifted quite far forward, and seems to be crossing the bridge about mid way through the ends.
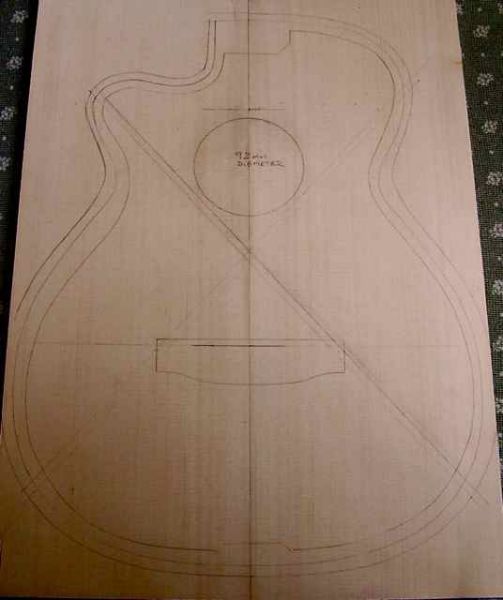
I've photoshoped this image to enhance the pencil marks to make them easier to see. I penciled in the 19th fret, then located the sound hole from that reference point. The sound hole is 47 mm radius. I've also marked out the location of the high E string and then outlined the bridge location.
When I start to lay out the X-braces It seems that they end up far narrower in the spread at the top and bottom of the legs than the photo that Bob provided. The top legs end up extending past the sound hole, which I think is too much. They are 5 mm away from the edge of the sound hole at their closest point. If I make this greater then they legs will splay out a bit more.
Thoughts and comments about this please. Have I miss calculated something do you think?
Body is some Birds Eye Maple that I picked up at the last swap meet. I think it was from Bob C. I wanted to get better access to the upper frets, so decided on a cutaway, and as I've never tried a Venetian Cutaway, I thought I'd give it a go.
After reading Benedetto's book, I decided that I'd go with side reinforcements that were full depth of the sides. Using shorter lengths of kerfed lining was also easier to handle, especially in the tight bends of the cutaway.
I've got the top and back joined, and I'm starting to lay out the bracing pattern. Bob's picture shows the X-brace to be shifted quite far forward, and seems to be crossing the bridge about mid way through the ends.
I've photoshoped this image to enhance the pencil marks to make them easier to see. I penciled in the 19th fret, then located the sound hole from that reference point. The sound hole is 47 mm radius. I've also marked out the location of the high E string and then outlined the bridge location.
When I start to lay out the X-braces It seems that they end up far narrower in the spread at the top and bottom of the legs than the photo that Bob provided. The top legs end up extending past the sound hole, which I think is too much. They are 5 mm away from the edge of the sound hole at their closest point. If I make this greater then they legs will splay out a bit more.
Thoughts and comments about this please. Have I miss calculated something do you think?
-
Bob Connor
- Admin
- Posts: 3115
- Joined: Mon Jul 09, 2007 9:43 pm
- Location: Geelong, Australia
- Contact:
The fretboard extension after the 19th fret is quite long.
That might give a little more wriggle room on the X by moving the soundhole south a little.
I agree the X looks a little close. When they forward shifted they generally opened the X a little.
More good pics of the NB here
The UMGF pics are here
That might give a little more wriggle room on the X by moving the soundhole south a little.
I agree the X looks a little close. When they forward shifted they generally opened the X a little.
More good pics of the NB here
The UMGF pics are here

G'day Allen,
Please understand I know nothing of the Norman Blake model , and don't think I've ever played one , but it looks to me that there is a very large unsupported area in front of the bridge before meeting up with th Xbrace intersection. I'd be surprised if it didn't dip quite a lot .
Please understand I know nothing of the Norman Blake model , and don't think I've ever played one , but it looks to me that there is a very large unsupported area in front of the bridge before meeting up with th Xbrace intersection. I'd be surprised if it didn't dip quite a lot .
Last edited by Craig on Thu Dec 25, 2008 11:22 pm, edited 1 time in total.
Craig Lawrence
I made up a X-brace with a 90 degree spread and placed it over the pattern. It works, but not quite if you know what I mean. The fret board looks like it's just a bit longer than where you'd expect the 20th fret, so I'll pencil that in and I might move the sound hole south a few mils and see what happens.
The problem I seem to be having is getting the legs of the X-brace to transect the ends of the bridge, while having the whole X-brace shifted towards the sound hole without the upper arms extending past the sound hole in the region that the upper transverse brace should be.
Craig, I was looking at the area in front of the bridge and was thinking the exact same thing. Options are to keep the top thicker in this area. Make an oversized bridge plate. Or even add a brace in front of the bridge patch. It does concern me though, and I'm going to be looking at this bracing some more before I commit to glue.
Thanks for you comments guys. And the link was helpful too Bob.
1 .75 inches is as far as I'm game between XBrace and bridge , and even then I notice a slight flat spot on the soundboard between the crossbaces. No dip , just a triangular shaped flat spot , and that's with a radiused bridge.
Obviously this guitar works quite well as it's a popular model . It may be that it has an acceptable and expected dip in front of the bridge.
Allen , I make the Xbraces 5 degree off 90 on Bob's top picture. Perhaps that may help with your layout
Obviously this guitar works quite well as it's a popular model . It may be that it has an acceptable and expected dip in front of the bridge.
Allen , I make the Xbraces 5 degree off 90 on Bob's top picture. Perhaps that may help with your layout
Craig Lawrence
-
Bob Connor
- Admin
- Posts: 3115
- Joined: Mon Jul 09, 2007 9:43 pm
- Location: Geelong, Australia
- Contact:
That's exactly what I do Bob , after receiving that advice from a respected Sydney Luthier .I leave about 3/4 " to 1 " of rectangular shape from the intersection and then carve it to be parabolic , but at full height until the rear end of the bridge. I still get a triangular shaped flat(ish) spot , but no dip. ( radiused bridge )bob wrote:Would it be reasonable to leave the X-brace unscalloped in the area between the bridge plate and the lap-joint to provide a little more support?
I increased the bridge patch in front of the bridge on my 12 string which seems to have curbed the flat spot affect somewhat . This , with just under 1.75 " between intersection and the front of the bridge .
This Norman Blake model appears to have a much greater span though. If you are wanting to make an absolute replica , I'd say a better shot of their bracing profile and their dimensions would tell the story and be the way to go . Man , those cross braces only kiss the bridge footprint at the very ends of the pyramid bridge wings . Not much to stabilize the bridge from rocking considerably in that unsupported area , but perhaps that's all part of the plan and what gives it a Norman Blake sound .
Your've done a great job with the Venetian cutaway Allen . The shape looks good and proportional I.M.O.
I'm off tomorrow for a weeks holiday with the family down the coast . A little fishing /swimming / biking etc . Should be fun . All the very best to all you guys , or should I say mates , for this festive season and may 2009 bring happiness and everything you wish . Careful on the road guys, with the missiles we steer.
Cheers to All , Craig
Craig Lawrence
-
Bob Connor
- Admin
- Posts: 3115
- Joined: Mon Jul 09, 2007 9:43 pm
- Location: Geelong, Australia
- Contact:
Maybe a 20 fret fingerboard will alllow you to do what you want with the X-brace Allen.
Last edited by Bob Connor on Fri Dec 26, 2008 6:11 pm, edited 1 time in total.
Great help guys.I think that I'm there with the layout of the X-brace.
I'm pretty pleased with how the cutaway came out. I bent the non cutaway side in the bender with my new Dick Smith themometer like Bob uses. It works a treat. The cutaway side I only bent the lower bout in the bender, then did the rest by hand on the hot pipe. I could get one bend right, but as I was working on the next bend the heat and steam would relax the bend I had just done. Took a bit of fiddling around, but eventually I got it to where I was happy.
I've moved the sound hole south by about 5 mm and this seems to have solved some of the problem that I was having. There is 2 1/4 inch between the front of the bridge and the edge of the intersection of the X-brace. This looks to be fairly similar to the photos of the bracing that Bob provided.
I'm certain that with that much room in front of the bridge there is going to be a tendency for this are to flatten or even dip. A bridge patch that extends into this area, and perhaps tapers to nothing will be a solution to this, as trying to gauge how much thicker to leave the top in this area is going to be a bit of a guess.
Some more progress today. Back strip inlayed and back thickness sanded, ready to brace.
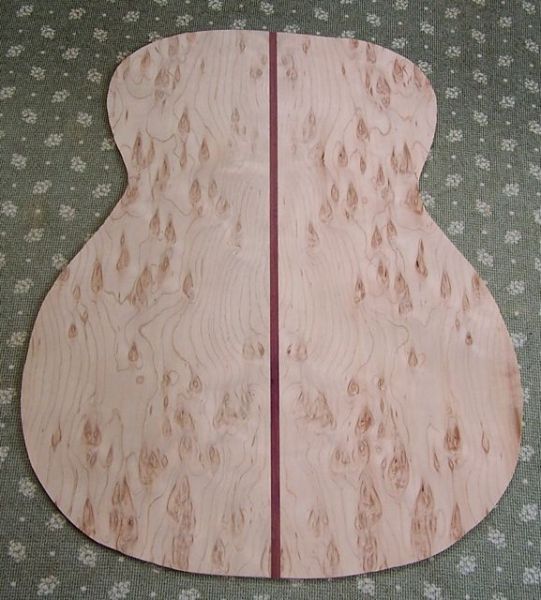
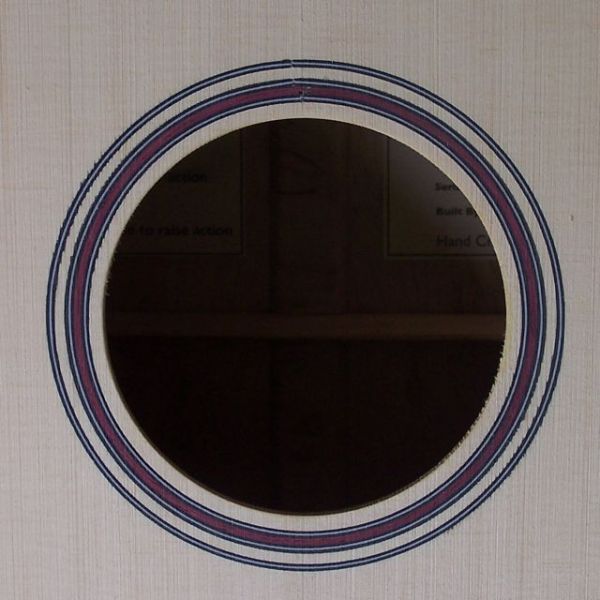
The binding is going to be purple heart. I've had some for a couple of years, and this is the first set of wood that the color works with. I wanted the rosette to tie in with the theme, so had to bend some up. It was slow going trying to get the radius bent without snapping and splintering, but I got there eventually.
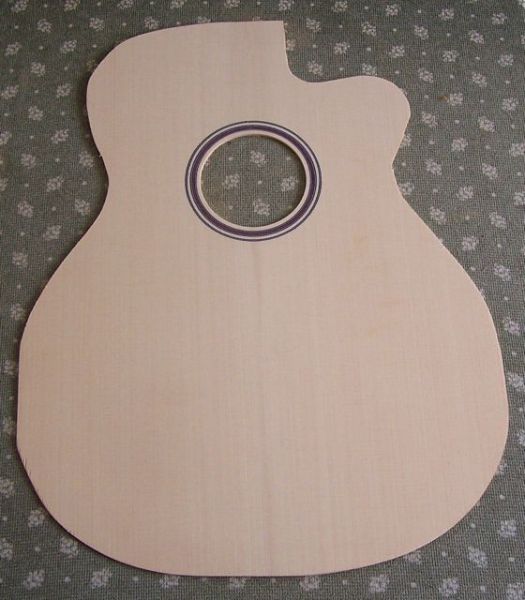
The top is Engelman and is really stiff, with some beautiful silk. More of Graham Hiens AA wood. It's just so nice, I'm not sure why you'd spend more for the higher grade stuff.
I also have the X-braces glued up and drying over night.
The binding is going to be purple heart. I've had some for a couple of years, and this is the first set of wood that the color works with. I wanted the rosette to tie in with the theme, so had to bend some up. It was slow going trying to get the radius bent without snapping and splintering, but I got there eventually.
The top is Engelman and is really stiff, with some beautiful silk. More of Graham Hiens AA wood. It's just so nice, I'm not sure why you'd spend more for the higher grade stuff.
I also have the X-braces glued up and drying over night.
Another productive day. Glued on the back last night, had most of the bracing done on the top, then finished it off today and got the box closed up.
Now the pressure is off. It's bloody difficult building anything in the tropics during the wet season. Moving from the RH controlled environment to the garage, where I'm allowed to make all the mess I like, and back every 5-10 minutes is tiresome. The top wants to turn into a donut if left out too long.
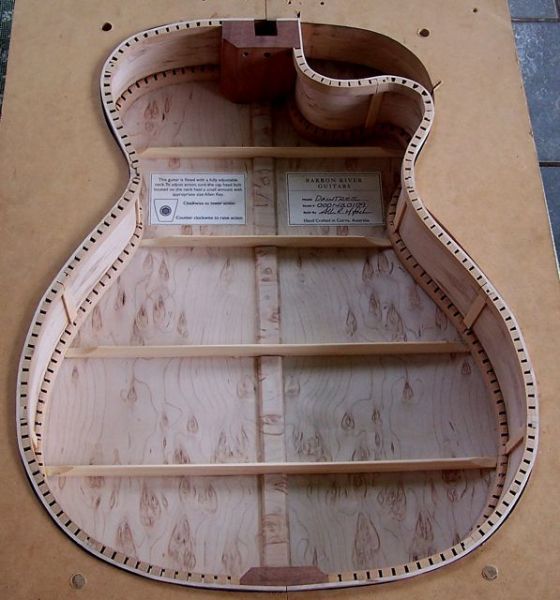
I made the bridge patch larger than I usually do. It's 1 3/4" to the edge of the x-brace. I was concerned that the large area would show a flat spot without some sort of reinforcement.
This is the first time I've used scalloped braces. Being a bit of a mystery to me, I watched Robbies bracing video, and jumped in. I penciled in a line 3" in from the rim. This marked the peak of the braces. I tried to keep the x-braces full height to the bridge, so penciled in the bottom of the scallop 1/2 way between the two points. Then went at it with a chisel.
Interestingly, the tap tone and response from a scalloped brace is different from a parabolic one. I ended up taking the point of where I started to scallop the x-brace north to the edge of the bridge plate to get it to loosen the top up a bit.

Now the pressure is off. It's bloody difficult building anything in the tropics during the wet season. Moving from the RH controlled environment to the garage, where I'm allowed to make all the mess I like, and back every 5-10 minutes is tiresome. The top wants to turn into a donut if left out too long.
I made the bridge patch larger than I usually do. It's 1 3/4" to the edge of the x-brace. I was concerned that the large area would show a flat spot without some sort of reinforcement.
This is the first time I've used scalloped braces. Being a bit of a mystery to me, I watched Robbies bracing video, and jumped in. I penciled in a line 3" in from the rim. This marked the peak of the braces. I tried to keep the x-braces full height to the bridge, so penciled in the bottom of the scallop 1/2 way between the two points. Then went at it with a chisel.
Interestingly, the tap tone and response from a scalloped brace is different from a parabolic one. I ended up taking the point of where I started to scallop the x-brace north to the edge of the bridge plate to get it to loosen the top up a bit.

-
Bob Connor
- Admin
- Posts: 3115
- Joined: Mon Jul 09, 2007 9:43 pm
- Location: Geelong, Australia
- Contact:
I don't recall if the maple was called ambrosia or not, but I scored 3 sets out of the 4 on offer. It was just so damn pretty I couldn't pass it up.
The lower tone bar just ended up that way Bob. When I penciled in the 3" in from the linings, that's where the peak ended up on that brace. I'm treading in unknown waters with scalloped bracing, so I took my best educated guess, and went with it.
Now that the top is glued on, there is a really nice tap tone to it. I also notice a slight change in pitch from bass to treble side, with the treble being just a bit higher in pitch. I'm hoping that this is a good sign of getting things right on the inside.
-
Mark McLean

- Blackwood
- Posts: 1174
- Joined: Thu Apr 10, 2008 2:03 pm
- Location: Sydney
Allen, Bob
I have been following this thread with interest because my current project is a 13-fret version of the Nick Lucas style L-00. I have a plan for a 14-fret L-00, so there will be a similar issue to your 14-to-12 fret conversion. My understanding from some technical descriptions elsewhere is that the 13-fret Gibsons just moved the bridge, bracing and soundhole all to the south by the equivalent distance of the 13-14th fret interval (a bit over 16mm in Gibson 24.7 scale). This keeps the relationship between those elements unchanged. Are there any pitfalls that you think I should look out for?
I have been following this thread with interest because my current project is a 13-fret version of the Nick Lucas style L-00. I have a plan for a 14-fret L-00, so there will be a similar issue to your 14-to-12 fret conversion. My understanding from some technical descriptions elsewhere is that the 13-fret Gibsons just moved the bridge, bracing and soundhole all to the south by the equivalent distance of the 13-14th fret interval (a bit over 16mm in Gibson 24.7 scale). This keeps the relationship between those elements unchanged. Are there any pitfalls that you think I should look out for?
Without seeing the bracing pattern, some of the things your going to need to look at is the spread on the x-braces. They might need to be tweaked a little bit for them to extend to the correct spot in relation to the upper bout. This also has the potential to alter the how stiff the top is across and with the grain. Not a bad thing, you just need to be aware of this.
Be sure to brace the sound hole in an appropriate way. Moving the x-brace south will leave more of the sound hole area unsupported if you do not change anything else but the placement of the x-brace and bridge.
Another thing that just came to mind, is that the x-brace arms north of the intersection, are going to be a bit longer, so are going to have more stress on them. Keep them full size until they get quite close to the linings. But after your first guitar, you'll probably be doing that anyway.
Last edited by Allen on Mon Dec 29, 2008 5:58 pm, edited 1 time in total.
-
DarwinStrings

- Blackwood
- Posts: 1873
- Joined: Thu Nov 13, 2008 10:27 pm
- Location: Darwin
Looks great Allen. I have a chunk of Purple Heart that I have similar plans for and hope it works as well as yours. I would like to see a closer shot of that Rosette if you get time. Its a shame you couldn't afford some wood without all those knots in it, maybe next time ask your partner for a little extra cash.
Jim
Jim
Who is online
Users browsing this forum: No registered users and 49 guests