I used a Stew-Mac router base for the Dremel, with their binding attachment. It also has the problem of a flat plate registering on an arched back or soundboard. But the problem is more likely to be with the operator than with the tool. Maybe I just didn't pay enough attention to checking the depth of cut all the way round. It seems to need a number of passes to get the job done properly. I will check out the Williams jig - thanks for the tip.
mm
new to the forums~ Cole Clark

Mark,
Ive got the Steamac Dremel router base and binding attachment but have never used it. I used the rosette cutting jig once and made a hash job of it...router attachment screws kept working loose halfway through the cut and the rosette jig has too much flex in it for my liking.
One trick with the jigs is to do your cuts as a number of passes and to work fairly fast but smoothly as you work the jig around the guitar. Position yourself so you dont have to stop and reposition yourself halfway through a cut. Also see Stewmac's catalogue for instruction on direction to make intial cuts to minimise tear out.
Cheers Martin
Heres a pic og my Luthier Tools binding channel cutting jig. Im actually using it to cut out some old binding off a classical but the way it works is the same. The lam trimmer is a Porter Cable 301 and the cutter is a double flute straight cutter. Thumb screws on the jig allow adjustment of the depth and width (large knob in pic) of the channel. I always test cut on a piece of scrap before attcking the guitar. The guide show is angled to follow arched top of guitar and there are two bearings that register on side of the guitar. Its important to makie sure that there arent any bumps on the sides for obvious reasons.
Cheers Martin
My jig

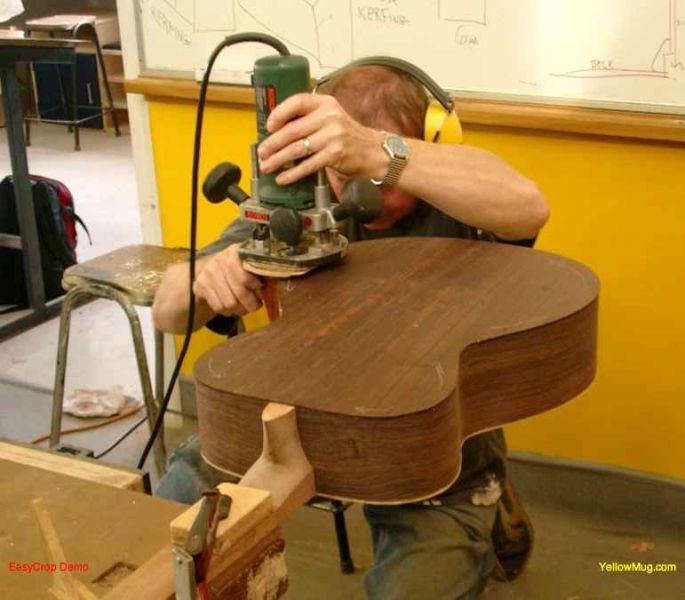
Kiwi Luthier Paddy Burgin using his jig made using plans in Jim Williams book. Does the same job for less loot. Note white pencil marks on back of guitar noting cut direction...this is to minimise tear out.
Cheers Martin
My jig
Kiwi Luthier Paddy Burgin using his jig made using plans in Jim Williams book. Does the same job for less loot. Note white pencil marks on back of guitar noting cut direction...this is to minimise tear out.

Howdy Jake,
Whilst I don't live in Tamworth , I may be your closest luthier neighbour. I'm 45 klm east of Walcha on the Port Maquirie Rd , at a little place called Tia . It may be on your map , there again it's so small , it may not ( about a 1 3/4 hour drive all up ). In any case give me a P.M.
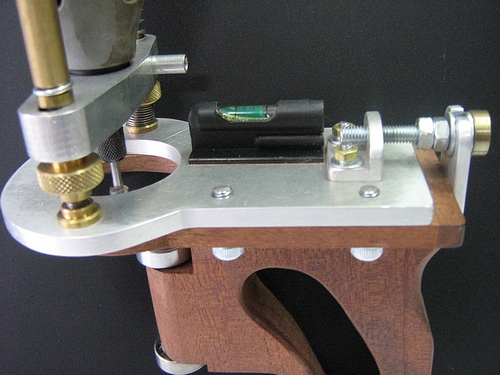
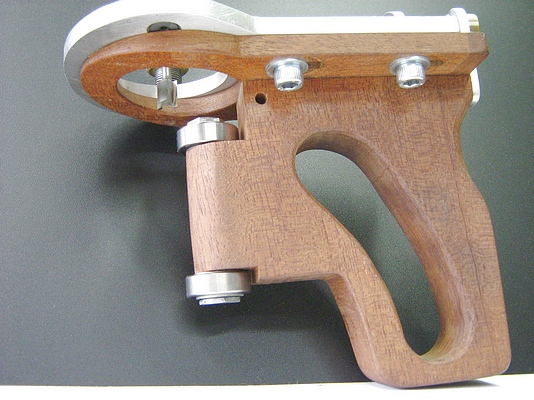
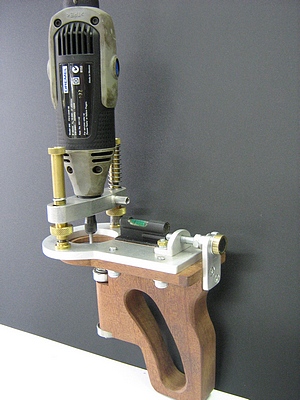
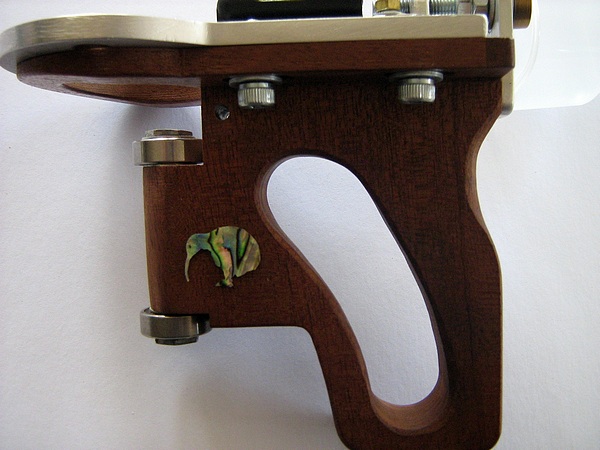
I'll have to beg to differ regarding the Dremmel for binding channels. I made this set up which works flawlessly in two passes. I have no variance in channel depth and width ( And absolutley NO gaps !) I have the Stewmac Dremmel router base to hold the machine , which is screwed on to my device as you can see . The jig allows micro adjustment for depth and width of cut. I swap bits to a spiral downcut for the purfling channell ( Shellac the edge of the soundboard first for a very clean ledge with no burr ) Also cut your ledges in the right order to avoid any tearout. ( see Stewmac's routing direction guide on their site )
 )
)
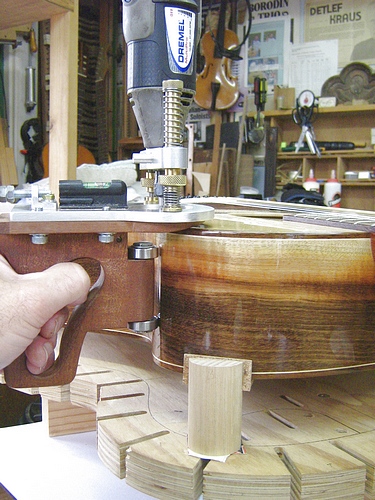
You'll note there is a donut type base ( angled at the front ) to register against the top and back plates . The donut's front angle allows for the radius of the soundboard and back plates to not raise the router above your desired depth of cut.
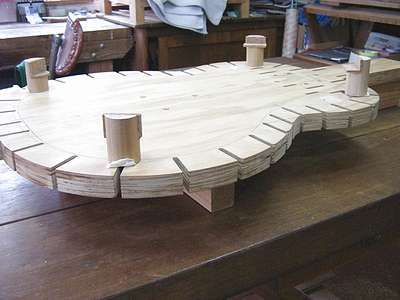
This Solera arrangement holds the guitar body solidly ,yet allows the jig's bearings to register against the side of the guitar
As Allen suggested regarding bending : get yourself a 3 inch piece of Gal. pipe and stick a small propane torch in the rear of it. You can make up a bracket of sorts to hold on to the pipe and maybe clamp it in your vise or whatever. Place a metal flap of sorts to sit over the front hole of the pipe. I make mine so its can allow a bit of heat leakage ( A round temperature guage off an old combustion stove ).It becomes a type of temperature controller by allowing more or less heat to escape . That, and the amount of flame on your torch .You'll soon get the hang of it , and find a setting that will deliver you a fairly constant temperature .This set up is cheap and easy to arrange for the beginner and very capable of giving you a good result.
As it heats up , test the temperature with a few drops of water on the pipe. If the drops do a quick dance then evaporate you right for temperature. If they evaporate on contact , it's too hot , if they don't dance , your too cold.
I have taken to putting on a wet cloth draped over the pipe to deliver the steam rather than lightly spray the wood itself every now and then. It ain't easy to begin with , so practice on scrap is definatley a must. Although I now use a Fox type bender , the occasional touch-up is still required with the pipe , not to mention cutaways and their bindings . It's an art well worth having aboard , in fact , I would say it's a must.
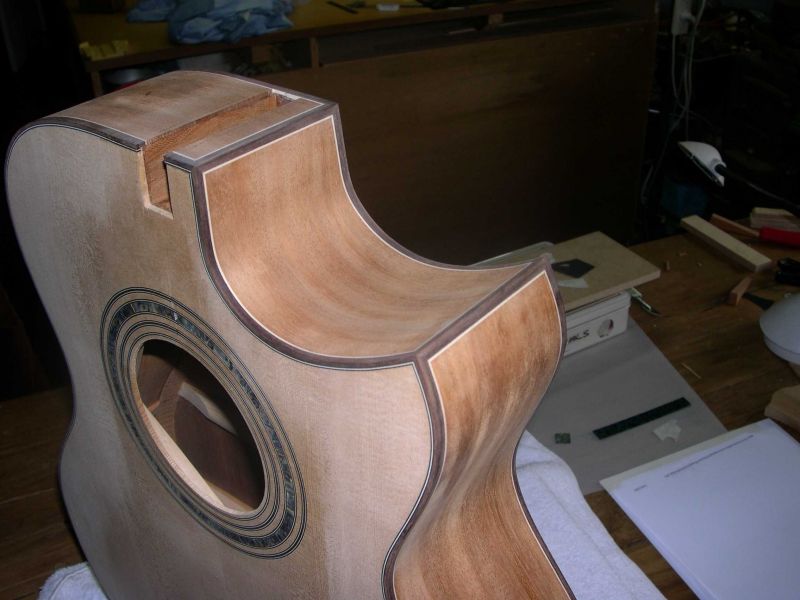
My cutaway and bindings here were done on the pipe , and the binding and purfling ledges done with my Dremmel Jig
A big "howdy" to you too Mark .Good to have some more Scottish blood here and great to have you aboard . We all look forward to your progress . Your Surname is my middle name ( a family name I inherited ) ,,,,, hey , we may be related !!
Cheers guys
Whilst I don't live in Tamworth , I may be your closest luthier neighbour. I'm 45 klm east of Walcha on the Port Maquirie Rd , at a little place called Tia . It may be on your map , there again it's so small , it may not
I'll have to beg to differ regarding the Dremmel for binding channels. I made this set up which works flawlessly in two passes. I have no variance in channel depth and width ( And absolutley NO gaps !) I have the Stewmac Dremmel router base to hold the machine , which is screwed on to my device as you can see . The jig allows micro adjustment for depth and width of cut. I swap bits to a spiral downcut for the purfling channell ( Shellac the edge of the soundboard first for a very clean ledge with no burr ) Also cut your ledges in the right order to avoid any tearout. ( see Stewmac's routing direction guide on their site )
)You'll note there is a donut type base ( angled at the front ) to register against the top and back plates . The donut's front angle allows for the radius of the soundboard and back plates to not raise the router above your desired depth of cut.
This Solera arrangement holds the guitar body solidly ,yet allows the jig's bearings to register against the side of the guitar
As Allen suggested regarding bending : get yourself a 3 inch piece of Gal. pipe and stick a small propane torch in the rear of it. You can make up a bracket of sorts to hold on to the pipe and maybe clamp it in your vise or whatever. Place a metal flap of sorts to sit over the front hole of the pipe. I make mine so its can allow a bit of heat leakage ( A round temperature guage off an old combustion stove ).It becomes a type of temperature controller by allowing more or less heat to escape . That, and the amount of flame on your torch .You'll soon get the hang of it , and find a setting that will deliver you a fairly constant temperature .This set up is cheap and easy to arrange for the beginner and very capable of giving you a good result.
As it heats up , test the temperature with a few drops of water on the pipe. If the drops do a quick dance then evaporate you right for temperature. If they evaporate on contact , it's too hot , if they don't dance , your too cold.
I have taken to putting on a wet cloth draped over the pipe to deliver the steam rather than lightly spray the wood itself every now and then. It ain't easy to begin with , so practice on scrap is definatley a must. Although I now use a Fox type bender , the occasional touch-up is still required with the pipe , not to mention cutaways and their bindings . It's an art well worth having aboard , in fact , I would say it's a must.
My cutaway and bindings here were done on the pipe , and the binding and purfling ledges done with my Dremmel Jig
A big "howdy" to you too Mark .Good to have some more Scottish blood here and great to have you aboard . We all look forward to your progress . Your Surname is my middle name ( a family name I inherited ) ,,,,, hey , we may be related !!
Cheers guys
Craig Lawrence
-
Mark McLean

- Blackwood
- Posts: 1174
- Joined: Thu Apr 10, 2008 2:03 pm
- Location: Sydney

Welcome to the forum Mark. It seems that you've got lots to contribute to the forum, so don't go back to lurking.
Craig....mate, you gotta start selling those jigs. Mine are just so rough and ready that now I'm to ashamed.
I also use my dremel to cut the notches in the sides for the braces to be let in. Mark them out and cut the edges with a Japanese saw. Then set the depth on the Stew Mac Dremel base and just route out the waste.
I think that a lot of these tips need to be documented in the Tutorial Section
Nice jig Craig......but imagine how it would look with a nice Porter Cable lam trimmer sitting in it.
I forgot to mention my other misgivings about the Dremels...the bearings are crap. Horses for courses I guess.
Ive just noticed your neat way of mounting the body in your workboard for the binding channel cutting job. Why the hell didnt I think of that?
Cheers Martin
I forgot to mention my other misgivings about the Dremels...the bearings are crap. Horses for courses I guess.
Ive just noticed your neat way of mounting the body in your workboard for the binding channel cutting job. Why the hell didnt I think of that?
Cheers Martin
this is my thrown together budget jig. based on the jim williams jig.
the only thing different from the photo is that I filed a lot greater angle from the middle of the washer to the front edge of the washer so that nowhere on the arch of the back made the cutter tilt back...
cheap as chips and works flawlessly..
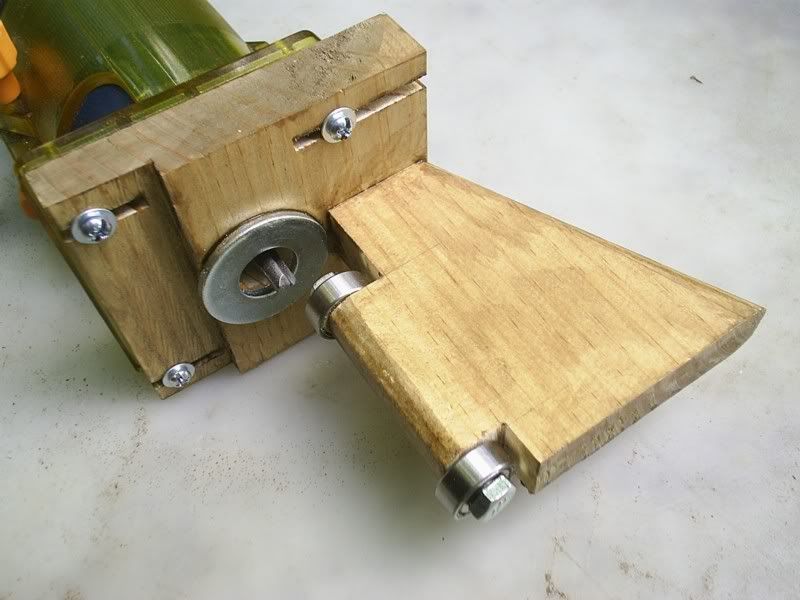
although I'm kinda embarrassed posting my jig after Craig's serious looking bit of kit.. I like the fine adjustment..It sure beats the hitting it with a hammer method I have to employ.
the only thing different from the photo is that I filed a lot greater angle from the middle of the washer to the front edge of the washer so that nowhere on the arch of the back made the cutter tilt back...
cheap as chips and works flawlessly..
although I'm kinda embarrassed posting my jig after Craig's serious looking bit of kit.. I like the fine adjustment..It sure beats the hitting it with a hammer method I have to employ.
Last edited by gratay on Thu Sep 18, 2008 8:52 pm, edited 1 time in total.
-
Paul B
Oh shit, don't say that! He'll bloody well do it too! Craig's jigs are almost as pretty as his guitars, and equally well made.Mark McLean wrote:Hey Craig, it seems that you make tools that are almost as beautiful as the guitars. That is a really cool jig! Just needs some abalone inlay on the handle.
My jigs work, but that's about all that can be said for them.
kiwigeo wrote:Nice jig Craig......but imagine how it would look with a nice Porter Cable lam trimmer sitting in it.
I forgot to mention my other misgivings about the Dremels...the bearings are crap. Horses for courses I guess.
Ive just noticed your neat way of mounting the body in your workboard for the binding channel cutting job. Why the hell didnt I think of that?
Cheers Martin
Martin , I have a Makita Lam trimmer . Using a machine of that size tends to make this type of unit top heavy. I have found more than enough power with my dremmel , but I take it very slowly with a couple of passes. Maybe my dremmel was made on a good day as it has zero run out , and the bearings are still perfect . I won't be changing any time soon as it works so well.
Yes, I do exactly as you do inletting the brace ends to the sides Allen . Makes for an accurate and neat pocket. The micro adjuster is very handy there for just the right depth of cut.
I enjoy making jigs to use ,and am always thrilled when they work so well. Yeah , I know I make an over the top neat job on them to the point of obsessiveness, but I do it for a good reason .They work better,,,,, and kind of set a higher standard for the operation ahead. A better end result me thinks .At least that's how my crazy obsessive mind works. I won't be turning jigs out for sale any time soon Allen as they take me so long to make and I'd sooner be making guitars. I keep thinking I've made all the jigs that I'll be needing , when yet another crops up . We're all in the same boat here Huh guys ? There's always another jig to make !
I'm in the middle of making a well needed Trojy type body clamp at the moment. It will make the job of building guitars just that much easier , and whilst making it , I'm thinking of my next move on the instruments I have under construction. Gives me a bit of time to think ahead and form greater ideas for them.
Mark ,,,,,,,,,,,,,,abalone inlay you say ,,,,,,, hmmmm:lol:
Appreciate your kind words guys. Cheers
Craig Lawrence
-
Mark McLean
- Blackwood
- Posts: 1174
- Joined: Thu Apr 10, 2008 2:03 pm
- Location: Sydney
That is outrageous! I've never known someone take what I say so literally! I will need to be careful about joke suggestions from now on.
But if you go to the trouble of making a tool look better than it needs to, why not go the whole way? The resident heretic will probably say that we shouldn't be encouraging this sort of behaviour - it's like buying an alcoholic a drink. But you seem to be such a far-gone perfectionist that we should just shake our heads and applaud. And if you do decide to sell them the value just went up about $50. You can sign me up for one of the deluxe models.
mm
hehe thats a fantastic jig Craig! wish i could be getting ur help on my project!  sorry i've gone a bit dorment the last few days i've been really busy and just had enough time to come on and be a sponge
thanks everyone for all ur input, and any ideas on how i could get this thing together in a regular school woodwork room would be great!
cheers
jake
thanks everyone for all ur input, and any ideas on how i could get this thing together in a regular school woodwork room would be great!
cheers
jake
Jake, it's been an awful long time since I was in a school woodwork shop, and the one I was in wasn't really suitable to build a guitar in as such a project would for sure be messed with by some dim witted Neanderthal.
You will need to plan out each part of your build. It can be broken down into several steps, and it's possible to jump between each part of the build to some extent. Some parts of the build are going to need to be in a relatively stable environment You will want to check up on this before you get too far into the build, then take measures if necessary.
This is far too large a subject to give the readers digest condescend version. Best that you keep reading and post your questions.
While we're taking the p*ss out of Kiwis........check this out:
http://www.break.com/index/dirty_deeds_ ... sheep.html

http://www.break.com/index/dirty_deeds_ ... sheep.html
Jake ,jmuller92 wrote:
thanks everyone for all ur input, and any ideas on how i could get this thing together in a regular school woodwork room would be great!
cheers
jake
Allen's post above makes very good sense. I recall my own school woodwork room to constantly have blunt planes and chisels etc . The files were usually worn out, and machines out of square . I suppose the teacher just didn't have enough time to maintain these tools as they should be , and of course the tools were mostly abused by other students.
On reflection , I would say that ironically, a school woodwork room is not a good environment to be learning woodworking skills, unless you have a particularly vigilant teacher able to keep tools and machinery up to scratch, as well as find enough time to keep an eye on your progress among all the other students. I'm hoping that doesn't sound too harsh , but see it as a probable reality. You could improve this situation ( if indeed it does exist ) , by bringing along you own sharpened planes and chisels maybe .
Craig Lawrence

Jake,
Get your chisels and planes etc from swapmeets, flea markets, smelly old uncles etc. There is plenty of good info on the net that will show you how to flatten the back of a chisel and get a good edge on it. I use a sheet of 10mm glass with various grits of wet and dry for my edge tools. Google how to tune a hand plane, find yourself an old Stanley or record block and smoothing plane and go to it.
If you have access to a drill press, have a look at Robbie's most recent post on how to use a Wagner Safe-T-Plane. The Wagner is a great way to get your stock down close to dimension, better still, if your buying wood from Tim Spittle, ask him to thickness sand the wood down for you. In reality, you do not need that many tools.
I would say at a bare minimum go get your own block plane, a 6, 12, and 19mm chisel, a Bacho cabinet scraper (look in the tutorial section, I posted a link which shows how to prep a card scraper just a few weeks back) a fine tooth razor saw, a craft knife and a decent gents saw.
That should give you a good start but you need to invest time in learning how to sharpen edge tools, google "Scary Sharp System"
Cheers
Kim
Most of the work that you are going to be using power tools for don't necessarily require consistent set up over several days for the tasks at hand.
For instance, if you are cutting brace wood, this in all likelihood will be accomplished in one session on the band saw. Cutting the top and back profile is the same. Making neck and end blocks ditto.
As for hand tools, Kim's recommendations are spot on. There are heaps of tools that make the job easier, but you certainly can get buy with just a few of the basics.
Who is online
Users browsing this forum: No registered users and 120 guests