In between house projects I decided to make a jig for guitar inlay work. Previously, I was using my Dremel tool freehand using paper cutout patterns and this was a slow process. I was considering purchasing a small CNC machine, however, at this stage my budget is limited. As an alternate method I decided to make a Pantograph Router from available scrap materials to make my design inlays.
This involved searching the internet where I found a suitable Pantograph Router design on You tube from 'Woodgears' (see link: 3-D router pantograph - Woodgears). I purchased the building plans for $12.00. It took me 3 to 4 days to build the Pantograph Router and then make suitable to fit my Dremel tool. The hard part was then making the perplex matching guide templates. I used 'Word' to create the inlay design patterns for the fretboard and the headstock logo. I then used my Dremel tool to cut the perplex guide shapes. This took a few goes to make the matching guide templates accurately to the shapes designed.
I then made some test inlays runs using a 1/32" router down cut bit. This involved making a pantograph guiding pin post to the same diameter as router bit to cut the inlay work correctly. The pantograph router has been set up to cutout half sized inlays. The guide templates had to be double in size to achieve the required sizing of my inlay designs.
At this stage I am happy with the results.
Wayne
Guitar Inlay cutting Jig
-
WJ Guitars
- Blackwood
- Posts: 404
- Joined: Thu Jan 26, 2017 4:28 pm
- Location: Sutherland NSW
- Contact:
Guitar Inlay cutting Jig
- Attachments
-
Re: Guitar Inlay cutting Jig
Love pantographs, it looks like its doing the job nicely too
Steve
Steve
-
WJ Guitars
- Blackwood
- Posts: 404
- Joined: Thu Jan 26, 2017 4:28 pm
- Location: Sutherland NSW
- Contact:
Re: Guitar Inlay cutting Jig
Thanks Steve for your comments
Wayne
I will now be able to achieve more consistent results in a short period of time, plus be able to create other types of design shapes that will enable more usages of the pantograph.Love pantographs, it looks like its doing the job nicely too
Wayne
Re: Guitar Inlay cutting Jig
Is it a two to one,
Be pretty good if someone local to you had a laser cutter, the you could get templates cut in perspex and keep them for your builds
Be pretty good if someone local to you had a laser cutter, the you could get templates cut in perspex and keep them for your builds
Re: Guitar Inlay cutting Jig
Wayne that looks pretty complicated - not surprised it took a while to build, but really useful. Is play a problem? I imagine you have to work in one direction to avoid backlash issues...?
Dave
Dave
------------------
Dave
Dave
-
OnlineMark McLean

- Blackwood
- Posts: 1166
- Joined: Thu Apr 10, 2008 2:03 pm
- Location: Sydney
Re: Guitar Inlay cutting Jig
That is really inspiring, and I could see myself making one of those. Great idea from Simso to get the perspex guides commercially cut. When you cut the inlay pockets do you do it to full depth, in one pass, or in multiple cuts?
-
WJ Guitars
- Blackwood
- Posts: 404
- Joined: Thu Jan 26, 2017 4:28 pm
- Location: Sutherland NSW
- Contact:
Re: Guitar Inlay cutting Jig
The pantograph has 2 size options two to one and three to one. All that is required to change the size is to take out two pins and then reposition and slides the pins in.by simso » Thu Mar 18, 2021 10:36 pm
Is it a two to one,
Be pretty good if someone local to you had a laser cutter, the you could get templates cut in perspex and keep them for your builds
Getting perpex templates cut on laser is a great idea and yes I will check this out. There is a place nearby that may be able to do this.
I cut in three passes. This is important with small diameter router bits to avoid shortening their life span and sharpen.by Mark McLean » Fri Mar 19, 2021 8:36 am
That is really inspiring, and I could see myself making one of those. Great idea from Simso to get the perspex guides commercially cut. When you cut the inlay pockets do you do it to full depth, in one pass, or in multiple cuts?
Yes it took a while to build and you need to be careful to accurately cut out all the components. However, all the shapes involved are not complex. The pantograph plans comes with two versions for a Dremel or larger sized router.by Dave M » Fri Mar 19, 2021 4:19 am
Wayne that looks pretty complicated - not surprised it took a while to build, but really useful. Is play a problem? I imagine you have to work in one direction to avoid backlash issues...?
I general work in on direction and cut as mentioned in three passes. I have also found no problems going in the reverse direction or had any backlash issues. If you tried to cut only one pass then you may encounter some problems especially with smaller diameter router bits. With larger diameter bits one pass is feasible.
Wayne
-
lamanoditrento

- Blackwood
- Posts: 617
- Joined: Thu May 05, 2016 9:50 am
Re: Guitar Inlay cutting Jig
That really looks like a fun project to build. Good looking results too Wayne
Trent
-
WJ Guitars
- Blackwood
- Posts: 404
- Joined: Thu Jan 26, 2017 4:28 pm
- Location: Sutherland NSW
- Contact:
Re: Guitar Inlay cutting Jig
by lamanoditrento » Fri Mar 19, 2021 10:39 am
That really looks like a fun project to build. Good looking results too Wayne/quote]
Yes it has been an interesting project. The pantograph design plans purchase did require some minor modification to the design to suit my Dremel tool. Instead of using timber clamp holders, I made an aluminum side clamp and base plate that enabled me to use a spare 'StewMac' Dremel screw on fitting that has a dust blower connection. I added an adjustable height vertical support that keeps the pantograph level and stable. See attached photos.
I also intend to make some clamps that slide into the base board to align and hold the guitar parts that are to be cut for inlaying. It is important that that these parts have been glued or attached on a mounting board with glue or double sided tape when cutting timber or pearl pieces. For fretboard pocket inlay cutting only clamping is required.
Its good when you can make a jig with available left over materials in your workshop and save on costs to help better build your guitar projects.
Wayne
- Attachments
-
Re: Guitar Inlay cutting Jig
WJ Guitars wrote: ↑Fri Mar 19, 2021 9:14 amThe pantograph has 2 size options two to one and three to one. All that is required to change the size is to take out two pins and then reposition and slides the pins
With the ability to go 3d, if you could some how add a pin somewhere that allows it to be 1:1 then you could use it for making and copying bridges etc, in essence then a duplicator as well
Steve

Re: Guitar Inlay cutting Jig
What are the maximum dimensions you can cut to? I guess this is governed by the closest/furthest the pub will move from the pivot.
Am I also right in thinking that you could do a complete bridge as long as the template was laid perpendicular to the pin-pivot line?
Am I also right in thinking that you could do a complete bridge as long as the template was laid perpendicular to the pin-pivot line?
Alan
Peregrine Guitars
Peregrine Guitars
-
WJ Guitars
- Blackwood
- Posts: 404
- Joined: Thu Jan 26, 2017 4:28 pm
- Location: Sutherland NSW
- Contact:
Re: Guitar Inlay cutting Jig
Yes I see there are more possibilities to add more value to the pantograph. A swappable longer side arm should work, see photo attachment. I would need to gain more experience with the 3D carving approach to make a guitar bridge. Its an interesting idea to develop.With the ability to go 3d, if you could some how add a pin somewhere that allows it to be 1:1 then you could use it for making and copying bridges etc, in essence then a duplicator as well
Steve
Wayne
The maximum dimension area available for an object to cut a piece is approximately 400mm x 100mm, see photo attachment. The plans drawings available for $12.00 from 'Woodgears' show this more clearly. At this stage I have no experience in making a bridge using a pantograph. I would need to trial the process to set out where the pin-pivot would best be positioned to start the carve. Both the bridge guide template and piece to carve would need to be aligned / positioned in the same orientation. I'd expect that you would need to be careful in the 3D operation to carve with the appropriate router bit.by TallDad71 » Sat Mar 20, 2021 9:34 pm
What are the maximum dimensions you can cut to? I guess this is governed by the closest/furthest the pub will move from the pivot.
Am I also right in thinking that you could do a complete bridge as long as the template was laid perpendicular to the pin-pivot line?
Wayne
- Attachments
-
-
WJ Guitars
- Blackwood
- Posts: 404
- Joined: Thu Jan 26, 2017 4:28 pm
- Location: Sutherland NSW
- Contact:
Re: Guitar Inlay cutting Jig
As previous suggested I organised getting the perspex templates made using a laser cutter.
This involved creating CAD drawings in a free trial CAD programme called 'SketchUP'. For each template drawing I created '3D' and '2D' DXF files. As a guide to make making the CAD drawings, see pdf attachment.
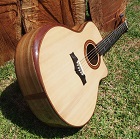
Only the '2D' files were finally required. I then sent the '2D' files to a company called 'LASERMADE'. After receiving these templates I have made test inlays and I am happy with the final results. See jpeg photo attachment.
I have provided some information on the photos that may be helpful if you are interested in making and using a router pantograph for your own style of inlay work.
Wayne
This involved creating CAD drawings in a free trial CAD programme called 'SketchUP'. For each template drawing I created '3D' and '2D' DXF files. As a guide to make making the CAD drawings, see pdf attachment.
Only the '2D' files were finally required. I then sent the '2D' files to a company called 'LASERMADE'. After receiving these templates I have made test inlays and I am happy with the final results. See jpeg photo attachment.
I have provided some information on the photos that may be helpful if you are interested in making and using a router pantograph for your own style of inlay work.
Wayne
- Attachments
-
- Dimensions.pdf
- (218.7 KiB) Downloaded 378 times
-
Who is online
Users browsing this forum: Mark McLean and 48 guests