Variations on a Macca.

-
Nick

- Blackwood
- Posts: 3628
- Joined: Thu Feb 26, 2009 11:20 am
- Location: Christchurch, New Zealand
- Contact:
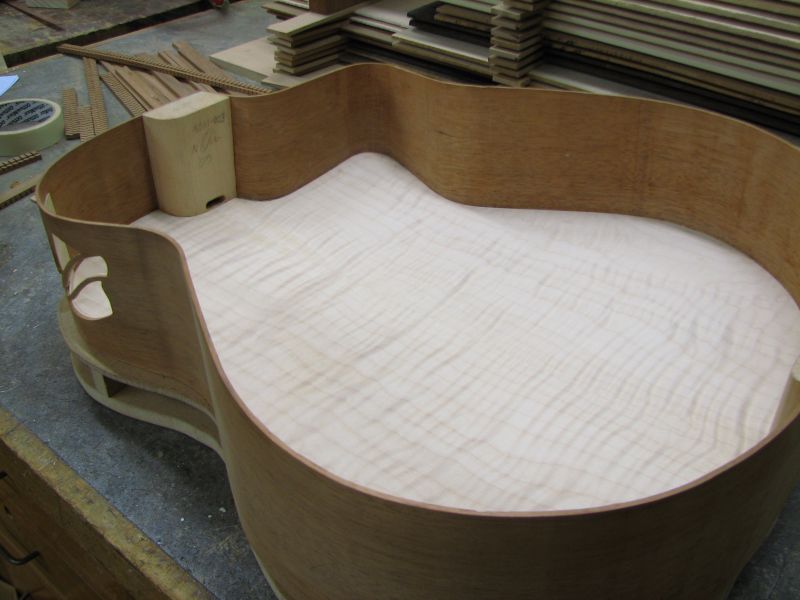
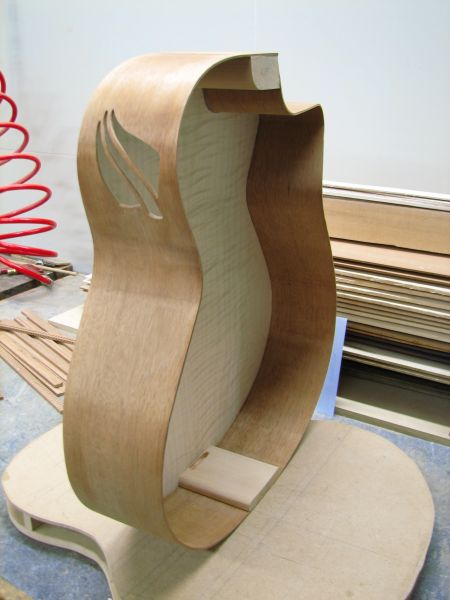
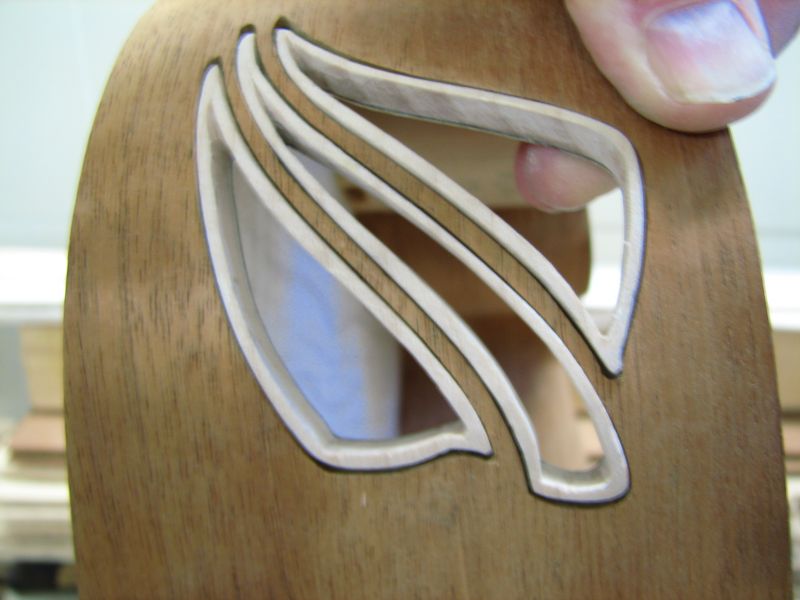
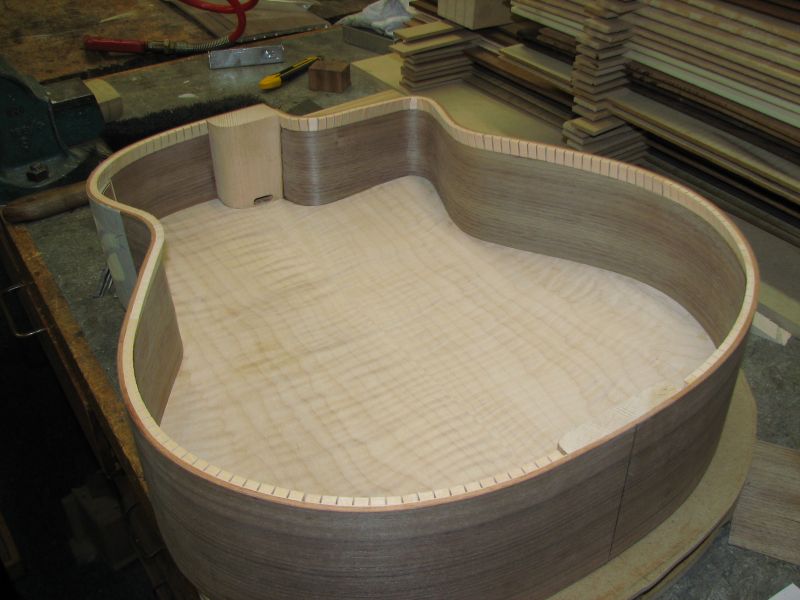
Finally glued in the inner back today and cut a soundport in the side. So some progress pickies for you.
Similar to the picture I posted before when the back wasn't glued in, but this time I've added some Titebond and a Maple re-enforcment seam into the equation.

And from the front
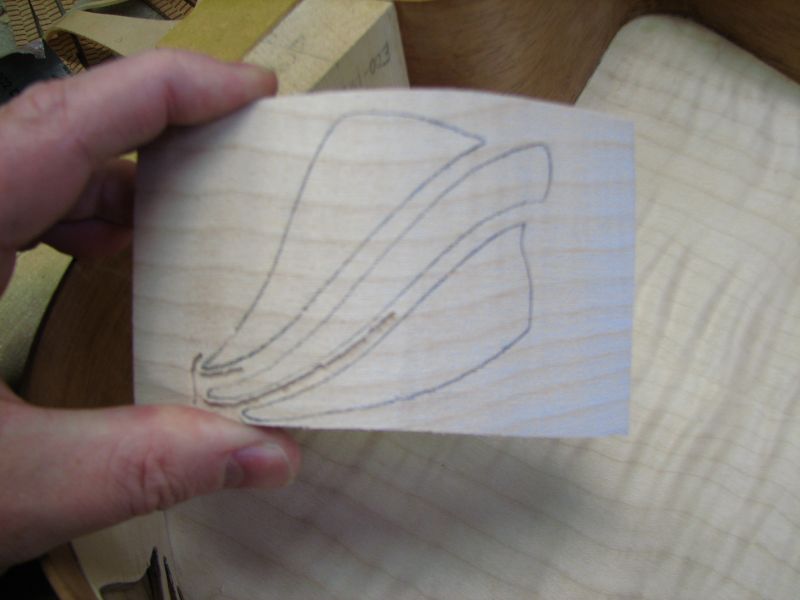
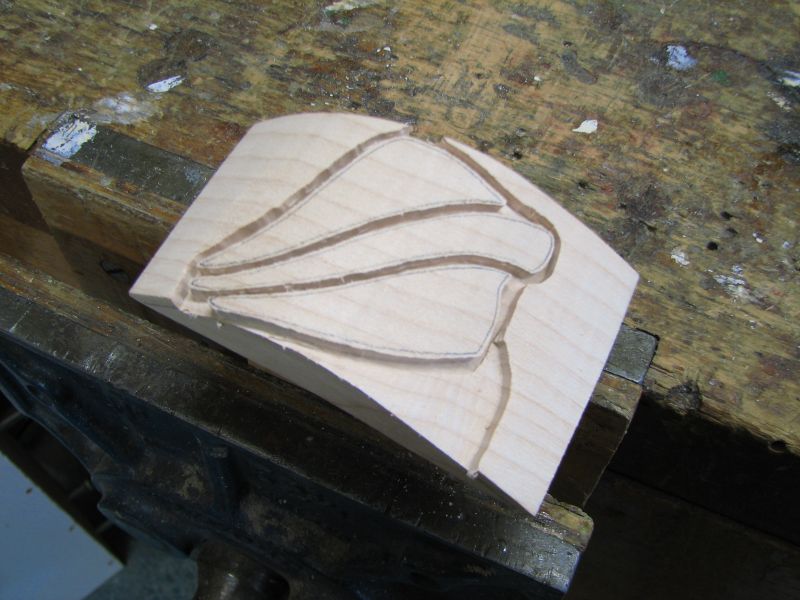
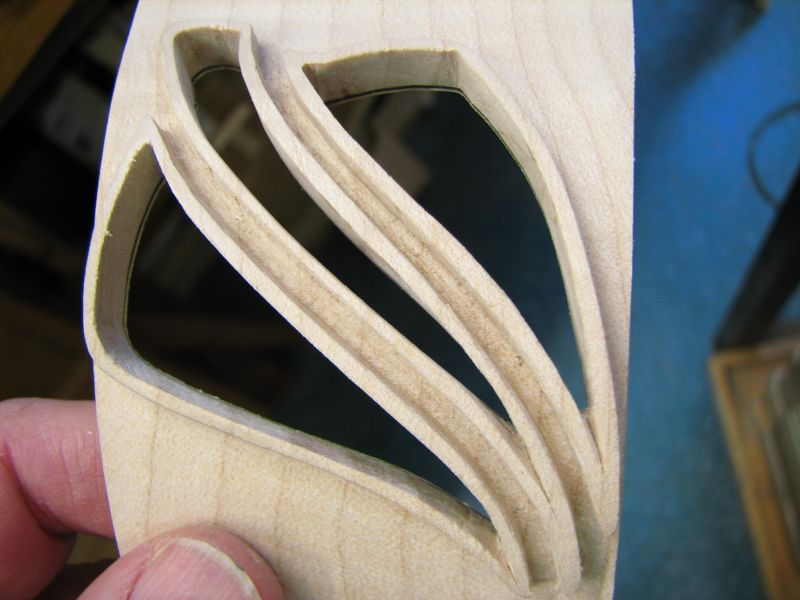
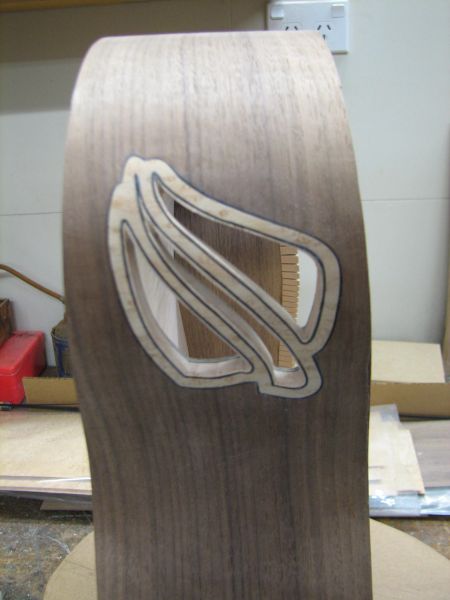
A better view of the sound port, I've tried to design it as a stylised silver fern (the emblem of our land, you can stick it in a bottle or hold it in your hand Amen,crack two ) which will eventually have a curly maple border around the inside of it so won't be so big.
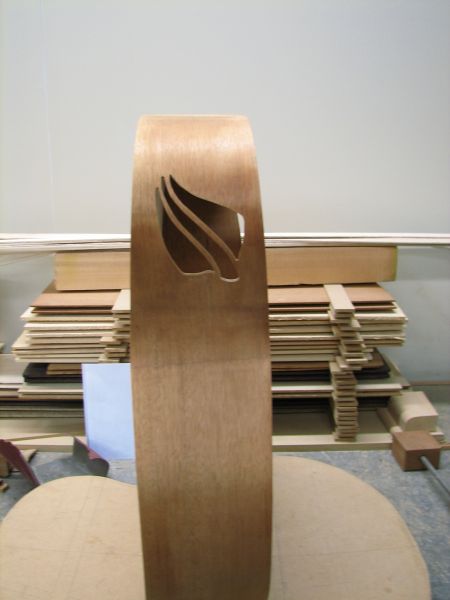
So that the thin pieces of Mahogany between the stalk & leaves didn't break out while I was cutting it (they're only 3mm wide) I glued this piece of maple veneer on the inside in an attempt to hold things together and bugger me it worked!

Well that's where I'm at at the moment but will post as more happens!
Similar to the picture I posted before when the back wasn't glued in, but this time I've added some Titebond and a Maple re-enforcment seam into the equation.
And from the front
A better view of the sound port, I've tried to design it as a stylised silver fern (the emblem of our land, you can stick it in a bottle or hold it in your hand Amen,crack two
So that the thin pieces of Mahogany between the stalk & leaves didn't break out while I was cutting it (they're only 3mm wide) I glued this piece of maple veneer on the inside in an attempt to hold things together and bugger me it worked!
Well that's where I'm at at the moment but will post as more happens!
Last edited by Nick on Fri May 15, 2009 6:55 pm, edited 3 times in total.
"Jesus Loves You."
Nice to hear in church but not in a Mexican prison.
Nice to hear in church but not in a Mexican prison.
-
J.F. Custom

- Blackwood
- Posts: 778
- Joined: Fri May 01, 2009 9:13 pm
- Location: Brisbane
- Contact:
Just came across this link Nick. Seems like both of you have been laying awake at night with similar thoughts.
http://www.luthiercom.org/phpBB3/viewto ... 121#p21121
http://www.luthiercom.org/phpBB3/viewto ... 121#p21121
-
Nick
- Blackwood
- Posts: 3628
- Joined: Thu Feb 26, 2009 11:20 am
- Location: Christchurch, New Zealand
- Contact:
Thanks Allen, that was spooky seeing somebody on the otherside of the planet thinking as warped as myself! I'll be following Todd's build with interest.Allen wrote:Just came across this link Nick. Seems like both of you have been laying awake at night with similar thoughts.
http://www.luthiercom.org/phpBB3/viewto ... 121#p21121
"Jesus Loves You."
Nice to hear in church but not in a Mexican prison.
Nice to hear in church but not in a Mexican prison.
-
Nick
- Blackwood
- Posts: 3628
- Joined: Thu Feb 26, 2009 11:20 am
- Location: Christchurch, New Zealand
- Contact:
Well things have slowed on the build in the last week & a half. I've been working mostly on the soundport 'lining/binding' ring but also had a damn sinus infection going on so my enthusiasm has been, shall we say....lacking somewhat but things are on the mend so it's almost back to full speed on the build. I'll just post a few pickies to give you an idea of what I'm up to. Some of these are blurry so please forgive me in advance.
I made a 'slice' out of some curly maple I had left over from an archtop back I made, and matched the curve to the outer face of the side.
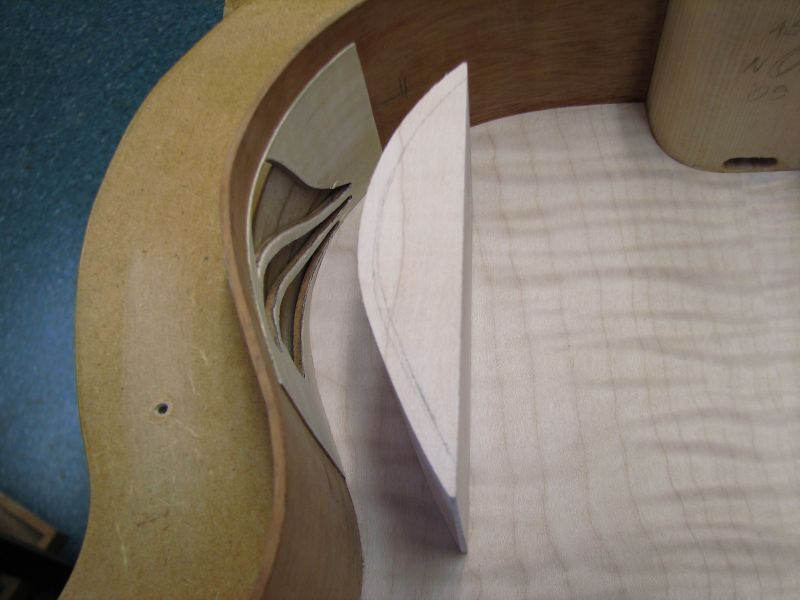
Then marked through the side ports to make the outline I had to work to (as you can see I'd started rough carving it out before I thought to take a picture!).
I gradually Dremeled away until I had gone the depth of the side plus some 'comfort' room for clean up afterwards. The rest of the block was hogged out after to the same depth & the face carved to match the inner curve of the side.
The shape was filed and shaped so that the lining sat inside the soundport holes with a gap all around for some black Araldite to provide a purfling line around the shape once it's all glued in. I then cut the curve on the back to make the whole thing thinner & cut out the inner sections and glued some black & white paper on the back so my linings had some purfling on it when looking 'into' the port. Here things are still 'in the rough but it gives you an idea of the effect I am trying to acheive.
& a shot showing the one piece lining sitting in the side.
Things still need to be shaped so that gaps are even all around but that's a job for another day!
Due to the time spent on the soundport I've now had a major mindshift about the 'plainess' of the Mahogany & decided to make this guitar a little more interesting so, to that end, I'm currently lining the sides (inside & out) with Walnut (almost like the original Macca's with their 'plys') & have a Walnut back set that will match nicely with the veneered sides. I was always going to use Curly Maple for the bindings but against the Mahogany it all looked a bit washed out so the Walnut should now provide a good contrast.
I'm leaving the inner veneer a lining width narrower so that my top linings get glued directly to the Mahogany (rather than the veneer) to lessen the possibility of any glue joints failing.
Anyway that's were I'm at for the moment, will update as I get more done.
I made a 'slice' out of some curly maple I had left over from an archtop back I made, and matched the curve to the outer face of the side.
Then marked through the side ports to make the outline I had to work to (as you can see I'd started rough carving it out before I thought to take a picture!).
I gradually Dremeled away until I had gone the depth of the side plus some 'comfort' room for clean up afterwards. The rest of the block was hogged out after to the same depth & the face carved to match the inner curve of the side.
The shape was filed and shaped so that the lining sat inside the soundport holes with a gap all around for some black Araldite to provide a purfling line around the shape once it's all glued in. I then cut the curve on the back to make the whole thing thinner & cut out the inner sections and glued some black & white paper on the back so my linings had some purfling on it when looking 'into' the port. Here things are still 'in the rough but it gives you an idea of the effect I am trying to acheive.
& a shot showing the one piece lining sitting in the side.
Things still need to be shaped so that gaps are even all around but that's a job for another day!
Due to the time spent on the soundport I've now had a major mindshift about the 'plainess' of the Mahogany & decided to make this guitar a little more interesting so, to that end, I'm currently lining the sides (inside & out) with Walnut (almost like the original Macca's with their 'plys') & have a Walnut back set that will match nicely with the veneered sides. I was always going to use Curly Maple for the bindings but against the Mahogany it all looked a bit washed out so the Walnut should now provide a good contrast.
I'm leaving the inner veneer a lining width narrower so that my top linings get glued directly to the Mahogany (rather than the veneer) to lessen the possibility of any glue joints failing.
Anyway that's were I'm at for the moment, will update as I get more done.
"Jesus Loves You."
Nice to hear in church but not in a Mexican prison.
Nice to hear in church but not in a Mexican prison.
-
Dennis Leahy

- Blackwood
- Posts: 872
- Joined: Wed Oct 10, 2007 12:32 am
- Location: Duluth, MN, US
- Contact:

-
Stephen Kinnaird

- Blackwood
- Posts: 287
- Joined: Sun Oct 14, 2007 1:45 pm
- Location: Texas, USA
-
Nick
- Blackwood
- Posts: 3628
- Joined: Thu Feb 26, 2009 11:20 am
- Location: Christchurch, New Zealand
- Contact:
Update so far, I mentioned I wasn't happy with the 'featureless' Mahogany that I had started this build with so over the weekend I glued Walnut veneer to the inside & outside leaving a strip of Mahogany the height of my linings clear on the inside so linings were all glued directly to the Mahogany.
A shot of the 'new' sides & linings.
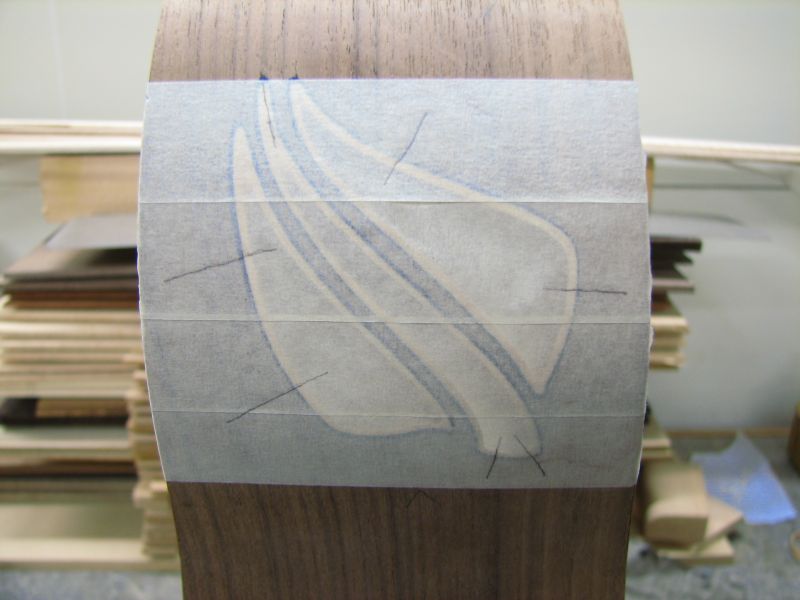
Also I glued in the soundport 'lining', which looked as though it had a nice even gap around it between it and the hole I cut in the side. This I filled with black Araldite to create a black border. After letting it harden off I cleaned off the excess but wasn't happy with what I saw !!!
!!!  the line wasn't even enough around the lining to my liking, it looked thinner in some places than others. So I've had to come up with a fix that will cover up my Faux Pas yet retain something special for the soundport.
It's a soundhole so why not put a rosette around it?
Here's a shot showing the lining underneath a layer of masking tape which will act as a surface to mark out where my rosette will sit when I come to inlay it. The angled lines are registration marks which line up with similar marks on my rosette so that it will line up exactly with the lining.
I have some nice pieces of Birdseye veneer, so after making some patterns of my soundport lining I glued the veneer to a piece of fibre veneer sheet to add support to the thin sections of Maple & cut my inner sections out.
Fortunately at work we have plenty of softboard around that people pin their posters and notices to so I cut a piece of this out along with a piece of Teflon sheet (so my glue doesn't stick the veneer to the softboard!) and pinned the rosette to it.
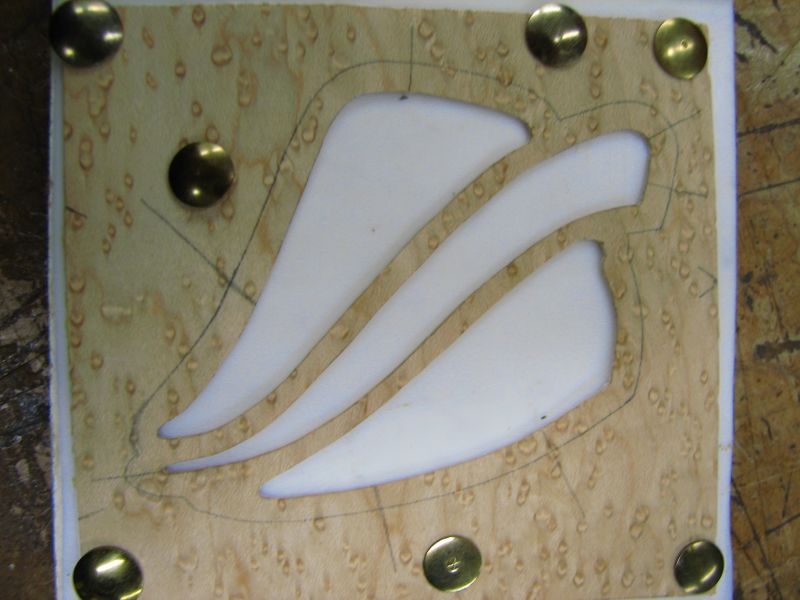
Now I am at this stage I am lining the edges with some dyed black Maple strips I have (0.5mm wide),the beauty of the softboard is that I can use drawing pins to hold the purfling in place while the glue drys and the heads of the pins hold the strip down flat & level with the back of the veneer.
A shot showing the first strip gluing up.

And with the stem section purfling done.
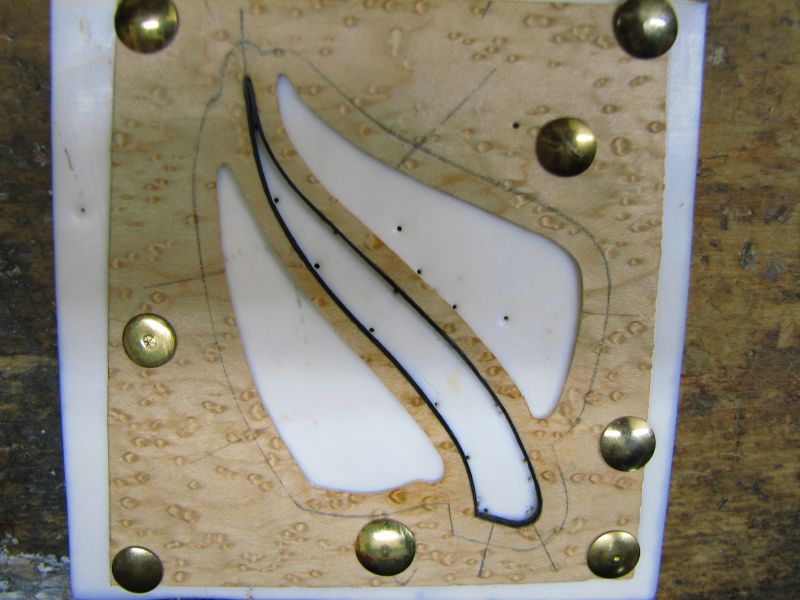
Once I have all the inner sections bound I will cut the outside shape to the pencil line and glue purfling around the edge & then I'll have my 'rosette', then comes the tricky bit!! Routing out a pocket for it to sit in around the lining. As long as I take my time & go carefully I think it should look not too bad and cover up my cock up reasonably well.
To be continued
A shot of the 'new' sides & linings.
Also I glued in the soundport 'lining', which looked as though it had a nice even gap around it between it and the hole I cut in the side. This I filled with black Araldite to create a black border. After letting it harden off I cleaned off the excess but wasn't happy with what I saw
It's a soundhole so why not put a rosette around it?
Here's a shot showing the lining underneath a layer of masking tape which will act as a surface to mark out where my rosette will sit when I come to inlay it. The angled lines are registration marks which line up with similar marks on my rosette so that it will line up exactly with the lining.
I have some nice pieces of Birdseye veneer, so after making some patterns of my soundport lining I glued the veneer to a piece of fibre veneer sheet to add support to the thin sections of Maple & cut my inner sections out.
Fortunately at work we have plenty of softboard around that people pin their posters and notices to so I cut a piece of this out along with a piece of Teflon sheet (so my glue doesn't stick the veneer to the softboard!) and pinned the rosette to it.
Now I am at this stage I am lining the edges with some dyed black Maple strips I have (0.5mm wide),the beauty of the softboard is that I can use drawing pins to hold the purfling in place while the glue drys and the heads of the pins hold the strip down flat & level with the back of the veneer.
A shot showing the first strip gluing up.
And with the stem section purfling done.
Once I have all the inner sections bound I will cut the outside shape to the pencil line and glue purfling around the edge & then I'll have my 'rosette', then comes the tricky bit!! Routing out a pocket for it to sit in around the lining. As long as I take my time & go carefully I think it should look not too bad and cover up my cock up reasonably well.
To be continued
"Jesus Loves You."
Nice to hear in church but not in a Mexican prison.
Nice to hear in church but not in a Mexican prison.
-
Dennis Leahy
- Blackwood
- Posts: 872
- Joined: Wed Oct 10, 2007 12:32 am
- Location: Duluth, MN, US
- Contact:
-
sebastiaan56

- Blackwood
- Posts: 1274
- Joined: Sun Oct 28, 2007 5:23 am
- Location: Blue Mountains
-
Nick
- Blackwood
- Posts: 3628
- Joined: Thu Feb 26, 2009 11:20 am
- Location: Christchurch, New Zealand
- Contact:
Just a quick update. The "rosette" is finally finished and inlayed in to the soundport. Still a few little bits of finese work to do like smooth sanding but just because we like pictures here
I took a few with things 'wetted' to give the finished look but were too blury to post I really must improve my photography skills!!
Now I can get on with the rest of the build after this hiccup.
I took a few with things 'wetted' to give the finished look but were too blury to post
Now I can get on with the rest of the build after this hiccup.
"Jesus Loves You."
Nice to hear in church but not in a Mexican prison.
Nice to hear in church but not in a Mexican prison.
-
Nick
- Blackwood
- Posts: 3628
- Joined: Thu Feb 26, 2009 11:20 am
- Location: Christchurch, New Zealand
- Contact:
So an update for anybody that's following this build, I'm onto the soundboard now and once the plates were joined I set my mind to designing a 'different' rosette for the 'grande bouche' than the standard Macca's (strips of purfling layed up similar to the petite bouche). I love the rosette segments that Jeremy did and subsequently uses as his avatar so I worked out a variation on this theme (hope you don't mind Jeremy) using the block inserts but having them connected by the purfling strips . The design means a load of new jigs and templates so for the Jigoholics here's a 'fix' of the pieces I designed to carry out the job
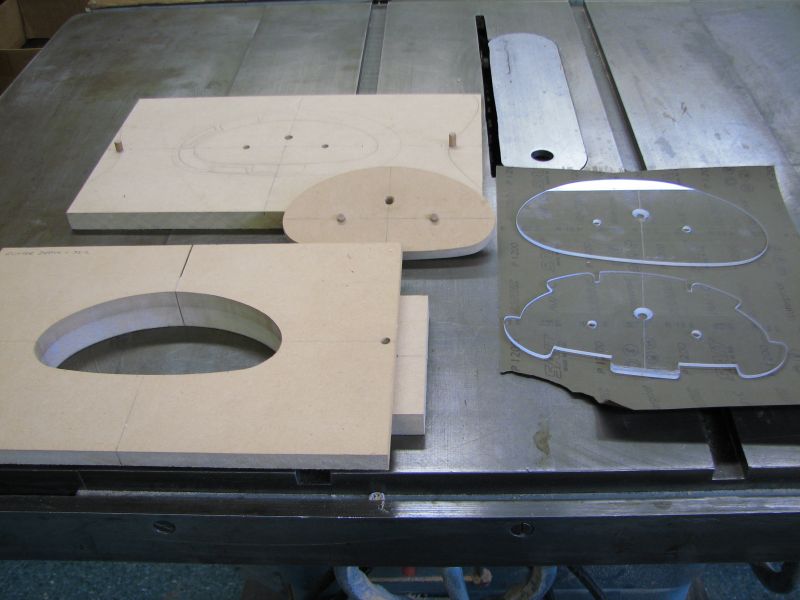
The piece in the foreground is the template that my pattern router bit will follow and cut the actual hole. The plate at the back is my "workboard" that has dowels each side to line up not only the hole template but after notching the excess on the edge of my soundboard, allows this to be located each time after removal. The other pieces are a spacer and the perspex template which will feature soon, these too have location dowels to accurately line each step up with the last
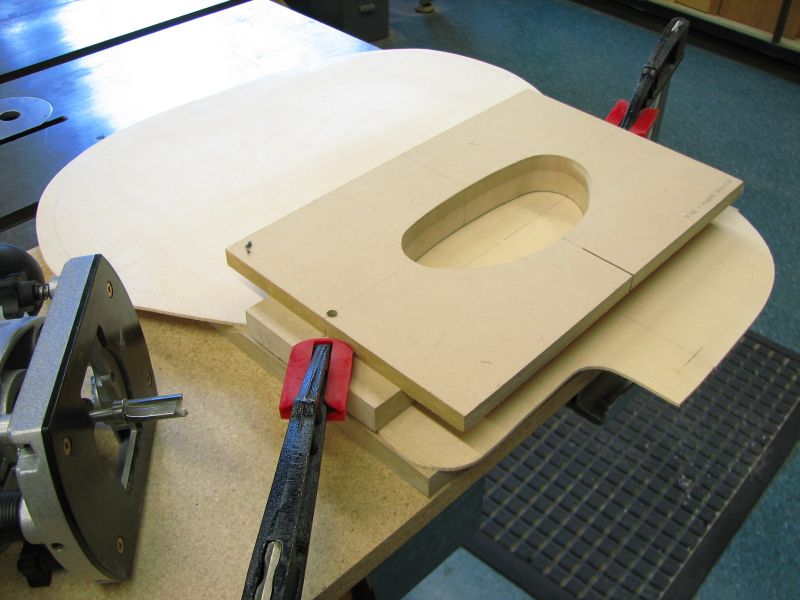
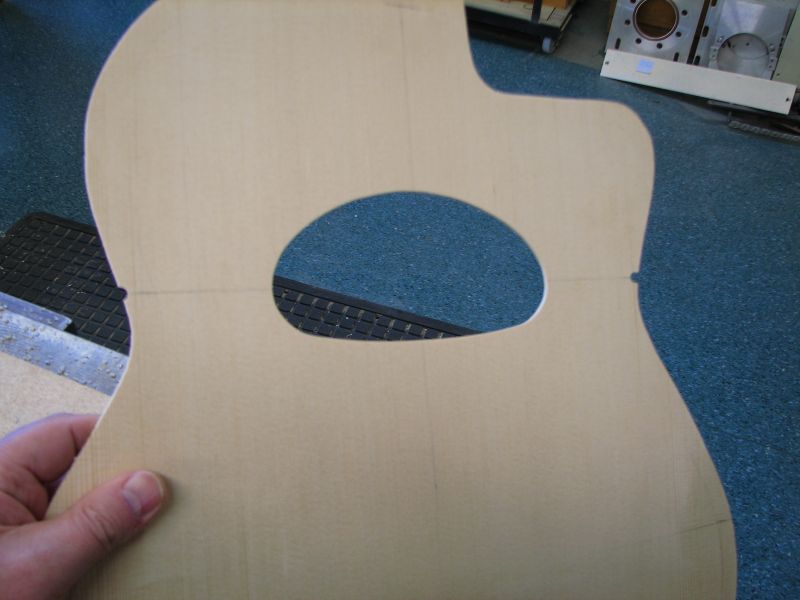
Hole template located with soundboard sandwiched and ready for cutting out the soundhole. Thirty seconds later et voila we have hole!
My spacer, which has the same shape as the soundhole was located and the first perspex template placed on it. This template cuts the channel for the first 'outline' purfling which is 1/16th (1.6mm)wide. My downcut bit also is 1/16th so the strip sits really snug into it. A picture showing the channel cut.
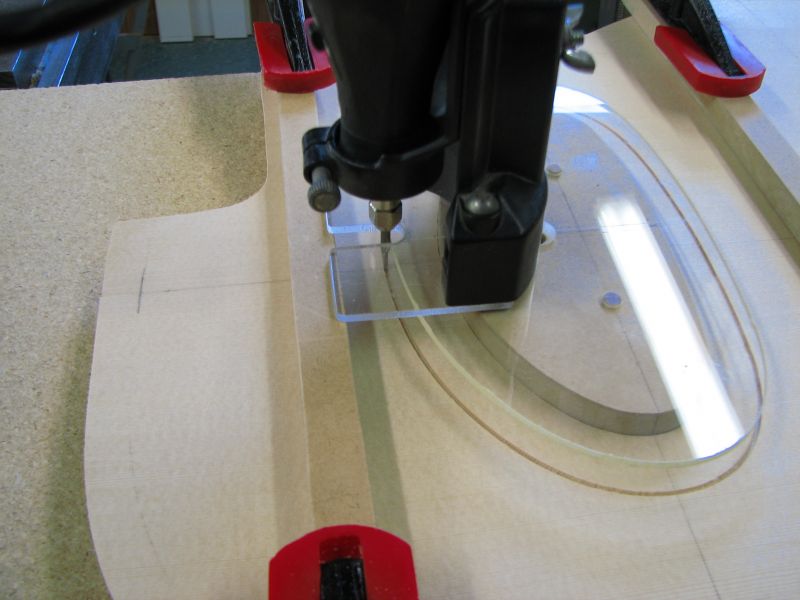
and with the spacer and pattern removed.
The beauty of this system (hope I'm not blowing smoke up me own arse here! ) is that it can be repeatedly taken apart and reassembled and always goes back exactly to the same location, guess my engineering experience comes in handy sometimes!
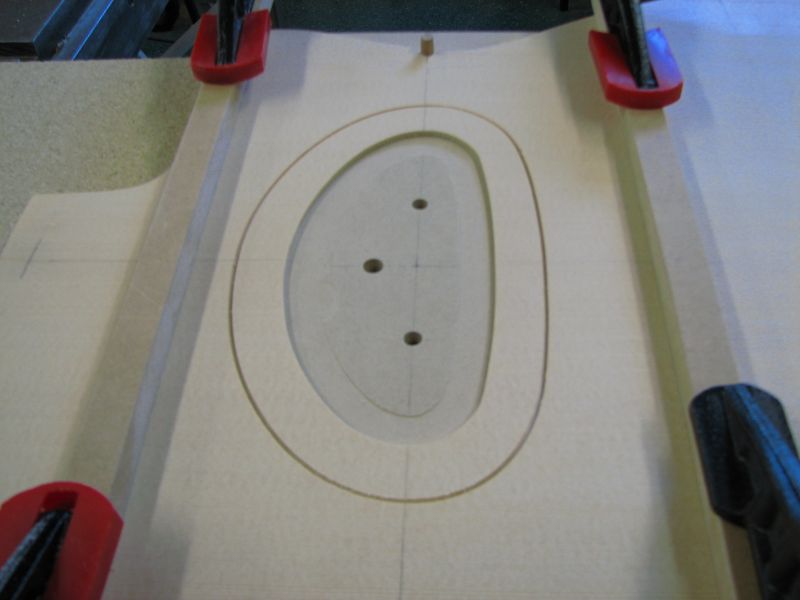
The outer purfling line was then glued in to help support the spruce that will end up only being 1/32 (0.8mm) once the inner purfling channel is cut.
Here's a pic of the inner pattern placed on the spacer and the channel cut.

Once this was cut I've started laying in the inner purfling lines in 'sections'
The 'almost' rectangular sections of the rosette I plan to inlay with some burl veneer but today I'll have to level off the purfling then finish the template for the insert shape as I plan to continue with the 1/32" theme and use this gap as a border between my inserts and the purfling. So more to come and I'll post the pics as I go.
The piece in the foreground is the template that my pattern router bit will follow and cut the actual hole. The plate at the back is my "workboard" that has dowels each side to line up not only the hole template but after notching the excess on the edge of my soundboard, allows this to be located each time after removal. The other pieces are a spacer and the perspex template which will feature soon, these too have location dowels to accurately line each step up with the last
Hole template located with soundboard sandwiched and ready for cutting out the soundhole. Thirty seconds later et voila we have hole!
My spacer, which has the same shape as the soundhole was located and the first perspex template placed on it. This template cuts the channel for the first 'outline' purfling which is 1/16th (1.6mm)wide. My downcut bit also is 1/16th so the strip sits really snug into it. A picture showing the channel cut.
and with the spacer and pattern removed.
The beauty of this system (hope I'm not blowing smoke up me own arse here!
The outer purfling line was then glued in to help support the spruce that will end up only being 1/32 (0.8mm) once the inner purfling channel is cut.
Here's a pic of the inner pattern placed on the spacer and the channel cut.
Once this was cut I've started laying in the inner purfling lines in 'sections'
The 'almost' rectangular sections of the rosette I plan to inlay with some burl veneer but today I'll have to level off the purfling then finish the template for the insert shape as I plan to continue with the 1/32" theme and use this gap as a border between my inserts and the purfling. So more to come and I'll post the pics as I go.
"Jesus Loves You."
Nice to hear in church but not in a Mexican prison.
Nice to hear in church but not in a Mexican prison.
-
John Steele
- Blackwood
- Posts: 155
- Joined: Fri Mar 06, 2009 4:58 pm
- Location: Wilson, NY. 14172
- Contact:
The rosette looks great there Nick. Be neat to see the final product. From the pics it looks like the router bit follows the template edge as a guide. Is there a bearing or just bit shaft? I can appreciate the complexity of making that inner pattern cut. Nice job.
J
J
"People who say it cannot be done should not interrupt those who are doing it"
George Bernard Shaw
George Bernard Shaw
-
Nick
- Blackwood
- Posts: 3628
- Joined: Thu Feb 26, 2009 11:20 am
- Location: Christchurch, New Zealand
- Contact:
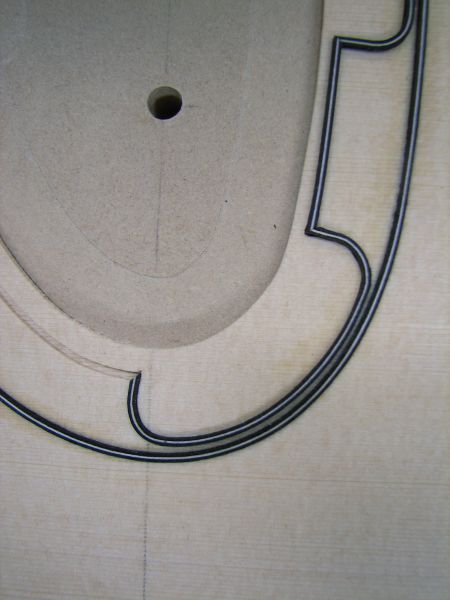
Thanks John, I just ran the 1/8th bit against the pattern sans bearing! The pattern has a line of masking tape around the edge to act as a bearing surface. As you can probably appreciate,running the fast spinning bit directly against the pattern causes too much heat and the perspex goes dog on me and starts melting! (from past experience.... a lesson learned!). I still haven't totally 'finalised' the veneer inserts yet but here's a couple more pics of the finished purfling.
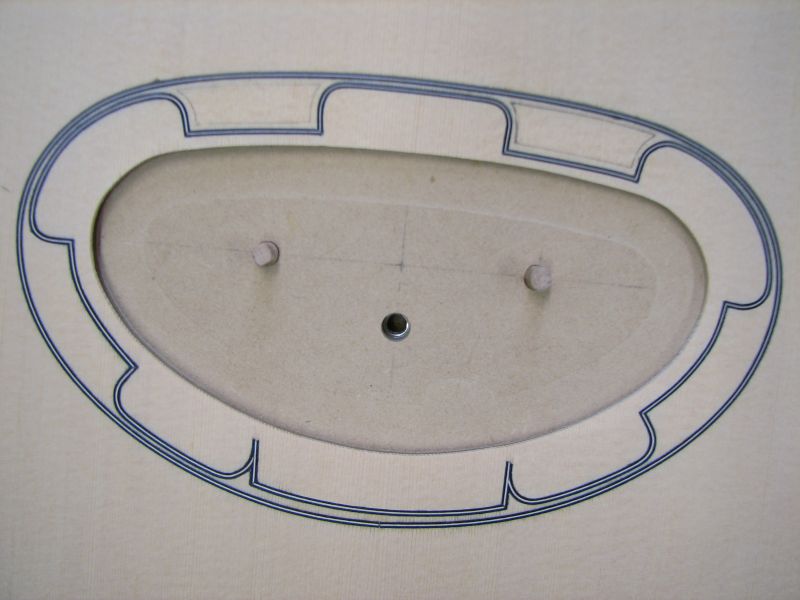
You can see I've penciled in where two of my inserts will sit.
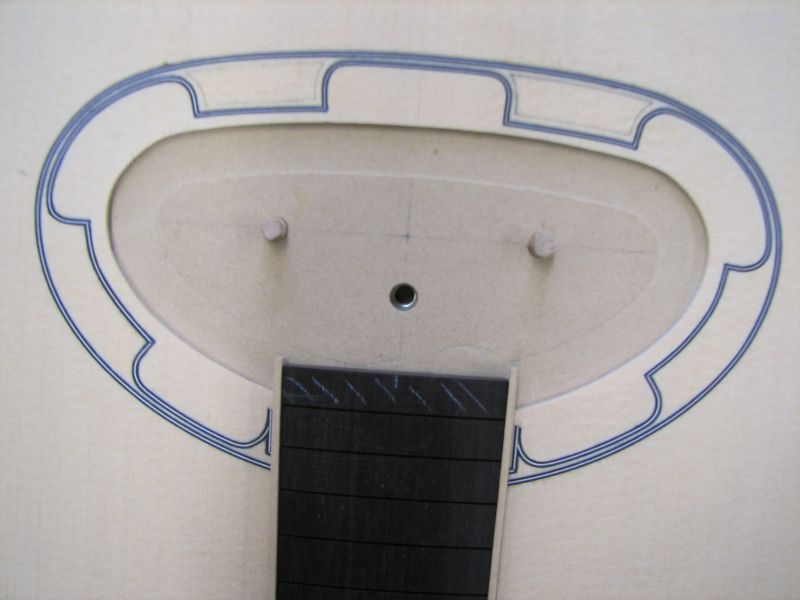
The two little straight sections I wanted to follow the taper of the fingerboard. here's a pic with a dummy fingerboard (finished one will be longer with 24 frets) and some binding added to give the general idea. I bothered doing the purfling piece between the two because I plan on doing a cantilevered fingerboard and so under there would be visible to some extent.
You can see I've penciled in where two of my inserts will sit.
The two little straight sections I wanted to follow the taper of the fingerboard. here's a pic with a dummy fingerboard (finished one will be longer with 24 frets) and some binding added to give the general idea. I bothered doing the purfling piece between the two because I plan on doing a cantilevered fingerboard and so under there would be visible to some extent.
"Jesus Loves You."
Nice to hear in church but not in a Mexican prison.
Nice to hear in church but not in a Mexican prison.

-
Nick
- Blackwood
- Posts: 3628
- Joined: Thu Feb 26, 2009 11:20 am
- Location: Christchurch, New Zealand
- Contact:
Thanks Allen but I'm begining to wonder if you were looking over my shoulderAllen wrote:At least throw us a bone, and tell us that you stuffed up a couple of tops before you got it to work out like that.
"Jesus Loves You."
Nice to hear in church but not in a Mexican prison.
Nice to hear in church but not in a Mexican prison.
Who is online
Users browsing this forum: Andos and 59 guests