
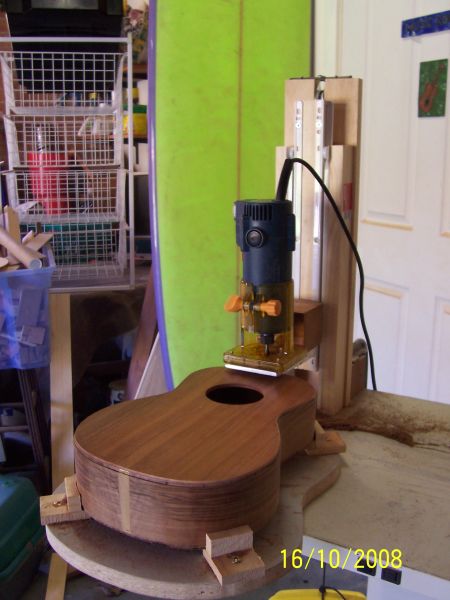
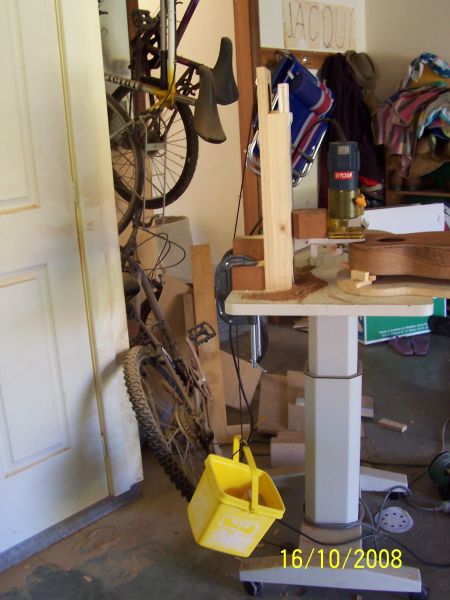
OK, I'm 3 instruments in to this luthiery thingy and I still can't seem to cut a clean Binding Channel.
I used a router for the flat body and a dremel for the archtops.
The router bit is from Stewmac and is sharp.
I think the problem is the router/dremel speed.
If I use a slow speed the bit grabs and tears at the wood.
If I use a fast speed the bit jumps and bounces when starting the cut.
On the Bunya top it really chipped away at it, almost like the wood is brittle.
With Blackwood it seems to grab the long grains and rip them out.
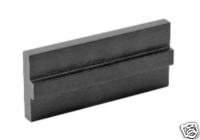
I use a purfling cutter to try to reduce any tearing beyong the binding area, but am left with lots of clean up to do.
So, do I blame the tools or the operator?
Craig
Routing Binding Channels 101
-
Pete Brown
- Blackwood
- Posts: 115
- Joined: Tue Dec 09, 2008 1:15 pm
Hi Craig
If you haven't already found them, have a look at the YouTube videos referenced on the following thread over at the OLF. http://www.luthiersforum.com/forum/view ... 17&t=19654
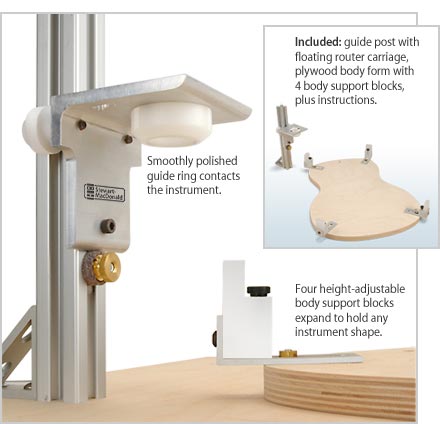
If you already own a router or laminate trimmer, the effort and expense to knock up a binding jig such as the one shown isn't that significant.
Dremels are generally considered underpowered for tasks like this, however, if you must use one, cut the channels in several passes until the required depth is reached.
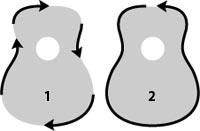
Whether you use a router or a Dremel, make sure you start them off the wood then ease into the cut with them running at full speed. Also, make sure you cut in the direction suggested in the videos or on this graphic:
At some time or another - where jigs and tools are concerned - you'll be faced with the choice between getting by or getting serious. I still find that the learning curve is steep enough without putting unnecessary obstacles in my way!
Good luck.
If you haven't already found them, have a look at the YouTube videos referenced on the following thread over at the OLF. http://www.luthiersforum.com/forum/view ... 17&t=19654
If you already own a router or laminate trimmer, the effort and expense to knock up a binding jig such as the one shown isn't that significant.
Dremels are generally considered underpowered for tasks like this, however, if you must use one, cut the channels in several passes until the required depth is reached.
Whether you use a router or a Dremel, make sure you start them off the wood then ease into the cut with them running at full speed. Also, make sure you cut in the direction suggested in the videos or on this graphic:
At some time or another - where jigs and tools are concerned - you'll be faced with the choice between getting by or getting serious. I still find that the learning curve is steep enough without putting unnecessary obstacles in my way!
Good luck.

This is the way I cut mine (in the graphic that is). I always take the time to chalk in the direction that I'm to cut, and have a good look at the grain taking note to start my cut in the right spot in relation to the way the grain is oriented. The less things you need to think about when doing this of work, when so much can go wrong in the blink of an eye, the better.
I use LMI's binding cutter in a laminate trimmer. I occasionally get a bit of chipping of the grain in some top woods, and have had a piece or two of very brittle side wood break away on me. All things that you learn to fix up the best you can as you go along.
I use LMI's binding cutter in a laminate trimmer. I occasionally get a bit of chipping of the grain in some top woods, and have had a piece or two of very brittle side wood break away on me. All things that you learn to fix up the best you can as you go along.
-
Pete Brown
- Blackwood
- Posts: 115
- Joined: Tue Dec 09, 2008 1:15 pm
Like Allen, I had minor chipping of my last set of sides when cutting in the direction indicated above. It's kind of comforting to hear that it happens to other people too!
When you think about it, the graphic shows how to avoid tear-out in the top by climb-cutting where necessary on the first pass, but doing so doesn't necessarily guarantee that the sides won't chip, particularly if the grain in the sides isn't parallel to the plane of the top and/or back and runs up into the bit as it advances around the top or back.
On my next attempt - a wildly-figured Claro Walnut body - I plan on setting the laminate trimmer to cut half the height of the bindings and will cut in the direction indicated on the graphic above. I'll then cut to full height, but will climb-cut the whole way around, i.e., move the trimmer in a clockwise direction around the perimeter of the top. A final pass in an anti-clockwise direction should clean up any fuzz. This is all theory of course, so please take it with a grain of salt.
As I cut the purfling channels last, I can simply follow the example in the graphic once again.
-
graham mcdonald

- Blackwood
- Posts: 473
- Joined: Thu Oct 25, 2007 11:57 am
- Location: Canberra
- Contact:
Craig,
Both Bunya and Blackwood are among the trickier timbers to cut for binding ledges. As you have found they can be brittle and splintery. A good deep cut with a purfling cutter helps, but is not a total guarantee. While it can be good for the soul to find ways to invisibly fill the tearout bits, it is preferable not to have to. I can't remember what your router setup is, but several shallow passes are much safer than one full depth one. Give me a call next time you have the router out and we can work out what might be going wrong
cheers
Graham McDonald
http://www.mcdonaldstrings.com
http://www.mcdonaldstrings.com

Thanks for the advice guys.
I'm aware of the routing direction (think I first saw it on the Stewmac help site). As you say, it makes logical sense not to cut uphill against the grain.
Pete, what you've said about the dremel being under powered has rung a bell. If I remeber right the dremel is designed for high speed at a cost to torque.
I saw a first timer cut a near perfect channel with a cheap laminate trimmer! Really started me thinking the problem was me.
To manage the carved instuments I'd have to try to knock up something like stewmac's true channel jig. (I certainly can't afford to buy it).
I'll let you all know how I go
Cheers
Craig
-
Pete Brown
- Blackwood
- Posts: 115
- Joined: Tue Dec 09, 2008 1:15 pm
The low-cost alternative is to copy the design offered by LMII at http://www.lmii.com/CartTwo/thirdproduc ... ng+MachineCraig Clancy wrote:To manage the carved instuments I'd have to try to knock up something like stewmac's true channel jig. (I certainly can't afford to buy it).
They also sell plans, but with a pair of drawer slides, some MDF and and a little imagination, I'm sure you can get by without them.
Last edited by Pete Brown on Sat Feb 14, 2009 1:16 am, edited 1 time in total.
-
DarwinStrings

- Blackwood
- Posts: 1873
- Joined: Thu Nov 13, 2008 10:27 pm
- Location: Darwin
Dave White is a member here Craig and he has posted his binding rebate jig on his website. You may not use his design but adding a little more info and a few more ideas can't hurt you decision making when it comes to building a fancy jig. Here is his web site http://www.defaoiteguitars.com good luck with the jig.
Jim
Jim
I just had a look at the LMII Binding Cutter and, thanks to Pete mentioning it, realised I have 2 drawer slides amongst the stuff stacked in the workshop loft (ala taffy & his recycling).
After this last build I have to give the credit card a few months to catch it's breath, so I intend to try knocking up a few jigs and this will be the first.
(Jim, I still need to look further into the Dave White design)
Will let you all know how it performs when built and given a few practice runs.
Since I will need to get a new laminate trimmer can anyone suggest what the minimum power should be? (the credit card never really gets a break, does it)
-
DarwinStrings
- Blackwood
- Posts: 1873
- Joined: Thu Nov 13, 2008 10:27 pm
- Location: Darwin
I use a Makita Craig, the one with the metal housing, they are 440watt but also $300. I'm not sure that power it a main concern, some of the cheaper ones have bad bearing housings or just bushes which may be ok when they are new but if you get a bit of slap in the bearing then you won't get the best cut. I have noticed on ebay the Makita now make a cheaper version called Maktec it is metal housed too with the same base plate and guide but $140.
Maybe find it on ebay and ask him some questions about the difference between it and the Makita at twice the price. Someone else maybe able to suggest a cheap one that they have first hand experience with.
Jim
Maybe find it on ebay and ask him some questions about the difference between it and the Makita at twice the price. Someone else maybe able to suggest a cheap one that they have first hand experience with.
Jim
-
Mike Thomas

- Blackwood
- Posts: 228
- Joined: Fri Jan 30, 2009 1:34 pm
- Location: Adelaide
StewMac vs LMI binding cutter jig
I'm a new member here, much impressed by the wealth of expertise on this forum. My first question (I anticipate there being many more) relates to the Ribbecke style binding cutter jigs sold by StewMac and LMI. I am likely to be buying one of these, or making something similar, in the near future. I have the LMI plan if I decide to build; but if I go for ready made I would like to know if there are any strong preferences for either the StewMac or the LMI version. My impression from the catalogues is that the StewMac version may be better. Mike Thomas.
Mike Thomas
"There are some enterprises in which a careful disorderliness is the true method"
"There are some enterprises in which a careful disorderliness is the true method"
-
DarwinStrings
- Blackwood
- Posts: 1873
- Joined: Thu Nov 13, 2008 10:27 pm
- Location: Darwin
Craig buddy cutting bindings is always problematic for builders until we jig-up with some special jigs.
Here are 3 possibilities for you from high-tech to low-tech. In all cases something that is often not addressed by newer builders is the importance of truing up the sides perfectly flat prior to cutting the binding channels. Since most methods register off the sides any imperfections in the sides that the binding jig registers off from will show up as an imperfection in the binding channels.
With this said a great tip that I got from Mario, a superb Canadian builder, is to cut a very shallow binding channel just deep enough to take the top and back plates less than flush and out of play. With the end grain of the top and back plates out of play truing up your sides with a flat block and 120 grit is FAR easier and way faster.... Also, the climb cuts as per the diagram above, are always how you want to make any binding cuts including the initial shallow passes.
Here are the jigs:
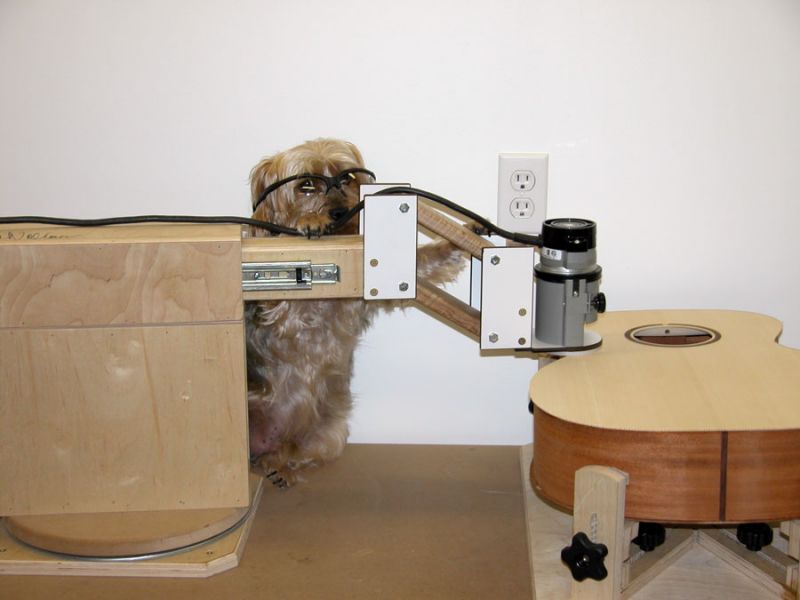
First is the William's jig, much like Dave's but without his mod. It's so very easy to use that even a Yorkie can do it....
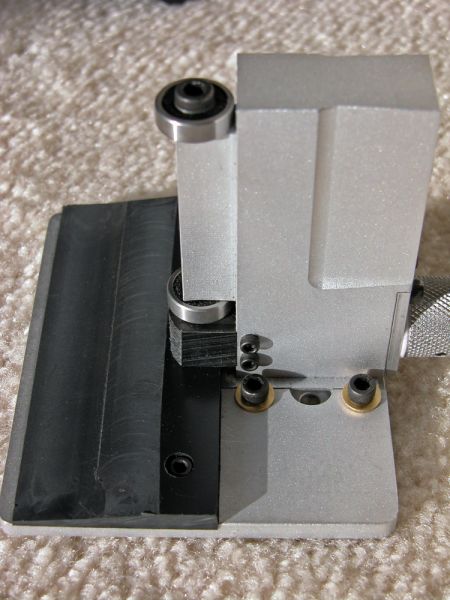
Next this type is a commercially available jig from Luthier Tools. Lots of folks like these and I would have too if the possibility for the thing to lean inward and take a divot out of your back or top did not exist.
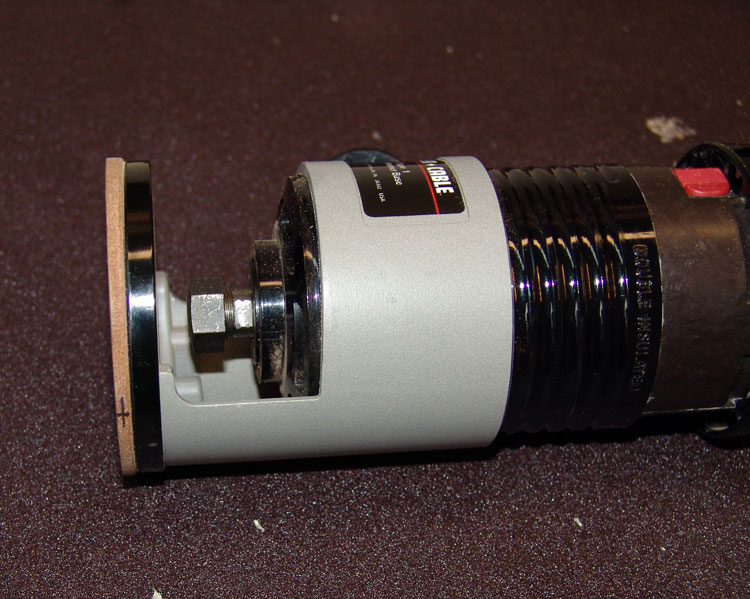
Lastly this is just a double stick taped wedge on the bottom of a Laminate trimmer. Very low-tech but if you calculate the angle of the wedge needed to match the respective dome of your top and back, you need two wedges, these things can do a decent job for very little money and effort. Note the marks on the thinnest part? These marks should be always toward the peak of the dome when routing around the guitar. So you rotate the Laminate trimmer in your hand keeping the marks pointed correctly much like a draftsman will twirl a pencil to keep the point sharp.
Dremels as others have said are just not powerful enough for routing binding channels.
Here are 3 possibilities for you from high-tech to low-tech. In all cases something that is often not addressed by newer builders is the importance of truing up the sides perfectly flat prior to cutting the binding channels. Since most methods register off the sides any imperfections in the sides that the binding jig registers off from will show up as an imperfection in the binding channels.
With this said a great tip that I got from Mario, a superb Canadian builder, is to cut a very shallow binding channel just deep enough to take the top and back plates less than flush and out of play. With the end grain of the top and back plates out of play truing up your sides with a flat block and 120 grit is FAR easier and way faster.... Also, the climb cuts as per the diagram above, are always how you want to make any binding cuts including the initial shallow passes.
Here are the jigs:
First is the William's jig, much like Dave's but without his mod. It's so very easy to use that even a Yorkie can do it....
Next this type is a commercially available jig from Luthier Tools. Lots of folks like these and I would have too if the possibility for the thing to lean inward and take a divot out of your back or top did not exist.
Lastly this is just a double stick taped wedge on the bottom of a Laminate trimmer. Very low-tech but if you calculate the angle of the wedge needed to match the respective dome of your top and back, you need two wedges, these things can do a decent job for very little money and effort. Note the marks on the thinnest part? These marks should be always toward the peak of the dome when routing around the guitar. So you rotate the Laminate trimmer in your hand keeping the marks pointed correctly much like a draftsman will twirl a pencil to keep the point sharp.
Dremels as others have said are just not powerful enough for routing binding channels.
My take on the binding channel cutting problem is this
-A laminate trimmer is the right tool because it is powerful, light and fast. Speed is essential to get clean cuts.
-A downcut spral bit helps to get cleaner cuts compared to a straight bit
I cut my first instruments channels by hand with a purfling cutter knife ( too much hard work)
The second was with a handheld trimmer with a base registering on the sides with two bearings.(still the danger of tipping inwards)
The next and all after are with a post/ slide mounted trimmer
set the body up on a plate and move it into the trimmer. WORKS GREAT
I used the baseplate from the handheld jig but with the bottom bearing removed. I could have used the guide that came with the trimmer.
I used a pulley wheel at the top and a counterweight to lessen the pressure on the face of the guitar.
You have the choice when using this type of rig to use the stewmac bits with the attached bearing or a separate bearing. Having experienced a seized router bearing in the past, I preferred to use the separate guide bearing. you do need to keep the body edge perpendicular to the jig (or the cut will be shallow), but this is easy and you can go around again if needed.
-
DarwinStrings
- Blackwood
- Posts: 1873
- Joined: Thu Nov 13, 2008 10:27 pm
- Location: Darwin
-
Pete Brown
- Blackwood
- Posts: 115
- Joined: Tue Dec 09, 2008 1:15 pm
-
Mark McLean

- Blackwood
- Posts: 1174
- Joined: Thu Apr 10, 2008 2:03 pm
- Location: Sydney
He remembers to use eye protection. That makes him smarter than a lot of humans.Hesh1956 wrote:Yeah Jim my friend he is not all that bright sometimes but he tries hard.....Toejam wrote:The Yorkie ( is that Yorkshire terrier?) is not looking to bright Hesh, it seems he/she has forgotten to plug the router in.
Jim
Mark


Craig,
I'm stealing Stew Mac's version of a binding jig.
Granted it isn't built yet, but I have all the bits and pieces now to put it together. The pillar is T-slot extruded aluminum that I got off of eBay. Shipping was more than the part and shipping wasn't bad.

I picked up a piece of aluminum angle for a few dollars and then I stalled trying to figure out how to mount the wheels. Not working for me, so I decided to ditch the wheels and go with linear bearings, which in reality are nothing more than pieces of some sort of plastic that fits into the slot. No wiggle no need to figure out the depth and the width.
These will get mounted on a plate that will be screwed into the side of the angle piece. I'll probably put one behind the angle plate as well.
I'm stealing Stew Mac's version of a binding jig.
Granted it isn't built yet, but I have all the bits and pieces now to put it together. The pillar is T-slot extruded aluminum that I got off of eBay. Shipping was more than the part and shipping wasn't bad.
I picked up a piece of aluminum angle for a few dollars and then I stalled trying to figure out how to mount the wheels. Not working for me, so I decided to ditch the wheels and go with linear bearings, which in reality are nothing more than pieces of some sort of plastic that fits into the slot. No wiggle no need to figure out the depth and the width.
These will get mounted on a plate that will be screwed into the side of the angle piece. I'll probably put one behind the angle plate as well.

Looks like the cover of ELP's great album "Brain Salad Surgery"Craig Clancy wrote:This is great. So many ways to achieve the same result. Keep them coming. A perfect soup of ideas stewing in my brain - for real - here's the picture to prove it!
(That really is me. Now you all know what I look like)
Who is online
Users browsing this forum: No registered users and 255 guests