My Weissenborn/Resonator Guitar

Talk about musical instrument construction, setup and repair.

Moderators: kiwigeo, Jeremy D

Post Reply
josh_cain
Sassafras
Posts: 47
Joined: Wed Sep 24, 2008 9:20 am
Contact:

My Weissenborn/Resonator Guitar

Post by josh_cain » Wed Sep 24, 2008 8:44 pm

Hi Guys,
I mentioned this guitar in another thread and Allen and Richard have suggested i make my own for it.

Its my year 12 design and technology final piece and im happy to say im nearly finished.

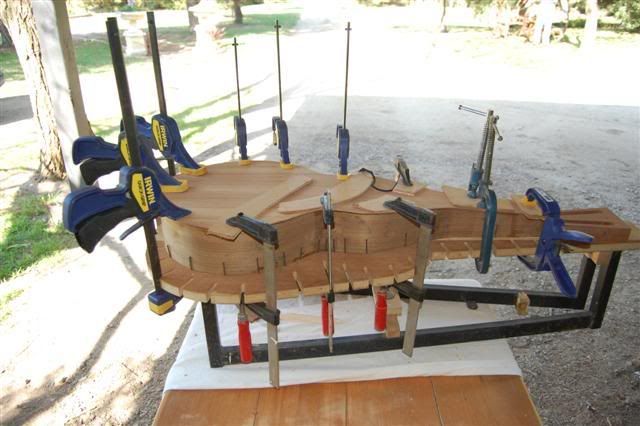
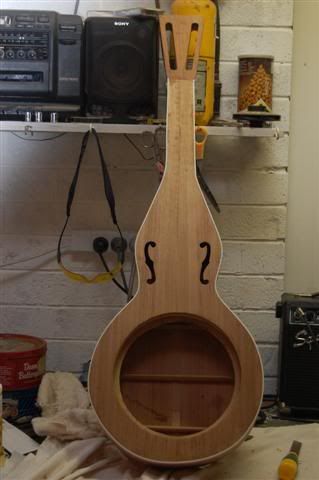
Its a small bodied design and has a 9.5inch cone (cheapy from stewmac)
the top and back are made from Mahogany (a recycled bench top) and the sides are Blackwood (bought from and bent by Tim Kill)

im using a Biscuit style bridge simply because the soundwell is a lot easier to make (time is of the essence in year 12)

As this is my first build and i dont have much experience in guitar construction, i bought a book called Build a Weissenborn, by Terry BUdell which has been really handy.

I have also had a lot of help from Tim Kill, who bent my sides and had me up to his workshop a few times to give me guidance which has been a real help.

i also borrowed a mould, which has made the build a lot easier and kept the sides in shape before the back was glued on.

i opted for a slotted headstock because i like the look of them, but am using normal machine heads turned upside down (so it can be tuned easily when sitting on the lap)

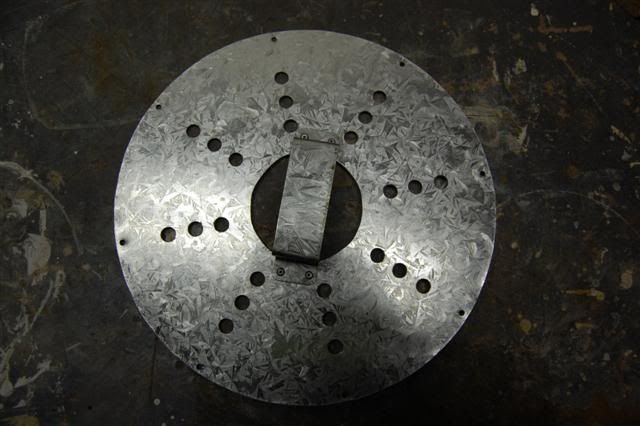
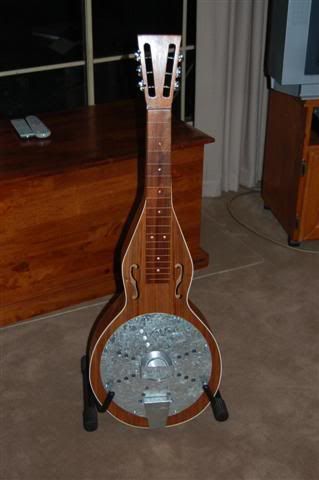
For the coverplate and tailpiece i am using rusted galvinised iron (similar to Donmo Rustbuckets), as i wanted the guitar to look old (part of the subject requires you to have a theme/style- mine was recycled and vintage materials) I'm going to use rusted screws for the fretboard markers as well which i hope looks good.

Image

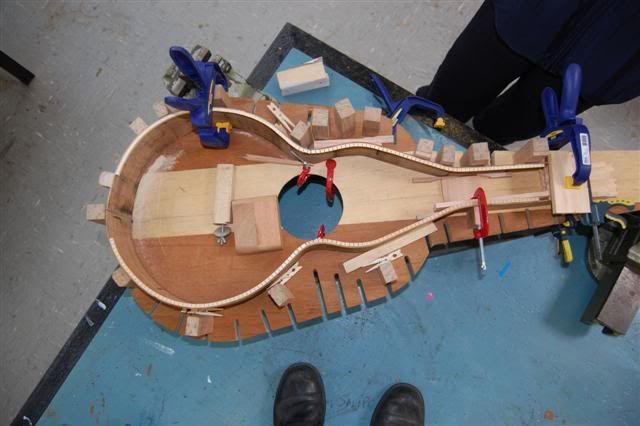
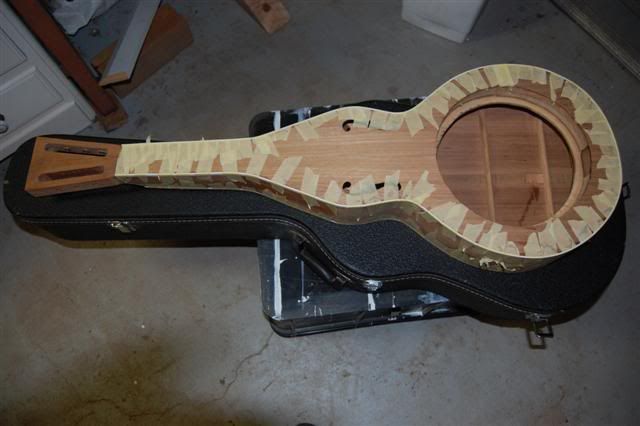
thats the best photo i have of the shape at the moment, but ill try and take a few tomorrow now the back and headstock are in.

any suggestions and criticisms are most welcome!


cheers,
Josh.

User avatar
sebastiaan56
Blackwood
Posts: 1283
Joined: Sun Oct 28, 2007 5:23 am
Location: Blue Mountains

Post by sebastiaan56 » Thu Sep 25, 2008 4:58 am

Onnya Josh,

Love the recycling concept and the rusty markers should give it an edge. Year 12 sucks I know but its the last spurt and then you can get on with your life.

If you want any rusty strings PM me......
make mine fifths........

User avatar
Allen
Blackwood
Posts: 5259
Joined: Thu Oct 11, 2007 5:39 pm
Location: Cairns, Australia
Contact:

Post by Allen » Thu Sep 25, 2008 5:51 am

I really like the concept you've gone with here. Have you seen the chemical treatments that you can buy to give metal a antique patina? Like aged copper, or rusty steel. Might be appropriate for the resonator cover.

I'm looking forward to seeing more shots.
Allen R. McFarlen
https://www.brguitars.com
Facebook
Cairns, Australia

User avatar
Kim
Admin
Posts: 4372
Joined: Wed Sep 26, 2007 8:32 pm
Location: South of Perth WA

Post by Kim » Thu Sep 25, 2008 7:54 am

Welcome to the ANZLF Josh,

Looking good so and with the demands of year 12 you are wise to concentrate on the things you need to get the job done and keep cost down such as pre-bent sides etc.

Cheers

Kim

User avatar
ozziebluesman
Blackwood
Posts: 1550
Joined: Wed Oct 10, 2007 9:12 am
Location: Townsville
Contact:

Post by ozziebluesman » Thu Sep 25, 2008 9:58 am

As I have already said, great innovation there Josh. I look forward to watching this one take shape.

Cheers

Alan

josh_cain
Sassafras
Posts: 47
Joined: Wed Sep 24, 2008 9:20 am
Contact:

Post by josh_cain » Sun Sep 28, 2008 10:25 pm

MAJOOOR setback today..


went to glue the back and top on and found a bunch of splits in the wood so now ive wasted a shitload of time bracing and shaping f holes for nothing.

pretty bloody annoyed as you can imagine. im getting some better wood from tim kill this week hopefully.

my old man had a look at the timber i had and was amazed anyone would give it to me to build somehting fragile with.....he pointed out a bunch of knots and twists. makes me angry that my teacher wouldve let me use it...

but thats working with wood i suppose. pitty it had to happen when ive only got a few weeks before its gota be handed in.....
Josh.

User avatar
Allen
Blackwood
Posts: 5259
Joined: Thu Oct 11, 2007 5:39 pm
Location: Cairns, Australia
Contact:

Post by Allen » Mon Sep 29, 2008 5:33 am

How about posting some pictures of the cracks in the top. There's not a lot that can't be fixed. There are some very talented repair people here on the forum, and it's worth getting some more opinions.

Sometimes its a problem with materials, and more often than not, it's a problem with the technique or execution. When you're building things like this, all kinds of little problems like this will pop up, and part of building is learning how to fix them. I've learnt far more by having to fix the stuff ups than when things went smooth without a hitch.
Allen R. McFarlen
https://www.brguitars.com
Facebook
Cairns, Australia

User avatar
kiwigeo
Admin
Posts: 10778
Joined: Sat Sep 29, 2007 5:57 pm
Location: Adelaide, Sth Australia

Post by kiwigeo » Mon Sep 29, 2008 11:27 am

Welcome to the world of luthiery Josh. Not alot of things go to plan when you're starting out.

Some pics of the top and back would be handy.

josh_cain
Sassafras
Posts: 47
Joined: Wed Sep 24, 2008 9:20 am
Contact:

Post by josh_cain » Fri Oct 03, 2008 10:09 am

i took the timber to tim kill the other day and he said it was only really good for kindling which was dissapointing. I just wish it had've split before i spent hours carving out the f-holes and doing the bracing.

but i was lucky and was able to get some new timber from Tim so im almost back to where i was a week ago.

Image

i glued the back on yesterday and will brace the top today (ran out of clamps).

for my next build i will definately be buying more Quick Grip clamps, theyre so easy to use.
Josh.

User avatar
Craig
Admin
Posts: 1090
Joined: Wed Sep 26, 2007 10:08 am
Location: N.S.W. in the bush

Post by Craig » Fri Oct 03, 2008 10:41 am

G'day Josh ,

I'm sure you're already aware of this , but just in case ,, You want to do all your glueing jobs when the humidity is down to 50 % or preferably a bit lower ( in the 40's ).
Wood contracts and expands with humidity fluctuations , so tis better to glue up in a medium % to avoid deformation at extreme humidities

Looking bloody good thus far though Josh . Set backs are the best learning curves and you'll look back at them in jest as time goes by ,,,( I promise :lol: )

Cheers Mate
Craig Lawrence

josh_cain
Sassafras
Posts: 47
Joined: Wed Sep 24, 2008 9:20 am
Contact:

Post by josh_cain » Thu Oct 09, 2008 6:20 pm

Bit of an update-
The box is now closed. binding is on, fretboard is ready to glue, coverplate/tailpiece are made and the whole thing is ready to be oiled.

Image
there's the coverplate. made from .6mm galv sheet. i decided not to rust it for two reasons- 1. it takes too long to do. and 2. the rust paint stuff costs $150 for the smallest kit. i played around with hydrochloric acid on some off cuts and got some cool rusty effects but i just dont have time to do it all properly.

Image
Binding is on- tim kill helped me cut the channel which made life a heap easier. i glued it with super glue, next time i will definately be more careful when doing this----it takes forever to get the excess glue off!!!
but it looks good now so im not too worried about it

Image
I was really lucky with the fretboard- tim kill gave me a spare one that he had that was already slotted. I used a plastic home brand ice cream container for the markers which was suggested by tim and worked really well.

Image


Should be oiled, cone installed and assembled on sunday...its exciting at this stage isnt it!

josh
Josh.

User avatar
Allen
Blackwood
Posts: 5259
Joined: Thu Oct 11, 2007 5:39 pm
Location: Cairns, Australia
Contact:

Post by Allen » Thu Oct 09, 2008 6:28 pm

Exciting for sure. It's turning into a really interesting guitar. Can't wait to see the completed instrument.
Allen R. McFarlen
https://www.brguitars.com
Facebook
Cairns, Australia

User avatar
ap404
Myrtle
Posts: 99
Joined: Mon Feb 25, 2008 1:33 am
Location: Brisbane
Contact:

Post by ap404 » Thu Oct 09, 2008 7:04 pm

Great design !

AP

josh_cain
Sassafras
Posts: 47
Joined: Wed Sep 24, 2008 9:20 am
Contact:

Post by josh_cain » Sun Oct 12, 2008 10:59 pm

ITS DONE! finally! :D

ill upload more pics tomorrow.

Image
Josh.

User avatar
ozziebluesman
Blackwood
Posts: 1550
Joined: Wed Oct 10, 2007 9:12 am
Location: Townsville
Contact:

Post by ozziebluesman » Mon Oct 13, 2008 12:01 am

Congratulations Josh, that is one innovative guitar. You should be very proud! It is going to be interesting to hear this guitar. Hope we get a chance to!

Thanks for sharing with us! So what's the next build?

Cheers

Alan

User avatar
Lillian
Blackwood
Posts: 1702
Joined: Fri Sep 28, 2007 10:31 pm
Location: New Mexico, USA
Contact:

Post by Lillian » Mon Oct 13, 2008 2:13 am

Way cool. More pictures and sound clips too please.

I do hope you are proud. You should be.

User avatar
Craig
Admin
Posts: 1090
Joined: Wed Sep 26, 2007 10:08 am
Location: N.S.W. in the bush

Post by Craig » Mon Oct 13, 2008 7:58 am

G'day Josh ,

Congratulations ! . That is very very cool. I love the design!

Fantastic effort ! :cl
Craig Lawrence

User avatar
kiwigeo
Admin
Posts: 10778
Joined: Sat Sep 29, 2007 5:57 pm
Location: Adelaide, Sth Australia

Post by kiwigeo » Mon Oct 13, 2008 7:46 pm

Looking good there Josh.

Just one question....have you been using Aquadhere PVA for all your joints or just for the fret markers in the photo above?

Cheers Martin

User avatar
sebastiaan56
Blackwood
Posts: 1283
Joined: Sun Oct 28, 2007 5:23 am
Location: Blue Mountains

Post by sebastiaan56 » Mon Oct 13, 2008 7:51 pm

Hi Josh,

That is one hot looking instrument mate!
make mine fifths........

josh_cain
Sassafras
Posts: 47
Joined: Wed Sep 24, 2008 9:20 am
Contact:

Post by josh_cain » Mon Oct 13, 2008 8:30 pm

kiwigeo wrote:Looking good there Josh.

Just one question....have you been using Aquadhere PVA for all your joints or just for the fret markers in the photo above?

Cheers Martin
thanks guys!

Alan, next build will either be a weissenborn or an 000.

Martin, yes i have used aquadhere for all joints except the bracing (used titebond). was that a bad move?

jc
Josh.

User avatar
Kim
Admin
Posts: 4372
Joined: Wed Sep 26, 2007 8:32 pm
Location: South of Perth WA

Post by Kim » Mon Oct 13, 2008 9:06 pm

Fantastic work Josh, congratulations M8.

I really like your design it is very clever and you ability to make the most of what is at hand will no doubt see you go forward very quickly as a builder.

Well done 8)

Kim

User avatar
Allen
Blackwood
Posts: 5259
Joined: Thu Oct 11, 2007 5:39 pm
Location: Cairns, Australia
Contact:

Post by Allen » Mon Oct 13, 2008 9:32 pm

It really looks good. I hope that you can post some more detail pictures. I'd love to have a closer look at it.
Allen R. McFarlen
https://www.brguitars.com
Facebook
Cairns, Australia

Richard
Myrtle
Posts: 75
Joined: Tue Feb 19, 2008 7:12 pm
Location: Brisbane
Contact:

Post by Richard » Tue Oct 14, 2008 12:47 pm

Looking very nice. I'm guessing influenced by Tim's pear-shaped models but you've given it your own unique look. Going with f-holes on your first is particularly daring/commendable.

With CA/supergluing palstic binding, to cut down on mess I'd recommend using less of a stronger tape (the binding tape most suppliers sell is perfect and fairly inexpensive) and cleaning it with a scraper. Sanding is hard work but a scraper takes care of the job in minutes... just be careful not to gouge the top/back with the corners as you go.

josh_cain
Sassafras
Posts: 47
Joined: Wed Sep 24, 2008 9:20 am
Contact:

Post by josh_cain » Tue Oct 14, 2008 4:02 pm

Ill have to wait to get it back from the assesors before I can take some photos.

Richard, yes it was inspired by Tim's Pear Shape, but with a bigger base (and rounder to make the coverplate look in proportion) and thinner 'shoulders'.

The 'f' holes were suprisingly not that difficult to do. I just printed a template off the net, then stuck it to some cardboard and cut it out. Then i measures where i wanted them to go and drew lines straight across the whole top of the guitar to make sure they were even. Then I drew them on a ndcut them out with a dremel, then used some tiny files and a bit of sandpaper to make the cuts smooth
Josh.

Post Reply

Who is online

Users browsing this forum: No registered users and 189 guests