thanks guys ..
Graham that sounds like what I've been reading..
so basically prior to fretting if i lay a straight edge on the fingerboard it should sit right on top of the bridge. Does this sound right
(given that the medium frets I'm using are about 1.1mm in height) ...
then once fretted should get the right clearance.
sounds like i will have to make my bridge thickness around 7.7/7.8mm ..Sounds like that maybe right on the borderline of bridge thickness .
thanks guys,
Grant
Bridges..How to?

-
Dave White

- Blackwood
- Posts: 452
- Joined: Mon Nov 12, 2007 3:10 am
- Location: Hughenden Valley, England
- Contact:
Grant,
Around 8mm or a tad over and I think you will be fine. You need the straight edge to be slightly higher than the top of the bridge (like Graham said) to allow for the string pull on the neck. With your 7.7mm plus 1.1mm fret height the extra 0.8mm should allow for this and bring the straight edge close to the top of the bridge. Then your saddle height above the bridge is determined by the action in the centre of the fretboard. If you want a low action, say 4/64" (1.59mm) then your saddle will be 8/64"(3.19mm) above the top of the bridge, and your strings will be 28/64" (11.19mm) above the top of the soundboard at the bridge. If you want a high action, say 6/64" (2.38mm) then your saddle will be 12/64"(4.76mm) above the top of the bridge, and your strings will be 32/64" (12.76mm) above the top of the soundboard at the bridge.
Around 8mm or a tad over and I think you will be fine. You need the straight edge to be slightly higher than the top of the bridge (like Graham said) to allow for the string pull on the neck. With your 7.7mm plus 1.1mm fret height the extra 0.8mm should allow for this and bring the straight edge close to the top of the bridge. Then your saddle height above the bridge is determined by the action in the centre of the fretboard. If you want a low action, say 4/64" (1.59mm) then your saddle will be 8/64"(3.19mm) above the top of the bridge, and your strings will be 28/64" (11.19mm) above the top of the soundboard at the bridge. If you want a high action, say 6/64" (2.38mm) then your saddle will be 12/64"(4.76mm) above the top of the bridge, and your strings will be 32/64" (12.76mm) above the top of the soundboard at the bridge.
Dave White
[url=http://www.defaoiteguitars.com]De Faoite Stringed Instruments[/url]
[url=http://www.defaoiteguitars.com]De Faoite Stringed Instruments[/url]
-
graham mcdonald
- Blackwood
- Posts: 473
- Joined: Thu Oct 25, 2007 11:57 am
- Location: Canberra
- Contact:
I have always done it with the frets in, but I make my necks in a funny way anyway, so I can alter the neck angle to the bridge height of around 10mm. Getting the neck angle right is always hard. If you have a perfectly flat soundboard it is fairly simple, but very few soundboards are, or should be for that matter. It gets even more complicated with a spherically domed soundboard (which is quite fashionable at the moment) where the neck has to be set at a tangent to the surface of the imaginary sphere that the soundboard is but a little segment of. Even when the arch of the soundboard that is set with the X braces shaped to the common 24' radius, that still puts a rise of between 1-2mm at the bridge if the soundboard is glued to to the sides when the top of the sides are in a plane. That means the neck has to be kicked back a little for the line along the top of the frets to be 10mm or so above the soundboard at the bridge.
There are several ways to work out this geometry. Jim Williams book, where he builds the body on the solera/workboard from the soundboard up, shows a good way for a beginner to do it. Jim's book builds the neck in at the same time, in the manner of the Spanish classical builders, but a bolt-on neck is a much better solution (and Jim does that himself these days). Still the making the body face down workboard is a effective way of being able to establish the neck angle once the soundboard, sides and blocks are all together.
There is no 'right' way to do this, just several methodologies which end up with the same result. The 10mm thick bridge allows enough depth in the saddle slot for 5-6mm of the saddle to sit solidly in there so it won't flop around with 3mm above the bridge top which you do need for the break angle over the saddle. There is also enough room to fit an undersaddle pickup if that is needed (but I hate the things and think they should all be thrown into a lake of boiling lava) (the one just down the river from the Skull Cave)
cheers
graham
Graham McDonald
http://www.mcdonaldstrings.com
http://www.mcdonaldstrings.com
Thanks Dave, You've saved my little brain all the maths..I will digest this post a lot more as i get closer.
and Graham I am with you on the piezo sound ...I detest it so much and under no circumstances will an undersaddle pickup be going anywhere near this guitar.... I may try a K & K though.
which leads me to a question,,
If there is no need for an undersaddle arrangement what depth of saddle slot can you get away with?
cheers Grant.

I received my Stewmac Intonator today along with a pile of wood from Tim Spittle.
Anyway I put the intonator to work on an Ibanez hack guitar my friend wanted me to change from right to left hander. The gadget is brilliant....took about 45 minutes to get it fitted and the new saddle slot pencilled out. The bottom E string needed a good 6mm compensation and could probably go back another 1mm if there was room. The guitar was obviously poorly setup when it came out of the factory.
Anyway if you want to make intonation an easy job then get one of thse babies.
-
Nick Payne
- Myrtle
- Posts: 87
- Joined: Tue Jun 10, 2008 9:31 am
- Location: Canberra
This article is worth reading:
http://www.newmillguitar.com/millen2.htm
It exclusively deals with compensation on classical guitar though.
http://www.newmillguitar.com/millen2.htm
It exclusively deals with compensation on classical guitar though.
-
graham mcdonald
- Blackwood
- Posts: 473
- Joined: Thu Oct 25, 2007 11:57 am
- Location: Canberra
- Contact:
Compensation at the nut has become quite fashionable in recent years and probably does add some extra control to the process, but all this stuff ignores the fact that the frets are positioned to an average position a 'well tempered' scale and so no fretted instrument can ever play exactly in tune.
cheers
graham
cheers
graham
Graham McDonald
http://www.mcdonaldstrings.com
http://www.mcdonaldstrings.com
Sorry to drag this thread up again but..
I'm getting cold feet about routing the saddle slot when the bridge is glued on...
Making a simple jig to do it is no problem,... but I'm wondering how you guys get the slot started. I'm assuming you don't just try and place a spinning router bit accurately onto the jig?
Do you have the router sitting in the jig ,start it up and somehow lower the cutter until it touches the bridge lock it off and make a pass..
Or do you use the radius of the bridge and set it up so that the cutter just touches the bridge at the highest point in the middle....make a pass and gradually lower it..
Its got me wonderin'?
Cheers Grant.
-
Dave White
- Blackwood
- Posts: 452
- Joined: Mon Nov 12, 2007 3:10 am
- Location: Hughenden Valley, England
- Contact:
-
Rod True

- Siberian Tiger
- Posts: 234
- Joined: Thu Sep 27, 2007 10:18 am
- Location: Abbotsford, BC Canada
Grant I slot my bridges before gluing it to the body.
Here's a couple pictures of my jig
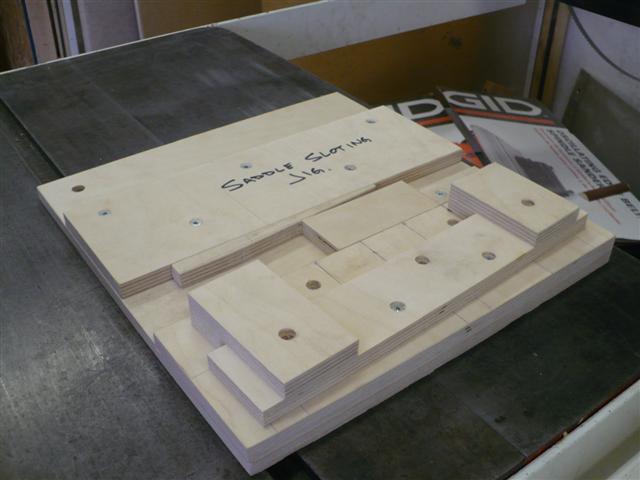
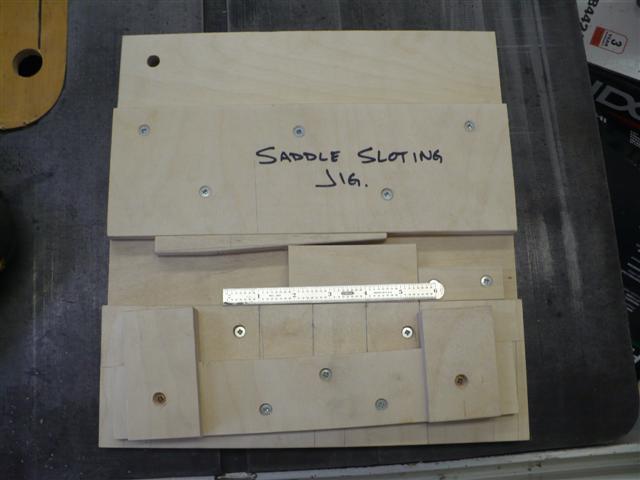
I use the wedge to secure the bridge in place. I turn my router on, lean one corner into the stoped edges (lower left) lower the router into the bridge till it's sitting on the jig, then I just route the slot.
I don't believe that it's more accurate to route the slot on the bridge after gluing to the body. It's all just about measuring properly. And if you're able to make some locator jigs, it can be faster to attach a fully finished bridge and go right to fine tuning the saddle instead of messing around with an intonator and jig to possibly scuff up a nicly buffed body.
Oh, and all my jigs are glued together with Fish glue which gives them better transfer of energy vs titebond or other PVA or AR glues
Here's a couple pictures of my jig
I use the wedge to secure the bridge in place. I turn my router on, lean one corner into the stoped edges (lower left) lower the router into the bridge till it's sitting on the jig, then I just route the slot.
I don't believe that it's more accurate to route the slot on the bridge after gluing to the body. It's all just about measuring properly. And if you're able to make some locator jigs, it can be faster to attach a fully finished bridge and go right to fine tuning the saddle instead of messing around with an intonator and jig to possibly scuff up a nicly buffed body.
Oh, and all my jigs are glued together with Fish glue which gives them better transfer of energy vs titebond or other PVA or AR glues
"I wish one of the voices in your head would tell you to shut the hell up." - Warren De Montegue

If when you position a pre-slotted saddle by referencing the saddle at the proper position great intonation is completely possible without routing the saddle slot after the bridge is installed. I have never done it any other way.
I agree though that routing the slot after the bridge is installed, and installed in the correct location, is a sure bet provided that the extra risk of this operation does not bite you.
I also prefer a 1/8" wide saddle just in case I need a bit more adjustment.
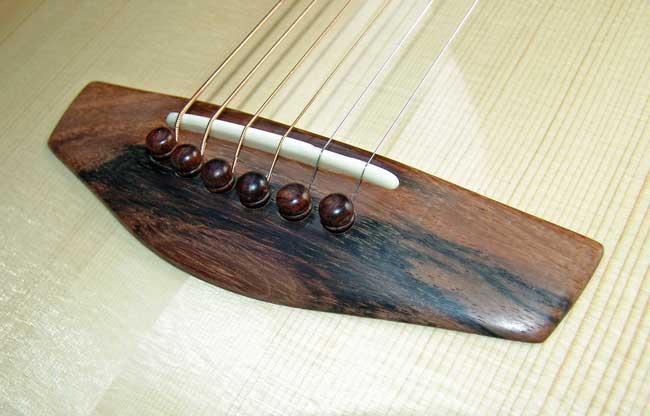
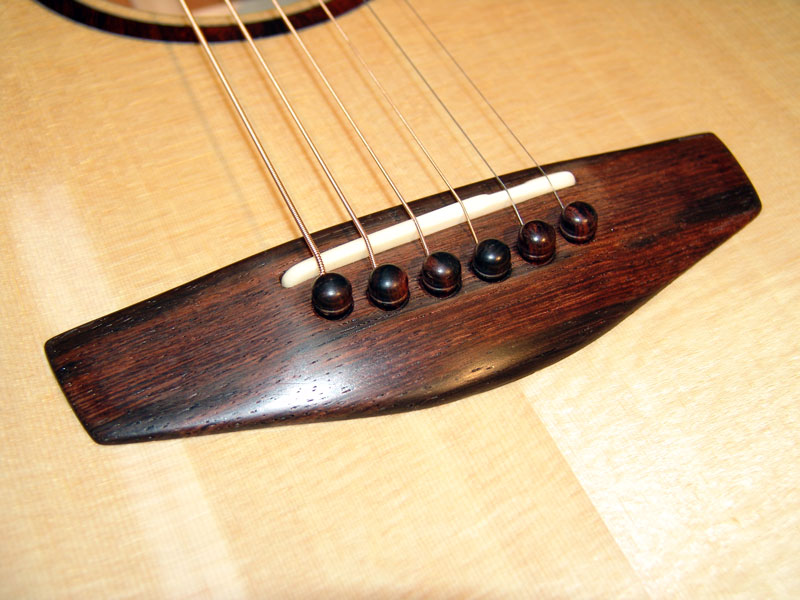
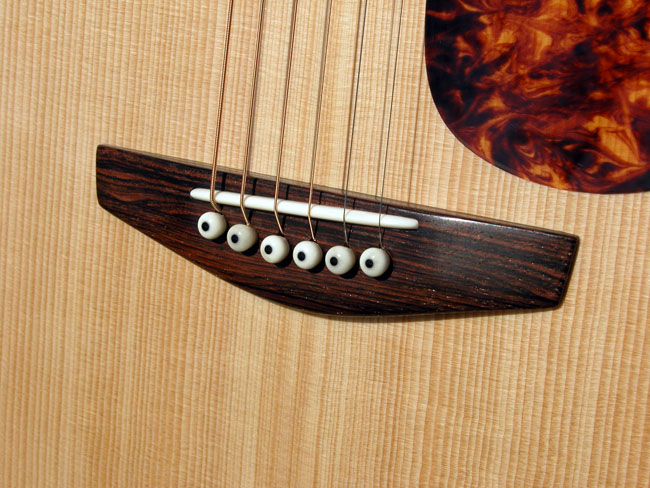
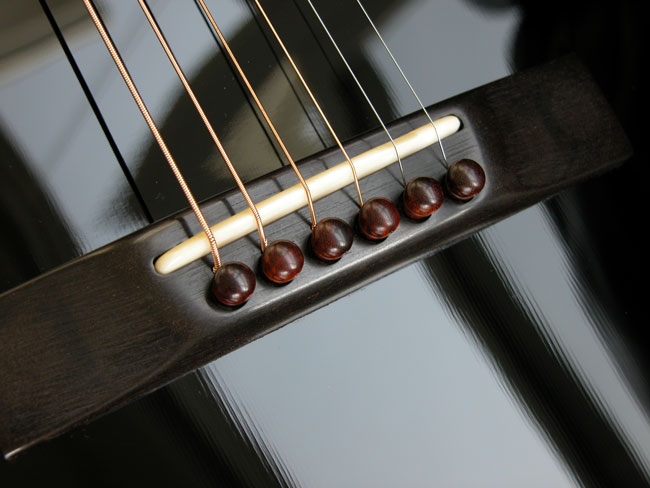
Here are some examples and if you look close you can see that where my intonation needed to be was well within the range of saddle crowning adjustment available to me. All these bridges where glued on with pre-routed saddles slots. BTW only one of these bridges was a CNC copy of an original design - can you guess which one?
I agree though that routing the slot after the bridge is installed, and installed in the correct location, is a sure bet provided that the extra risk of this operation does not bite you.
I also prefer a 1/8" wide saddle just in case I need a bit more adjustment.
Here are some examples and if you look close you can see that where my intonation needed to be was well within the range of saddle crowning adjustment available to me. All these bridges where glued on with pre-routed saddles slots. BTW only one of these bridges was a CNC copy of an original design - can you guess which one?
Lovely looking bridges Hesh...I can't pick the CNC one.
A question for those that use the IBEX ruler to locate their bridge...
It has a marking for the E string with compensation added..
I'm wondering would this be for the front edge of the saddle slot or the middle of the saddle slot?
does anyone know?
cheers Grant.
A question for those that use the IBEX ruler to locate their bridge...
It has a marking for the E string with compensation added..
I'm wondering would this be for the front edge of the saddle slot or the middle of the saddle slot?
does anyone know?
cheers Grant.
-
Rod True
- Siberian Tiger
- Posts: 234
- Joined: Thu Sep 27, 2007 10:18 am
- Location: Abbotsford, BC Canada
Good question Grant. Now I don't know these rulers and I looked on the Guitar Woods website and it didn't say.
Most compensation is designated to the center of the saddle, not the leading edge so that would be my guess, but it's just a guess.
Most compensation is designated to the center of the saddle, not the leading edge so that would be my guess, but it's just a guess.
"I wish one of the voices in your head would tell you to shut the hell up." - Warren De Montegue

-
graham mcdonald
- Blackwood
- Posts: 473
- Joined: Thu Oct 25, 2007 11:57 am
- Location: Canberra
- Contact:
It doesn't really matter where on the saddle you make that point. I place it 1mm or so from the front edge to give a little room for adjustment, which also gives a little more saddle to play with for the bottom string.A question for those that use the IBEX ruler to locate their bridge...
It has a marking for the E string with compensation added..
I'm wondering would this be for the front edge of the saddle slot or the middle of the saddle slot?
does anyone know?
cheers
graham
Graham McDonald
http://www.mcdonaldstrings.com
http://www.mcdonaldstrings.com
Who is online
Users browsing this forum: No registered users and 115 guests