First off take a look at John How's website to see his vintage finished guitars, they we're the inspiration. I contacted him and his were done with a water based gel dye, which he found very easy to work with but has been discontinued, so he was exploring alternatives for when his supply of dye runs out.
I've only done the one top like this so I think I need a little more practice at it before I do a tute on the process. But jogging the old grey cells, this is what I remember.
I used the TransTint dyes, honey amber, golden brown, and reddish brown. I made a mix of each in a small baby food bottle, it dilutes at the ratio of 1 oz to 1 qt. so a little goes a long way. They say to dilute with alcohol or water, I diluted mine with water.
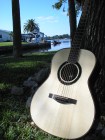
Now you want to sand the top to the level you want first, probably should wet to raise the grain and then re-sand. Now to dye, I wet the surface so it wouldn't absorb the dye too quickly or too strong. Then used a small rag to rub in the honey amber all over, and then working wet on wet went to the golden brown, and then the reddish brown, dedicating a small rag to each color, just like doing a burst, blending the colors in, with the lightest in the center, darker to the edges.
This one came out real subtle, you don't really see a burst effect, but the mix of color did add a richness to the color that the amber alone didn't have.
So you can rub with a wet rag to soften the colors, and of course do more layers to increase the saturation. You can also sand areas you're not pleased with after it dries and rework.
It's something you just have to jump into and play with until something starts to happen that pleases you.

But it's a pretty forgiving process and since aged and vintage patina is what you're after a little working and re-working doesn't seem to hurt. It seems to lighten up as it dries, and when your pleased with it just seal it with a rub-on shellac coat.
Hope this helps,
Joe