Here's the thing, the best guitar builders I know put the blinders on at some point early in their careers, and they build one after another after another, etc. They spend a lot of time talking to musicians, and if they're lucky, they get someone who can give honest and helpful constructive criticism.
Luthier to luthier stuff is fine and all that, but frankly I think it can get awfully "ivory tower" after a bit. I'm reminded of Professor Kasha who spent hundreds of hours talking up his theories of impedance matching strings to a top...and whose disciples' guitars have left the world of real guitar players pretty much bored stiff. Kasha's first guitar was built at Guild to his exact perfect specs. Intellectualized to death. He showed it to Segovia who promptly pronounced it a piece of crap. Kasha spent the entirety of a night carving away the braces. Now there's science for you...he was reduced to pure empirical guitar hacking. Segovia still didn't like it and never did; he played Hauser and then Ramirez 'til he died.
So we are not the real judges who count of one another's work. If what we do does not please the players, then what's the point? I sincerely believe that the only way to develop to get to where you can please the players is to build, build, build. And that sometimes means building guitars you know are experiments just to really test out your ideas. No guitarist I know plays a CAD drawing...
ANZLF Adjustable Neck Joint Group Discussion
-
Rick Turner
- Blackwood
- Posts: 311
- Joined: Sun Jan 13, 2008 10:22 am
- Location: Santa Cruz, Ca.
- Contact:

Rick ,
I think you'll find no shortage of repair experience with some of our members here , myself included ,and also noticing Tom's post above.
It's just that we refrain from adopting the " I've repaired/ built more guitars than you've had hot dinners ", approach,, ..Take note
Matthew said it well, we enjoy and have fun with this craft.
Now let's get back to what this thread is about ! and cut the crap !
Edit : Sorry Matt. I was posting the same time as yourself .
Last edited by Craig on Thu Mar 27, 2008 4:00 pm, edited 1 time in total.
-
Rick Turner
- Blackwood
- Posts: 311
- Joined: Sun Jan 13, 2008 10:22 am
- Location: Santa Cruz, Ca.
- Contact:
Note taken, but not needed as there was no criticism intended. However, I must say that I see a lot of luthierie discussions on the Internet where a good couple of years fixing guitars would clear up a lot of issues for folks who want to make guitars. There are a lot of discussions that would benefit from more wood chips and sawdust having been created by the participants. I understand the desperation that goes into wanting never to make a dud guitar, and that's especially true for those early in their years in the field. The more guitars you handle and work on, the less anxious one will be and the more willing to try different things as experiments. Trying something and not having it work or having a guitarist find something you didn't think of with regard to your idea is incredibly valuable.
Back to adjustable necks...they won't be for everyone; many will prefer a more conventional design, but I can tell you this...when you demonstrate how easy it is to adjust action to a potential client, you'll see a light bulb go off in their mind and you'll probably make a convert. Now if they can just afford your guitar, you'll be golden.
Back to adjustable necks...they won't be for everyone; many will prefer a more conventional design, but I can tell you this...when you demonstrate how easy it is to adjust action to a potential client, you'll see a light bulb go off in their mind and you'll probably make a convert. Now if they can just afford your guitar, you'll be golden.
Rick Turner
Guitar Maker, Experimenter, Diviner
www.renaissanceguitars.com
www.d-tar.com
Guitar Maker, Experimenter, Diviner
www.renaissanceguitars.com
www.d-tar.com

Not disagreeing with you Rick but it seems Prof Kasha wasnt the only person to get his guitars rejected by Maestro....Rick Turner wrote: I'm reminded of Professor Kasha who spent hundreds of hours talking up his theories of impedance matching strings to a top...and whose disciples' guitars have left the world of real guitar players pretty much bored stiff. Kasha's first guitar was built at Guild to his exact perfect specs. Intellectualized to death. He showed it to Segovia who promptly pronounced it a piece of crap. Kasha spent the entirety of a night carving away the braces. Now there's science for you...he was reduced to pure empirical guitar hacking. Segovia still didn't like it and never did; he played Hauser and then Ramirez 'til he died.
Quoting from the GAL Big Red Book, Vol 3, p3:
(RE Brune) "launched into a story regarding one of the guitars Hauser Snr sent to him in the '30s when he was playing a concert in Berlin. This was before the days of UPS and other delivery services, and train delays and such caused this particular instrument to follow him around most of Germany during his concert tour. When it finally reached him, he played it for a while and sent it back to Hauser with a note to keep trying".

That's around 110kg pull ! Quite a lot of stress. I was interested in what James had to say in his above post , that 80 kg of pull at the long end equates to 300 kg with an 80mm. pivot point at the other end .
Makes you stop and realise the actual forces at work and how important the strength of the neck joint is.
Makes you stop and realise the actual forces at work and how important the strength of the neck joint is.
Actually Craig the forces on the the lower bolt are a lot less.
James was incorrect on applying string tension to a lever arm the length of the neck.
Since the strings are parallel to the neck and a maximum of 20mm above where the neck pivots on the body, and the lower bolt is about 60mm below this then you are looking at about 1/3 of string tension resisted in tension by the lower bolt.(depending on the actual geometry of the arrangement)
This is not the only force the neck joint has to resist however. It also has to cope with handling and mishandling and impacts.
Jeff
O.K. here's another,one of my plans I'll call MARK 2.
It does away with a captured screw system and is very simple . The set screw decides the angle and the lower screw is tightened against it. It's ferrule is only 3/8 " the other 1/2 "
It does however require two ferrules in the heel. What I do like about it is the fact that the lower screw/bolt tightens against something , rather than the thread being held steady by the T-Nut in the headblock as is my MARK1 . Not saying that won't work either. I 'm looking forward to your views guys.
It seems so simple , I keep thinking I've missed something bleedin' obvious.
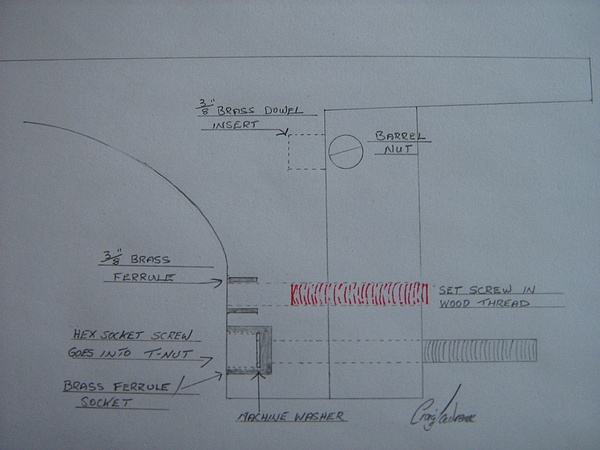
As I say , it requires two ferrules ,so some may not like that idea.
Dave , If you can P.M. me your postal address , I'll knock a couple of those ferrules up for you in the meantime and send them over.
Cheers guys , Craig
It does away with a captured screw system and is very simple . The set screw decides the angle and the lower screw is tightened against it. It's ferrule is only 3/8 " the other 1/2 "
It does however require two ferrules in the heel. What I do like about it is the fact that the lower screw/bolt tightens against something , rather than the thread being held steady by the T-Nut in the headblock as is my MARK1 . Not saying that won't work either. I 'm looking forward to your views guys.
It seems so simple , I keep thinking I've missed something bleedin' obvious.
As I say , it requires two ferrules ,so some may not like that idea.
Dave , If you can P.M. me your postal address , I'll knock a couple of those ferrules up for you in the meantime and send them over.
Cheers guys , Craig

It would mean two different size keys to keep in your case Allen , that's correct.
I rushed together this idea and post this morning . On reflection ,it may be better to have the lower setscrew below the neck bolt/screw.
I could leave out the top bolt altogether . I'm pretty sure that's what Rick was getting at earlier on.
Cheers ,Craig
I rushed together this idea and post this morning . On reflection ,it may be better to have the lower setscrew below the neck bolt/screw.
I could leave out the top bolt altogether . I'm pretty sure that's what Rick was getting at earlier on.
Cheers ,Craig
-
Dennis Leahy

- Blackwood
- Posts: 872
- Joined: Wed Oct 10, 2007 12:32 am
- Location: Duluth, MN, US
- Contact:
Setscrews:
I have found some longer (1" - 25mm) set screws locally, and have been experimenting with them. I do not have a full set of metric drill bits, just Imperial, so I have to report in 64ths. I bought 1/4-20 thread x 1" long setscrews, and drilled holes in a 3/4" (19mm) thick Hard Maple scrap, at:
16/64" (1/4")
15/64"
14/64" (7/32")
then screwed the setscrews in. I should say I tried to cram a setscrew into the 7/32" hole, but that hole is too small. I also tried tapping the holes with a 1/4-20 tap. Then, I took a hex key and ran the setscrews in and out of the wood, mindlessly, far more times than they would ever need to turn in a guitar's lifetime. Finally, with a single setscrew protruding 1/4" (6mm) from the board, I set the board on concrete, and placed a bull elephant on top. Er, I mean, I stepped on the board (225 lbs of blubber.) Then I rocked on the board. Then I jumped on the board. I wanted to see if the setscrew would strip the wood and get shoved back into the hole by the pressure. (225 lbs on a single setscrew is more than double the amount of pressure that a pair or setscrews will undergo in a real guitar.) I measured the amount that the setscrew protruded before and after the concrete dance.
Conclusion: 15/64" hole, untapped, (self-tapped by screwing in the setscrew), with 3/4" of threads engaged in wood (Hard Maple), using a 1/4-20 threaded setscrew, will easily hold.
Examining various metric and imperial screw threads, I am even more convinced that the coarser threads will be a better long term solution in wood. All of the metric threads and the fine imperial threads are quite fine, not just in terms of the number of threads per inch, but also in the length that the thread sticks out from the shaft of the screw/bolt. I think we have to keep in mind that the neck block wood is subject to seasonal shrinkage, and even though that may seem minor, it may make a setscrew that had *perfect* contact and torque in the most humid season, and make it too loose in the dry season. With a nice long (25mm to 38mm) setscrew this may not be an issue, but I would hope that whatever I do will stand the test of time.
Are coarse, imperial threaded setscrews available in Australia, New Zealand, and England?
If I want a tip other than the most readily available "cup" tip, I know ordering them online is my only solution. For me, the postage doubles the cost (though it is still minor.) If you guys cannot find anything suitable locally and need to order them, let me know if I can help. One benefit of ordering them is that I have a very wide variety of setscrews to choose from. Locally, the only type available is a cup tip (which I think is a poor choice to make contact with an inlaid metal disc - especially brass.) At McMaster-Carr, I have a lot more options on thread pitch, length, and tips:
 -
-  -
-  -
-  -
-  -
- 
Cup tip ---- Cone tip ---- Flat tip ---- Oval tip ---- Extended tip ---- Swivel Ball Bearing tip
I'm looking at the flat, oval, or extended tip - but I can understand if someone decides the cone tip will work best in their engineering. To me, from an engineering perspective, the oval tip seems to make the most sense.
Craig, 8mm diameter sounds like overkill to me. I would think 1/4" (6mm) should be more than enough. As for the length, I'd say that 3/4" long (19mm) may be long enough (if the setscrew does not stick out too far from the wood), that 1" (25mm) would add insurance, and my original thought of 1-1/2" (38mm) is overkill. So, I am buying the 1" long, 1/4-20 thread, with the oval tip.
Fingerboard extension support:
With adjustable necks comes floating fingerboards. Beneath the fingerboard you need some mass or (theoretically), any notes fretted up there sound weak. I have seen carbon fiber used to support the fingerboard extension, which looks to me as if it handles the job of stiffening the fingerboard, but does not add much mass. I know a couple of builders laminate fingerboards (Batson uses steel in the lamination), but then I think they are usually trying not to make a cutout in the soundboard at all. Others, (like Grant Goltz), use a block of wood beneath the fingerboard extension. If you're going to have a truss rod with its adjustment through the sound hole, you'll need to dado a 3/8" (9mm) deep channel through the wood block, which means your wood block needs to be at least 1/2" (12mm) thick. If the metal discs (the contact points for the upper setscrews) are epoxied into the neck heel, you can see that they are down at least 12mm, if they are beneath the fingerboard extension support block and the actual contact point (fulcrum) is probably close to 25mm beneath the strings. But, for intonation, we want those contact points as high up (as close to the strings) as possible. If you have not checked out the Grant Goltz thread (see the the link in a previous post), I recommend it, if only to help visualize the mortises. You'll see that Grant's upper pivot point is about 1-1/4" (32mm) beneath the strings.
Hey Dave, how far beneath the strings is your pivot point?
Dave hears no intonation difference wherever his upper setscrews/pivot points are, so it may not be necessary to move the pivot points up higher.
I would like to see those contact points as far up as possible, even right up under the fingerboard. That would mean angling the setscrews, and dadoing notches out of the underside of the fingerboard extension support block, to allow the setscrews their path. That would also require using longer setscrews, because more of the threads will be sticking out of the wood. It might also require that the metal disk (contact point for the setscrew) in the neck heel be set in at the same angle.
The last paragraph, about angled setscrews, is probably over-engineering a solution. I really just wanted to post the other info with my "test" results, conclusions, and a source for setscrews with various types of contact tips. You can probably ignore the angled setscrew idea, as I'm not even convinced it is worth the extra effort.
Dennis
I have found some longer (1" - 25mm) set screws locally, and have been experimenting with them. I do not have a full set of metric drill bits, just Imperial, so I have to report in 64ths. I bought 1/4-20 thread x 1" long setscrews, and drilled holes in a 3/4" (19mm) thick Hard Maple scrap, at:
16/64" (1/4")
15/64"
14/64" (7/32")
then screwed the setscrews in. I should say I tried to cram a setscrew into the 7/32" hole, but that hole is too small. I also tried tapping the holes with a 1/4-20 tap. Then, I took a hex key and ran the setscrews in and out of the wood, mindlessly, far more times than they would ever need to turn in a guitar's lifetime. Finally, with a single setscrew protruding 1/4" (6mm) from the board, I set the board on concrete, and placed a bull elephant on top. Er, I mean, I stepped on the board (225 lbs of blubber.) Then I rocked on the board. Then I jumped on the board. I wanted to see if the setscrew would strip the wood and get shoved back into the hole by the pressure. (225 lbs on a single setscrew is more than double the amount of pressure that a pair or setscrews will undergo in a real guitar.) I measured the amount that the setscrew protruded before and after the concrete dance.
Conclusion: 15/64" hole, untapped, (self-tapped by screwing in the setscrew), with 3/4" of threads engaged in wood (Hard Maple), using a 1/4-20 threaded setscrew, will easily hold.
Examining various metric and imperial screw threads, I am even more convinced that the coarser threads will be a better long term solution in wood. All of the metric threads and the fine imperial threads are quite fine, not just in terms of the number of threads per inch, but also in the length that the thread sticks out from the shaft of the screw/bolt. I think we have to keep in mind that the neck block wood is subject to seasonal shrinkage, and even though that may seem minor, it may make a setscrew that had *perfect* contact and torque in the most humid season, and make it too loose in the dry season. With a nice long (25mm to 38mm) setscrew this may not be an issue, but I would hope that whatever I do will stand the test of time.
Are coarse, imperial threaded setscrews available in Australia, New Zealand, and England?
If I want a tip other than the most readily available "cup" tip, I know ordering them online is my only solution. For me, the postage doubles the cost (though it is still minor.) If you guys cannot find anything suitable locally and need to order them, let me know if I can help. One benefit of ordering them is that I have a very wide variety of setscrews to choose from. Locally, the only type available is a cup tip (which I think is a poor choice to make contact with an inlaid metal disc - especially brass.) At McMaster-Carr, I have a lot more options on thread pitch, length, and tips:
- - - - - Cup tip ---- Cone tip ---- Flat tip ---- Oval tip ---- Extended tip ---- Swivel Ball Bearing tip
I'm looking at the flat, oval, or extended tip - but I can understand if someone decides the cone tip will work best in their engineering. To me, from an engineering perspective, the oval tip seems to make the most sense.
Craig, 8mm diameter sounds like overkill to me. I would think 1/4" (6mm) should be more than enough. As for the length, I'd say that 3/4" long (19mm) may be long enough (if the setscrew does not stick out too far from the wood), that 1" (25mm) would add insurance, and my original thought of 1-1/2" (38mm) is overkill. So, I am buying the 1" long, 1/4-20 thread, with the oval tip.
Fingerboard extension support:
With adjustable necks comes floating fingerboards. Beneath the fingerboard you need some mass or (theoretically), any notes fretted up there sound weak. I have seen carbon fiber used to support the fingerboard extension, which looks to me as if it handles the job of stiffening the fingerboard, but does not add much mass. I know a couple of builders laminate fingerboards (Batson uses steel in the lamination), but then I think they are usually trying not to make a cutout in the soundboard at all. Others, (like Grant Goltz), use a block of wood beneath the fingerboard extension. If you're going to have a truss rod with its adjustment through the sound hole, you'll need to dado a 3/8" (9mm) deep channel through the wood block, which means your wood block needs to be at least 1/2" (12mm) thick. If the metal discs (the contact points for the upper setscrews) are epoxied into the neck heel, you can see that they are down at least 12mm, if they are beneath the fingerboard extension support block and the actual contact point (fulcrum) is probably close to 25mm beneath the strings. But, for intonation, we want those contact points as high up (as close to the strings) as possible. If you have not checked out the Grant Goltz thread (see the the link in a previous post), I recommend it, if only to help visualize the mortises. You'll see that Grant's upper pivot point is about 1-1/4" (32mm) beneath the strings.
Hey Dave, how far beneath the strings is your pivot point?
Dave hears no intonation difference wherever his upper setscrews/pivot points are, so it may not be necessary to move the pivot points up higher.
I would like to see those contact points as far up as possible, even right up under the fingerboard. That would mean angling the setscrews, and dadoing notches out of the underside of the fingerboard extension support block, to allow the setscrews their path. That would also require using longer setscrews, because more of the threads will be sticking out of the wood. It might also require that the metal disk (contact point for the setscrew) in the neck heel be set in at the same angle.
The last paragraph, about angled setscrews, is probably over-engineering a solution. I really just wanted to post the other info with my "test" results, conclusions, and a source for setscrews with various types of contact tips. You can probably ignore the angled setscrew idea, as I'm not even convinced it is worth the extra effort.
Dennis
Another damn Yank!

-
Dennis Leahy
- Blackwood
- Posts: 872
- Joined: Wed Oct 10, 2007 12:32 am
- Location: Duluth, MN, US
- Contact:
Hi Kim, and thanks for the kind words. I am a little bit afraid that the swivel ball tip could vibrate at some frequency, even though the ball would always be under pressure. It would be maddening to track down! I am placing a McMaster Carr order probably today or tomorrow, so if I can grab something for you (or anyone here) please let me know.Kim wrote:Great work Dennis
The swivel ball bearing look very interesting indeed but the extended tip would work very reliably. Once again thanks for the effort and kind gesture, your a good mate and a valued member of the ANZLF.
Cheers
Kim
I'm also thinking the metal disk (contact point) might be better made from steel, rather than brass, though that would be less of an issue as long as the cup tip is avoided. Again, probably thinking into overkill territory, but if a small change would add to longevity...
Dennis
Another damn Yank!
-
Dennis Leahy
- Blackwood
- Posts: 872
- Joined: Wed Oct 10, 2007 12:32 am
- Location: Duluth, MN, US
- Contact:
OK, this thread has made me also do some experimenting with a solution (for an internal adjustable mechanism) using no setscrews at all, and simply using a pair of captured screws with crossdowels (barrel nuts.) This idea loses the adjustable yaw that a pair of upper setscrews would provide, but this idea does include adjustment both for neck pitch angle, as well as intonation adjustment. And, just one hex key.
This idea could be made external by flipping the lower bolt, as already discussed here.
Here's a CAD sketch:

Neck Tilted Down by 1°
The upper cyan blue line is the string in a normal orientation. The red line shows the string position with a full 1° tilt, far more than necessary (unless the top distorts quite a bit after time.)
Blue line length: 25.40054"
Red line length: 25.42108"
difference: 0.02054" (but again, the difference would probably be half of that or less in a normal adjustment)
This design uses a 1/4-20 bolt with a hex socket, nylon washers in contact with the wood on both sides, and a pair of nuts jammed together to capture the bolt.
I tried this, using a 3/4" (19mm) thick piece of Hard Maple. It took a little bit of practice, but I can successfully jam the nuts together to provide a tight capture of the bolt, where the bolt can still be rotated using the hex key in the orientation with the least mechanical advantage (using the long end of hex key in bolt.)
There is virtually no play (wiggle) in the bolts. The only play is the junction of the crossdowel (barrel nut) and the bolt. (machining tolerances for off-the-shelf parts) I tried Teflon tape, and it initially works perfectly, but quickly breaks down when I screw and unscrew the bolt a dozen times. So, I am ordering some light-duty Loctite (#222) to see if that will fill in the slop, and still allow the bolt to spin easily enough to call it adjustable.
I'm not saying this is "the answer" to adjustable neck joints, just another possibility to examine.
Dennis
This idea could be made external by flipping the lower bolt, as already discussed here.
Here's a CAD sketch:
Neck Tilted Down by 1°
The upper cyan blue line is the string in a normal orientation. The red line shows the string position with a full 1° tilt, far more than necessary (unless the top distorts quite a bit after time.)
Blue line length: 25.40054"
Red line length: 25.42108"
difference: 0.02054" (but again, the difference would probably be half of that or less in a normal adjustment)
This design uses a 1/4-20 bolt with a hex socket, nylon washers in contact with the wood on both sides, and a pair of nuts jammed together to capture the bolt.
I tried this, using a 3/4" (19mm) thick piece of Hard Maple. It took a little bit of practice, but I can successfully jam the nuts together to provide a tight capture of the bolt, where the bolt can still be rotated using the hex key in the orientation with the least mechanical advantage (using the long end of hex key in bolt.)
There is virtually no play (wiggle) in the bolts. The only play is the junction of the crossdowel (barrel nut) and the bolt. (machining tolerances for off-the-shelf parts) I tried Teflon tape, and it initially works perfectly, but quickly breaks down when I screw and unscrew the bolt a dozen times. So, I am ordering some light-duty Loctite (#222) to see if that will fill in the slop, and still allow the bolt to spin easily enough to call it adjustable.
I'm not saying this is "the answer" to adjustable neck joints, just another possibility to examine.
Dennis
Last edited by Dennis Leahy on Sat Sep 26, 2009 1:14 am, edited 2 times in total.
Another damn Yank!
Dennis , thanks for that excellent report on set screws. I too favour the oval model . I only seem to be able to get the cup tip , where I live , bit these could easily be filed to an oval tip.
The set screws I bought were 1 1/4 " for the 6 mm , and 1 1/2 " for 8 mm.. I am going to try and get some stainless ones next . I agree that the 6 mm. are all that may be required.
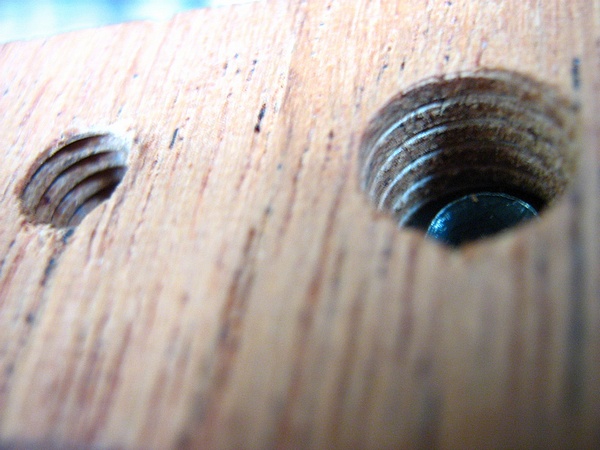
The 6 mm. ones have a thread pitch of 1 mm. whereas the 8 mm. ones have a pitch of 1.25 mm. They look much coarser visually. I thought the coarser thread would be better until I tried out both on a trial run. I did this trial on Mahogany with the correct grain orientation. The coarser thread not only have a wider spacing between the thread , but also have their thread go deeper. In both cases I found drilling a hole around 1/32 " smaller than the actual thread was as small as I could get,and still have the set screw happily cut it's own thread. Your test into Maple would have made it hard work for the poor old setscrew ,and hence ,you could only get the hole 1/64 " smaller.
Here is a pic of the results ;
You can see that the 6 mm. one on the left,has cut a thread full depth to the setscrew's thread. The coarser threaded 8 mm. one has cut a thread probably as deep, but this hasn't been enough to house this type of thread properly .
( having trouble loading the pic ,,will try again )
The set screws I bought were 1 1/4 " for the 6 mm , and 1 1/2 " for 8 mm.. I am going to try and get some stainless ones next . I agree that the 6 mm. are all that may be required.
The 6 mm. ones have a thread pitch of 1 mm. whereas the 8 mm. ones have a pitch of 1.25 mm. They look much coarser visually. I thought the coarser thread would be better until I tried out both on a trial run. I did this trial on Mahogany with the correct grain orientation. The coarser thread not only have a wider spacing between the thread , but also have their thread go deeper. In both cases I found drilling a hole around 1/32 " smaller than the actual thread was as small as I could get,and still have the set screw happily cut it's own thread. Your test into Maple would have made it hard work for the poor old setscrew ,and hence ,you could only get the hole 1/64 " smaller.
Here is a pic of the results ;
You can see that the 6 mm. one on the left,has cut a thread full depth to the setscrew's thread. The coarser threaded 8 mm. one has cut a thread probably as deep, but this hasn't been enough to house this type of thread properly .
( having trouble loading the pic ,,will try again )
Last edited by Craig on Sun Mar 30, 2008 9:37 pm, edited 1 time in total.
-
Rick Turner
- Blackwood
- Posts: 311
- Joined: Sun Jan 13, 2008 10:22 am
- Location: Santa Cruz, Ca.
- Contact:
Have you considered cantilevering the fingerboard and freeing up the upper bout of the top so it can vibrate? Have you considered accessing the bolts with an extra-long Allen wrench through a hole in the butt end of the guitar so you don't have to loosen the strings? Have you built this yet?
Rick Turner
Guitar Maker, Experimenter, Diviner
www.renaissanceguitars.com
www.d-tar.com
Guitar Maker, Experimenter, Diviner
www.renaissanceguitars.com
www.d-tar.com
As you can see , the 6 mm. one on the left with it's finer 1 mm. thread pitch does a better job.. It also turns better . Quite smooth yet very firm . The coarser 8 mm. one ( 1.25 mm thread pitch ) tends to 'click'. Stainless setscrews may have a slightly different feel again , having a smoother thread surface than the blackened steel ones I used.
Regards the distance of the pivot from the fretboard :
I planned on 30 mm. which leaves 20 mm. for the neck extension and pocket and a further 10 mm. for the head of the neck bolt under the neck pocket .
If I was to lose the top neck bolt ( as suggested in my Mark 2 plan ) , the pivots could go a tad higher , but even with a 30 mm. pivot , there doesn't seem to be an intonation problem . I may be wrong here , but I think Dave's pivot point was even greater and still doesn't have a problem with intonation.
I too tryed the thread tape to stop any play in the bolts. Not very successful, which is why I came up with my Mark 2 system , where it doesn't become a concern .
It would be a shame to lose the yaw adjustment Dennis . It's part of the beauty of the adjustable neck system . I don't see that we need to lose them.
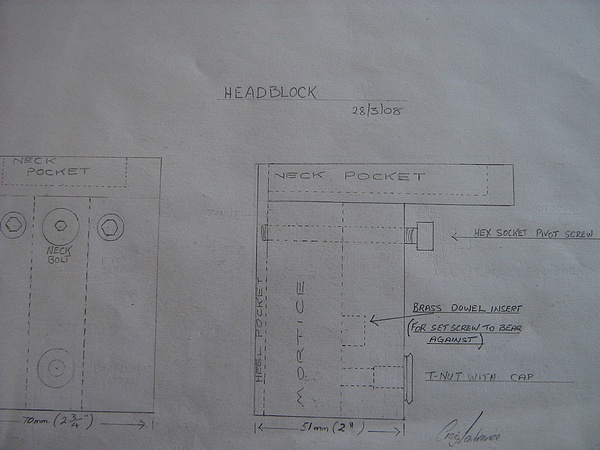
We have to keep in mind the actual fabrication of the system too. I originally had a barrel in the lower headblock to hold the lower neck bolt , but this would make it difficult to have this lined up properly, remembering that a hole for it would have to be made in the headblock before attaching the headblock to the sides of the guitar. It's why I changed to a T-Nut to catch the lower neckbolt.
A hole would be drilled through the neckblock after a initial neck 'fit'. This hole being drilled by placing the drill bit through the HEEL bolt hole and then drilled through the neck block , ensuring an exact fit to both. A t-nut could then easily be fitted to the rear of the headblock via through the sound hole.
Cheers Craig
Last edited by Craig on Sun Mar 30, 2008 9:41 pm, edited 1 time in total.
Sorry Rick , I was posting the same time as yourself.
Yes I have considered canilevering the fingerboard and freeing up the upper bout as in your design. I understand that you strengthen up the fingerboard extension with carbon fibre into the fingerboard itself. Could you tell us about this Rick ?
I don't see a real need to get the pivots higher than I have on my plan ,as my calculations show 30mm. has virtually no affect on intonation, and allows for a 20 mm. thick fretboard extension ,which is enough for me to continue my 1/8" X 3/8" carbon fibre neck rods right through to the end of the fretboard.
Yes , we considered an extra long allen head adjuster through the butt of the guitar in an earlier posting Rick . The problem is , you must have it with you to do the adjustment . Will it fit in your case ? Will this unique tool get lost or misplaced ?
No , I have only made mock-ups so far . But these have been good and show any weakness or plus' to the design.
I sense a lot of folk losing their patience with this design thread I really believe we are getting very close .
"patience grasshopper "
Cheers , Craig
Yes I have considered canilevering the fingerboard and freeing up the upper bout as in your design. I understand that you strengthen up the fingerboard extension with carbon fibre into the fingerboard itself. Could you tell us about this Rick ?
I don't see a real need to get the pivots higher than I have on my plan ,as my calculations show 30mm. has virtually no affect on intonation, and allows for a 20 mm. thick fretboard extension ,which is enough for me to continue my 1/8" X 3/8" carbon fibre neck rods right through to the end of the fretboard.
Yes , we considered an extra long allen head adjuster through the butt of the guitar in an earlier posting Rick . The problem is , you must have it with you to do the adjustment . Will it fit in your case ? Will this unique tool get lost or misplaced ?
No , I have only made mock-ups so far . But these have been good and show any weakness or plus' to the design.
I sense a lot of folk losing their patience with this design thread
"patience grasshopper "
Cheers , Craig
-
Rick Turner
- Blackwood
- Posts: 311
- Joined: Sun Jan 13, 2008 10:22 am
- Location: Santa Cruz, Ca.
- Contact:
I can only say that the way I've done it on about 20 guitars works just fine. Not in theory, not on paper, not in my mind, not in mock-ups...but in reality on real guitars that make real music. They're easy as can be to adjust. It takes all of about ten seconds...fifteen if you fumble with the Allen wrenches. It's stable, especially once you tighten the lock screw. Adjusting the action has little effect on intonation unless you go to extremes and the string stretch factor kicks in. You've got complete control over all relevant axes of movement. It's adjustable with off-the-shelf tools that fit in the case. You don't have to loosen strings to make adjustments. To me, all those advantages completely overwhelm any aesthetic issues, and I've "tested" that by showing the guitars not at luthier events, but at places like MerleFest where dozens and dozens of guitar players who could give a lesser flip about lutherie issues have "gotten it", especially when I show them a ten second neck reset...
I understand that some may object to seeing hardware, but for those folks, Martins are fine. I just don't see the point in compromising what an adjustable neck joint CAN offer just to hide it. What can it offer? Very complete parametric control over every aspect of how the neck joins to the body. Tilt (action), linear position (intonation), and yaw ( position of strings on fingerboard. Then add in a peghead accessible truss rod adjustment, and you can accomplish all movements of the neck basically with strings on and up to pitch.
Then cantilever the fingerboard so it doesn't touch the top, and you've got the potential to develop more of the soundboard for tone and volume. I consider that a big plus.
Yes, I dado graphite up into the fingerboard and down into the neck. I relieve it over the body. Yes, the fingerboard is slightly more flexible over the body, but it does not affect tone or volume as many would think it would...once again, the value of just doing it and listening rather than imagining that it would be a problem and shying away from "just doing it". Notes above the neck joint area are loud and punchy, proving that little or no tone is gained by gluing the fingerboard to the top (as it is not on violin family instruments...).
And all the above is gained with a system that is just dumb-ass simple to do. In a production environment with the hardware made in quantity, this just has to be the easiest way to put on a neck that there is. There's no fitting of the heel or underside of the fingerboard to the end of the body and the top. There are no mortises to deal with. The neck is just suspended away from the body with adjustable hardware joining the two pieces.
I'll tell you this, also...Once you do this, you'll never believe in the tonal superiority of a traditional dovetail again. The whole idea that it's needed to transfer tone from the neck into the body is just hogwash. Some one of these days I'm going to build a very traditional dreadnaught with everything "normal" except for the neck joint. Adi top on rosewood back and sides, scalloped bracing, Martin style peghead and neck look other than my truss rod and graphite...and then the full-tilt neck. I think it might be possible to build a real banjo killer this way and take the traditional bluegrass guitar up to another level of sophistication and performance.
Rick Turner
Guitar Maker, Experimenter, Diviner
www.renaissanceguitars.com
www.d-tar.com
Guitar Maker, Experimenter, Diviner
www.renaissanceguitars.com
www.d-tar.com
Rick
This all sounds very interesting but do you have any images to share? It would sure make it a lot more easy for some of us to understand you concepts if we could SEE exactly what you are talking about and how you are going about it.
Also, with you being a "PRO" builder, I guess the question also needs to be ask, what happens if someone here did decide that your system was the best for them, would they risk finding a letter from your lawyers in their mail box threatening litigation over intellectual property etc, or do you accept that you are in fact waiving that right by posting information about your methods in a public forum??
I am not trying to be a smart ass, in fact I appreciate your input here and applaud your willingness to share. But, I really do think that it is important to get all the cards on the table now so it clears the air for everyone involved in this sort of exchange.
Cheers
Kim
-
Rick Turner
- Blackwood
- Posts: 311
- Joined: Sun Jan 13, 2008 10:22 am
- Location: Santa Cruz, Ca.
- Contact:
I'll post some pictures, and the June/Summer issue of Fretboard Journal will have some great shots as well.
Nothing I've done with this is patented, and anyone who wants to do it can do so as far as I'm concerned. Most of it is "prior art", and the rest that may be original to me is public domain. I've added little "improvements", and there are other structural elements in my guitars that work syngergistically with the tilting neck to make it all of a whole piece. There is a final piece to the puzzle that I'm working on that I may consider patenting, but it's really yet another issue in neck construction and isn't necessary to what we're talking about here.
I'll try taking pictures of the guitar I have here tomorrow when the light is good, and I'll take the neck off of it to show the details. I don't have any raw truss rod/heel dowel assemblies right now, but I will within a month or so as I'm making a bunch of necks.
Rick Turner
Guitar Maker, Experimenter, Diviner
www.renaissanceguitars.com
www.d-tar.com
Guitar Maker, Experimenter, Diviner
www.renaissanceguitars.com
www.d-tar.com
Thanks for the clarification and willingness to share with us Rick, I look forward to seeing those images when you have the opportunity to post them pity a copy of frets journal is soo far away.
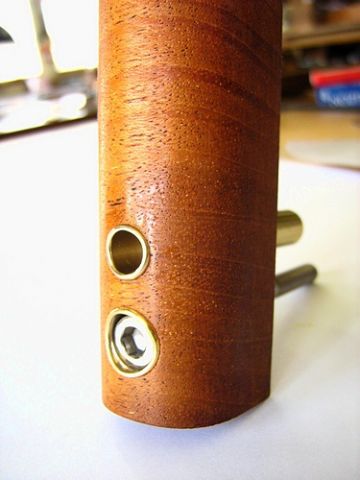
Anyhow, I think the more ideas in the hat that we have here the better. I must say that the combined ideas the guys have been coming up with here and that Craig has been pulling together for us looks very clever and shows great promise at this stage of development. I particularly like Craig's version of the exposed hardware as it looks very stylish and in keeping with a more traditional style of guitar.
Cheers all
Kim
Who is online
Users browsing this forum: No registered users and 78 guests