Craig,
It's not so much headblock shrinkage I'm concerned about but more vibration and pressure on the pivot bolts unscrewing them in time. If when the lock-nut is tightened against the headblock you can't unscrew the pivot bolt from the inside then the system will be fine with the one nut.
Some other thoughts - the reason I went away from Mike Doolin's tensioned bottom bolt system and adapted to my version was that getting the neck on and off is a real pain. With the adjusting bolt under tension/capture it is hard to turn (as it should be) and you can imagine how long it takes to bolt the neck on (and take it off). Also the precision of the bolt alignment holes needs to be spot on.
So now I'm thinking - you need the amount you need to screw the bottom bolt in to get the neck on/off to be as minimal as possible and allow enough adjustment wriggle room for the neck adjustability. So I'm thinking forget the mortice and tennon. Do the equivalent of a butt-neck - but it sits inside a small pocket in the neck block. Use a hanger bolt (like Mario Proulx) for the top neck bolt with your pivot screw arangements (T-Bolt in headblock etc). Then do your captured bolt system on the bottom going into a T-bolt/threaded insert in the bottom of the neckblock where the gap between the locking bolts that capture the adjusting bolt and the start of the threaded insert in the heelblock in the routed pocket is as small as possible to allow the neck to be bolted on/off (and structurally secure) and enough room for adjustment in and out. As the top bolt is a hanger you don't have to arse about getting both bolts to engage - the bottom one engages, the top one goes through the hole and you have enogh wriggle room and then fit the locking nut from inside the soundhole. Plus you can use a smaller neckblock for this sytem - especially if you use cf flying buttress braces. You would drill a hardwood dowel into the neck-heel like Mario does for the hanger bolt and this might be a good thing for the bottom bolt stability as well.
You could use your existing system and make the gap at the bottom minimal but I like the idea of one continuous face on the neckblock front face for all of the bolts to go in and the ability to use a smaller neck-block.
I'll try and draw it all up and post a picture later.
ANZLF Adjustable Neck Joint Group Discussion
-
Dave White

- Blackwood
- Posts: 452
- Joined: Mon Nov 12, 2007 3:10 am
- Location: Hughenden Valley, England
- Contact:

Dave ,
I can't see that getting the neck on and off with my design will be any more difficult than a standard bolt on neck system. In fact slightly easier. Just undo the top neck bolt ( which goes into the barrel in the heel tenon ), then undo the socket head adjusting screw. This screw is only threaded around 10 mm. into it's barrel in the headblock. Simple , and could be done in under a minute. Anyway , why would we need to take the neck off when we have a fantastic adjustable neck ?

I can see where you're going with a butt join system, but would like to see your plan of same. It's a personal choice I guess. You're either a butt join guy or a mortice and tenon guy.The butt join allows for a headblock of smaller dimensions, but at a cost of having to use a threaded type insert , or a hanger bolt into wood. Be it Hanger or insert , you have a metal thread into wood to hold the neck on . Not much different than a wood screw when it's all boiled down, although I can see a wood dowel glued through the heel helping.
I see cross barrel nuts perfectly suited to changing neck angles , as they can turn to suit the new angle . Inserts are limited to how much play is in their actual thread(and that's providing they are installed perfectly straight in the first place)
I know others have been quite happy with metal inserts/hangerbolts and a butt join,but I have read of too many instances where they have stripped out. This may well be due to a poor installation of the insert /hangerbolt.
There is also another issue: if you were to use a butt join, there isn't a lot of wood left in the lower heel after accommodating the adjustment screw and ferrule. It's looking like a fairly weak spot . Whereas with a tenon on the heel ,there is still quite a bit of "meat" left in that area to handle that 170 odd pound of string pull.
To be fair though , I think we should wait until we see your plan before passing any sort of judgement , as I may be missunderstanding your description completley. It's happened before !
I feel much more confident with a cross barrel set-up, and a mortice and tenon to line up ,( and keep lined up )the neck to the body.
True , it requires a headblock of slightly larger dimensions , but I'd sleep better at night.
The headblock with my adjustable design is only 1/4 " deeper than a standard barrel and bolt-on headblock . Not a lot of difference, and I believe a substantial headblock to be a very good thing . I see it as the heart of the instrument . The top,back,sides,and neck all being attached to it.
Cheers , Craig
I can't see that getting the neck on and off with my design will be any more difficult than a standard bolt on neck system. In fact slightly easier. Just undo the top neck bolt ( which goes into the barrel in the heel tenon ), then undo the socket head adjusting screw. This screw is only threaded around 10 mm. into it's barrel in the headblock. Simple , and could be done in under a minute. Anyway , why would we need to take the neck off when we have a fantastic adjustable neck ?
I can see where you're going with a butt join system, but would like to see your plan of same. It's a personal choice I guess. You're either a butt join guy or a mortice and tenon guy.The butt join allows for a headblock of smaller dimensions, but at a cost of having to use a threaded type insert , or a hanger bolt into wood. Be it Hanger or insert , you have a metal thread into wood to hold the neck on . Not much different than a wood screw when it's all boiled down, although I can see a wood dowel glued through the heel helping.
I see cross barrel nuts perfectly suited to changing neck angles , as they can turn to suit the new angle . Inserts are limited to how much play is in their actual thread(and that's providing they are installed perfectly straight in the first place)
I know others have been quite happy with metal inserts/hangerbolts and a butt join,but I have read of too many instances where they have stripped out. This may well be due to a poor installation of the insert /hangerbolt.
There is also another issue: if you were to use a butt join, there isn't a lot of wood left in the lower heel after accommodating the adjustment screw and ferrule. It's looking like a fairly weak spot . Whereas with a tenon on the heel ,there is still quite a bit of "meat" left in that area to handle that 170 odd pound of string pull.
To be fair though , I think we should wait until we see your plan before passing any sort of judgement , as I may be missunderstanding your description completley. It's happened before !
I feel much more confident with a cross barrel set-up, and a mortice and tenon to line up ,( and keep lined up )the neck to the body.
True , it requires a headblock of slightly larger dimensions , but I'd sleep better at night.
The headblock with my adjustable design is only 1/4 " deeper than a standard barrel and bolt-on headblock . Not a lot of difference, and I believe a substantial headblock to be a very good thing . I see it as the heart of the instrument . The top,back,sides,and neck all being attached to it.
Cheers , Craig

+1 !Damn your good with a drill press, I'd love to see what you would be capable of with a lathe.
Looking good so far Craig, the brass ferrule is going to look elegant and go a long way toward inspiring confidence in the buyer/player/adjuster.
I'm just enjoying watching this thread head into three dimensions ...
Just a quick and rough mock-up of what the adjuster will look like
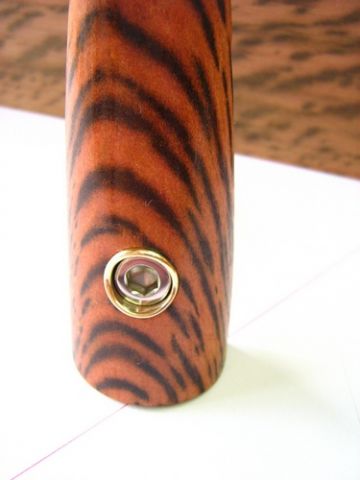
Tiger Myrtle from Tim (Australian Tonewoods)
Cheers, Craig Lawrence
..
Tiger Myrtle from Tim (Australian Tonewoods)
Cheers, Craig Lawrence
..
Last edited by Craig on Mon Mar 17, 2008 8:21 pm, edited 1 time in total.
-
Tom Morici

- Blackwood
- Posts: 103
- Joined: Thu Nov 01, 2007 5:46 pm
- Location: Montana, USA
- Contact:
Craig,
Your brass insert sample looks great, nice quality look.
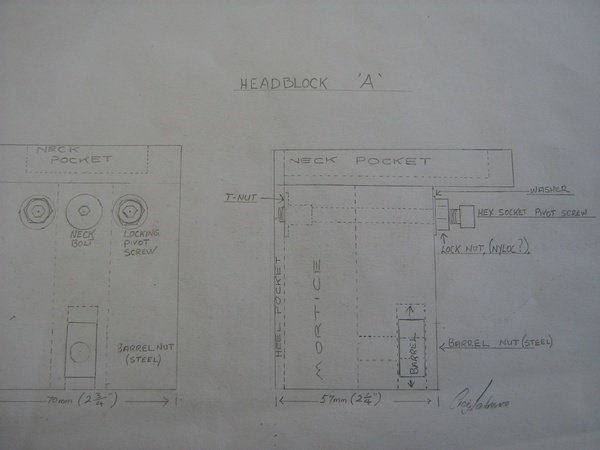
If it was me i would go with the top pivot adjustment screws as you show
in your Neckblock drawing "B". I feel it would be tricky to be able to adjust
the bolt as shown in Headblock "A" One hand inside the soundhole holding
a wrench (and it would have to be a short one) while your other hand tries to adjust with a allen wrench, (through the soundhole) the cap head bolt.
Maybe you have real tiny hands.
Im with you I don't care for the butt joint heel either, I like the extra contact area of the mortise and tenon also.
I can't see how the barrel connector can rotate with adj.
The bolt is straight and the threaded hole in the barrel is straight.
As you adj. the angle of the heel. The force would try to push the barrel
up towards the fretboard or down towards the back of the guitar.
Clockwise would be the up force counter clockwise the down force.
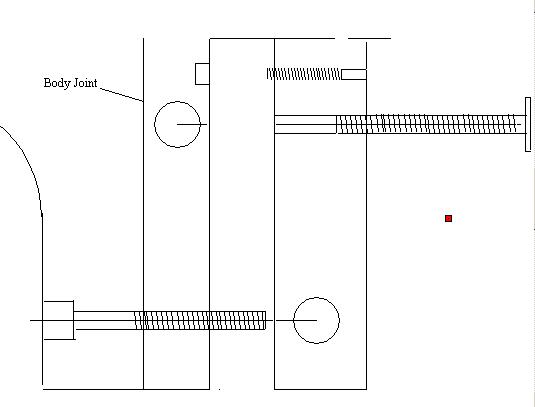
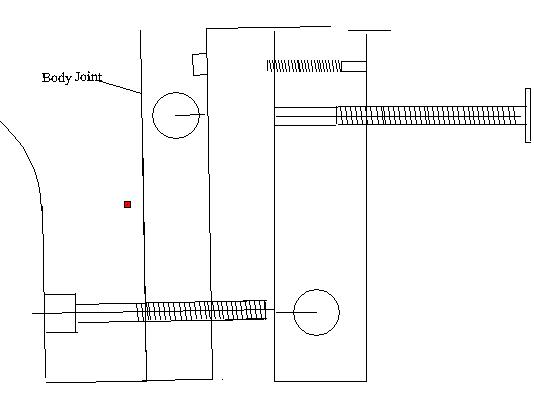
The first pic shows the connection as straight. The 2nd pic shows the heel
adj. in by 1 deg. The CL draw on the heel bolt shows what I tried to explain.
This is how I see it. Others may see it another way.
Straight Joint.
Joint 1 deg. tilt
I hope this helps!
Cheer's
Tom
Your brass insert sample looks great, nice quality look.
If it was me i would go with the top pivot adjustment screws as you show
in your Neckblock drawing "B". I feel it would be tricky to be able to adjust
the bolt as shown in Headblock "A" One hand inside the soundhole holding
a wrench (and it would have to be a short one) while your other hand tries to adjust with a allen wrench, (through the soundhole) the cap head bolt.
Maybe you have real tiny hands.
Im with you I don't care for the butt joint heel either, I like the extra contact area of the mortise and tenon also.
I can't see how the barrel connector can rotate with adj.
The bolt is straight and the threaded hole in the barrel is straight.
As you adj. the angle of the heel. The force would try to push the barrel
up towards the fretboard or down towards the back of the guitar.
Clockwise would be the up force counter clockwise the down force.
The first pic shows the connection as straight. The 2nd pic shows the heel
adj. in by 1 deg. The CL draw on the heel bolt shows what I tried to explain.
This is how I see it. Others may see it another way.
Straight Joint.
Joint 1 deg. tilt
I hope this helps!
Cheer's
Tom

I would like to offer a sincere apology to those who use the butt joints .
I'm afraid I "call em the way I see em " sometimes without giving enough thought .
This is how Craig gets himself in deep trouble !
I'm sure they work O.K. . As a matter of fact ,My very first guitar , which I still have , has a screwed on neck and is still going strong.
I do think , however , that the barrel set -up would be better in this instance.
So sorry guys.
Tom , I'll get back to you shortly.
Cheers , Craig
Thanks for pointing that out Tom.
If you go back a page and look at my last plan , you'll see I mention the hole in the headblock (for the screw going to the barrel ) as a 7.5 mm. hole.The screw is 5.87 mm. in diameter.
I intended drilling the hole through the heel at around 1.5 degree. Of course the barrel can rotate some .
As I mentioned in a previous post, a half turn on the adjuster screw , lowers the action .5 mm.. I consider that a fair whack of an adjustment. In this case the thread move in Half a mm. ( about 1/64 " ) . I don't think there is a concern there Tom.
I have tried a dummy run at tightening the pivot and lock nut . I have a small 10 mm spanner ( just a normal cheap one from bunnings ) . I can hold the allen wrench from turning while tightening the nut . It's not that hard . One handed obviously . Bear in mind also Tom , I can't see the pivots being adjusted much ,if at all, after final set up. Dave ,who is experienced with adjustable necks , mentioned this also in a previous post
Cheers , Craig
If you go back a page and look at my last plan , you'll see I mention the hole in the headblock (for the screw going to the barrel ) as a 7.5 mm. hole.The screw is 5.87 mm. in diameter.
I intended drilling the hole through the heel at around 1.5 degree. Of course the barrel can rotate some .
As I mentioned in a previous post, a half turn on the adjuster screw , lowers the action .5 mm.. I consider that a fair whack of an adjustment. In this case the thread move in Half a mm. ( about 1/64 " ) . I don't think there is a concern there Tom.
I have tried a dummy run at tightening the pivot and lock nut . I have a small 10 mm spanner ( just a normal cheap one from bunnings ) . I can hold the allen wrench from turning while tightening the nut . It's not that hard . One handed obviously
Cheers , Craig
Last edited by Craig on Mon Mar 17, 2008 8:57 pm, edited 1 time in total.
Tom,
I just did a calculation on your 1 degree adjustment you show in your plan.
1 degree would lower the string height above the 12th fret by 2.75 mm.
We are talking a whole lot less , when it comes to adjusting the action . Using .5mm adjustment as an example , the angle change is around .2 of one degree.
It's a valid point all the same ,and I'll give it more thought, thanks mate.
Once again my apologies for my thoughtless comments regarding heel joints. It was a crap thing to say , and more than likely wrong ! As I say , my old guitar is still going strong and both my kids play it regularly.
Cheers, Craig
-
Dave White
- Blackwood
- Posts: 452
- Joined: Mon Nov 12, 2007 3:10 am
- Location: Hughenden Valley, England
- Contact:
Craig,
No need to apologise - I don't use butt joints either I wasn't challenging your design either. I was just doing "thinking out lout" stuff which this thread sort of dragged me in to - great fun. Thinking about your design further - it is probably more robust.
There are always reasons to take a neck off - even with an adjustable neck system - if you have to work on the body and do re-sprays etc on finishes then with the neck off will be a lot easier. Plus during the build the neck will be on and off as you adjust, fit it into the neck pocket etc etc. This part you can do without the bottom bolt captured of course. Trust me )I'm a luthier ), unless I have this wrong which is very possible, the bottom bolt when captured should be hard to turn as it is meant to be stable and do minute turn adjustments. A 10mm threading will/should take a lot of effort/time plus you have to support the neck in its "wobbly" state as you do it - not like tightening normal neck bolts with the neck snugly in position.
Are you going to drill the hole for the bottom barrel bolt all the way through the side of the neck block? And are you going to use a side sound port to get at it and make sure the angle is correct for the bottom bolt when the neck goes on? As you will have to pre-drill before the neck block goes on, there will be no wriggle room in the horizontal plane for where the bottom bolt of the neck has to be to mate up with it and have the fretboard the right height on the body. That means it's going to be precision engineering all the way - I'm generally a coward an crave wriggle room where possible . With a t-nut/threaded insert in the neck-block rather than a barrell bolt, you have the luxury of marking up and fitting the insert as the neck is fitted, making sure everything is in the right place.
I love the brass ferrule - have you considered making a few more and selling them? I'm not tooled up for this sort of stuff and would love to buy some. The other option is something like the Waverly bushing converters or electric guitar through body string ferrules, but they don't look as neat and the inside diameter may not be large enough for the bolt head.
Great stuff.
No need to apologise - I don't use butt joints either
There are always reasons to take a neck off - even with an adjustable neck system - if you have to work on the body and do re-sprays etc on finishes then with the neck off will be a lot easier. Plus during the build the neck will be on and off as you adjust, fit it into the neck pocket etc etc. This part you can do without the bottom bolt captured of course. Trust me )I'm a luthier
Are you going to drill the hole for the bottom barrel bolt all the way through the side of the neck block? And are you going to use a side sound port to get at it and make sure the angle is correct for the bottom bolt when the neck goes on? As you will have to pre-drill before the neck block goes on, there will be no wriggle room in the horizontal plane for where the bottom bolt of the neck has to be to mate up with it and have the fretboard the right height on the body. That means it's going to be precision engineering all the way - I'm generally a coward an crave wriggle room where possible
I love the brass ferrule - have you considered making a few more and selling them? I'm not tooled up for this sort of stuff and would love to buy some. The other option is something like the Waverly bushing converters or electric guitar through body string ferrules, but they don't look as neat and the inside diameter may not be large enough for the bolt head.
Great stuff.
Dave White
[url=http://www.defaoiteguitars.com]De Faoite Stringed Instruments[/url]
[url=http://www.defaoiteguitars.com]De Faoite Stringed Instruments[/url]
G'day Dave ,
I wish I could buy the ferrules off the shelf ! . They aren't that easy to make ( on a drill press ) .difficult to centre the hole. I imagine it would be no problem with a lathe . It'll be good when Allen gets his new lathe Only lives just round the corner ( I wish ! )
I made the ferrule with a 3.5 mm. thick floor or base or bottom . Hope you know what I mean. This is because it is an important area, handling string pull as well as being the bearing surface for the adjusting screw. I've mentioned it before , but the ferrule also increases the bearing surface area considerably . The ferrule will be epoxied in so the walls of the ferrule will also share that load.
I'm too tired at the moment to get into the hole line -up thing , but I'll think it out. Any ideas here would be bloody good value !
There is nothing to stop that lower hole going right through the neck block ( past the barrel ) for lining up purposes. ,,,,,,,,,,,,,,,,my brain hurts
Cheers , Craig
I wish I could buy the ferrules off the shelf !
I made the ferrule with a 3.5 mm. thick floor or base or bottom
I'm too tired at the moment to get into the hole line -up thing , but I'll think it out. Any ideas here would be bloody good value !
There is nothing to stop that lower hole going right through the neck block ( past the barrel ) for lining up purposes. ,,,,,,,,,,,,,,,,my brain hurts
Cheers , Craig
-
Dennis Leahy

- Blackwood
- Posts: 872
- Joined: Wed Oct 10, 2007 12:32 am
- Location: Duluth, MN, US
- Contact:
Is there a consensus that setscrews screwed through a 3/4" (19mm) to 1-1/2" (38mm) neckblock can and will unscrew themselves with pressure and/or vibration over time? I have a very difficult time imagining that those setscrews could rotate on their own.
Maybe we're not talking about the same thing. I'm thinking that the minimum distance that the setscrew threads would be in contact with wood would be 19mm, and that would be a 19mm thick neckblock for a butt joint neck. If a mortise and tenon is used, and assuming the tenon is 19mm long and that the neck block itself is about 38mm (1.5") thick, then the setscrew could be the full 38mm (1.5") long (with hex socket exposed.) I see in several sketches presented here, the setscrew is shown partially buried in the wood, leaving a tunnel to get to the setscrew head. I would propose to use longer setscrews, bringing them to the inner surface of the neckblock (full length setscrews.) Unfortunately, a pair of 1/4-20 x 1-1/2" setscrews will add significant weight, and the only setscrews that are that length are 1/4-20.

Setscrews in wood may be a case where (lower tpi count) Imperial threads are superior to metric threads.
I am buying a couple of 1/4-20 x 1-1/2" setscrews to experiment with. I'll try drilling holes of various sizes, and just screwing the setscrews into untapped holes (sort of self-tapping setscrews.) I'll also try tapping other holes with a 1/4-20 tap.
I will also try for less weight (at the expense of shorter length and thus less thread to wood contact) by trying the next longest available setscrews, with smaller diameter: 10-32 x 3/4" long. That will be less than half the weight of the 1/4-20 x 1-1/2" setscrews, and I'm betting they will do the job.
A setscrew in wood presents wood fibers in contact with threads - in a way, that's doing the same thing as a nyloc nut. In fact, I think it might be difficult to get the setscrews to turn. I plan on putting a bit of soap on the threads. I suspect that the size to drill the hole - just large enough but not too large - plus whether or not to tap the hole will be the keys.
Isn't it irritating that the hex key (Allen wrench) size for Allied truss rods is 9/64", the hex key size for the cross dowel furniture bolts are 4mm, and the hex key size for the 10-32 setscrews are 3/32" or 1/4-20 setscrews are 1/8"??? Damn, that's 3 different Allen wrenches!
I'll let you know what I find out, but then again, you may not believe me anyway, because I won't have a good way to supply the pressure and vibration as well as seasonal expansion and contraction of the neck block wood comparable to real life.
Dennis
Maybe we're not talking about the same thing. I'm thinking that the minimum distance that the setscrew threads would be in contact with wood would be 19mm, and that would be a 19mm thick neckblock for a butt joint neck. If a mortise and tenon is used, and assuming the tenon is 19mm long and that the neck block itself is about 38mm (1.5") thick, then the setscrew could be the full 38mm (1.5") long (with hex socket exposed.) I see in several sketches presented here, the setscrew is shown partially buried in the wood, leaving a tunnel to get to the setscrew head. I would propose to use longer setscrews, bringing them to the inner surface of the neckblock (full length setscrews.) Unfortunately, a pair of 1/4-20 x 1-1/2" setscrews will add significant weight, and the only setscrews that are that length are 1/4-20.
Setscrews in wood may be a case where (lower tpi count) Imperial threads are superior to metric threads.
I am buying a couple of 1/4-20 x 1-1/2" setscrews to experiment with. I'll try drilling holes of various sizes, and just screwing the setscrews into untapped holes (sort of self-tapping setscrews.) I'll also try tapping other holes with a 1/4-20 tap.
I will also try for less weight (at the expense of shorter length and thus less thread to wood contact) by trying the next longest available setscrews, with smaller diameter: 10-32 x 3/4" long. That will be less than half the weight of the 1/4-20 x 1-1/2" setscrews, and I'm betting they will do the job.
A setscrew in wood presents wood fibers in contact with threads - in a way, that's doing the same thing as a nyloc nut. In fact, I think it might be difficult to get the setscrews to turn. I plan on putting a bit of soap on the threads. I suspect that the size to drill the hole - just large enough but not too large - plus whether or not to tap the hole will be the keys.
Isn't it irritating that the hex key (Allen wrench) size for Allied truss rods is 9/64", the hex key size for the cross dowel furniture bolts are 4mm, and the hex key size for the 10-32 setscrews are 3/32" or 1/4-20 setscrews are 1/8"??? Damn, that's 3 different Allen wrenches!
I'll let you know what I find out, but then again, you may not believe me anyway, because I won't have a good way to supply the pressure and vibration as well as seasonal expansion and contraction of the neck block wood comparable to real life.
Dennis
Another damn Yank!
Morning everyone,
Back after a good nights sleep ( but dreaming of screws and nuts ) Hopefully with a clearer brain.
Great to hear from you again Dennis . We need all the brain power we can muster at the moment , and your alternate thinking maybe just what the doctor ordered.
Firstly Dennis , The set screws are essentially what Dave has been using. It may be difficult to obtain set screws 1 1/2 " long. Why not trial socket head screws instead, with those being threaded all the way to their head, the head remaining proud of the headblock They will do the same job. We will await your findings. thanks mate.
Tom ,Yes the set screws into nyloc nuts provide ease of adjustment without having to resort to a spanner and allen wrench at the same time. Headblock 'B' isn't worth throwing out just yet !. I'll be interested to see what Dennis' trials provide also.
Tom again! Thanks also for pointing out the changing angle issue as the adjusting screw is screwed in and out. It makes it clear to me that a barrel nut (that can rotate) will have little affect and not at all what is required . I overlooked this earlier. The adjusting screw would in fact be moving in an arch. It may not however be of too much concern ,as the amount of adjustment in normal playing situations is tiny . As my calculations above show : .5mm change in string height ,means the screw has to turn in around .5 mm only. I am still concerned about it nevertheless.
Dave , The lining up of the adjusting screw hole in the heel to the hole and anchoring thread in the headblock is of greater concern to me than all others, and you are certainly correct in this regard. The barrel hole would , as you say , have to be drilled before installing the headblock to the rims (sides ), and the captured screw system put in place before fitting the neck
We want an amount of wriggle room for sure . To have to make this system to exact tollerances is not what the average luthier is after. I'm prepared to scrap the horizontal barrel in the headblock idea ( paricularly after considering Tom's point of view ).
Your idea of drilling the lower headblock hole after the neck has it's "fit" ,and then inserting a T-nut in the headblock's arse end, ( via though the soundhole) would work as far as I can see. The only reservations I have ,are that you would see the T-nut flange ( through the soundhole ) ,.It's only aesthetics , I know , but not a great look. Secondly, we would be relying on the amount of play in the T-nuts thread to handle the screws angle change ,when being adjusted. It may have enough ?? I'm not sure with out testing.
Thirdly , I'm supposing this T-nut to be epoxied in place. Should the neck cop a fair bump, do you think that epoxied in T-nut could be dislodged out the arse end ?? . Hey , look guys , I'm may be dreaming up scenarios that may never arise, but better to have things covered in all eventualities.
It would seem to me that my original barrel nut in the headblock would be great if it had up and down type movement. In other words, the barrel would have to be in a elongated hole ( elongated vertically , that is ) . This sounds like a crap system to me , but it is what kept going around my mind most of last night..
This whole system we have developed together has come a long way since we started a fortnight ago. It's starting to look good , but isn't worth a rats arse if it's installation requires absolute and exact engineering.
An idea dawned on me this morning. The penny finally dropped !
It's only an idea at this stage and I'd like to" run it up the flag pole and see if the cat wants to lick it" ( crazy saying huh?. One wonders how these sayings come to be )
Instead of having the barrel set in the headblock in a horizontal position, Howzabout we have it set in the headblock in a vertical position with the hole in the headblock being longer than required This would allow the barrel to move up or down to suit lining up with the adjuster screw.
Keep thinking guys ! ,,, we're getting closer ! Please don't be hesitant about coming forward with any thoughts/ideas you have. They may be more useful than you think !
Cheers, Craig
Back after a good nights sleep ( but dreaming of screws and nuts )
Great to hear from you again Dennis . We need all the brain power we can muster at the moment , and your alternate thinking maybe just what the doctor ordered.
Firstly Dennis , The set screws are essentially what Dave has been using. It may be difficult to obtain set screws 1 1/2 " long. Why not trial socket head screws instead, with those being threaded all the way to their head, the head remaining proud of the headblock They will do the same job. We will await your findings. thanks mate.
Tom ,Yes the set screws into nyloc nuts provide ease of adjustment without having to resort to a spanner and allen wrench at the same time. Headblock 'B' isn't worth throwing out just yet !. I'll be interested to see what Dennis' trials provide also.
Tom again! Thanks also for pointing out the changing angle issue as the adjusting screw is screwed in and out. It makes it clear to me that a barrel nut (that can rotate) will have little affect and not at all what is required . I overlooked this earlier. The adjusting screw would in fact be moving in an arch. It may not however be of too much concern ,as the amount of adjustment in normal playing situations is tiny . As my calculations above show : .5mm change in string height ,means the screw has to turn in around .5 mm only. I am still concerned about it nevertheless.
Dave , The lining up of the adjusting screw hole in the heel to the hole and anchoring thread in the headblock is of greater concern to me than all others, and you are certainly correct in this regard. The barrel hole would , as you say , have to be drilled before installing the headblock to the rims (sides ), and the captured screw system put in place before fitting the neck
We want an amount of wriggle room for sure . To have to make this system to exact tollerances is not what the average luthier is after. I'm prepared to scrap the horizontal barrel in the headblock idea ( paricularly after considering Tom's point of view ).
Your idea of drilling the lower headblock hole after the neck has it's "fit" ,and then inserting a T-nut in the headblock's arse end, ( via though the soundhole) would work as far as I can see. The only reservations I have ,are that you would see the T-nut flange ( through the soundhole ) ,.It's only aesthetics , I know , but not a great look. Secondly, we would be relying on the amount of play in the T-nuts thread to handle the screws angle change ,when being adjusted. It may have enough ?? I'm not sure with out testing.
Thirdly , I'm supposing this T-nut to be epoxied in place. Should the neck cop a fair bump, do you think that epoxied in T-nut could be dislodged out the arse end ?? . Hey , look guys , I'm may be dreaming up scenarios that may never arise, but better to have things covered in all eventualities.
It would seem to me that my original barrel nut in the headblock would be great if it had up and down type movement. In other words, the barrel would have to be in a elongated hole ( elongated vertically , that is ) . This sounds like a crap system to me , but it is what kept going around my mind most of last night..
This whole system we have developed together has come a long way since we started a fortnight ago. It's starting to look good , but isn't worth a rats arse if it's installation requires absolute and exact engineering.
An idea dawned on me this morning. The penny finally dropped !
It's only an idea at this stage and I'd like to" run it up the flag pole and see if the cat wants to lick it"
Instead of having the barrel set in the headblock in a horizontal position, Howzabout we have it set in the headblock in a vertical position with the hole in the headblock being longer than required This would allow the barrel to move up or down to suit lining up with the adjuster screw.
Keep thinking guys ! ,,, we're getting closer ! Please don't be hesitant about coming forward with any thoughts/ideas you have. They may be more useful than you think !
Cheers, Craig
-
Tom Morici
- Blackwood
- Posts: 103
- Joined: Thu Nov 01, 2007 5:46 pm
- Location: Montana, USA
- Contact:
Craig,
I am glad you see what I was trying to explain. And yes you are correct
1 deg. of angle change would have to be considered dramatic.
your calculations on this are correct. I made it 1 deg. so that the alignment change would be easier to see.
Also the fact that you will only have 10mm of the bolt engaged into the barrel nut will also allow a bit of "wiggle" room. The thread on the bolt and the threaded hole in the barrel nut are loose enough to add a bit more of a "fudge" factor also.
I find the vertical barrel nut interesting, give me enough time and Im sure too find something wrong with it.
I think the idea of drilling the bolt holes in the neckblock and the heel tenon at a 1-1/2 deg angle would cause a "ramp" effect as the bolts are tightened. The neck would rise up slightly as it is tightened.
Dennis,
we agree that set screws threaded into the wood block for pivot points,should hold fast. 1-1/2" long seems longer than needed.
Waiting for your input of your results.
Allen,
I wanted to thank you for starting this thread, it is fun to run it through
the think tank. Thanks mate!
Tom
Ignoring the pivot screw set -up for the time being ( at least until we hear back from Dennis ,, ) Here is an update on what I was trying to explain in my above post, regarding the lower barrel in the headblock.
My old plan is now looking a bit rough around the edges with all the changes I've made . Hoping you can still see it clear enough.
I've enlarged the headblock hole to 8mm. for extra wriggle room
Cheers , Craig
My old plan is now looking a bit rough around the edges with all the changes I've made . Hoping you can still see it clear enough.
I've enlarged the headblock hole to 8mm. for extra wriggle room
Cheers , Craig
Tom Morici wrote:
I think the idea of drilling the bolt holes in the neckblock and the heel tenon at a 1-1/2 deg angle would cause a "ramp" effect as the bolts are tightened. The neck would rise up slightly as it is tightened.
Tom
Correct again Tom ! , The hole to now be @ 90 degree to the heel.
Oh ! , and before you point it out Tom
I hate to seem the bloke that either rejects or accepts others ideas . Makes me appear a bit of a smart arse. I'm just trying to co-ordinate this whole ' think tank' . If any of you guys feel I've made a wrong move , please speak up . ( examples are, Dennis going back to the setscrews in a wooden thread , and Tom believing more in headblock 'A than 'B' )
Please also speak-up if you find my role as annoying . I seem to have adopted it without realizing it. Kind of ' Self appointed'
Cheers , Craig
-
Dennis Leahy
- Blackwood
- Posts: 872
- Joined: Wed Oct 10, 2007 12:32 am
- Location: Duluth, MN, US
- Contact:
Yes, agreed, an excellent exercise to run all these ideas through my cranium.
A thought: if a pair setscrews are indeed able to withstand 1/2 of the pressure exerted on the neck (say about 180 lbs from the strings, and a few more pounds from crossdowel bolts tightened to hold the neck on - that's maybe 100 pounds max per setscrew) and resist any rotating due to vibration, then I would also think that...
a single setscrew at the bottom of the heel (in conjunction with the lower crossdowel and bolt) would be able to handle the job of providing the lower adjustable stop position for the neck. Whether this lower setscrew is accessed from the outside of the guitar (and thus threaded through the neck heel) or accessed from within the guitar (and thus threaded through the neck block), I think it easily has adequate structure to perform the duty of stopping the neck heel at any position within the range.
I guess this is rehashing, but I have a guitar in my hands that has an adjustable neck joint, made of simply a pair of crossdowels and bolts. The only magic is that there is an air gap between the bottom of the tenon and the mortise. So, instead of a perfect mortise and tenon joint, the tenon is cut at a 1° angle, ensuring that only the top of the tenon touches the bottom of the mortise pocket. Once that upper crossdowel is tightened, the neck is nearly immobilized. As the lower crossdowel bolt is tightened, the air gap gets closer to being closed, dropping the string action.
It is actually very simple, and it works. To my thinking, there are two deficiencies:
1.) the neck angle is not adjustable from outside the guitar (you may or may not see this as a deficiency, but let's address it as a possible deficiency)
2.) as the neck angle changes, the string scale length changes, thus there is a change in intonation
I am not sure why Dave is not experiencing # 2, as I'm sure his ears are better than mine. It may be that in my neck, the actual effective pivot point of the end of the tenon (which is at least 1/2" below the fingerboard, is creating a bigger string length change than he is experiencing with setscrews up closer to the fingerboard. In fact, I feel like that must be it.
If there is a third deficiency:
3.) not all that easy to adjust. (Admittedly, Grant Goltz has made neck angle changes several times in his guitars, and says it is a matter of loosening strings - to get through the soundhole - five seconds to crank or loosen the lower bolt, and re-tightening the strings. With an offset soundhole, my guitar should have been even easier, but I used a wacky suspended bracing system that put braces in my way. So, you'd think I'd be foaming at the mouth to move the neck angle adjuster externally. I'm resistant, for my own use (but, maybe I'll get past my aesthetic prejudice.)
I find that the upper bolt does need to be loosened just slightly to get the lower bolt to do its job as the adjuster.
So, for me and my way of thinking, the upper setscrews will solve issue #2. The single lower setscrew makes the entire neck angle a tripod. What could be simpler than a tripod. And, the tripod can work whether the lower setscrew comes from the outside or from the inside.
To address deficiency #3, I plan to try disc springs under the bolt heads, which I hope will compress and expand to allow the tiny (0.5°) required angle change in the neck, without having to loosen the crossdowel bolts at all.
If I ever build a guitar for someone that wants the external adjustment capability, my first thought will be a setscrew mounted through the neck heel.
Sorry if rehashing this engineering method tangent is now out of place in this thread.
Dennis
Another damn Yank!
Let me try to get this straight in the old gray matter. The upper adjustment screws (whether set screws or cap head screws) will actually be holding to top of the neck just slightly away from the neck block. The upper neck bolt will pull the neck up snug against these set screws. Then the lower adjuster screw will either tilt the neck up or down.
If this is the case, then the upper set screws are a definite improvement to my mock up for the simple fact of not having to back off the upper neck bolt. The neck is going to pivot on these screws with some ease.
I suspect that we're looking too hard for flaws with the design here. If the neck is going to pivot on the upper set screws, and the lower adjusting bolt will move the neck the desired amount for any normally required adjustment, then I'm liking where this has progressed too.
We are left with how to go about building it, ie. when to drill holes for neck bolts. With something that requires precise alignment of of all these parts, I like the idea of drilling on a drill press through neck block and neck, before they are attached to the sides. This does pose a problem with making sure that the neck block is glued precisely to the sides especially in relation to the top.
The reason I like the idea pre-building the neck/neck block is that I've never been totally satisfied with trying to drill by hand and get everything square and lined up once the box has been assembled.
If there anyone has insight on how to go about this, then please, I'm all ears.
-
Dave White
- Blackwood
- Posts: 452
- Joined: Mon Nov 12, 2007 3:10 am
- Location: Hughenden Valley, England
- Contact:
Craig,Craig L wrote: Your idea of drilling the lower headblock hole after the neck has it's "fit" ,and then inserting a T-nut in the headblock's arse end, ( via though the soundhole) would work as far as I can see. The only reservations I have ,are that you would see the T-nut flange ( through the soundhole ) ,.It's only aesthetics , I know , but not a great look. Secondly, we would be relying on the amount of play in the T-nuts thread to handle the screws angle change ,when being adjusted. It may have enough ?? I'm not sure with out testing.
Thirdly , I'm supposing this T-nut to be epoxied in place. Should the neck cop a fair bump, do you think that epoxied in T-nut could be dislodged out the arse end ?? . Hey , look guys , I'm may be dreaming up scenarios that may never arise, but better to have things covered in all eventualities.
It would seem to me that my original barrel nut in the headblock would be great if it had up and down type movement. In other words, the barrel would have to be in a elongated hole ( elongated vertically , that is ) . This sounds like a crap system to me , but it is what kept going around my mind most of last night..
I wasn't thinking arse end but "missionary position". Drill from the front end of the neck-block when a dry run fit of the neck has marked the correct position - you could make a jig for this with a drill bushing guide that clamps over the guitar like the ones for routing mortices/dovetails etc. The hole doesn't have to go all the way through the neck-block, just enough to take the adjusting bolt through with room for adjustment, so you won't see anything from inside the soundhole. I think a good threaded insert epoxied in would be perfectly fine. You don't need any swivel to fit the neck - you will have to do the "support the wobbly neck" bit I described earlier though - and when the top bolt/pivot screws are set the adjustment range is small enough for it not to be an issue. The vibration issue is dealt with by the captured adjusting bolt - which aill be very hard to turn
The problem with the vertical barrel bolt is that when the back is glued on you have no access at all.
Dave White
[url=http://www.defaoiteguitars.com]De Faoite Stringed Instruments[/url]
[url=http://www.defaoiteguitars.com]De Faoite Stringed Instruments[/url]
-
Dave White
- Blackwood
- Posts: 452
- Joined: Mon Nov 12, 2007 3:10 am
- Location: Hughenden Valley, England
- Contact:
Allen,Allen wrote:Let me try to get this straight in the old gray matter. The upper adjustment screws (whether set screws or cap head screws) will actually be holding to top of the neck just slightly away from the neck block. The upper neck bolt will pull the neck up snug against these set screws. Then the lower adjuster screw will either tilt the neck up or down.
That is the essence of the Mike Doolins system and my adaptation of it. The top neck bolt doesn't have to be touched at all. Mike uses a captured bolt for the bottom adjuster and I adapted it to keep a bottom neck bolt and a bottom set screw. On mine you do have to slacken and re-tighten the bottom neck bolt to make an adjustment but neck installation/removal is easier.
As for the headblock, you can pre-drill all of the top holes for bolts/set-screws, it will be the bottom hole in the neck-block that will be the hard one. I've suggested an adaptation to Craig's system above that would be easy to mark and drill with a simple jig after the body has been assembled.
By the way - one of the trickiest bits we haven't touched on yet is how to route the neck socket that the neck heel sits in "seamlessly". A brain storm on jigging this would be of great value - particularly how you cut the heel profile anything other than straight up and down.
Dave White
[url=http://www.defaoiteguitars.com]De Faoite Stringed Instruments[/url]
[url=http://www.defaoiteguitars.com]De Faoite Stringed Instruments[/url]
-
Dave White
- Blackwood
- Posts: 452
- Joined: Mon Nov 12, 2007 3:10 am
- Location: Hughenden Valley, England
- Contact:
Dennis,
In the system you describe there is a gap at the bottom of the neck between the heel and tennon. What happens when you pull sharply downwards on the end of the neck Hendrix whammy bar style? Does the neck pivot and push the lower bolt head back slightly into the soundhole?
Yes - the top pivots need to be as close to the fingerboard bottom as your design permits - this is the pivot point that moves little to nothing and so the impact on intonation is tiny to negligable.
If you have a system with the pivot points/top neck bolt close to the fingerboard such that when tightened let you hold the neck with a bottom barrel bolt with an air gap between the bottom of the tennon and neck block that is absolutely rock solid unless the bottom bolt is turned, then you have cracked it - you don't need a captured bottom bolt. I suspect that the system won't be steady state rock solid though unless you fully tighten the bottom bolt (nothing left to adjust) or else have the top bolt quite a distance from the fingerboard so that your intonation point does become an issue.
As I say - there is only one way to find out - to paraphrase "Build it, make it work, and they will come . . . "
Dave White
[url=http://www.defaoiteguitars.com]De Faoite Stringed Instruments[/url]
[url=http://www.defaoiteguitars.com]De Faoite Stringed Instruments[/url]
I was thinking if it's going to be a mortise/tenon set up, then both parts will be built before assembling the box. Should be fairly easy to build this way, but as I said previously, alignment is critical.
I read recently on the OLF by Micheal Payne I believe, that he uses a work board with a center line scribed and aligns and attaches his body mold to this. Then uses a simple jig to locate the neck and tail block accurately to the center of the instrument while he glues them to the sides. Seems like a doable solution to some of the issues that we are going to be faced with here.
As far as the shape of the heel, that is a real tricky one. Personally, I prefer a slender, shaped heel, and I really don't see any way of getting this to sit into it's pocket accurately without shaping the heel, then scribing the shape on the side material. Then cutting it very carefully with whatever method you feel comfortable with. A scalpel and a great deal of care comes to mind here.
Gotcha Dave, missionary it is !
Do you think epoxy strong enough to retain that T-nut though? The reason I had it in my mind to put it at the arse end was that the string pull would be pulling against the flange which would be hard up against the rear of the headblock. ( can't be pulled out/through ).
I thought I'd hit on it with the vertical barrel. In fact I was quite pleased with myself,,,,,,,,,,,until now ,,,,,,, . I think you are right Dave . Once it's in there you can't get it out, and I don't like the idea of that much at all.
B.T.W. After your description of taking off the neck with a captured screw , I can see that it poses some difficulty, or should I say inconvenience . I think I might cop that inconvenience if the benefit was to have an external adjuster, but there again , I've never undone a neck with a captured screw system as yet , so what do I know . Also mate, I would make up a heap of ferrules and send them to you if they were that easy for me to knock up ( man, I know I owe you that at least) . Truth is , they're very tricky to make on the drill press. I'm sure a guy with a lathe would pop them out in no time, and that's probably the way to go.
I've given nyloc nuts a fair trial this afternoon , just so I know of their durability. With the particular nuts I used ( 6 mm.) they failed miserably.
I ran the nuts up and down a thread about 1 1/2 inches long ( once only ) ,after which their locking type resistance had bloody near gone altogether. That was with that particular brand of Nyloc nut . Other brands may perform better, but I've certainly lost confidence in them.
I also gave the set screw into wood ( creating their own thread ) , thing a good go. Using a piece of Mahogany with the correct grain orientation, I trialed several different size holes . I got the tightest fit when the hole was 1.1 mm. smaller than the actual outside dimensions of the thread . I went for a hole 1.25 mm. smaller than the thread , and it didn't like it . The wood started lifting around the entrance to the hole , so settled with the hole 1.1 mm. smaller than the thread . I must say that I'm fairly impressed with their performance. Dave , you have been using them for some time . Do you think a steel thread into steel retainer ( T-nut etc ) , is worth pursuing ? I had it in my mind that it was the way to go , but it poses an extra set of problems by way of locking them from turning, whereas the wooden thread seems to offer enough resistance without having to worry about lock nuts etc . Did you find your belt and braces method necessary or just as an extra insurance ?
Dennis , we are trying for an external adjusting system, that is ,if we can design one that will work reliably. It would be a whole lot easier to deal with an internal adjustment with a locking screw . That's been handled by people like Dave without problems ,as far as I know. To be able to adjust the string action , without having to loosen the strings and dive into the soundhole would be a great advantage . This is what we are striving for, and hopefully achieve.
You mention the intonation thing again . We have covered that in a fair amount of detail , and discovered that this isn't an issue at all. This was confirmed by Dave who is experienced with his adjustable system , and also with my calculations showing that with a pivot point of 30 mm. from the fretboard , the string length only increases it's length by .093 mm. ( around 3 1/2 thou ) , when lowering the string action .5 mm above the twelfth fret. Intonation is of no concern.
To recap :
We have only Daves idea of a T- nut in the lower headblock to accept Craig's captured screw system. Using Daves T-nut would enable the builder to line up the heel to the headblock . I suggested this T-nut would be better placed in the arse end of the headblock ( the headblock face you see through the soundhole), although it would in my opinon look shithouse. I've expressed concerns that the T-nut might get pulled out when installed in the front of the headblock ( Daves missionary position ) Hope I haven't missed anything here . Let me know if I have !
With the upper pivots , we have a steel thread going into a T- nut (installed into the front of the headblock) with a locking screw set against the headblock surface . ( as per Craig's plan ) ,,OR a steel thread ( by way of a set screw or long threaded screw ) creating it's own thread through the headblock. My trials with Nyloc nuts show them to be unreliable.
That's it so far , but please tell me if you think I've missed something.
Dave , I can't say I'm absolutley wrapped in a T-nut being installed in the front of the lower headblock with only epoxy keeping it from being pulled out by the 170 odd pound of string pull.To me it makes more sense to have it installed at the rear where it can't be dislodged by the pull of the strings. Shame it would look so ugly . Maybe a cosmetic job may help in this regard.
I invisage drilling this lower hole through the headblock by puting the drill through the lower heel hole ( captured screw system removed of course ) and drilling through the headblock . This to be done after doing a neck "fit". It would give this hole the correct angle and placement in the headblock. Whatdoyareckon ?
Sorry to be so long winded folks.
Cheers Craig
Do you think epoxy strong enough to retain that T-nut though? The reason I had it in my mind to put it at the arse end was that the string pull would be pulling against the flange which would be hard up against the rear of the headblock. ( can't be pulled out/through ).
I thought I'd hit on it with the vertical barrel. In fact I was quite pleased with myself,,,,,,,,,,,until now ,,,,,,,
B.T.W. After your description of taking off the neck with a captured screw , I can see that it poses some difficulty, or should I say inconvenience . I think I might cop that inconvenience if the benefit was to have an external adjuster, but there again , I've never undone a neck with a captured screw system as yet , so what do I know . Also mate, I would make up a heap of ferrules and send them to you if they were that easy for me to knock up ( man, I know I owe you that at least) . Truth is , they're very tricky to make on the drill press. I'm sure a guy with a lathe would pop them out in no time, and that's probably the way to go.
I've given nyloc nuts a fair trial this afternoon , just so I know of their durability. With the particular nuts I used ( 6 mm.) they failed miserably.
I ran the nuts up and down a thread about 1 1/2 inches long ( once only ) ,after which their locking type resistance had bloody near gone altogether. That was with that particular brand of Nyloc nut . Other brands may perform better, but I've certainly lost confidence in them.
I also gave the set screw into wood ( creating their own thread ) , thing a good go. Using a piece of Mahogany with the correct grain orientation, I trialed several different size holes . I got the tightest fit when the hole was 1.1 mm. smaller than the actual outside dimensions of the thread . I went for a hole 1.25 mm. smaller than the thread , and it didn't like it . The wood started lifting around the entrance to the hole , so settled with the hole 1.1 mm. smaller than the thread . I must say that I'm fairly impressed with their performance. Dave , you have been using them for some time . Do you think a steel thread into steel retainer ( T-nut etc ) , is worth pursuing ? I had it in my mind that it was the way to go , but it poses an extra set of problems by way of locking them from turning, whereas the wooden thread seems to offer enough resistance without having to worry about lock nuts etc . Did you find your belt and braces method necessary or just as an extra insurance ?
Dennis , we are trying for an external adjusting system, that is ,if we can design one that will work reliably. It would be a whole lot easier to deal with an internal adjustment with a locking screw . That's been handled by people like Dave without problems ,as far as I know. To be able to adjust the string action , without having to loosen the strings and dive into the soundhole would be a great advantage . This is what we are striving for, and hopefully achieve.
You mention the intonation thing again . We have covered that in a fair amount of detail , and discovered that this isn't an issue at all. This was confirmed by Dave who is experienced with his adjustable system , and also with my calculations showing that with a pivot point of 30 mm. from the fretboard , the string length only increases it's length by .093 mm. ( around 3 1/2 thou ) , when lowering the string action .5 mm above the twelfth fret. Intonation is of no concern.
To recap :
We have only Daves idea of a T- nut in the lower headblock to accept Craig's captured screw system. Using Daves T-nut would enable the builder to line up the heel to the headblock . I suggested this T-nut would be better placed in the arse end of the headblock ( the headblock face you see through the soundhole), although it would in my opinon look shithouse. I've expressed concerns that the T-nut might get pulled out when installed in the front of the headblock ( Daves missionary position )
With the upper pivots , we have a steel thread going into a T- nut (installed into the front of the headblock) with a locking screw set against the headblock surface . ( as per Craig's plan ) ,,OR a steel thread ( by way of a set screw or long threaded screw ) creating it's own thread through the headblock. My trials with Nyloc nuts show them to be unreliable.
That's it so far , but please tell me if you think I've missed something.
Dave , I can't say I'm absolutley wrapped in a T-nut being installed in the front of the lower headblock with only epoxy keeping it from being pulled out by the 170 odd pound of string pull.To me it makes more sense to have it installed at the rear where it can't be dislodged by the pull of the strings. Shame it would look so ugly . Maybe a cosmetic job may help in this regard.
I invisage drilling this lower hole through the headblock by puting the drill through the lower heel hole ( captured screw system removed of course ) and drilling through the headblock . This to be done after doing a neck "fit". It would give this hole the correct angle and placement in the headblock. Whatdoyareckon ?
Sorry to be so long winded folks.
Cheers Craig
-
Bob Connor

- Admin
- Posts: 3132
- Joined: Mon Jul 09, 2007 9:43 pm
- Location: Geelong, Australia
- Contact:
Send me through a detailed drawing with the dimensions of the brass ferrule and I'll get some done.
Rick's leaving for Europe on holiday in 3 weeks so it'll probably be when he gets back if you blokes can hold on that long.
If he could get them done beforehand he could probably drop some into Dave while he's in England.
Rick is actually forum member number 3 (ricksta) and does check in here from time to time and he'd be a great resource for anything you blokes need custom made.
Bob
Who is online
Users browsing this forum: No registered users and 84 guests