In my experience combining BWB with a wood binding can be quite sucessful if you have access to a vacuum pump, work out a logical sequence and work methodically and quickly. You are working against glue drying and wood expanding on one surface ata fairly fast rate, particularly on a hot day. I have found that:
Glad wrap is a good medium for a cover on the vacuum board
Flywire works well as an air circuit for evacuating air
Melamine is an effective surface to sustaining a vacuum seal.
Expansion joint foam works well as a compressive clamping caul on the neoprene rubber.
The wood binding piece works well as a pressure caul on top of the veneers, so keep the wood on the top side.
Vacuum clamping time works is about 1 hour but you can sustain the vacuum for longer if you like.
The glue will cause the venner to curl if left in the unclamped state for too long.
The wood binding section will cup slightly as the moisture from the glue is drawn through the wood.
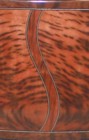
Check out the images. When I process the bindings I will add some more images. The seal between the neoprene and the melamine doesn't usually require a caul but i put it on top just in case it leaks when I leave the workshop. The vacuum pump (Busch) will get hot ~ 75celcius but this is its normal temp.
- BWB-Demo-2.jpg (74.81 KiB) Viewed 16603 times
- BWB-Demo-4.jpg (63.23 KiB) Viewed 16603 times
- BWB-Demo-5.jpg (70.77 KiB) Viewed 16603 times
- BWB-Demo-12.jpg (79.66 KiB) Viewed 16603 times