Page 1 of 1
Slotted Peghead Slotting Jig
Posted: Wed Jul 16, 2008 10:17 pm
by Taffy Evans
Hi All
Some time ago Allen asked if I could do a Tutorial on the Peg head slotting jig that I built a few weeks ago, well here it is, I hope….it’s my second attempt.
I had experienced problems in the past at times when routing slots, of the cutter wanting to pull the router away from the fence, and so make its own way across uncharted timber. This was due to either a lack of concentration
or lack on skill on my part. Whatever the cause I did not want to wreck a good piece of neck timber so I wanted to make the procedure fool proof, here is what I came up with. It is a bit complicated looking but once made its easy to use.
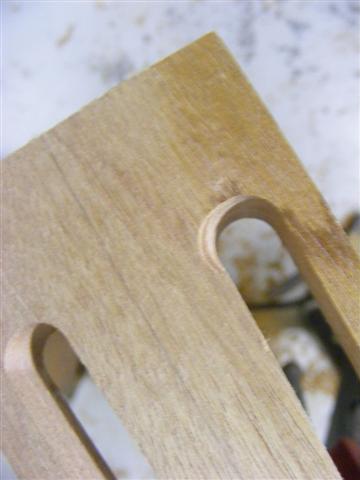
Photo 1 shows what this jig attempts to prevent. You could answer the phone while routing, try it and let me know.
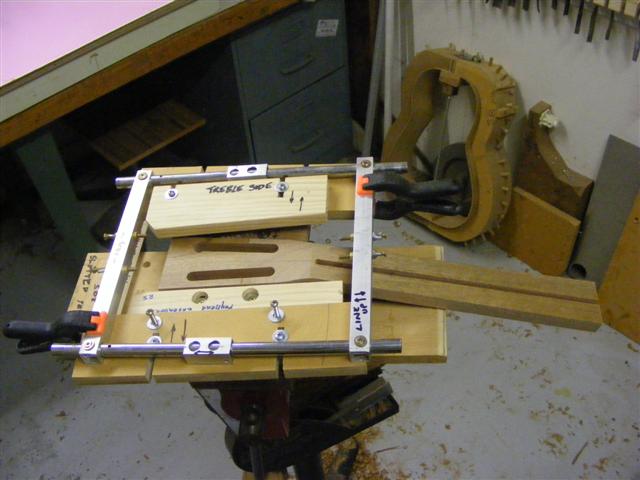
Photo 2 gives an idea of what the jig looks like with the neck in place, showing one “top fenceâ€
Posted: Thu Jul 17, 2008 6:02 am
by Allen
Thanks very much for posting that Taffy. It' looks like you thought of all the things that need adjusting in a hand built neck and have a solution for each of them.
Food for thought for building my own.
Posted: Thu Jul 17, 2008 5:19 pm
by Dave White
Taffy,
Great stuff - a really clear photo tutorial and very useful. I'll have to make myself one. A couple of quick things - photo 8 seems to be photo 7 repeated and photo 11 didn't quite make it through the upload.
I'd be a little nervous about using plastic spring clamps to hold the aluminium frame steady - Sod's Law and I are on intimate terms - and would probably use small G clamps, but it obviously works fine for you.
Thanks again.
Posted: Thu Jul 17, 2008 5:48 pm
by Allen
You know, just a couple short weeks ago, Taffy didn't know how to post a photo. Now he's gone and done this. Quite a giant leap.

And I've just re-read it again, and see a bunch more things that I missed the first time through that will make building jigs much more "universal".
Thanks Taffy.
Posted: Thu Jul 17, 2008 6:08 pm
by Kim
Great stuff Taffy,
I agree with Dave, this is a clearly presented and most useful tutorial.
Thanks for making the effort to share with us M8.
Cheers
Kim
Posted: Thu Jul 17, 2008 7:06 pm
by Dave White
Allen wrote:You know, just a couple short weeks ago, Taffy didn't know how to post a photo. Now he's gone and done this. Quite a giant leap.
Allen,
I wasn't criticising - far from it. It's nice to have a great tutorial like this one "complete" for posterity so if at some stage Taffy could edit it or Bob can "fix it" then it would be perfectomundo!!
Posted: Thu Jul 17, 2008 7:37 pm
by Kim
Taffy,
I've fixed up image 11, if you can't figure out how to replace the double up of image 7 with image 8 of the "peghead extenders", just post the image by replying in this thread and I will move it there for you.
Cheers
Kim
Posted: Fri Jul 18, 2008 6:02 am
by Allen
I didn't think you were Dave. Sorry to leave that impression.
Posted: Fri Jul 18, 2008 8:13 am
by Taffy Evans
Hi
Thanks for input so far. All comments taken in the spirit they are given. Allen I planned for this jig to handle 12 string pegheads also, and differents shapes. Dave you are correct about the clamps, I have plans to put an inbuilt clamping system on. The mixed up photo's, I'm sorry about that. I tried doing this presentaion whilst on line straight into the message window I was at it for about 4 hours, then I thought I'd be smart and hit {preveiw} and lost the lot after that. Then I thought that I could prepare the whole text on my computer and copy and post it across to the forum site, I tried it and it worked. Getting all the photo's to uplaoad in the right order was a big worry. Thank kim I hope this works.
Thank again
Posted: Fri Jul 18, 2008 2:53 pm
by Kim
Worked out just fine Taffy and all is in order now

Sorry to hear about you loosing all your text when you previewed your post. It shows you are a very patient and sharing man to have sat down to do it all again for us. If it had happened to me, there would be yet another monitor on top of the pile below the computer room window.

One handy thing I have noticed about this forums software, it can be very forgiving, insomuch that if you use your browser navigation arrows to move back a page or two after such a mishap, quite often you will find all your text is still there and you can simply 'copy and paste' back into a new reply field and all is OK.
Cheers
Kim
Posted: Fri Jul 18, 2008 4:51 pm
by Dave White
Kim,
Thanks for doing the fixes.
Taffy,
I know all about the frustration of setting tutorials like these up as I've done a few on my website. The "spend 4 hours and watch it all disappear" scenario certainly fills up the swear box quickly. Like you, for long posts or tutorials, I now do them first in a Word Document where I know the technology and I can then use copy and paste, and when it all goes tits up it's no big deal.
Thanks again for the great tutorial.