Peg Shaper (plan)
Posted: Tue Jul 02, 2013 8:57 pm
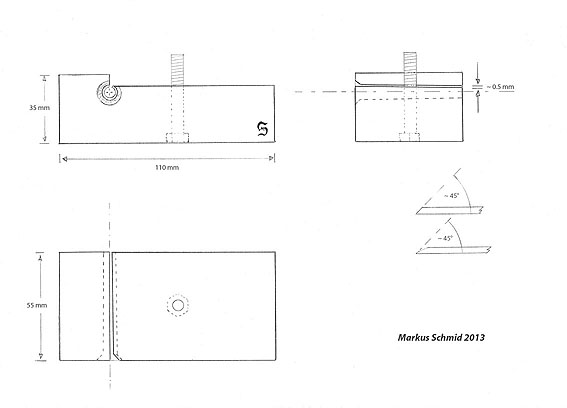
Remembering my first attempts making replacement wooden tuning pegs about ten years ago I thought now that for some it might be helpful to have a technical drawing of this useful tool you can make for the price of a junk of wood and a plane blade or other piece of flat tool steel of the required width. But the idea of making one's own peg shaper is not only the one of saving money: if you make your pegs with a tool that was made with the same peg hole reamer you are making the peg holes your pegs will really fit and work fine.

(Click on the picture to see and/or download the plan in a more reasonable resolution for printing)
There are mainly two important things that make the peg shaper work properly.
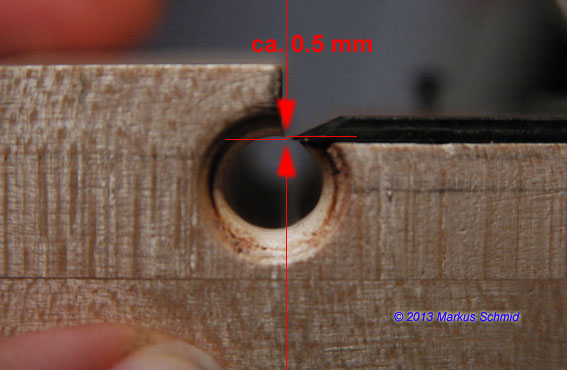
The first one is that the blade edge should be just a little bit (ca. 0.5 mm) below the apex of the hole:

The second one is the blade bevel angle. With this design it should be something around 45°. In the picture above the main bevel angle is 25° I believe, but the secondary bevel which is so small that you can not see it in that picture, is 45°.
To adjust the blade I simply shove the reamer in the pegshaper's hole, move the blade until its edge touches the reamer , tighten the wingnut and I'm done. It is important though to not apply any pressure at all, neither when sliding in the reamer nor when sliding the blade against the reamer, or you will end up with too thick shavings an may damage the reamer and blade edge too.
Also note that I have ground off (and of course re-sharpened) the left blade corner to the "entrance angle".
I have used a narrower blade than I planned to use initially, which lets me use two alignment pins which are not essential but help a bit to not get the blade out of alignment when tightening the wing nut. In any case, blades without a slot will require another fixing mechanism.
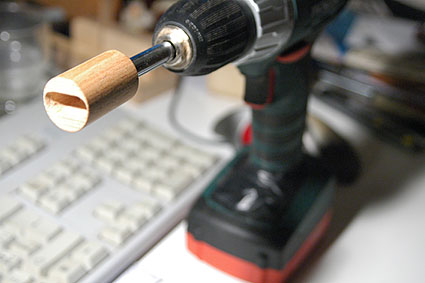
Ready to go!
A simple crank will prevent blisters on your fingers, and an drill will speed up the procedure significantly.

Before end-fitting the pegs (that is, reaming the peg holes to its final size) I compress the peg shaft turning it a couple of times in a conical hole of the length of the shaft. This has to be done using the "lubricant" of your preference. Graphite powder works fine, but I get better results (smoother tuning) with talcum powder.

(Click on the picture to see and/or download the plan in a more reasonable resolution for printing)
There are mainly two important things that make the peg shaper work properly.
The first one is that the blade edge should be just a little bit (ca. 0.5 mm) below the apex of the hole:

The second one is the blade bevel angle. With this design it should be something around 45°. In the picture above the main bevel angle is 25° I believe, but the secondary bevel which is so small that you can not see it in that picture, is 45°.
To adjust the blade I simply shove the reamer in the pegshaper's hole, move the blade until its edge touches the reamer , tighten the wingnut and I'm done. It is important though to not apply any pressure at all, neither when sliding in the reamer nor when sliding the blade against the reamer, or you will end up with too thick shavings an may damage the reamer and blade edge too.
Also note that I have ground off (and of course re-sharpened) the left blade corner to the "entrance angle".
I have used a narrower blade than I planned to use initially, which lets me use two alignment pins which are not essential but help a bit to not get the blade out of alignment when tightening the wing nut. In any case, blades without a slot will require another fixing mechanism.
Ready to go!
A simple crank will prevent blisters on your fingers, and an drill will speed up the procedure significantly.

Before end-fitting the pegs (that is, reaming the peg holes to its final size) I compress the peg shaft turning it a couple of times in a conical hole of the length of the shaft. This has to be done using the "lubricant" of your preference. Graphite powder works fine, but I get better results (smoother tuning) with talcum powder.