Page 1 of 1
Laminated Binding form
Posted: Mon Apr 13, 2009 4:56 pm
by Allen
I knocked this us a few days ago, and have been busy making linings for a couple of OM's and it's worked out so well I thought you might be interested.
The idea comes from John Bogdonavish's book, and I thought it was a much better method that the one I had been using.
19mm MDF cut the same as your body mold. It's then lined with some sort of gasket material that will be the approximate thickness of you're sides. He calls for cork, but living up here in Cairns, it's impossible to find. so I used some high density foam packing material. I've got a heap of it, so it was cheap. It's just glued in place with some spray adhesive.
The male part of the mold is made smaller by the amount of the size of linings you wish to use. I found a washer that had the size I wanted, so ran it around the mold with a pencil to mark the size. Cut and sand to suit.
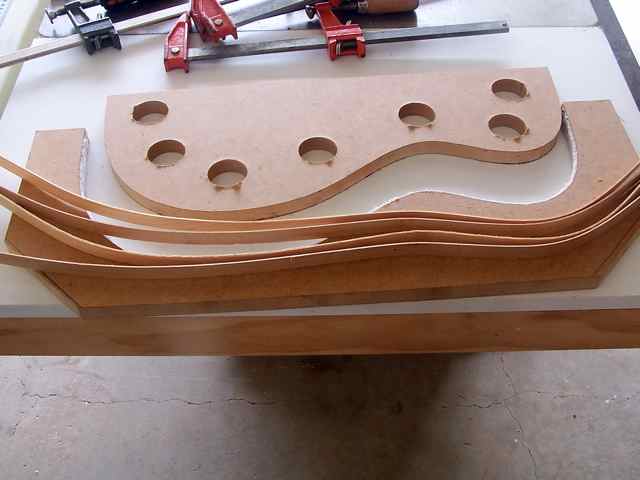
Rip your strips, run through drum sander, and then apply glue. Clamp with a little pressure, gradually increasing pressure all around until you get good squeeze out.
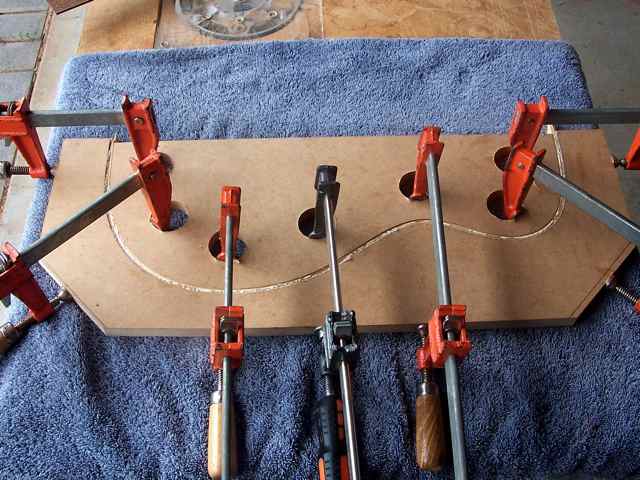
Let dry for 4 hours, then run them over a round over bit, Clean up with sandpaper by hand and your set to install.
Posted: Mon Apr 13, 2009 5:42 pm
by Nick
Niiiice. Thanks for posting this Allen, seen them formed with a side bender jig (which I havent got!!!) but this is an excellent and simple way to form them and glue in one go sans bender. :serg
Posted: Mon Apr 13, 2009 7:11 pm
by Taffy Evans
Good one Allen thanks for that.
Posted: Tue Apr 14, 2009 4:00 am
by Dennis Leahy
Thanks, Allen!
Well thought-out, nice and low tech too.
Dennis
Posted: Tue Apr 14, 2009 5:27 am
by jeffhigh
Looks great Allen,
How many layers in what thickness are you using?
Posted: Tue Apr 14, 2009 5:46 am
by Allen
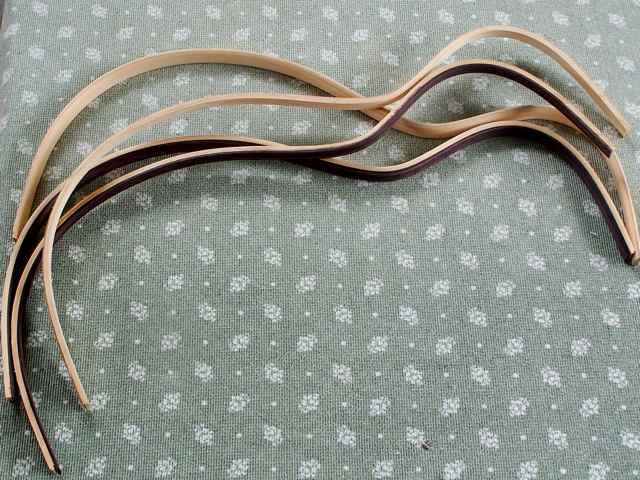
4 layers at about 1.5 - 1.6 mm thick. The ones I made with the rosewood outer are thicker, as the rosewood is 2 mm.
Posted: Tue Apr 14, 2009 5:59 am
by jeffhigh
Another insomniac Allen?
Using any heat or mosture for bending the strips?
Posted: Tue Apr 14, 2009 6:04 am
by Allen
No Jeff, I'm a very early riser, and will be off to work in a couple of minutes.
I prebend the strips just because it was easy to do, and I didn't want to crack any. No moisture though. If you use thin enough material, or some that's really flexible, I'm pretty sure you could do them without prebending.
Posted: Tue Apr 14, 2009 6:34 am
by Localele
The best part is the next step when you glue the perfectly shaped linings into the body,So easy and neat. IMHO a much nicer look than kerfed linings and something that makes your guitar stand out the first time someone peeks inside.Ukulele builders will find this method much better too because of the tighter bends involved around the upper bout.Cheers.
Posted: Tue Apr 14, 2009 1:21 pm
by Lillian
Allen, I like the concept. Granted, I've only glued linings onto one guitar, but I remember having to futz with the back linings so that they would lay flat was they came out of the waist and down the taper towards the neck. Yours appear to be in only one plane, so how do they fit the back as it tapers towards the neck block?
Posted: Tue Apr 14, 2009 1:27 pm
by Kim
Good one Allen, glue form lamination is great, the results are strong and look very neat and this is a good way to get the job done, thanks for sharing.
Cheers
Kim
Posted: Tue Apr 14, 2009 4:20 pm
by Allen
Lillian wrote:Allen, I like the concept. Granted, I've only glued linings onto one guitar, but I remember having to futz with the back linings so that they would lay flat was they came out of the waist and down the taper towards the neck. Yours appear to be in only one plane, so how do they fit the back as it tapers towards the neck block?
Can't say for sure Lillian. I've not had problems with the way I've done them before, so I'll see how these ones go in. I pre-profile my sides, and when I hold these ones in place they look like they are going to need very minimal clamping, and look to be flush.
Posted: Wed Apr 15, 2009 9:43 am
by cactus bum
Thanks for the great graphic explination Allen. I am wondering if you considered beveling or giving a quarter round to the interior corner that shows when one looks into the soundhole? This would lose a few grams of weight and maybe a roundover would look ok. Thanks, Cactus
Posted: Wed Apr 15, 2009 12:48 pm
by Lillian
Well this is something that I'm just going to have to give a try. Thanks for sharing Allen.
Posted: Wed Apr 15, 2009 4:31 pm
by steve_I
Hi all,
I used this method to make linings as well and experienced an "issue" with it that you may or may not be aware of - springback.
I left the laminated linings sit for a few days and the radius of the curves in the upper and lower bout areas reduced significantly. In fact, Bogdanovich refers to this problem on his website where he sells molds to do this (
http://jsbguitars.com/ProductDetails.cf ... category=8). To quote his site "The upper and lower bout are splayed out slightly to compensate for the linings tendency to curl inward. ".
I ended up re-shaping them using a bending iron but I wonder whether they would hold this shape.
I seem to remember an article in FWW on laminating curved shapes where they stated that different glues other than standard wood glues should be used for this type of bending because of the tendency for springback to come into effect. I wonder whether this may be the cause of the problem I found using this method. The method does produce beautiful linings. I used Alaskan Yellow Cedar and they look great.
Regards,
Steve.
Posted: Wed Apr 15, 2009 5:28 pm
by Kim
Hi Steve,
Welcome to the ANZLF.
I use to build timber handrails for spiral stair cases. This is done by glue form lamination whereby you wind slates of wood around a pre-made drum form gluing and clamping into position as you go. You then shape the rail by hand once unclamped from the drum.
Two things would help reduce springback in this process allowing the rail to remained within a usable radius matching the balustrade and stair treads. One was epoxy glue (although it can be done with PVA expect more springback and be prepared to work real fast) and more to the point of this thread, was making the form a tighter radius than the stairs to compensate for spring back.
I would say the same would apply here as indeed it does with side bending forms. I make mine curve in at the end of the upper and lower bouts around 13mm more than the actual guitar body shape, this seems to compensate well for a little springback.
Cheers
Kim
Posted: Thu Apr 16, 2009 8:55 am
by steve_I
Thanks for the welcome, Kim!
Apologies for using the wrong term - springback is not the correct word for what occurred - maybe curl would be a better term - the upper and lower bout actually curled inward rather than outward (springback). There's no mention of this occurring in Bogdanovich's book that I can find but the molds he sells address the problem by splaying out the end of the lining mold to compensate.
An article that I found in an old Fine Woodworking mag (Lamination Bending - FWW July/Augist 2003) refers to a problem using white and yellow woodworking glues as "creep". To quote the article
"When lamination bending, I don't use either white or yellow woodworking glues because both of these glues remain slightly flexible, even when fully cured. That means, in time, they can allow the plies to slip a bit. Manufacturers call this "creep."
Posted: Thu Apr 16, 2009 5:45 pm
by Allen
Mine have been out of the forms for nearly a week now. There is no curl whatsoever. There is a very slight amount of spring back in each of the bouts, but the waist is spot on.
I don't mind the slight spring back in the bouts, as the extra tension just helps keep them tight when I go to clamp them in place.
I've made them with both Titebond and HHG. The Uke ones are made with HHG, while these were made with some Titebond since I didn't know how long I'd need to get all these laminations in place, and didn't want to have to rush.
If the upper and lower bouts have actually pulled in, then this is really odd. I would think that there is some shrinkage or swelling happening to make the inner laminations smaller in relation to the outer ones. I've got no explanation how or what would cause this.
And welcome to the forum Steve. Good to have you on board.
Posted: Sun Apr 19, 2009 4:30 pm
by Allen
Here's a picture of the linings installed and a couple coats of shellac applied to the rims. Gotta seal up that hide glue on the bias tape, and I want the inside of this instrument buffered against extremes of humidity swings. It's destined for Ohio, and that's a heck of a change from the wet tropics.
I would have liked to use EIR as the outside lamination on both top and bottom of the guitar, but there was only enough left from the sides for 1 strip. So as you're only going to see the bottom one, that's all it's going to get.
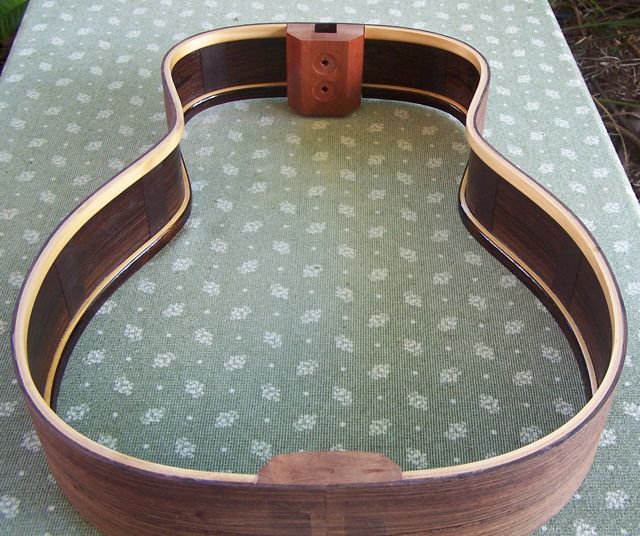
Lillian, they fit very snug all the way around without undo force. there are some slight gaps next to some of the bias tape, I think more to do with the folded over double thickness of the tape, that I usually iron out flat. Problem with that though is the edge sometimes frays a bit and I didn't want that look either.
As they are so stiff, you will need small clamps rather than cloths pegs to clamp them in the areas that aren't a perfect fit. This has much more to do with the inconsistencies in the bent sides. Once all glued in though, the rims fit the body mold perfectly, and slide in and out of the mold without having to shoe horn them in.
And sure, it's a lot of extra work, but these rims are rock solid built like this. And I really like the look.
Posted: Sun Apr 19, 2009 8:23 pm
by Kim
Allen wrote:
And sure, it's a lot of extra work, but these rims are rock solid built like this. And I really like the look.
Beautiful work, I really like the look as well Allen and why not go the extra yard when your results are without exception, extra good.
Cheers
Kim
Posted: Sun Apr 19, 2009 10:51 pm
by Dennis Leahy
Really beautiful and functional, Allen! I do especially like the EIRW capped one.
Hey, I notice the circular depressions on your neck blocks - do you use washers beneath the bolt heads? Will the neck be adjustable on this one?
Dennis
Posted: Sun Apr 19, 2009 11:03 pm
by Lillian
I like the look too Allen. Nicely done. Thanks for sharing.
Posted: Mon Apr 20, 2009 5:22 am
by Allen
Dennis Leahy wrote:Really beautiful and functional, Allen! I do especially like the EIRW capped one.
Hey, I notice the circular depressions on your neck blocks - do you use washers beneath the bolt heads? Will the neck be adjustable on this one?
Dennis
This guitar and another one built identical, but short and long scale length are getting the standard bolt on neck. Not adjustable. They fellow that has commissioned them wants them to look very traditional. I used a Fortner bit to create a slight pocket for the head of the knock down bolt. No reason other than I thought it might look a little bit more planned out.