Page 1 of 1
Another DIY intonation jig (for pre-made bridges)
Posted: Tue Jan 20, 2009 7:12 pm
by seeaxe
I have seen another intonation jig on the site, so thought I would show you all this one and see what you think
When I was gluing on the bridges I wanted to make sure I had the best compromise for intonation. I had the dimensions from the kits but thought it would be a mission to fix if they weren't right, (saddle slots were already cut) so I set up the bridges and saddles in the advised position without any glue, then screwed this jig into a small hole I had made as a pilot for the end pin, to act as a temporary tailpiece.
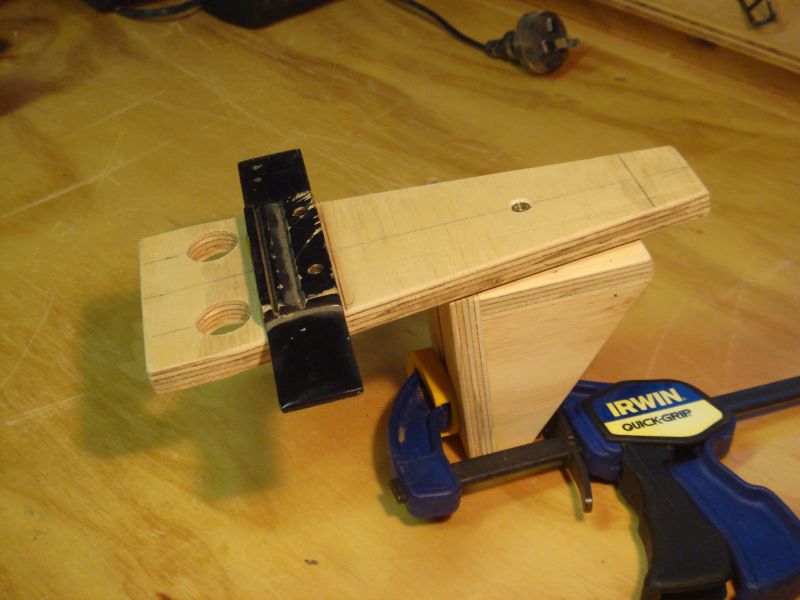
The slot in the back part allows for different depths of body. I used a wood screw with a washer through the slot and into the end pin hole.
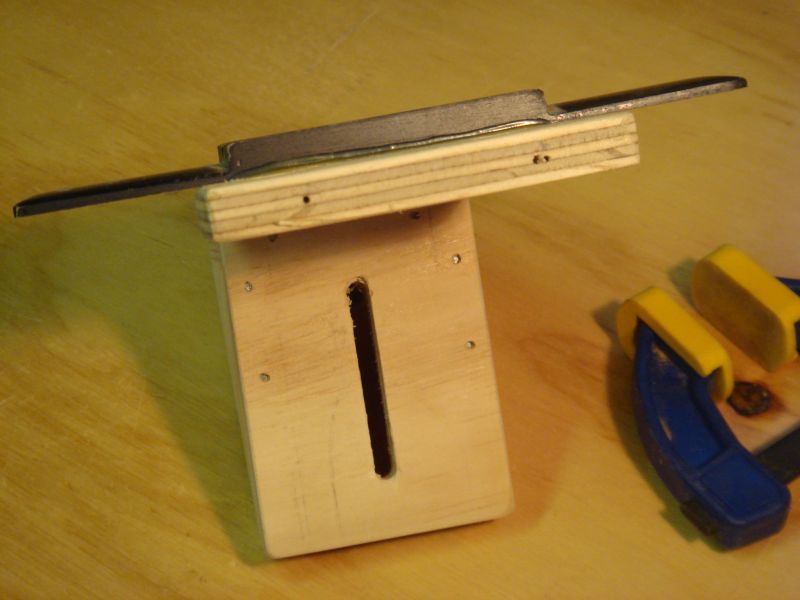
I then put a new top and bottom E string through the two small holes in the end of the jig (set low to get the best possible angle over the saddle) and tied them off at the old scrap bridge, then tuned them to full pitch and checked the intonation with a tuner. I adjusted the bridge position until I had the best compromise of intonation, while keeping the bridge square, then marked the bridge position, dissassembled the jig and glued the bridge in place.
The jig will work on any guitar and can be used for steel or nylon strings. I need to put some felt pads on it so it won't scratch the finish.
How does everyone else do this, or do you rely on measurements and then cut the saddle slot afterwards?
Cheers
Richard
Posted: Tue Jan 20, 2009 8:08 pm
by Taffy Evans
Hi Richard
Yes I use a similar set up, however I use a tailpiece, [the chrome trapeze shaped type]that attaches to the end pin this allows the bridge to sit on the top of the guitar I ues the two É' strings and tune them up somewhat.
The strings go from the tailpiece through two modified bridge pins in the bridge, over the saddle and on to the tuners. It also gives me a ball park look at the action over the frets, I say ball park as things are going to change with six string up to pitch.
Posted: Wed Jan 21, 2009 4:58 am
by hilo_kawika
Hi Richard,
I have a couple of suggestions for you.
As Taffy said, the bridge needs to be resting on or very near the top so that the string action will be as near as possible to what it will be. So perhaps you might want to replace the piece of plywood that the bridge is sitting on with relatively thin sheet metal with leather on the underside to protect the top.
Another issue is the adjustment of the bridge with respect to scale length. If you have slightly different scale length instruments (or if the compensation position you thought was right turns out not to be), you'll need to have a way of changing the position of the bridge forward and backward, perhaps with a threaded rod of some sort. Perhaps the bridge should also rotate horizontally to allow for the different compensation lengths that bass and treble strings have.
aloha,
Dave Hurd
www.ukuleles.com
Posted: Wed Jan 21, 2009 6:32 pm
by seeaxe
Hi Dave,
I realise I probably didnt explain this properly - this is just a tailpiece, the bridge you see in the photo is just an anchor so I could use it for nylon as well as steel strings.
The strings are tied off at the old bridge, go down and though the plywood, (see the two little holes in the second photo) so they are pretty close to the soundboard then up and over the saddle of the bridge I am trying to position. The real bridge is "floating " on the soundbaord in about the right place so I can adjust it back and forth. This jig sits near the back end of the guitar.
Using the old bridge on the jig is a nod to Taffy's recycling thread.
Anyway, thanks for the looking and for the comments
Cheers
Richard
Posted: Wed Jan 21, 2009 9:48 pm
by Kim
Lots of ways to do this without Stewie's intonawhatsamacallit.
To get close to where the slot needs to be I use an Ibex fret ruler to mark the scale length on the unslotted bridge which has already been glued to the top of the guitar guided by the same rule. I then use a false bone saddle, or veneer of bone, which is just a bit wider in length than the over all string spacings and about as tall as I guesstimate the saddle will need to be above the bridge to give good action. I place this 3mm wide false saddle in alignment with the marks on top of the unslotted bridge.
Stringing with both E's I use off cuts of "B" string bent into an "L" shape to place under them at around the centre line of the bone veneer saddle and then tune the E's up to pitch. Checking the intonation and moving the bits of "B" string back or forth across the bone veneer until all is good, I mark the bridge at each end of the false saddle in line with the bottom legs of the "L" shaped bits of "B" string thereby confirming the centre line position of the saddle slot rout.
Once the slot is routed with a nice firm fit for a flat topped saddle blank, I string up the instrument and use these same "L" shaped pieces of "B" string adjusted back and forth across the top surface of the flat topped saddle to find and mark the correct intonation point for each string. With a fine cut file I graduate the strings delivery to the saddle from the bridge pin across the rear of the saddle and then shallow ramp to the marked point at the front of the saddle leaving only a small bevel to assist support.
Cheers
Kim
Re:
Posted: Sat Jan 22, 2011 11:50 pm
by ckngumbo
seeaxe wrote:Hi Dave,
The real bridge is "floating " on the soundbaord in about the right place so I can adjust it back and forth. This jig sits near the back end of the guitar.
Cheers
Richard
Oh DUH! Thanks I understand now. I thought . . . .never mind

I really like this jig!
Rob
Re: Another DIY intonation jig (for pre-made bridges)
Posted: Sun Jan 23, 2011 10:58 pm
by kiwigeo
A nifty jig. Ive got the Stewmac intonator and while it's a more expensive option compared to Richards jig it comes into it's own when you need to re-route a saddle slot on a guitar which has bum intonation. I recently used it to do a right to left conversion on a mates flat top.
Re: Another DIY intonation jig (for pre-made bridges)
Posted: Tue Jan 25, 2011 8:21 pm
by Dominic
Hey, given action changes due to humidity, intonation changes due to string gauge and brand, even slight unintended bends when fingering and also string wear I think setting the intonation super accurate is kind of over doing it. Plus the fact that the temperament we use is not perfect anyway. Setting it perfect with new strings you might find it starts to move away from perfect intonation and out of the accepted range once these other factors set in. You can never be sure where on the curve you are starting. In the end I think the best you can do is to get an average intonation that is around the middle of all these expected changes. I’ve always just used the SM saddlematic with their recommended compensation for different scales. Slightly longer for shorter scales and slightly shorter for longer scales. I’ve also been using a bit of nut compensation on the last few to sweeten it up a bit.
But that's just me.
Cheers
Dom
http://www.stewmac.com/shop/Tools/Speci ... matic.html
Re: Another DIY intonation jig (for pre-made bridges)
Posted: Fri Feb 04, 2011 10:12 am
by jeffhigh
Dom, what you say makes a lot of sense to me
Setting up a bridge position to a measurement using the stewmac saddlematic or some other template arrangement works just fine for me.
Sure, do a bit of fine tuning when you have the strings on and action set, but don't worry about a few cents.
Millions of factory guitars have been built using templates for bridge position
Only when they are wrong or worn do you get a problem.