When I first started this guitar making thing I agonised about how to cut the rosette. After looking at the tools available at Stew Mac etc, I decided to DIY. After a few sleepless nights thinking about how to make this thing, this is what I came up with. I usually hate making jigs, but this was really enjoyable to make. Cost was $0. It was made from same scrap quarter sawn Myrtle and a 6mm dowel that I already had. Basically it screws onto a Stew Mac Dremel base so the base sits on the spruce top, and you slide the centre piece to adjust the radius. The slide is made up of 45deg surfaces that I cut on the router table with a 45deg router bit and they are lubricated with graphite. I photcopied my small ruler and glued it on so I could measure the distances accurately. The centre dowel was slightly more than 6mm so I put it in the lathe and carefully cut it down (took a few attempts to get it right) to a very slight taper so it slides into the hole on the jig and locks into place. The taper ensures it can turn in the 6mm hole in the Spruce and backing MDF, but to assist that I also lubricated the end of the dowel with graphite. The slide is locked into place with 2 small wedges, and I drilled some location holes at every 5mm, but have never used them. It is important to use 2 wedges in case one comes loose.
The first rosette came out quite good, the second was a near disaster, the third looks to be perfect as far as I can tell. The near disaster was my own stupid fault, the jig itself worked perfectly. Lessons learned from the near disaster were to use a sharp downcut bit in the dremel, i.e. one that has not gone near Ebony inlay, not all 6mm drill bits are created equal, and don't use an old Dremel. My 15yo Dremel still works perfectly, but there is a small amount of slop in the bearings that was there when new. Bought a new Dremel that does not have this problem. I also bought a new expensive brad point 6mm drill bit to accurately drill the hole. Bad move. This bit drills a hole just fractionally larger -> slop in the hole. Everthing needs to be firm with no slop at all, but then you all know that already don't you?
When I made the first rosette, I also made a template for future reference so the rosette can be reproduced again exactly. Saves a lot of time. 3rd Rosette took around 15mins to cut the groove into the Spruce top and the soundhole, and another 5 minutes to cut the Myrtle ring.
I was worried that the Myrtle would swell in higher humidity and the slide would jam, but in practice that has not happened. It works beautifully, hope someone might find the idea useful.
Om built rosette cutting jig
-
peter.coombe
- Blackwood
- Posts: 746
- Joined: Fri Oct 15, 2010 2:52 pm
- Location: Bega, NSW
- Contact:
Om built rosette cutting jig
- Attachments
-
- Rosette jig template.JPG (63.13 KiB) Viewed 8166 times
-
- Rosette jig finished channel.JPG (50.38 KiB) Viewed 8166 times
-
- Rosette jig underside.JPG (64.75 KiB) Viewed 8166 times
-
- Rosette jig front.JPG (72.91 KiB) Viewed 8166 times
-
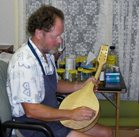
- Rosette jig in action.JPG (52.48 KiB) Viewed 8166 times
Peter Coombe - mandolin, mandola and guitar maker
http://www.petercoombe.com
http://www.petercoombe.com
Who is online
Users browsing this forum: No registered users and 10 guests