No 5, a 12 string - Progress Pic

Talk about musical instrument construction, setup and repair.

Moderators: kiwigeo, Jeremy D

Post Reply
User avatar
kiwigeo
Admin
Posts: 10597
Joined: Sat Sep 29, 2007 5:57 pm
Location: Adelaide, Sth Australia

No 5, a 12 string - Progress Pic

Post by kiwigeo » Fri Jul 18, 2008 8:05 pm

A bit of progress on the latest build, a 12 string. Lutz top (from Shane N) and IRW back and sides. Neck joint is an old fashioned dovetail M and T...I love a challenge.

This is my first attempt at a bound fretboard. The binding is stock standard Stewmac maple binding and the method is as on John Mayes DVD set.

Cheers
Martin

Image

User avatar
Dave White
Blackwood
Posts: 452
Joined: Mon Nov 12, 2007 3:10 am
Location: Hughenden Valley, England
Contact:

Post by Dave White » Fri Jul 18, 2008 8:14 pm

Martin,

Looking good. Shane's Lutz is amazing stuff!!
Dave White
[url=http://www.defaoiteguitars.com]De Faoite Stringed Instruments[/url]

User avatar
Dave Anderson
Blackwood
Posts: 260
Joined: Sun Sep 30, 2007 2:38 pm
Location: Florida, USA

Post by Dave Anderson » Fri Jul 18, 2008 11:31 pm

Martin, Lookin' Goood so far ! I agree that Shanes' Lutz is an excellent Top wood.
My SJ that I built with Lutz IS the best sounding guitar I have made.
You gotta love that wood. I like the maple binding too. Do you use a vacuum
hold down to route your binding channels? I'd like to see your set-up.
Dave Anderson
Port Richey,Florida

User avatar
Allen
Blackwood
Posts: 5252
Joined: Thu Oct 11, 2007 5:39 pm
Location: Cairns, Australia
Contact:

Post by Allen » Sat Jul 19, 2008 7:00 am

You must be a master of that dovetail joint now Martin. Nice looking package your building there.

I didn't know that there was a preferred way to bind a fret board. I haven't seen the Mayer's DVD's, so can you enlighten those of us that have been stumbling around in the shop trying to get them to look right. The ones I've been doing are heaps of work, and there's gotta be an easier way.
Allen R. McFarlen
https://www.brguitars.com
Facebook
Cairns, Australia

User avatar
Bob Connor
Admin
Posts: 3132
Joined: Mon Jul 09, 2007 9:43 pm
Location: Geelong, Australia
Contact:

Post by Bob Connor » Sat Jul 19, 2008 7:49 am

Looking great Martin. Not too much more to do now.
Bob, Geelong
_______________________________________

Mainwaring and Connor Guitars

User avatar
Dominic
Blackwood
Posts: 1098
Joined: Thu Jan 10, 2008 8:58 am
Location: Canberra

Post by Dominic » Sat Jul 19, 2008 9:39 am

This one has been going for a while hasn't it martin? You must be pleased it is nearly done. Bet you can't wait to hear that lovely glittery 12 stringiness.
Dom
You can bomb the world to pieces,
but you can't bomb the world to peace!

User avatar
Kim
Admin
Posts: 4376
Joined: Wed Sep 26, 2007 8:32 pm
Location: South of Perth WA

Post by Kim » Sat Jul 19, 2008 10:14 am

Very nice Martin,

The binding looks nice, crisp, and clean. What is your method for cutting the binding ledge in the headstock?

Cheers

Kim

User avatar
kiwigeo
Admin
Posts: 10597
Joined: Sat Sep 29, 2007 5:57 pm
Location: Adelaide, Sth Australia

Post by kiwigeo » Sat Jul 19, 2008 10:47 am

Kim,

I use my Trend T5 router and the Stewmac cutter/bearing set.....probably not the best way to do it but it works.

Cheers Martin

Kim wrote:Very nice Martin,

The binding looks nice, crisp, and clean. What is your method for cutting the binding ledge in the headstock?

Cheers

Kim

User avatar
kiwigeo
Admin
Posts: 10597
Joined: Sat Sep 29, 2007 5:57 pm
Location: Adelaide, Sth Australia

Post by kiwigeo » Sat Jul 19, 2008 10:58 am

Allen wrote:You must be a master of that dovetail joint now Martin. Nice looking package your building there.

I didn't know that there was a preferred way to bind a fret board. I haven't seen the Mayer's DVD's, so can you enlighten those of us that have been stumbling around in the shop trying to get them to look right. The ones I've been doing are heaps of work, and there's gotta be an easier way.
I still havent mastered the dovetail joint. I actually went alot better with the joint on the previous instrument.

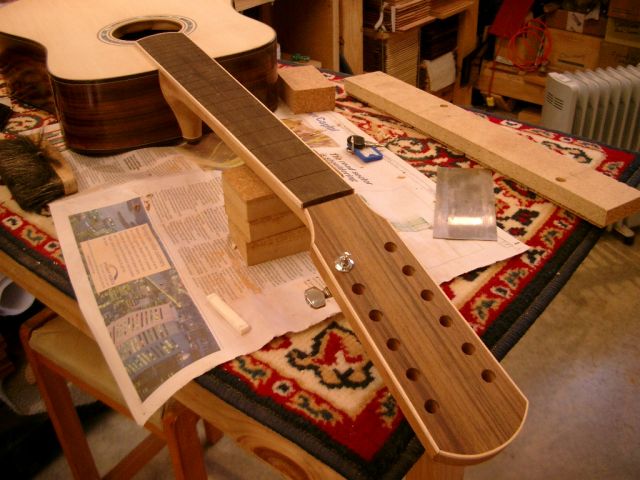
Johns method for binding the fretboard. He simply makes the fretboard narrower by an amount to fit width of the binding and then he just glues the binding on.

The sequence of events for binding my fretboard were as follows:

1. level and square up ebony blank.
2. work fretboard to final thickness. I calculate this from neck rake, bridge height etc. On this instrument the fretboard ended up 6.5mm thick.
3. Cut fret slots. I use the Stewmac jig. Depth of slots is checked with a piece of fretwire with tangs filed off.
4. Mark out final shape of fretboard allowing for width of binding on sides of same.
5. Plane fretboard to final shape. Work soundhole end of fretboard into rounded profile on disc sander.
6. Radius fretboard using radius blocks. This fretboard runs from 16 through 12 through 9" radius.
7. Check depth of slots again and deepen if necessary.
8. Bend maple binding on pipe and glue to curved soundhole end of fretboard. Secure with binding tape while glue is setting.
9. Trim ends of binding flush with sides of fretboard. A mitre joint could be done here if you feel so inclined.
10. Glue bindng on sides of fretboard. Again using binding tape to secure. make sure you leave overhang on top and bottom of fretboard to allow for scraping flush.
11. Scrape binding flush with fretboard.

User avatar
Allen
Blackwood
Posts: 5252
Joined: Thu Oct 11, 2007 5:39 pm
Location: Cairns, Australia
Contact:

Post by Allen » Sat Jul 19, 2008 12:45 pm

Yep, that's how I've done it on all my boards. I guess there isn't much that can be done to make it simpler.
Allen R. McFarlen
https://www.brguitars.com
Facebook
Cairns, Australia

User avatar
Stephen Kinnaird
Blackwood
Posts: 287
Joined: Sun Oct 14, 2007 1:45 pm
Location: Texas, USA

Post by Stephen Kinnaird » Sun Jul 20, 2008 11:52 am

Great looking work, Martin!
What type of finish are you planning to use?

Steve
There are some great woods, down under!

User avatar
kiwigeo
Admin
Posts: 10597
Joined: Sat Sep 29, 2007 5:57 pm
Location: Adelaide, Sth Australia

Post by kiwigeo » Sun Jul 20, 2008 2:39 pm

Hi Steve,

I french polish all of my instruments.

User avatar
Craig
Admin
Posts: 1090
Joined: Wed Sep 26, 2007 10:08 am
Location: N.S.W. in the bush

Post by Craig » Thu Jul 24, 2008 12:08 pm

Looking very cool Martin. As Bob said , not long to go now.

Be prepared to get very hooked on playing this one.I know when I finished mine ,I had trouble puting it back in it's case.

Nice binding work too Martin . Love the look !
Craig Lawrence

User avatar
kiwigeo
Admin
Posts: 10597
Joined: Sat Sep 29, 2007 5:57 pm
Location: Adelaide, Sth Australia

Post by kiwigeo » Thu Jul 24, 2008 9:41 pm

Hi Craig,

This guitar has been a bit of a wild child. I stuffed up on my first attempt at making the fretboard......once Id got the dovetail M and T joint done the length of the neck had shortened by a significant amount requiring construction of a new fretboard.

My current headache is deciding on whether to go for 12 pin or 6 pin bridge.

User avatar
Dennis Leahy
Blackwood
Posts: 872
Joined: Wed Oct 10, 2007 12:32 am
Location: Duluth, MN, US
Contact:

Post by Dennis Leahy » Fri Jul 25, 2008 4:30 am

Lookin' really good, Martin!

Please post some sound clips after it has had a little bit of time to settle in. I love the sound of a 12-string!

Dennis
Another damn Yank!

User avatar
Craig
Admin
Posts: 1090
Joined: Wed Sep 26, 2007 10:08 am
Location: N.S.W. in the bush

Post by Craig » Fri Jul 25, 2008 9:00 am

kiwigeo wrote:Hi Craig,


My current headache is deciding on whether to go for 12 pin or 6 pin bridge.

Of course it's totally up to you Martin , but after building a shared pin bridge , ( with help from Dave White and Howard Klepper ),I would recommend it. I used a fairly beefy bridge plate @ 3mm. thick ( Rosewood ) . The bridge didn't have to have such a massive footprint as a twelve pin type. Couple that with it being lighter also and six less pins ( less congested ), there are more than enough reasons for giving it a go.

I've posted a fairly comprehensive tute in our tutorials section , which should be fairly easy to follow. Bob and Dave have used it and seemed quite happy with it.

I would also urge you to use a 3/16 " or 5mm. wide saddle ( There's is plenty of room for it with a shared pin bridge ) , so that you can compensate the strings individually. This in itself makes a huge difference to the sound of the twelve string , particularly when playing up the neck. In fact, I think it is one reason some folk are never really happy playing a twelve. They sound wonderful when they play in tune !

If you need any help or tips Martin , I'm happy to help out
Craig Lawrence

User avatar
kiwigeo
Admin
Posts: 10597
Joined: Sat Sep 29, 2007 5:57 pm
Location: Adelaide, Sth Australia

Post by kiwigeo » Fri Jul 25, 2008 10:37 am

Thanks Craig,

Im leaning towards the shared pin bridge. Ive already got a 5mm wdie saddle blank ready go. The wider saddle gives one more to play with when compensating and its said that the transmission of the sound from string to soundboard is improved with a bigger saddle footprint.

Cheers Martin

Hesh1956
Blackwood
Posts: 1420
Joined: Thu Sep 27, 2007 9:58 am

Post by Hesh1956 » Fri Jul 25, 2008 11:00 am

Very nice work - as always, Martin and this is going to be a killer 12! :cl :cl :cl :cl

Post Reply

Who is online

Users browsing this forum: Google and 162 guests