Hi to you all,
SESSION 1
This is a first guitar build thread of my friend and business partner Joel (forum handle timberfreak). Joel build his first Ukulele as built our during our first Ukulele Building Course held here in Townsville recently. Joel sliced up some wood for his first guitar build on Saturday and he sent me an email and said its Melaleuca Al, what do you think? Hmmmmm, I remember back on the dairy farm 40 years ago we planted these trees as fast growing shade and wind breaks for our cattle. Anyway, he arrived last Monday morning with this set of Melaleuca or common name Paperbark. Joel may chip in later with the botanical name.
So I have never used this before and first impression is it feels like Myrtle. It is close grain and will not need pore filling. Tap tone is nothing like Myrtle which can be a bit dead but more lively and nice sustain. It is heavier than Myrtle but not so stiff across the grain. We took its thicknesses down to about 2.8 mm. Bracing is Oregon which will be ok for the back and a first build. We will use spruce bracing for the Sitka top chosen for this build.
The build is an OM non cutaway using the Scott Antes plan but we will modify the bracing thickness a little and use a soundhole patch. Other than those changes pretty much off the plan. The neck is going to be a one piece Queensland Maple bolt on.
Here are a few pictures of the first four hour session Monday morning:
to be continued.......
Cheers
Alan
Build Thread: The Paperbark Guitar
-
ozziebluesman

- Blackwood
- Posts: 1529
- Joined: Wed Oct 10, 2007 9:12 am
- Location: Townsville
- Contact:
Build Thread: The Paperbark Guitar
- Attachments
-
- Shooting the back edges ready for join
-
- Back joined tape and tent method marking out shape from template
-
- Cutting out OM shape
-
- Thicknessing the back
-
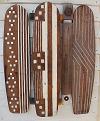
- Cutting out the brace stock
-
- Sanding the radius on the back braces standard 15'
-
- Back braced up in the go bar deck
-
- Simple brace design 7 mm x 14mm
-
- Back
-
- Paperbark back braced and stored in radius dish
-
- Top joined using tape and tent method
-
- Always a good sign when you can't find the centre line...
-
- Where is than darn centre line
-
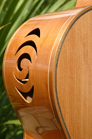
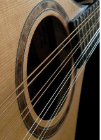
- Making the rosette ring from some Paperbark
"Play to express, not to impress"
Alan Hamley
http://www.hamleyfineguitars.com/
Alan Hamley
http://www.hamleyfineguitars.com/
-
christian
- Blackwood
- Posts: 338
- Joined: Wed Oct 20, 2010 10:31 am
- Location: Bay of Islands NZ
- Contact:
Re: Build Thread: The Paperbark Guitar
Hi Alan,
This is sure to be a cracker, it will be interesting to see how this paperbark works out tonally.
You certainly packed a lot into one session!! keep it up.
Cheers,
Christian.
This is sure to be a cracker, it will be interesting to see how this paperbark works out tonally.
You certainly packed a lot into one session!! keep it up.
Cheers,
Christian.
Why does the eye see a thing more clearly in dreams than the imagination when awake?
Leonardo da Vinci
www.christiandruery.com
Leonardo da Vinci
www.christiandruery.com
-
ozziebluesman
- Blackwood
- Posts: 1529
- Joined: Wed Oct 10, 2007 9:12 am
- Location: Townsville
- Contact:
Re: Build Thread: The Paperbark Guitar
Thanks Christian.
Joel is a very experienced cabinet maker and a fine furniture maker so working with wood is his passion. My role in this build is purely as a mentor and point out my sequence of events building an acoustic guitar so he is a joy to teach. He loves using woodworking hand tools which he says reminds him why he first got into woodworking. Kingfisher Furniture which he owns and manages is a big shop and I can see how making benches and counters out of particle board can get boring.
As far as the Paperbark goes as a tonewood it will be interesting to see how it will sound. The wood certainly has the ascetic appeal. I think if we build it so the top is responsible for most of the tone it should work out well. The proof is always in the pudding so we will see how it pans out.
Thanks for your interest.
Cheers
Alan
"Play to express, not to impress"
Alan Hamley
http://www.hamleyfineguitars.com/
Alan Hamley
http://www.hamleyfineguitars.com/
Re: Build Thread: The Paperbark Guitar
Pretty nice looking wood Alan, n same as Christian hope it sounds as good as it looks.
Steve
Steve
Re: Build Thread: The Paperbark Guitar
Looks good Alan, I always like to see work with " outlaw " timbers. 
"Were you drying your nails or waving me good bye?" Tom Waits
Bill
Bill
Re: Build Thread: The Paperbark Guitar
Hi Alan
Thanks for this post. Having noticed large melaleuca sp growing on Magnetic Island and around Airlie Beach
when on holidays past, I had wondered if anyone had ever tried using it in guitar building. Where did Joel source his
supplies of melaleuca?
Thanks for this post. Having noticed large melaleuca sp growing on Magnetic Island and around Airlie Beach
when on holidays past, I had wondered if anyone had ever tried using it in guitar building. Where did Joel source his
supplies of melaleuca?
Bruce Mc.
-
ozziebluesman
- Blackwood
- Posts: 1529
- Joined: Wed Oct 10, 2007 9:12 am
- Location: Townsville
- Contact:
Re: Build Thread: The Paperbark Guitar
Thanks Bill and Steve.
Bruce I think the wood come from the Atherton Tablelands but not absolutely sure.
Joel will hopefully correct me if I'm wrong.
Cheers
Alan
Bruce I think the wood come from the Atherton Tablelands but not absolutely sure.
Joel will hopefully correct me if I'm wrong.
Cheers
Alan
"Play to express, not to impress"
Alan Hamley
http://www.hamleyfineguitars.com/
Alan Hamley
http://www.hamleyfineguitars.com/
Re: Build Thread: The Paperbark Guitar
The wood reminds me a lot of Anigre (spelling?). Here is a wikipedia image: http://en.wikipedia.org/wiki/File:Anigre.jpg
-
DarwinStrings

- Blackwood
- Posts: 1877
- Joined: Thu Nov 13, 2008 10:27 pm
- Location: Darwin
Re: Build Thread: The Paperbark Guitar
I guess you know you're doing okay with your joinery when you can't find the bugga Alan.ozziebluesman wrote:Where is that darn centre line
Jim
Life is good when you are amongst the wood.
Jim Schofield
Jim Schofield
-
ozziebluesman
- Blackwood
- Posts: 1529
- Joined: Wed Oct 10, 2007 9:12 am
- Location: Townsville
- Contact:
Re: Build Thread: The Paperbark Guitar
Not me Jim, its this damn cabinet maker that has such fine woodworking skills. You should see his furniture work. The long trying plane helps too and wouldn't be without it as even I can get real good results using it.
Cheers
Alan
Cheers
Alan
"Play to express, not to impress"
Alan Hamley
http://www.hamleyfineguitars.com/
Alan Hamley
http://www.hamleyfineguitars.com/
-
ozziebluesman
- Blackwood
- Posts: 1529
- Joined: Wed Oct 10, 2007 9:12 am
- Location: Townsville
- Contact:
Re: Build Thread: The Paperbark Guitar
SESSION 2
Another four hours this morn spent on the OM. Started out marking the sound hole and cutting channels for a Paperbark rosette Joel made last week. Using some off cuts from the top he joined two pieces for the sound hole patch, glued in the rosette and then cut the channels for the black white black purfling gluing those in a little later. Sliced up some bracewood for the transverse and the x brace from some Sitka spruce. While the rosette dried Joel started on the bending of the sides. The wood bent with ease as expected as it feels so similar to myrtle and sassafrass. Joel squared up the side ends with a new saw he has been dying to try out. Damn him, I gotta have one of them saws now. Joel worked on the rosette with his trusty block plane and leveled it to the top. He then measured out, cut out and drilled a centre hole in sound hole patch. Next job was to cut the lap joint in the x braces. Once that was achieved he then shaped the edges of the soundhole patch with the block plane so they matched the arc of the x brace. The transverse was cut out and scalloped on the bandsaw and the bottom of the brace was sanded dead flat. Next the tail block was glued in and the top was put in the go bar to glue up the soundhole patch and transverse brace. Had to use the aircon this morn as we had a very heavy fog and dew this morning. I will put both the top and sides in the dry box tonight. Another good mornings progress on the Paperbark guitar.
Here are a few pictures:
To be continued:
- Attachments
-
-
-
-
-
-
-
-
-
-
-
-
-
-
-
-
-
"Play to express, not to impress"
Alan Hamley
http://www.hamleyfineguitars.com/
Alan Hamley
http://www.hamleyfineguitars.com/
-
timberfreak
- Gidgee
- Posts: 5
- Joined: Wed Jul 03, 2013 8:47 pm
- Location: Townsville
- Contact:
Re: Build Thread: The Paperbark Guitar
Thanks Alan and hi all. Must admit I'm finding this guitar building thing a lot of fun. The melaleuca is locally sourced. We milled it from just down the road from a property at Cape Cleveland. The top of the tree was screwed off during cyclone yasi and we managed to get a few nice pieces out of the base. It's actually the first time I've used this timber for anything and I love it. Will definitely use it again if I can get my hands on some more.
Cheers, Joel
Cheers, Joel
Re: Build Thread: The Paperbark Guitar
The melaleuca is going to look great Joel.
Happy to see it bends OK.
Happy to see it bends OK.
Mike
-
ozziebluesman
- Blackwood
- Posts: 1529
- Joined: Wed Oct 10, 2007 9:12 am
- Location: Townsville
- Contact:
Re: Build Thread: The Paperbark Guitar
SESSION 3
Good progress again this morning and the humidity is perfect today.
Cut the mortise into the neck block, glued it in for a bolt on neck join, leveled, profiled the sides where the back will join the rim, glued in the linings and side supports. The fingerboard is Bloodwood and it came from the same property as the Paperbark. Nice light figure and red colour about the same weight as some of the Desert hardwoods so it is a little thinner. Joel inlayed the pearl dots, groved the slots, removed all saw dust from the fret slots and pressed in some medium frets.
Some more progress pictures for you:
Cheers
- Attachments
-
- Cutting the mortise into the neck block
-
- Gluing in the neck block
-
- Gluing in the neck block
-
- Sanding in the 12 inch radius
-
- Inlaying the dots
-
- Profiling the rim where the back will join
-
- Gluing in the linings
-
- Fingerboard fretted
-
- Rims ready to close box
"Play to express, not to impress"
Alan Hamley
http://www.hamleyfineguitars.com/
Alan Hamley
http://www.hamleyfineguitars.com/
-
ozziebluesman
- Blackwood
- Posts: 1529
- Joined: Wed Oct 10, 2007 9:12 am
- Location: Townsville
- Contact:
Re: Build Thread: The Paperbark Guitar
SESSION 4
This morning Joel spent four hours on his build at the Kingfisher workshop. The Silkwood guitar neck blank was cut out last week and today has the truss rod channel cut, neck stiffeners channels cut, head stock face leveled, profile cut out, truss rod carbon fiber stiffeners glued in and a filler cap glued over the truss rod. Joel also cut out the neck tenon, drilled the bolt holes in the neck and neck block and cut out the excess side material covering over the mortise. He also leveled the sides of the frets and filed the bevel on the fret ends.
Beautiful work today and here are a few pictures.
Cheers
- Attachments
-
- 100 mm x 100 neck wood
-
- neck blank
-
- jig to level headstock
-
- bloodwood fingerboard ready
-
- routing channels
-
- cutting the tenon
-
- neck ready
-
- neck and fingerboard ready
-
- Hmmmm looks a bit like a guitar
-
- bolt and holes located
-
- carbon fiber stiffeners
-
- truss rod stiffeners filler strip glued in
"Play to express, not to impress"
Alan Hamley
http://www.hamleyfineguitars.com/
Alan Hamley
http://www.hamleyfineguitars.com/
-
ozziebluesman
- Blackwood
- Posts: 1529
- Joined: Wed Oct 10, 2007 9:12 am
- Location: Townsville
- Contact:
Re: Build Thread: The Paperbark Guitar
SESSION 5
Moving along nicely with the back voiced, rims radiused and the back has been glued on. Soundhole cut out and Joel prepared the final braces for the top. He has used some Paperbark for the bridge patch which will be interesting to see what it sounds like. The Paperbarck it close grained and quite hard so it could work well. The top has been braced and ready now to close the box next week. Joel scraped the trussrod filler cover and squared the top of the neck ready for the fingerboard to be glued on next week.
Moving along nicely here are some action pictures. Thanks for your interest. Cheers Alan
- Attachments
-
-
-
-
-
-
-
-
"Play to express, not to impress"
Alan Hamley
http://www.hamleyfineguitars.com/
Alan Hamley
http://www.hamleyfineguitars.com/
-
ozziebluesman
- Blackwood
- Posts: 1529
- Joined: Wed Oct 10, 2007 9:12 am
- Location: Townsville
- Contact:
Re: Build Thread: The Paperbark Guitar
SESSION SIX
Inlet the top into the rim, voiced the top and closed the box on Monday. Joel took the neck and fingerboard with him back to his workshop to glue up the fingerboard with some epoxy, glue on the headplate and make up some binding for the body. Closing the box at my workshop took all the clamps I have. I will be going in to his workshop Friday so will take a few pics of the neck. The box is very responsive and I believe the guitar is going to sound damn good!
A few pictures and thanks for your interest:
Cheers
Alan
- Attachments
-
- In-letting the transverse and x brace
-
- Leveling the rim
-
- Some brace shaping
-
- Final brace design
-
- All clamps on deck
"Play to express, not to impress"
Alan Hamley
http://www.hamleyfineguitars.com/
Alan Hamley
http://www.hamleyfineguitars.com/
Re: Build Thread: The Paperbark Guitar
Nice work fellas, I love a nice scribe saw.
"Were you drying your nails or waving me good bye?" Tom Waits
Bill
Bill
-
ozziebluesman
- Blackwood
- Posts: 1529
- Joined: Wed Oct 10, 2007 9:12 am
- Location: Townsville
- Contact:
Re: Build Thread: The Paperbark Guitar
SESSION SIX
A few more pictures from session six carried out at Joel's workshop last Friday. Don't you love the head plate material.
to be continued............
A few more pictures from session six carried out at Joel's workshop last Friday. Don't you love the head plate material.
to be continued............
- Attachments
-
- fingerboard epoxied to the neck
-
- Paperbark headplate material beautiful figure
-
- head plate material from the original Paperbark tree
-
- flushing the top to the rim
-
- flushing the back to the rim
"Play to express, not to impress"
Alan Hamley
http://www.hamleyfineguitars.com/
Alan Hamley
http://www.hamleyfineguitars.com/
-
ozziebluesman
- Blackwood
- Posts: 1529
- Joined: Wed Oct 10, 2007 9:12 am
- Location: Townsville
- Contact:
Re: Build Thread: The Paperbark Guitar
SESSION SEVEN
I bought a new Colt Router for the Stew Mac binding system so Joel tried it out. Worked a treat so we cut the channels on the mini maton, another OM and just the top of the Kona. Joel has been shaping the neck and the heel and we made sure the neck lined up with the centre line. The headstock shape was cut out, nut fitted and Joel has a Bloodwood bridge blank prepared with saddle slot routed out. Starting to look good!
Here are some more pictures and thanks for your interest:
- Attachments
-
- cutting the binding and purfling channels
-
- shaping the heel
-
- shaping the neck
-
- a view of the back of the neck
-
- binding and purfling channel cut top and back
"Play to express, not to impress"
Alan Hamley
http://www.hamleyfineguitars.com/
Alan Hamley
http://www.hamleyfineguitars.com/
-
DarwinStrings
- Blackwood
- Posts: 1877
- Joined: Thu Nov 13, 2008 10:27 pm
- Location: Darwin
Re: Build Thread: The Paperbark Guitar
How is this paperbark one going Joel or Alan?
Jim
Jim
Life is good when you are amongst the wood.
Jim Schofield
Jim Schofield
-
ozziebluesman
- Blackwood
- Posts: 1529
- Joined: Wed Oct 10, 2007 9:12 am
- Location: Townsville
- Contact:
Re: Build Thread: The Paperbark Guitar
G'day Jim,
We have both been very busy. Joel has a big order for some hand made stools and we have our third Ukulele Building Course starting next Saturday. We never dreamed the interest would be so high. We have eight starters for this next course so last Monday I bent up 10 sets of concert ukulele sides ready for the next course. I have started a new student mentoring him through a 018 acoustic guitar build and have just finished a OM build with a Doctor who will be playing his newly built guitar at his wedding day this coming Saturday down in Toowoomba. He did a fine job of the guitar I was very proud of his first ever acoustic guitar build.
So Joel has the Paperbark OM ready for the finish process he will be back at it soon.
Cheers
Alan
"Play to express, not to impress"
Alan Hamley
http://www.hamleyfineguitars.com/
Alan Hamley
http://www.hamleyfineguitars.com/
Who is online
Users browsing this forum: Google and 291 guests