Good bye go bar?

Talk about musical instrument construction, setup and repair.

Moderators: kiwigeo, Jeremy D

User avatar
TimS
ANZLF Approved Supplier
Posts: 210
Joined: Thu Sep 27, 2007 8:16 pm
Location: Perth, Western Australia
Contact:

Good bye go bar?

Post by TimS » Sun Jul 21, 2013 1:55 pm

Just some food for thought!

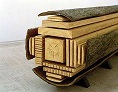
Jig assembly not completely refined but sufficient to do a test run. Alignment of braces will require some making on the sound board but maybe indexing point on the jigs be included. Initially used a t-slot cutter approach for the channels but two different straight cutters approaching the board from either side will suffice. Nuts were turned down slightly to improve channel entry. May have to include a frame that the template and workboard fit into to compensate for accumulative pressure on the template. Will keep you posted!

Tim

TS-BraceJig-1.jpg
TS-BraceJig-1.jpg (26.79 KiB) Viewed 21727 times
TS-BraceJig-2.jpg
TS-BraceJig-3.jpg
[url]http://www.australiantonewoods.com[/url]

User avatar
Tod Gilding
Blackwood
Posts: 838
Joined: Thu Mar 10, 2011 7:32 pm
Location: South West Rocks NSW

Re: Good bye go bar?

Post by Tod Gilding » Sun Jul 21, 2013 5:39 pm

Got Any More Pics Tim ?
Tod


Music is everyone's posession. It's only publishers who think that people own it.
John Lennon

User avatar
TimS
ANZLF Approved Supplier
Posts: 210
Joined: Thu Sep 27, 2007 8:16 pm
Location: Perth, Western Australia
Contact:

Re: Good bye go bar?

Post by TimS » Sun Jul 21, 2013 6:28 pm

Clamps and braces removed.
TS-Bracejig-4.jpg
Template removed
TS-Bracejig-5.jpg
Underside of template
TS-Bracejig-6.jpg
Glue line cleanup doesn't appear to be much of an issue.
TS-Bracejig-7.jpg
[url]http://www.australiantonewoods.com[/url]

DaveW
Blackwood
Posts: 107
Joined: Fri Dec 07, 2012 9:14 pm
Location: Perth West Australia

Re: Good bye go bar?

Post by DaveW » Sun Jul 21, 2013 7:22 pm

Mad Scientist !
How is the adjustable neck going that you were working on last time I was around and you ended up with lots of my hardearned ?
Dave
The Older I Get The Better I was ?

User avatar
TimS
ANZLF Approved Supplier
Posts: 210
Joined: Thu Sep 27, 2007 8:16 pm
Location: Perth, Western Australia
Contact:

Re: Good bye go bar?

Post by TimS » Sun Jul 21, 2013 7:25 pm

Neck joint Type 2 is done in my head but I just need some free time!
[url]http://www.australiantonewoods.com[/url]

User avatar
charangohabsburg
Blackwood
Posts: 1818
Joined: Sat Oct 16, 2010 1:25 am
Location: Switzerland

Re: Good bye go bar?

Post by charangohabsburg » Sun Jul 21, 2013 7:46 pm

DaveW wrote:Mad Scientist !
How is the adjustable neck going that you were working on last time I was around and you ended up with lots of my hardearned ?
Dave
It works! :)
(Well, maybe that one was "Type 1")
TimS wrote:Will keep you posted!
Waiting patiently for the updates! 8)
Markus

To be stupid is like to be dead. Oneself will not be aware of it.
It's only the others who suffer.

User avatar
needsmorecowbel
Blackwood
Posts: 974
Joined: Sun Oct 04, 2009 7:48 pm
Location: Melbourne

Re: Good bye go bar?

Post by needsmorecowbel » Sun Jul 21, 2013 9:53 pm

Can't wait to see this build Tim,

Stu

Shane Woonton
Blackwood
Posts: 112
Joined: Thu Jul 28, 2011 1:23 pm

Re: Good bye go bar?

Post by Shane Woonton » Tue Jul 23, 2013 8:20 am

A go-bar deck just seems so much simpler.... :?

User avatar
colburge
Blackwood
Posts: 344
Joined: Fri Mar 02, 2012 11:14 am
Location: Upper Caboolture

Re: Good bye go bar?

Post by colburge » Tue Jul 23, 2013 6:02 pm

More than one way to skin a cat :)

Col

User avatar
TimS
ANZLF Approved Supplier
Posts: 210
Joined: Thu Sep 27, 2007 8:16 pm
Location: Perth, Western Australia
Contact:

Re: Good bye go bar?

Post by TimS » Tue Jul 23, 2013 8:01 pm

Yes I guess a Go Bar approach is quite simple. The only issues that i have come across are migration of braces during initial gluing and room to accommodate the jig. That being said the best method is the one that suits you which you are most comfortable with.

regards

Tim
[url]http://www.australiantonewoods.com[/url]

nnickusa
Blackwood
Posts: 902
Joined: Sat Feb 04, 2012 4:07 pm
Location: Brunswick Heads, NSW

Re: Good bye go bar?

Post by nnickusa » Wed Jul 24, 2013 10:59 am

Interesting Tim. I might prefer something that ids more, I don't kow, spiderweb-like, so I can acccess the braces for glue clean up. (Mine don't come up that neat :roll: )

I will say, that I get very little sliding around of the braces, but I think that's because my sticks are timber, and cut just oversize, so the pressure isn't very sideways....

Yours seems to replace a vacuum clamping setup, rather than a go-bar deck.

Food for thought.
I wish I was half the man my dog thinks I am....

Cheers,
Nick

https://www.facebook.com/pages/DMI-hand ... 744?ref=hl

Ormsby Guitars

Re: Good bye go bar?

Post by Ormsby Guitars » Wed Jul 24, 2013 11:21 am

I dont make acoustics, but this just seems like a really awkward way of doing things. You mention space for the jig if it's a go bar setup. What is above this jig that limits space if it was a go bar system? And cleaning dry glue is a much harder job, if the excess isnt wiped away when wet. Im sure I can see a gap under the X bar too.

User avatar
TimS
ANZLF Approved Supplier
Posts: 210
Joined: Thu Sep 27, 2007 8:16 pm
Location: Perth, Western Australia
Contact:

Re: Good bye go bar?

Post by TimS » Thu Jul 25, 2013 8:53 am

Thanks Perry regarding the X Brace area. However in this case the glue joint is fine. I used my 105mm macro and got down into the contact point (~40 mm) between the brace and the sound boated.
TS-BraceJig-Glue-1.jpg
TS-BraceJig-Glue-2.jpg
[url]http://www.australiantonewoods.com[/url]

User avatar
colburge
Blackwood
Posts: 344
Joined: Fri Mar 02, 2012 11:14 am
Location: Upper Caboolture

Re: Good bye go bar?

Post by colburge » Thu Jul 25, 2013 10:13 am

Hi Tim

Out of interest - how long did it take you to get everything glued up and tightened down.


Cheers

Col

Ormsby Guitars

Re: Good bye go bar?

Post by Ormsby Guitars » Thu Jul 25, 2013 11:09 am

TimS wrote:Thanks Perry regarding the X Brace area. However in this case the glue joint is fine. I used my 105mm macro and got down into the contact point (~40 mm) between the brace and the sound boated.
TS-BraceJig-Glue-1.jpg
TS-BraceJig-Glue-2.jpg

Looks perfect!

User avatar
TimS
ANZLF Approved Supplier
Posts: 210
Joined: Thu Sep 27, 2007 8:16 pm
Location: Perth, Western Australia
Contact:

Re: Good bye go bar?

Post by TimS » Thu Jul 25, 2013 5:49 pm

Having already cut braces to size and the x brace half lap, applying glue and clamping would have been about 10 mins.

regards

Tim
[url]http://www.australiantonewoods.com[/url]

DaveW
Blackwood
Posts: 107
Joined: Fri Dec 07, 2012 9:14 pm
Location: Perth West Australia

Re: Good bye go bar?

Post by DaveW » Thu Jul 25, 2013 7:57 pm

Hi Tim
just being another "prophet of doom"
it doesnt allow you to play around with the brace positions
cant forward /back shift the X brace ,cant alter the tone bars etc etc
it doesnt allow for much "artistic license"
sorry mate ...Im not a fan
you can beat me unmercifully next time I come around to buy wood !!
Dave
The Older I Get The Better I was ?

User avatar
TimS
ANZLF Approved Supplier
Posts: 210
Joined: Thu Sep 27, 2007 8:16 pm
Location: Perth, Western Australia
Contact:

Re: Good bye go bar?

Post by TimS » Thu Jul 25, 2013 9:46 pm

Not quite sure about the etc etc etc etc. Thats not something I would glue on the sound board. The ability to move the tone bars around is, I would have thought, a decision that occurs well before the gluing phase after careful consideration about the effects of the previous build brace wood positions. It is actually very easy to move the x brace. It would probably be more of an issue with the two transverse braces above the sound hole. Fan club! This a forum for sharing ideas not attracting a devoted following. This is much in the same way that design ideas over the ages and across cultural divides in lutherie, have been the basis for inspiring, as of yet unanticipated connections. But wait! Type 2 Brace gluing jig is but two weeks away and this jig allows you to have infinite positions, complete gluing access and great visual access!

regards

Tim
[url]http://www.australiantonewoods.com[/url]

User avatar
Trevor Gore
Blackwood
Posts: 1609
Joined: Mon Jun 20, 2011 8:11 pm

Re: Good bye go bar?

Post by Trevor Gore » Thu Jul 25, 2013 10:42 pm

TimS wrote:But wait! Type 2 Brace gluing jig is but two weeks away and this jig allows you to have infinite positions, complete gluing access and great visual access!
I'm in suspenders !! :?


Can't wait....


Don't tell me....


Not a...


Gobar deck??


:lol:


Sorry, couldn't help myself... Must do more to encourage innovation around here....

User avatar
TimS
ANZLF Approved Supplier
Posts: 210
Joined: Thu Sep 27, 2007 8:16 pm
Location: Perth, Western Australia
Contact:

Re: Good bye go bar?

Post by TimS » Thu Jul 25, 2013 11:01 pm

Maybe flat bar deck!
[url]http://www.australiantonewoods.com[/url]

User avatar
colburge
Blackwood
Posts: 344
Joined: Fri Mar 02, 2012 11:14 am
Location: Upper Caboolture

Re: Good bye go bar?

Post by colburge » Fri Jul 26, 2013 8:18 am

TimS wrote:Maybe flat bar deck!
Tim

What if instead of the clamps you had a large bolt permanently fixed in each corner on the bottom board, and corresponding hole in the top board? Slip a small stand-off over the bolt slightly taller than the braces, brace it all up, slip the top board on over the bolts and put a nut and washer on each corner before tightening down all your brace bolts.

Cheers

Col

User avatar
TimS
ANZLF Approved Supplier
Posts: 210
Joined: Thu Sep 27, 2007 8:16 pm
Location: Perth, Western Australia
Contact:

Re: Good bye go bar?

Post by TimS » Fri Jul 26, 2013 8:42 am

Maybe Col, however you would have to assume that the pressure would be even over all glued surfaces and this is invariably not possible. The varying downward movement of the soundboard into the built-in radius of the top, be it symmetric or asymmetric across it surface, and the deflection/flex of the jig.

regards

Tim
[url]http://www.australiantonewoods.com[/url]

User avatar
TimS
ANZLF Approved Supplier
Posts: 210
Joined: Thu Sep 27, 2007 8:16 pm
Location: Perth, Western Australia
Contact:

Re: Good bye go bar?

Post by TimS » Fri Jul 26, 2013 6:40 pm

Just an edit to my last post.

There are at least two variables to consider that work against even clamping: 1. varying downward movement of the soundboard into the built-in radius of the top, be it symmetric or asymmetric across it surface , and 2. the deflection/flex of the jig.
[url]http://www.australiantonewoods.com[/url]

simonm
Blackwood
Posts: 176
Joined: Mon Sep 07, 2009 7:09 am

Re: Good bye go bar?

Post by simonm » Tue Jul 30, 2013 11:36 pm

I remember seeing a "mould"/"template" like this for sale on the German ebay a few years ago. It was made out of some kind of heavy rubber if my memory if correct. I believe it came from one of the old German factories that went belly up mostly likely in the 80's. Similar kind of steel string bracing pattern. Not sure how clamping would have worked.

User avatar
sebastiaan56
Blackwood
Posts: 1279
Joined: Sun Oct 28, 2007 5:23 am
Location: Blue Mountains

Re: Good bye go bar?

Post by sebastiaan56 » Wed Jul 31, 2013 7:15 pm

What about a system based on a series of bench dogs? The hardest bit making the arms long enough.
make mine fifths........

Post Reply

Who is online

Users browsing this forum: Gec and 242 guests