Hello there all,
I am considering setting up a buffing arbor system to improve my finishes and before i go an buy from good ole stewmac was wondering if anyone here (Sydney) has found a local supplier for large buffing wheels and perhaps even an arbor setup?
Mark
Buying buffing setup
-
Mark G
- Sassafras
- Posts: 44
- Joined: Sun Jul 24, 2011 2:19 am
- Location: Blacktown, Sydney NSW
- Contact:
Buying buffing setup
Mark Gosbell
http://gosbellguitars.com.au
http://gosbellguitars.com.au
-
DarwinStrings

- Blackwood
- Posts: 1877
- Joined: Thu Nov 13, 2008 10:27 pm
- Location: Darwin
Re: Buying buffing setup
Hi Mark, I use soft cotton buffs on and Makita bench grinder, I would have to search to see if I can find the Melbourne based supplier. I have seen the Stewy Mac ones and although mine are a little smaller they do just as good of a job. I am now considering changing to Allen's method though cause his looks better as it is not so high speed which I am sure has it's benefits and if you have a look at Allen's finishes I doubt any method is better. HERE is the link to Allen's tute but I think there might be another one he put up as I don't think he uses the drill press anymore, he just uses and hand held drill.
Jim
Life is good when you are amongst the wood
Jim
Life is good when you are amongst the wood
Life is good when you are amongst the wood.
Jim Schofield
Jim Schofield

Re: Buying buffing setup
Before you go blowing heaps of money in a bench mounted setup, try a 3" handheld buffer with a 3m waffle pad.
I tried on about a year ago on the advice of a pro painter, skeptical at first I bout a $60 eBay cheapie thinking its cheaper than a $400 paint shop one and if it dies it doesnt matter and if i liked it I can buy a good one.
The thing is still going very well and I cannot believe I've gone for so many years without one. Much safer than a buffing arbor as well. I think everyone who's ever used an arbor (myself included) has a story or a near miss. The 3" handheld I can hold the guitar on a stand with one hand and buff with the other
Re: Buying buffing setup
I should also add that it is variable speed (important that it is)

Re: Buying buffing setup
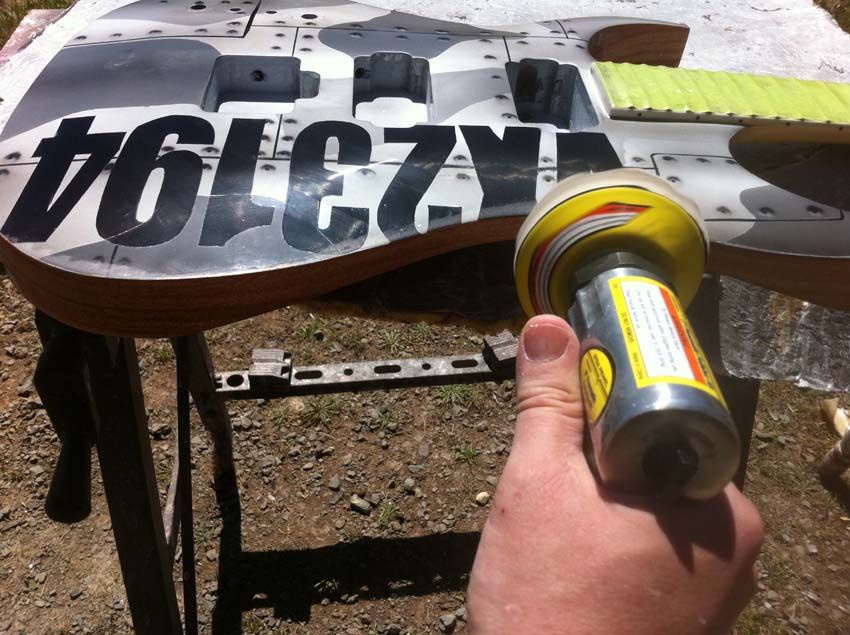
The mini buff I used is called a pistol buff in the automotive trade. I have the Snap-On brand one that will set you back a bit more than the cheap outlet store one, but I use it every single day, sometimes for hours at a time in the day job, and it just goes and goes and goes.
The pads are the hard white ones by Farecla for the buff out, and I'm using the 3M Perfect-it buffing compound. A very little goes a long way. Much less than you see in my tutorial.
I changed from the Autoglym compound because this new 3M one works far better, and the Autoglym seemed to separate and go bad well before I got though a 1/4 of the bottle.
If you get the combination of compound, speed of buff, and pressure on the pad right, the finish will come up like glass in seconds. No need for finer compounds or glazes. Slower speed works better than high speed.
I buffed out two ukes a couple of days ago in less than 15 minutes for the pair.
-
Mike Thomas

- Blackwood
- Posts: 226
- Joined: Fri Jan 30, 2009 1:34 pm
- Location: Adelaide
Re: Buying buffing setup
Could you give us a picture or a link to the Snap-on buff you use, Allen. I had a look at the Snap-on site, but couldn't find a mini/pistol buff, and I'd like to see what one looks like.
Mike Thomas
"There are some enterprises in which a careful disorderliness is the true method"
"There are some enterprises in which a careful disorderliness is the true method"
Re: Buying buffing setup
Allen wrote:The mini buff I used is called a pistol buff in the automotive trade. I have the Snap-On brand one that will set you back a bit more than the cheap outlet store one, but I use it every single day, sometimes for hours at a time in the day job, and it just goes and goes and goes.
The pads are the hard white ones by Farecla for the buff out, and I'm using the 3M Perfect-it buffing compound. A very little goes a long way. Much less than you see in my tutorial.
I changed from the Autoglym compound because this new 3M one works far better, and the Autoglym seemed to separate and go bad well before I got though a 1/4 of the bottle.
If you get the combination of compound, speed of buff, and pressure on the pad right, the finish will come up like glass in seconds. No need for finer compounds or glazes. Slower speed works better than high speed.
I buffed out two ukes a couple of days ago in less than 15 minutes for the pair.
When talking buffers, compounds etc also are a main piece of the puzzle.
I also use 3M Perfect It.
However I use the green 3M pads which are softer than the white and I found give I finer buff. The difference though, I found that I had to run over it by hand with a 3000 grit (not excessive, more so like a rough hand buff only taking about a minute for the whole guitar) before hitting it with the green waffle and the perfect it. I found this made a world of difference.
So my buffing schedule is:
- Start cutting at 2000 wet
- Rub over with 3000 wet
I'm constantly airhosing the surface dry during the 2000 stage so I can see where it's at
- 3M perfect it with the green waffle on the 3" pistol buffer (air gun)
- wipe over with a scratch free cloth
Re: Buying buffing setup
I use one of these with the pad Allen suggested above. It is cheap and works well.
http://www.tradetools.com/products/RI2273K
http://www.tradetools.com/products/RI2273K
Jeremy D

Re: Buying buffing setup
I use the same basic set-up and am very happy with the results. I have a simple 3" foam pad in my buffing tool. I think the secret is the 3M Perfect-it. The stuff is like magic! You need to experiment with speed and pressure a little bit but once you get the "feel" WOW!!
A really shiny guitar in less than 30 minutes....
Mikey
A really shiny guitar in less than 30 minutes....
Mikey
-
Mark G
- Sassafras
- Posts: 44
- Joined: Sun Jul 24, 2011 2:19 am
- Location: Blacktown, Sydney NSW
- Contact:
Re: Buying buffing setup
As always this group superseded my expectations. I haven't been happy using my drill with buffing pad for a while now...never could quite get the glass look I was after. I'll look carefully at your tutorial Allen and perhaps do some shopping for a handheld unit and definitely seek out the 3M product. Thanks ever so much everyone.
Mark Gosbell
http://gosbellguitars.com.au
http://gosbellguitars.com.au
Re: Buying buffing setup
If it's lacquer you are buffing, then there is no need at all to sand finer than P1500, and I only go that fine when I can't find a piece of P1200. If you are using a 2 pack product, then it depends on how hard it is on how fine you need to go. We use Glasurit at the Panel shop and we only sand out to P2000 in most instances. But it's pretty bloody rare that you ever need to go finer than P2500.
So for the Mirotone that I use, I wet-sand to P1200. The finish before sanding is already better than most factory instruments, but then again, I'm pretty good with the spray gun. Use the pistol (mini buff) with 3M Perfect-It compound. Minutes later it's like glass.
It's the combination of using the right density of pad with the compound along with the correct speed and pressure that gets the finish up nice and glossy very quickly. It's a bit like dancing. No one can tell you how to do it. You just have to practice.
Here is the picture of my buff.
And a couple of ukes that I buffed in under 15 minutes Sunday morning. Crappy photo as it was late this afternoon when I got back out in the shed.
So for the Mirotone that I use, I wet-sand to P1200. The finish before sanding is already better than most factory instruments, but then again, I'm pretty good with the spray gun. Use the pistol (mini buff) with 3M Perfect-It compound. Minutes later it's like glass.
It's the combination of using the right density of pad with the compound along with the correct speed and pressure that gets the finish up nice and glossy very quickly. It's a bit like dancing. No one can tell you how to do it. You just have to practice.
Here is the picture of my buff.
- 2_Ukes.jpg (119.59 KiB) Viewed 28493 times
Re: Buying buffing setup
The buffer I use is just a cheaper version of what Allen posted above.
Yes, I use automotive 2k clear over west systems epoxy sealer. Automotive spraying is where my paint education started years ago spraying cars and it carried over to me adapting those methods to timber and using auto 2k on my guitars.
As you know, most panel shops dont wet sand to finer grades, in fact most just leave it off the gun, so using examples from the automoitve trade is pretty bad for our purposes here, as guitarists expect higher than automotive quality finish.
I know the last car I sprayed (the Corvette I mentioned in the other thread) I didnt wetsand back any deeper than 2000 before I polished. A guitar on the other hand is much smaller so we are able to spend time detailing a bit extra. I start rubbing the clear at 2000, unless I had a shit day on the gun and it might need a slight rub at 1000 first, but that i very rarely do and if so only for a couple areas. So usually I just start wet rubbing at 2000 to get it flat, then rub over it with the 3000 before the perfect it. Finesse it is another 3M polish that is very great. A local acoustic luthier whom has been building longer than I have been alive uses the Finesse it on his $5000+ builds and he also rubs back to the 3000 grit before hand polishing with the finesse it.
For the purpose and in the manner I use the 3000 grit, 2500 and 3000 would pretty much do the same job as I'm not using them as a deep/detailed sand, its more like a ferocious wipe over and it does make a massive difference.
As Allen has displayed with his pics above, these tools and products do give a great finish.
Heres the last guitar I sprayed/polished:
Re: Buying buffing setup
http://buy1.snapon.com/catalog/item.asp ... ir=catalog
These rock.
They are almost quiet enough to have a conversation while using it. What are the cheapies like?
I deal with enough screaming tools on construction sites all day. And not always in the bloke's hands.
These rock.
They are almost quiet enough to have a conversation while using it. What are the cheapies like?
I deal with enough screaming tools on construction sites all day. And not always in the bloke's hands.
Re: Buying buffing setup
The cheapie is no louder than my rattle gun or die grinder (whilst they're not under load!)
I'm pretty anal about wearing ear protection for most things but I've never felt the need to wear it with this.
I'm pretty anal about wearing ear protection for most things but I've never felt the need to wear it with this.
Re: Buying buffing setup
liam_fnq wrote:
I deal with enough screaming tools on construction sites all day. And not always in the bloke's hands.
...............
Kevin
Kevin
Re: Buying buffing setup
Quick revision - in my earlier posts I stated I'm now using the green pads, it should read blue. I just saw the pile of them and I'm using the blue pads with the 3" buffer and the perfect it. In the pic earlier theres a white pad, I'm no longer using those for this purpose.
-
Phil Mailloux
- Myrtle
- Posts: 83
- Joined: Sun Jan 11, 2009 9:31 am
Re: Buying buffing setup
I bought the Stewmac buffer a few years back, cost an arm and a leg of shipping to get here, I thought I'd get the best finishes in the world with this thing. I don't know if the problem is the user or not but I don't like my finishes, way too many swirls marks once I'm done, I'm using the coarse and fine compounds and usually sand down with micromesh wet down to one of the smaller grits.
On a few of the latest builds I just do micromesh as i dislke what comes out of the buffer, i'll only use it to give a quick buff to necks or would use the buffer only on medium compound as the fine brings out the swirl big time. Don't know if anyone has any advice here but i'm contenplating trying one of the buffs in the above posts as a change
On a few of the latest builds I just do micromesh as i dislke what comes out of the buffer, i'll only use it to give a quick buff to necks or would use the buffer only on medium compound as the fine brings out the swirl big time. Don't know if anyone has any advice here but i'm contenplating trying one of the buffs in the above posts as a change
OzBassForum.com
MaillouxBasses.com
MaillouxBasses.com
-
Ormsby Guitars
Re: Buying buffing setup
I'll take that stewmac one off your hands if its for sale.
Re: Buying buffing setup
Break down your process and let us know from beginning to end, including what grit paper you use and whether its wet or dry, as well as what type of compound you're using. This way you can get a few different opinions on how to alter your method and get rid of the marks.Phil Mailloux wrote:Don't know if anyone has any advice here but i'm contenplating trying one of the buffs in the above posts as a change
-
Phil Mailloux
- Myrtle
- Posts: 83
- Joined: Sun Jan 11, 2009 9:31 am
Re: Buying buffing setup
Perry, not really wanting to get rid of it at this point since I might be the one not using it properly, never had proper tutorial for using this, its all learning on your own as you go as you know. I haven't seen a decent video tutorial on buffing so far.
Here's the breakdown, in order of the steps involved
1- I spray Mirotone Mirolac clear and sand flat between the layers with 3M P400 dry
2- once lacquer is done, I'll sand 3M P600 and P800 wet
3a- originally I then switch to menzerna coarse and fine compound on the buffer, got craploads of swirls marks I didn't like
3b- at some point I decided to switch to Micromesh wet from 1500 to 3600 then move to the buffer coarse and fine, still too many swirl marks, got rid of buffer fine and only did coarse which leaves a reasonable shine
3c- I'm now so annoyed that I do Micromesh 1500 to 12000 by hand instead of using the buffer
OzBassForum.com
MaillouxBasses.com
MaillouxBasses.com
-
Ormsby Guitars
Re: Buying buffing setup
I dont wetsand a gloss finish prior to buffing, with anything courses than 1500 grit. And even then, its only if there is a "problem" spot. Usually a start and finish with 2000 grit.
I use the foam waffle pads on a makita polisher. Im ready to go to the stationary buffing wheel setup now though after trying one a couple years ago.
I use the foam waffle pads on a makita polisher. Im ready to go to the stationary buffing wheel setup now though after trying one a couple years ago.
-
Phil Mailloux
- Myrtle
- Posts: 83
- Joined: Sun Jan 11, 2009 9:31 am
Re: Buying buffing setup
I'm not sure I'm getting that Perry, do you mean you dry sand only? up to 2000 then move to the Makita polisher?
OzBassForum.com
MaillouxBasses.com
MaillouxBasses.com
Re: Buying buffing setup
There are different grading standards to abrasives. The most common being the "P" designation. So when talking grit you need to compare apples to apples. MiroMesh uses another system as far as I'm aware. The finest grit in the P system that I've seen is P3000. That's so fine that it doesn't take much more than a brisk rub with a soft rag to bring lacquer up to a shine.
-
Ormsby Guitars
Re: Buying buffing setup
I sand between coats obviously, then after the final coat, i wet sand with 2000grit, unless there is an 'imperfection' and then i just hit that spot with 1500. If it is a run, then I razor it off first. 1500 is really only if there is orange peel or a speck of dust in the final coat.Phil Mailloux wrote:I'm not sure I'm getting that Perry, do you mean you dry sand only? up to 2000 then move to the Makita polisher?
Lately, Ive also been using a 4000grit foam pad on my orbital after the 2000. Works pretty good, but not sure if it takes longer, or is quicker... if it gets a bit of dirt under there it really marks the surface.
Then on to the waffle pad by 3M on the polisher. Then lambswool for the tiny bit of extra shine. Not really necessary, Im just anal.
-
Phil Mailloux
- Myrtle
- Posts: 83
- Joined: Sun Jan 11, 2009 9:31 am
Re: Buying buffing setup
Right that makes sense thanks for that, I've always wondered if I was adding all the scratches myself by sanding from P600 and up, I once tried just spraying a thinner coat after my last top coat was dry and that gave a great shine to the body where I felt like I should just leave it as is. I might want to try that again or do it your way, seems a whole lot easier. The final sanding and buffing takes me most of a day to do, its been very iritating so far
OzBassForum.com
MaillouxBasses.com
MaillouxBasses.com
Who is online
Users browsing this forum: Jules93 and 198 guests