Tru-Oil finish advice

Talk about musical instrument construction, setup and repair.

Moderators: kiwigeo, Jeremy D

Post Reply
User avatar
Paul Eisenbrey
Myrtle
Posts: 56
Joined: Sat Oct 16, 2010 2:27 pm

Tru-Oil finish advice

Post by Paul Eisenbrey » Fri Jan 27, 2012 5:05 pm

Hi Folks,

I am making a parlor guitar for my grandson, and it is getting down to the final few steps. I decided to try using tru-oil to finish this one, and so far it is working out much better than my previous two efforts. Both of them were unsuccessful french polish jobs.

I have 25 coats on the guitar, and I was planning to buff it out after letting it harden for a couple weeks. But it is so darn *shiney* now, I am wondering if buffing is necessary. If I just level it, then spread a wash coat (50% naptha) and leave it at that, would that be good enough?

Here are some photos, so you know what it looks like now:
DSCN0147.jpg
DSCN0147.jpg (68.6 KiB) Viewed 25450 times
DSCN0148.jpg
DSCN0148.jpg (88.87 KiB) Viewed 25450 times
DSCN0149.jpg
DSCN0149.jpg (73.16 KiB) Viewed 25450 times
Thanks!

--Paul

jeffhigh
Blackwood
Posts: 1536
Joined: Thu Feb 07, 2008 5:50 am
Location: Caves Beach, NSW
Contact:

Re: Tru-Oil finish advice

Post by jeffhigh » Fri Jan 27, 2012 6:21 pm

Been a while since I did a tru-oil finish, but I did find that because you don't get any burn in between coats, you can get witness lines showing when you level sand.
I found it best to just level up then put a last coat on and call it done.

User avatar
WaddyT
Blackwood
Posts: 231
Joined: Tue Apr 15, 2008 1:49 am
Location: Charlotte NC
Contact:

Re: Tru-Oil finish advice

Post by WaddyT » Sat Jan 28, 2012 3:14 am

Wow, that's exactly the opposite of my experience. On my current build, After I started finishing, and had several coats on, I kept seeing little places that made me mad, where I hadn't prepped well enough. In more than one place I sanded back to wood, re-applied Tru-Oil and the places were invisible within a few coats. I did not try to just finish those areas, I just kept finishing all over, as though I had not sanded through. Worked great. However, all that said, I was done with my finish within 8 - 10 coats, put on very thin. I worked them out with MicroMesh, then polished by hand with Novus 2 and 3.
Waddy

Build Albums 12 done - 1 in process

Clip for #1 Barrios' "Una Limosna por el Amor de Dios" - Not me playing

User avatar
auscab
Blackwood
Posts: 650
Joined: Wed Jan 12, 2011 1:12 am
Location: Melbourne Australia

Re: Tru-Oil finish advice

Post by auscab » Sat Jan 28, 2012 10:59 am

Hi Paul,

With oil finishes ,I have not used Tru Oil ,I used to use Tung Oil.
But I have used oil based sanding sealer , and played around with satin or gloss on top of that.
I dont do it that way any more, but for the right job I like, oil based sanding sealer with shellac over the top. I'm talking furniture here.

so with a finish like oil with a shellac top , or just a straight shellac finish, a quick way of knocking back a glitzy shine , is to give it a fine light cut back with say a worn 600 or 800 grit paper , then wipe that off, then brush on some oil and turps and give a dab of beeswax in a few spots and give it an even pressure full length strokes with the grain with a 0000 steel wool. wipe it off and buff dry with a clean soft rag. it comes up looking pretty nice.

I think with just a straight oil finish it will work .

User avatar
Kim
Admin
Posts: 4376
Joined: Wed Sep 26, 2007 8:32 pm
Location: South of Perth WA

Re: Tru-Oil finish advice

Post by Kim » Sat Jan 28, 2012 12:34 pm

I achieved good results with Truoil by using a burnishing method. i.e. Carefully prep the surface of the wood out to 2000 grit before anything is applied (the wood itself will have a sheen by then). Then apply a 'thin' coat of Truoil over a selected work area e.g. back or one of the sides etc, and use a paper towel to take off 'all' the excess Truoil that you can. Now start working the tacky surface fast and hard with a clean cloth to burnish off all of the product that you can..you want to build up friction heat when doing this. Change to a clean bit of cloth when the tackiness reduces and go again until there is little resistance. Leave that panel and move to the next as long as you are not placing a freshly worked panel face down on the bench. Let that set up for a few hours (if your doing it right, your arm will need at least that long to recover :wink: ) and then repeat until you achieve the gloss level your after.

No need to buff, just apply silicone free wax and buff that and then maintain the surface with periodic applications of wax.

Excuse the image quality, 'old' camera, bad light, an no tripod but you get 'some' idea of the gloss level..from memory the first image was taken during process as a demo after the first 2 or 3 coats.
IMG_0446.jpg
1st_backofbridge_2K.jpg
1st_backofbridge_2K.jpg (69.62 KiB) Viewed 25359 times
butt_wedge1.jpg
The only problem I have encountered with a Truoil finish was the direct result of epoxy amine blush cause by poor a understanding of that phenomenon. The blush only occurred on those areas which had large pores and retained the most epoxy...the effect of the blush was to reverse the polymerisation process in those areas which made them go dull and tacky after just a few weeks. Later, those same areas formed into peaks which hardened off, or crystallised to leave a dull rough brittle surface...my advice remains that unless you fully understand what epoxy amine blush is and how to avoid it, to never use epoxy as a pore filler if you intend to use Truoil, or any other product that hardens through a process of polymerisation of driers, such as Tung Oil, or any traditional oil based varnish.

(EDIT) Just looking at the OLF and someone posted the following thread..The TO slurry method seems a really good option to pore fill for this finish...

http://www.thegearpage.net/board/showth ... p?t=711780

Cheers

Kim

User avatar
Paul Eisenbrey
Myrtle
Posts: 56
Joined: Sat Oct 16, 2010 2:27 pm

Re: Tru-Oil finish advice

Post by Paul Eisenbrey » Sat Jan 28, 2012 1:24 pm

Thanks guys!

Kim -- absolutely beautiful work. I should have asked this question at the outset. Because I used zpoxy. Way too late to avoid the amine blush. Live and learn.

What I think I'll do is mix Rob and Waddy's advice. Put a wash coat on, sand it out with micromesh, then put a beezwax coat on.

I'll post some pics in the gallery when it's done. :)

--Paul

User avatar
Kim
Admin
Posts: 4376
Joined: Wed Sep 26, 2007 8:32 pm
Location: South of Perth WA

Re: Tru-Oil finish advice

Post by Kim » Sat Jan 28, 2012 1:38 pm

Paul Eisenbrey wrote:Thanks guys!

I should have asked this question at the outset. Because I used zpoxy. Way too late to avoid the amine blush. Live and learn.

--Paul
Don't panic yet Paul, epoxy amine blush is triggered by the proper combination of temperature + moisture in the air + ppm of Co2 in the atmosphere during mixing, application, and curing. If you applied the epoxy in a well ventilated area when humidity was not too high (in the morning with a rising temp is better than :pm ) then you may be OK...but you really cannot know if there will be a problem or not for the next few months. To give you some idea, the guitar in the above images looked fine for about 6 weeks and then 'gradually', dull patches began to appear. Nothing major, just a little dull and they would not polish out. Then over time they spread, some merging in to each other and they became more pronounced until they felt like sandpaper.. :cry:

Take a look at the link edited into my last post...check out what user "Quarter" has to say about TO...he's getting spectacular results. 8)

http://www.thegearpage.net/board/showth ... p?t=711780

Cheers

Kim

User avatar
P Bill
Blackwood
Posts: 521
Joined: Mon Oct 18, 2010 8:31 am
Location: Cedar Vale, Qld Australia

Re: Tru-Oil finish advice

Post by P Bill » Sat Jan 28, 2012 1:49 pm

We don't see enough of your work Kim.
"Were you drying your nails or waving me good bye?" Tom Waits

Bill

User avatar
auscab
Blackwood
Posts: 650
Joined: Wed Jan 12, 2011 1:12 am
Location: Melbourne Australia

Re: Tru-Oil finish advice

Post by auscab » Sat Jan 28, 2012 2:02 pm

Really, nice looking Kim.
I think it's the first build of your I have seen.

User avatar
Kim
Admin
Posts: 4376
Joined: Wed Sep 26, 2007 8:32 pm
Location: South of Perth WA

Re: Tru-Oil finish advice

Post by Kim » Sat Jan 28, 2012 3:02 pm

P Bill wrote:We don't see enough of your work Kim.
No one has for a while Bill...I've been hijacked!!! :lol:

'Honey do' can be an awful demanding thing in an old weatherboard home and with two teenage girls both of whom sing and play better than I these days, I've been relegated 'guitar tech to the stars' and that can keep a bloke pretty time free..... but the pay is really good for the sole 8)

I also get side tracked :oops: 
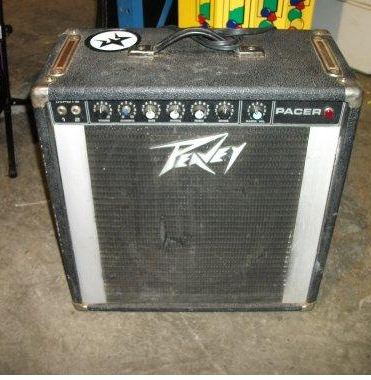
e.g. Worked on an 89 Epiphone X1000 superstat recently fitted with the infamous terminally ill KB bridge..found a few interesting things on that one but the most recent distraction was when the girls needed an amp to tote about for jam sessions. A valve amp was out of the equation because they needed something light weight enough for them to lug around (they don't like the idea of a fat bald 50+yo roadie following them to the friends places for some reason), but the amp also had to have enough output to cut through an acoustic drum kit. Well I had what I though was the perfect thing..a 1970's solid state, 45watt Peavey Pacer 1 x 12 combo. But the girls flatly refused to use it... because "its got issues daddy" "its sounds all scratchy daddy" and "Its so bloody Ugly daddy"

I did not take any before shots but here's a few of the same amp in similar condition I scrounged from the net..
all2.JPG
all2.JPG (39.14 KiB) Viewed 25319 times
back1.JPG
back1.JPG (67.83 KiB) Viewed 25319 times
Mine was probably in a bit worse nic than the one above with the speaker cloth more torn and the cabinet hardware properly rusted...so the girls had a point I suppose. So I ventured off to learn more about electronics and fixed all the "issues daddy", and then worked out a way to 'properly' dye tolex so the colour would go 'into' the material and not scratch off like paint does or some of the 'so called' dyes will when bumped into door ways and things as one is incline to do when lugging around an amp. Getting that sorted allowed me to fix both the "its so bloody ugly daddy" and the "can't you make it a blue one daddy??" complaints at the same time.

I probably should do a thread on the whole process rather than hijack this one but this is what I came up with...the image of the back best shows the colour change...painting the fascia was a complete bastard too, ended up doing it by hand :|
IMG_2909 (Medium).JPG
IMG_2916 (Medium).JPG
IMG_2960 (Medium).JPG
IMG_2930 (Medium).JPG
IMG_2918 (Medium).JPG
Sounds great now too because I replaced all the electrolytic caps, stripped, cleaned and refurbished the pots, fitted a new reverb tank, full 17" down the bottom of the cab instead of the pissy 8" under the chassis as per original. Biggest single improvement in sound though came when I replaced the original Peavey/Eminence PA voiced speaker with a 50watt aussie made Lorantz greenback clone....sounds very valveish now and with the volume up, and master down, it distorts nicely without bursting ear drums...Speaking of drums, it also has the output to cut through pretty much anything..not surprising because from what I understand these old USA made Peavey SS's shared the same preamp circuitry from 45 to 400watts..I was fortunate enough to have John Madison drop in during a trip up from Albany last week, he can probably vouch for the output. :gui

Best of all, whenever the girls plug in these days I get.."oooowww its soooo cooool daddy" and "thank you daddy xxx"...like I said, the pays pretty great...the neighbours are not so impressed though.. :P

Thank you Daddy!!
EnD.JPG
Cheers

Kim

User avatar
auscab
Blackwood
Posts: 650
Joined: Wed Jan 12, 2011 1:12 am
Location: Melbourne Australia

Re: Tru-Oil finish advice

Post by auscab » Sat Jan 28, 2012 5:53 pm

Kim
8) for the woodwork
8) for the electric amp resto,how do you know all this stuff??
8) 8) for the pair of smart looking young ladies,that also jam.

User avatar
kiwigeo
Admin
Posts: 10587
Joined: Sat Sep 29, 2007 5:57 pm
Location: Adelaide, Sth Australia

Re: Tru-Oil finish advice

Post by kiwigeo » Sat Jan 28, 2012 6:22 pm

Hmmph! Not much of an amp...the volume controls only go up to 10.
Martin

User avatar
WaddyT
Blackwood
Posts: 231
Joined: Tue Apr 15, 2008 1:49 am
Location: Charlotte NC
Contact:

Re: Tru-Oil finish advice

Post by WaddyT » Sun Jan 29, 2012 11:37 am

Yeah, but your ears start to bleed at 8. :D
Waddy

Build Albums 12 done - 1 in process

Clip for #1 Barrios' "Una Limosna por el Amor de Dios" - Not me playing

User avatar
kiwigeo
Admin
Posts: 10587
Joined: Sat Sep 29, 2007 5:57 pm
Location: Adelaide, Sth Australia

Re: Tru-Oil finish advice

Post by kiwigeo » Sun Jan 29, 2012 11:54 am

Kim wrote:
EnD.JPG
Cheers

Kim

I think we all want to ask the question but most of us are afraid to........but I'm used to getting my arse kicked at least once every few hours so I'm going to ask the question anyway.

How can a bloke as ugly as Kim produce two daughters who are absolute stunners??? :mrgreen:
Martin

jeffhigh
Blackwood
Posts: 1536
Joined: Thu Feb 07, 2008 5:50 am
Location: Caves Beach, NSW
Contact:

Re: Tru-Oil finish advice

Post by jeffhigh » Sun Jan 29, 2012 1:46 pm

Kim's beautiful on the inside...........or at least that's what his proctologist told me.

User avatar
kiwigeo
Admin
Posts: 10587
Joined: Sat Sep 29, 2007 5:57 pm
Location: Adelaide, Sth Australia

Re: Tru-Oil finish advice

Post by kiwigeo » Sun Jan 29, 2012 10:47 pm

jeffhigh wrote:Kim's beautiful on the inside...........or at least that's what his proctologist told me.
:lmao :lmao
Martin

Shane Woonton
Blackwood
Posts: 112
Joined: Thu Jul 28, 2011 1:23 pm

Re: Tru-Oil finish advice

Post by Shane Woonton » Mon Jan 30, 2012 7:45 pm

Hi there,

Question for Kim - Can you tell me how you did your rubbed oil finish on the top? Did you mask the bridge area or finish it and scrape it back to wood for gluing the bridge or.... ??

Cheers,

Shane

User avatar
Kim
Admin
Posts: 4376
Joined: Wed Sep 26, 2007 8:32 pm
Location: South of Perth WA

Re: Tru-Oil finish advice

Post by Kim » Tue Jan 31, 2012 1:45 am

Shane Woonton wrote:Hi there,

Question for Kim - Can you tell me how you did your rubbed oil finish on the top? Did you mask the bridge area or finish it and scrape it back to wood for gluing the bridge or.... ??

Cheers,

Shane
Shane, from memory I tapped off the bridge area with a couple of layers of blue masking tape, I use the stuff that is about 50mm wide so a single piece will cover the entire foot print. I then lightly sealed the top with shellac (super blonde waxless) going a bit heavier at the bridge area over the tape so it would firm up the bond at its edge. Once the shellac is well dry..longer is better, I sanded back the whole top well going a little lighter as I neared the tape, it still gets sanded but less so. By the time the top is ready for the TO to be applied there is very little shellac left anywhere but in the grain of the tape.

Contrary to what is often assumed 'and' the blurb you will read from Birchwood Casey, I have found that Truoil will 'not' actually penetrate into spruce very far at all...To accurately measure its penetration into those test pieces of spruce I had used prior to putting the finish on that top shown above, I would have need a device graduated in 'um'..the only thing I have that's anything like that is an old dial indicator which is graduated in ants dicks, and they are 'way' too big.

Cheers

Kim

Shane Woonton
Blackwood
Posts: 112
Joined: Thu Jul 28, 2011 1:23 pm

Re: Tru-Oil finish advice

Post by Shane Woonton » Tue Jan 31, 2012 11:42 am

Thanks Kim! Bought some Tru-oil last week to finish my current build. Your pictures above have given me something to shoot for.

Shane

User avatar
Cookie man
Myrtle
Posts: 58
Joined: Thu Aug 11, 2011 2:56 pm
Location: Adelaide, SA

Re: Tru-Oil finish advice

Post by Cookie man » Tue Jan 31, 2012 12:00 pm

kiwigeo wrote: I think we all want to ask the question but most of us are afraid to........but I'm used to getting my arse kicked at least once every few hours so I'm going to ask the question anyway.

How can a bloke as ugly as Kim produce two daughters who are absolute stunners??? :mrgreen:
I was thinking the same thing, but perhaps not the ugly part....unless Kim's wife is *really* pretty to compensate for ugliness.... If so, then the girls must have inherited his fantastic personality instead 8)

Thanks for the discussion guys, gonna go with Tru oil for my first project now, cheers :)
needsmorecowbel wrote: Markus it doesn't count when you briefly duck out the shed, make a fly fishing rod, then catch a trout from your hand carved canoe, package it (with the hand made vacuum machine) and then take a photo with your home made electron microscope....
:lol:

User avatar
John Maddison
Blackwood
Posts: 356
Joined: Tue Jun 03, 2008 11:15 pm
Location: Albany, Western Australia
Contact:

Re: Tru-Oil finish advice

Post by John Maddison » Tue Jan 31, 2012 9:03 pm

Kim wrote:...I was fortunate enough to have John Maddison drop in during a trip up from Albany last week, he can probably vouch for the output. :gui
Kim, consider it well & truly vouched for! ... :wink:.

Gotta say, when your girls started ramping up some impressive AccaDacca etc riffs I was more than impressed not only with their superb playing but with the awesome power out of that li'l Peavey ... great job on the restoration project; it must have taken you HOURS to strip & re-build the cabinet & all those bits to bring it back to it's full glory.

A huge thanks to you & the family for a brilliant night. The home-made chilli oil on the BBQ'd meat went down with copious beers a treat. I was in awe/envy of your workshop setup; your craftsmanship in jig-making & machinery restoration; the Grand Festo Collection, and the endless array of tools on that shadow board in the Glue Room. Then there was the tone wood stash you were still pulling out for show-n-tell at 1 in the morning - did you get all those boards packed away next day in the right order?

Good times mate ...
John M

User avatar
needsmorecowbel
Blackwood
Posts: 974
Joined: Sun Oct 04, 2009 7:48 pm
Location: Melbourne

Re: Tru-Oil finish advice

Post by needsmorecowbel » Tue Feb 07, 2012 8:12 pm

Kim with your buffing technique do you require more coats than if you didn't use this technique? How many coats roughly would you do of tru oil on an acoustic? I'm aiming for about 30-50 on my current electric bass as it is Huon Pine. Might give your buffing method a go as using fine steel wool between coats is just creating these tiny little scratches in the top.

User avatar
Kim
Admin
Posts: 4376
Joined: Wed Sep 26, 2007 8:32 pm
Location: South of Perth WA

Re: Tru-Oil finish advice

Post by Kim » Wed Feb 08, 2012 12:14 pm

I put on a base coat of TO fairly heavy relative to what I followed up with just to get some product down. This is not to say that any was left to 'dry', rather I worked smaller areas with a more heavily loaded cloth before removing the excess. The main thing is to get some friction heat into it and to keep rubbing until the tack drops off with a fast moving cloth (slow down too much and friction will build and cause more drag on the surface) As for how many coats, I just stopped when the surface looked how I wanted it so I don't really know. But I would work a panel and leave it to setup for a few hours and then work the opposite side.

The whole process extended over a number of days, perhaps 3 or 4, but because of the setup breaks between working panels, not that many total coats were involved, just lots of fresh rags, always, every time, use fresh cloth to apply and burnish off a fresh coat, 'never' reuse a rag that has any TO on it. A couple of thinks, the user at the link I posted above suggests glazing off with 2 parts TO to 1 part turps...with heavier coats I reckon that would work well and it may work really well with the burnish method also, 'but' I would work a piece of scrap side by side as you work the guitar so you could then run a test first with a same sample...it may prove to be disastrous other wise.

Once your happy with the application of the finish, should you then wish to buff it out for an even higher gloss level, be sure to leave it harden for 'at least' one month, more is better because the full polymerisation process is quite slow. Keep that in mind also before you lock the guitar up and leave it sitting on the fuzz of a guitar case. Those fine synthetic filaments can breakdown when in direct contact with a fresh finish and 'will' transfer onto the finish and fuck it up...Best bet is no guitar case for more than a short trip for the first month or two. Keep this in mind also in how you treat the finish for the first month, it will bruise quite easy at first but provides better protection in time...much like FP does..

Last tips..When you buy a bottle of TO, buy a bag of marbles as well..As you use the product, drop a marble into the bottle to bring its content back up past the shoulder and into the brim of the neck. Displacing air in this way will go a very long way toward preventing skinning over and general degradation of the product.

Cheers

Kim

User avatar
needsmorecowbel
Blackwood
Posts: 974
Joined: Sun Oct 04, 2009 7:48 pm
Location: Melbourne

Re: Tru-Oil finish advice

Post by needsmorecowbel » Wed Feb 08, 2012 3:04 pm

Thanks Kim I have resanded back to 800 and will continue up toward 2000 and let you know how I go with your technique (will tryout on a test piece)

Post Reply

Who is online

Users browsing this forum: No registered users and 154 guests