Anyway I thought that I would show how I did it. Basically I took the neck off and then drilled a 3/8inch hole next to the headblock and jigsawed it off. It was quite liberating once I had finished
In the end it was quite an easy job really because I sawed the top off and then pared what was left back nearly to the linings and planed the bindings down as well. I have a powered radius dish sander made from an old lathe head and a countershaft and a motor so that makes things very easy at this stage. I just sanded the last 1/2 mm or so back to the linings and went a 0.0something further so that i made sure I sanded away the old glue and hey presto....ready for the new top...it will be interesting to see if my replacement top is exactly the same or if I have to finesse the neck angle at all. Anyway I am sure that it will only be a very small adjustment if it needs it as they both came out of the same 30' radius dish that matches the sander.
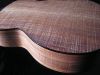
I thought that I would show you all the photos but I will not divulge the reason for such radical surgery because as I said it would embarrass the maker...
It has been an interesting process and a new one for me. Once I got over the initial horror of plunging a jigsaw into the top of my guitar I felt much better! So I hope you enjoy the photos of the open top surgery and I will post some other pics after the binding and purfling are done and when it is all back together.
You may notice the debris has fallen fortuitously on the makers label to protect his identity

the WoodRat


