Some Cheeky Fixes

Talk about musical instrument construction, setup and repair.

Moderators: kiwigeo, Jeremy D

Post Reply
User avatar
needsmorecowbel
Blackwood
Posts: 974
Joined: Sun Oct 04, 2009 7:48 pm
Location: Melbourne

Some Cheeky Fixes

Post by needsmorecowbel » Sun Feb 27, 2011 9:36 pm

Hey guys i got some solid bodies joined recently as the guy only wanted 25 bucks. While most of the bodies were fine there was one that had a really shoddy join down the centre join line of the drop top. The glue is very noticeable from close up but with the new skunk stripe it should be much crisper. Before i had this body glued together i had another body of Huon Pine joined together by the same company/ mob...Bad idea as they insisted on using biscuits to join them rather than just a butt join. The edge of the neck pocket happened to be exactly dead centre of one of the biscuits...sigh...But here are a few fixes that will no doubt jazz up the mistakes/ errors.

Image
Image
Image
Image


Kudos to Rod (rocket) for suggesting the cheeky purfling/ wood skunk stripe to cover up the join line.

Stu
Last edited by needsmorecowbel on Sun Feb 27, 2011 9:54 pm, edited 5 times in total.


User avatar
Lillian
Blackwood
Posts: 1705
Joined: Fri Sep 28, 2007 10:31 pm
Location: New Mexico, USA
Contact:

Re: Some Cheeky Fixes

Post by Lillian » Mon Feb 28, 2011 2:22 am

Nicely done Stu. That was a great solution.

Alan Stassforth
Kauri
Posts: 35
Joined: Mon Nov 15, 2010 4:09 am

Re: Some Cheeky Fixes

Post by Alan Stassforth » Sat Mar 05, 2011 12:24 pm

Good job, Stu.
Hey, I like your body shape!
Alan

ckngumbo
Blackwood
Posts: 102
Joined: Mon Oct 26, 2009 11:41 am
Location: Florida US

Re: Some Cheeky Fixes

Post by ckngumbo » Sun Mar 06, 2011 3:51 am

Nice work! It didn't just fix the problem but I think your work made things much more elegant.
Rob

User avatar
Taffy Evans
Blackwood
Posts: 997
Joined: Wed Apr 30, 2008 6:54 pm
Location: Charters Towers North Queensland

Re: Some Cheeky Fixes

Post by Taffy Evans » Sun Mar 06, 2011 6:39 am

Hi Stu, Its amazing how many design feature grow from hiding mistakes, faults and blemishes.

The guitar shown here built in 1992 started out with three pickup cavities, as the customer ordered, then after paying a deposit he did not return. So I did a similar fix to yours to the body so I could fit two pickups for he next customer. Whats that about the mother of invention.
PB060015.JPG
Taff

User avatar
Lillian
Blackwood
Posts: 1705
Joined: Fri Sep 28, 2007 10:31 pm
Location: New Mexico, USA
Contact:

Re: Some Cheeky Fixes

Post by Lillian » Sun Mar 06, 2011 12:04 pm

Taffy, I love the way you find solutions.

User avatar
needsmorecowbel
Blackwood
Posts: 974
Joined: Sun Oct 04, 2009 7:48 pm
Location: Melbourne

Re: Some Cheeky Fixes

Post by needsmorecowbel » Mon Mar 07, 2011 3:00 am

You are a classy man with fixes taff...love that logo on the headstock

User avatar
Daniel_M
Blackwood
Posts: 122
Joined: Mon Jan 31, 2011 5:15 pm
Location: North Parramatta

Re: Some Cheeky Fixes

Post by Daniel_M » Mon Mar 07, 2011 6:03 pm

Hey Stu,

Great fix! what is happening with that piece of Tiger Mrytle?

Thanks

Dan. :gui

User avatar
needsmorecowbel
Blackwood
Posts: 974
Joined: Sun Oct 04, 2009 7:48 pm
Location: Melbourne

Re: Some Cheeky Fixes

Post by needsmorecowbel » Fri Apr 08, 2011 1:16 pm

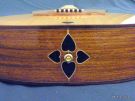
In LATE response to your question the myrtle covers half a biscuit. I got a table manufacturer to join the two pieces of huon pine with a jointer and he insisted upon have two biscuits in the join. I told him to put them 100 mm apart in the centre so they would not intrude upon the tail or the neck pocket of the guitar. Well the biscuits were not in the centre but 100 mm from each end and i managed to cut right through it with the router (couldn't really be helped). So i figured to fix it I'd get 3 bits of Tiger Myrtle- 1. Neck patch, 2. Pick guard, 3. Input Jack Cover

The Electric i have made is turning into a Frankenstein of fixes and Lessons learned...

Lesson 1: Always lock your plunge on the router...
Lesson 2: (A REAL NO BRAINER) Don't Drill Input Jack Holes in the side before trying to round the edges...le sigh...Any suggestions for a FIX?
Lesson 3: Really Don't need such a Large Control Cavity

Image
Image
Image
Image
Image
Image
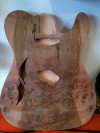
LESSON 1-Went too deep on the plunge and had to make a choc/wedge of maple then glue, clamp and re rout.
Image
LESSON 2- seemed like the bevel wanted to go 'home' in the hole (Happy Gilmore Style)
Image
LESSON 3- Control Cavity itself is rather large

User avatar
needsmorecowbel
Blackwood
Posts: 974
Joined: Sun Oct 04, 2009 7:48 pm
Location: Melbourne

Re: Some Cheeky Fixes

Post by needsmorecowbel » Sat Apr 09, 2011 8:56 pm

.

Post Reply

Who is online

Users browsing this forum: Google and 169 guests