Florentine cutaway

Talk about musical instrument construction, setup and repair.

Moderators: kiwigeo, Jeremy D

Post Reply
User avatar
Craig
Admin
Posts: 1090
Joined: Wed Sep 26, 2007 10:08 am
Location: N.S.W. in the bush

Florentine cutaway

Post by Craig » Sat Oct 31, 2009 6:09 pm

This is what I have on the go at the moment
I'm pretty happy how the cutaway mitered join worked out , especially considering it being a fairly light colour where you can't hide much ,and also because it was pommele figured ,,,,, and Mahogany. :lol: No visable glue line and all the figuring lines up. Craig's a happy camper ! :D

Image

Image

Image

Image


I can describe how I did it , if any of you guys are interested


:D
Last edited by Craig on Sat Oct 31, 2009 7:42 pm, edited 1 time in total.
Craig Lawrence

User avatar
Bob Connor
Admin
Posts: 3126
Joined: Mon Jul 09, 2007 9:43 pm
Location: Geelong, Australia
Contact:

Post by Bob Connor » Sat Oct 31, 2009 7:07 pm

I'm interested. :D
Bob, Geelong
_______________________________________

Mainwaring and Connor Guitars

maurie
Kauri
Posts: 36
Joined: Fri Mar 20, 2009 11:18 pm
Location: Albany W.A.

Post by maurie » Sat Oct 31, 2009 7:48 pm

Very neat Craig
I'm interested also
Maurie

User avatar
Allen
Blackwood
Posts: 5259
Joined: Thu Oct 11, 2007 5:39 pm
Location: Cairns, Australia
Contact:

Post by Allen » Sat Oct 31, 2009 7:52 pm

I'm interested, but you're going to have to wait for the 1 week mandatory banning after posting that Craig. :lol:
Allen R. McFarlen
https://www.brguitars.com
Facebook
Cairns, Australia

jeffhigh
Blackwood
Posts: 1536
Joined: Thu Feb 07, 2008 5:50 am
Location: Caves Beach, NSW
Contact:

Post by jeffhigh » Sat Oct 31, 2009 8:13 pm

Beautiful work Craig !

User avatar
kiwigeo
Admin
Posts: 10778
Joined: Sat Sep 29, 2007 5:57 pm
Location: Adelaide, Sth Australia

Post by kiwigeo » Sat Oct 31, 2009 8:26 pm

He's banned right now...for asking if we were "interested".

Allen wrote:I'm interested, but you're going to have to wait for the 1 week mandatory banning after posting that Craig. :lol:

User avatar
Lillian
Blackwood
Posts: 1702
Joined: Fri Sep 28, 2007 10:31 pm
Location: New Mexico, USA
Contact:

Post by Lillian » Sun Nov 01, 2009 12:59 am

Normally I tend to think we are somewhat loose with banning, but this time I have to agree whole heartily. Asking if we are interested.... shesh!

That's right up there with asking if we'd like to see one of your new jigs.

User avatar
Nick
Blackwood
Posts: 3640
Joined: Thu Feb 26, 2009 11:20 am
Location: Christchurch, New Zealand
Contact:

Post by Nick » Sun Nov 01, 2009 8:20 am

Anybody want to buy a whole load of tonewood and some tools?
That's disgustingly good Craig, makes me feel like I'm knocking up packing crates.
Martin or Allen...are you able to hand out life bans or is one week the maximum penalty? :D
You gotta let us in on your 'secret' method.
"Jesus Loves You."
Nice to hear in church but not in a Mexican prison.

User avatar
Craig
Admin
Posts: 1090
Joined: Wed Sep 26, 2007 10:08 am
Location: N.S.W. in the bush

Post by Craig » Sun Nov 01, 2009 9:21 am

kiwigeo wrote:He's banned right now...for asking if we were "interested".

Allen wrote:I'm interested, but you're going to have to wait for the 1 week mandatory banning after posting that Craig. :lol:
:lol: :lol: O.K. ,,, I was just having you guys on :lol:

Here's how I did it ;


With great difficulty ! :lol: :lol:


To the business :

I gave this great thought , as my goal was for an invisable joint. What is the best method of making the tightest joint possible ?? I could only think of a plane and shooting board , as the joins on my tops and backs done this way can't be seen. Sandpapered edges don't work quite so well as a clean planed finish. I.M.O.

From my drawn out plans , I established the correct angle these mitres would meet . ( also taking into account the curves of the cutaway tip )

Before bending the treble side and cutaway piece , I stacked them ( much like you do a stacked neck scarf joint ) , and layed them on a mini type shooting board . Using a scary sharp little block plane , I matched them perfectly.

I then bent them on my fox style bender, but paid attention that the very ends (where the miters are ) were well supported and well clamped to conform to the template /inside mold shape . The tendancy is for these ends to not quite comply , so additional attention is required , with an additional clamp or two over the bending machine to hold these very ends down.

The cutaway was bent on the bending machine also . I've made an inside mold much like the body mold we use. It sits in the machine where the body mold normally sits. I've made this to slightly overbend this cutaway shape . It's as well I did as this Mahogany ( like most Mahoganies ) suffered quite a bit of spring back. Not too dramatic , but enough to have me quickly install them in my outside building mold the moment I got them out of the bending machine ,, and vowing to not remove them until such time as I had the box closed !!! :lol:


I wanted to pull in the cutaway shape from the template line as I felt it gave a more pleasing look. This asymmetry gave the cutaway a more cool ' tucked-in ' look which I really like. A little like some solid body electrics are shaped.

To achieve this I placed a 3 1/2 "length of 10 mm.brass rod between the outside mold and cutaway side which had it sprung in to my desired shape. This brass rod not only gave me this asymmetry I wanted but more importantly , it held the end of the side miter in a very straight line ( mahogany likes to distort, cup or ripple when being bent ) . Not that mine suffered too much of this rippling , but the rod ensured a VERY straight edge with which to meet it's mitered partner.

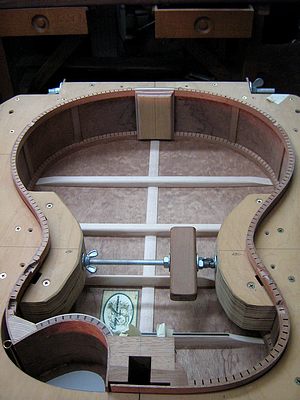
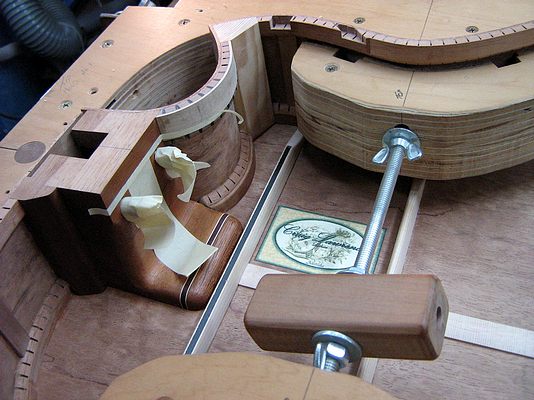
You can see this brass rod still there in this boat picture . It demanded springing the side a little but not enough to worry about. After I installed heavy duty liners , a fairly large Spruce corner block , and a few other little extras , it was as solid as a rock.

Image

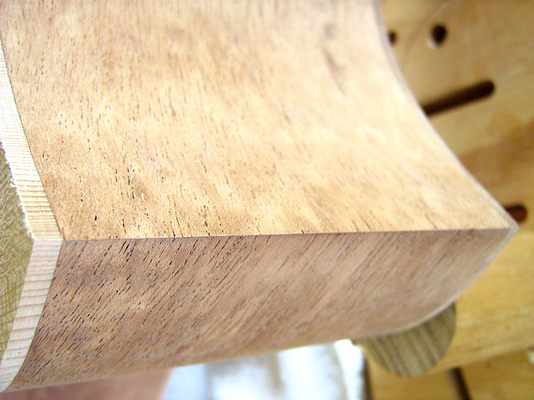
I then glued in the headblock and the cutaway corner block ( making sure it was an exact fit for this cutaway shape ).

Next I glued the end of the cutaway piece to the side of the headblock. Being Mahogany ,it too suffered from a little 'spring back' after bending . This worked to my advantage , as when the glue had dried on the headblock and I encouraged the mitered end to meet the side miter at the tip of the cutaway ,it was happy to snug right up against it . It looked to be a perfect fit , but before glueing, I managed to get a caul against it and was able to clamp this caul from the outside of the mold whist it set. I'm only sorry I wasn't able to get any pics of the operation , but beleive me when I say I was way too busy getting it right than worry about taking pictures ! :lol: ,,, next time maybe ,,

All in all it wasn't easy , but the result made it worth while to me . Even with my magnifying glasses , I can't see a glue line
Craig Lawrence

jeffhigh
Blackwood
Posts: 1536
Joined: Thu Feb 07, 2008 5:50 am
Location: Caves Beach, NSW
Contact:

Post by jeffhigh » Sun Nov 01, 2009 10:38 am

Craig I really hate the look of most cutaways, but the shape of yours looks right. I think it is the asymetry, never would have thought of doing that.

User avatar
Craig
Admin
Posts: 1090
Joined: Wed Sep 26, 2007 10:08 am
Location: N.S.W. in the bush

Post by Craig » Mon Nov 02, 2009 10:08 am

Thanks a heap Jeff. I'm not to keen on a lot of cutaways either . I'll take it as a big compliment considering you normally hate cutaways . I've been calling this one a ' tucked Florentine ' :lol: . I'll be using this in my future builds from now on as it's so , umm,,,, sexy ( for want of a better word )

I'd also like to take this opportunity to give another big thanks to you Jeff , for all the engineering advice you have been giving us guys . In particular ( but not only ) C.F. reinforcement. I have used quite a lot on this guitar , but will reserve the details for another thread.

Many thanks also to Lillian ( XX - that's two big kisses :D ) , Maurie, Allen ,Bob and Martin.

Nick ,my fellow Kiwi mate ,,,, If this one turns out half as good as your Maccaferri type masterpiece I'll be an extremely happy man. Cheers for your disgustingly nice comment though :lol:

As I said ,it's not an easy process and there are a number of steps where it could all go very wrong :cry: Lining up the corner block to the first miter glue-up , and getting rid of any trace of squeeze out , so that the partnering mitre isn't obstructed just being one example.


Whoops , just realised I've posted this reply whilst being banned,, several times . Well , all I can say is " up ya kilt ! " :lol:
Craig Lawrence

User avatar
HiString
Beefwood
Posts: 27
Joined: Mon Oct 08, 2007 10:07 pm
Location: NSW

Post by HiString » Mon Nov 02, 2009 1:55 pm

That is such an elegant design................I may have to start redrawing my archtop before I attack the top plate. :wink:

ChrisO 8)
Music creates a kind of pleasure which human nature cannot do without.

User avatar
Lillian
Blackwood
Posts: 1702
Joined: Fri Sep 28, 2007 10:31 pm
Location: New Mexico, USA
Contact:

Post by Lillian » Mon Nov 02, 2009 2:49 pm

:oops: :bh


That's just wonderful. It took rereading your explanation to realize why I liked your cutaway, I'm firmly planted in Jeff's camp in regards to cutaways. I didn't realize until you mentioned the pipe that it was asymmetrical. That really does make a huge difference. It looks right. It looks balanced and it doesn't look like a fix to a bad day at the bender.

Paul B

Post by Paul B » Mon Nov 02, 2009 8:58 pm

Looking good my friend, you just keep getting better and better.

Is that an extra veneer of spruce I see down between your heel block and the sides?

Oh, and you wouldn't believe it, I came home after having the mother-outlaw looking after the kids for two frigging nights, to find the neck on my first guitar snapped at the heel block. She denied knowledge, but my daughter blabbed. I'll post some pics on the repair when I stop feeling ill just thinking about it. God I spent a lot of time on that thing (as you know).

User avatar
Craig
Admin
Posts: 1090
Joined: Wed Sep 26, 2007 10:08 am
Location: N.S.W. in the bush

Post by Craig » Mon Nov 02, 2009 9:23 pm

Paul mate , I feel sick for you . That's a real hard one to cop . Set too as quick as you can and do the repair . Sooner the better and you'll quickly brighten up. I'm sure this is good advice.

Best regards ,
Craig Lawrence

User avatar
Stu
Blackwood
Posts: 245
Joined: Sun May 11, 2008 7:15 pm
Location: Melbourne, Australia
Contact:

Post by Stu » Mon Nov 02, 2009 10:29 pm

Congrats Craig on an amazing cutaway mitre. Perfect.
Sheesh, you sure it ain't photoshopped? :wink:

And commiserations to you Paul. That really bites the big one.
I'm doubly sickened by the outright denial of the incident. :cry:


cheers, Stu

User avatar
Craig
Admin
Posts: 1090
Joined: Wed Sep 26, 2007 10:08 am
Location: N.S.W. in the bush

Post by Craig » Tue Nov 03, 2009 8:32 am

Paul B wrote:
Is that an extra veneer of spruce I see down between your heel block and the sides?

.

Well spotted Paul ! . It's a Sassafrass capping strip on the liner between the headblock and cutaway block to help reinforce the cutaway .Actually , it's a piece of Heavy duty Walnut Fox type liner I used there ( the two piece type), I had left over from a previous build . Doesn't match the rest of the liners , but I figured it can't be seen once the box is closed , so it's function over form in this case. I did it on the bottom liner too , only with a piece of Mahogany for appearances sake. I added an extra liner capping on the other side of the corner block also , which extends round to near the waist . By the time I'd finished reinforcing the cutaway area ( a rather large corner block as well --- Spruce to save weight ) , I reckon it's stronger than a non cutaway guitar :lol:

A picture shows this better "

Image


Before anyone mentions it ,,,, NO , the masking tape isn't there to add any reinforcement ! :lol: It's there to catch any glue squeeze out glueing the top on. I just peeled it off after glueing on the top leaving it clean as a whistle for my adjustable neck hardware.

You'll also notice the fairly long foot on the headblock . This , to help stop any headblock rotation once strung up. Almost as important as reinforcing the top of the headblock from rotation IMO.

You can see this foot has racing stripes !! I figure this will definatley make the neck play faster :lol: [size=0]another bad joke [/size]

In reality , they are there to cap the end of the foot . I could only make this foot around 1/2" thick to leave enough room to fit the bottom adjustable neck hardware. Not much strength with only 1/2 " thickness ,especially with this grain orientation , so I fitted three carbon fibre tubes right through. The foot cap and racing stripes are to hide the end of these tubes.

Image


As I said earlier , I've used quite a bit of carbon fibre reinforcement on this guitar , but I'll reserve most of the details for another thread . In the meantime though, note the No.1 back brace has a carbon fibre cap . ( think ' neutral axis ) This ,to help any flattening of the back radius caused by headblock rotation/ string tension.
Meeting up with the headblock foot , it makes for a pretty strong area.

No photoshopping on that cutaway miter shot either Stu :lol: ya cheeky bugger. :lol:

In all seriousness ChrisO ( HiString), I reckon my ' Tucked Florentine ' design would look awesome on an archtop.
Craig Lawrence

User avatar
Taffy Evans
Blackwood
Posts: 1067
Joined: Wed Apr 30, 2008 6:54 pm
Location: Charters Towers North Queensland

Post by Taffy Evans » Tue Nov 03, 2009 10:40 am

Great work Craig, I love to see the care and thought that goes into such work. There always seems something to be gained, no matter how little, for future use by others, or an idea or procedure that confirms that what we did was right.

Craig, I have used the foot style neck block on my Resonator guitars, with a foot top and bottom. I also do the same with the tail block, a foot top and bottom. This enabled me to do away with the rod that goes between the two blocks that is common on that type of guitar to stop things collapsing. I find it strong as you stated.

Nice work Craig thanks for sharing.
Taff

User avatar
Craig
Admin
Posts: 1090
Joined: Wed Sep 26, 2007 10:08 am
Location: N.S.W. in the bush

Post by Craig » Tue Nov 03, 2009 12:41 pm

Cheers Taff. I can't see the point of taking all the knowledge we have gained/ learned / discovered to the grave without sharing this information . It's one of the main reasons I belong to the forum . That ,and the friendships we gain, the fun and humour we share

The other side of the coin is that I feel it only fair we credit those we learn these things from . My thanks to Jeff Highland ( our resident engineer ) in an above post being a good example.

I don't know as I would be putting a foot on my tailblock ( soundboard end at least) though Taff . To me that seems like killing out some vital soundboard space in a very important area. I do quite the opposite and bevel the thing so it has the same width as the liners . Hey ! , but what do I know . These things are so mysterious in how they function anything's possible.
Yes, I too have been using a headblock foot in my builds so far. I can't see how it could be robbing the instrument of any appreciable string reponse and it must help keep headblock rotation to a minimum
Craig Lawrence

User avatar
Kim
Admin
Posts: 4372
Joined: Wed Sep 26, 2007 8:32 pm
Location: South of Perth WA

Post by Kim » Tue Nov 03, 2009 2:27 pm

Craig wrote: No photoshopping on that cutaway miter shot either Stu :lol: ya cheeky bugger. :lol:
Must have cost a bloody fortune for a block of pommel hog that thick Craig...pfffffffffffft! Some people are so wasteful and will spare no expense to impress.


Well done smart arse, your work is impeccable 8)

Cheers

Kim

User avatar
Taffy Evans
Blackwood
Posts: 1067
Joined: Wed Apr 30, 2008 6:54 pm
Location: Charters Towers North Queensland

Post by Taffy Evans » Tue Nov 03, 2009 4:48 pm

I hear what you are saying Craig, and in a flat top guitar I agree, but in the Reso guitar there this not much top wood after cutting a hole for the metalwork, and it's a thicker top and also coupled to the back plate, so I do not look for a lot of resonance from the top. I do not use a soundwell [often 3 ply maple] stiffening up the top in my Resonator guitars so I do get a bit more of a woody tone mixed with the metal cone.
Taff

User avatar
Craig
Admin
Posts: 1090
Joined: Wed Sep 26, 2007 10:08 am
Location: N.S.W. in the bush

Post by Craig » Tue Nov 03, 2009 6:23 pm

Kim wrote:
Must have cost a bloody fortune for a block of pommel hog that thick Craig...pfffffffffffft! Some people are so wasteful and will spare no expense to impress.


Well done smart arse, your work is impeccable 8)

Cheers

Kim

:lol: :lol: :lol: Ah ! so your on to me ya sly bugger . :lol: Never thought of that Kim ,,, ummmm. No it wouldn't work ,, not unless you carved the back and sides out of one solid block :lol: Doesn't sound like much fun. Thanks mate

Sorry Taff :oops: , I can see now you were referring to Reso's . My mistake . Thought I must have misunderstood something :roll:
Craig Lawrence

User avatar
kiwigeo
Admin
Posts: 10778
Joined: Sat Sep 29, 2007 5:57 pm
Location: Adelaide, Sth Australia

Post by kiwigeo » Wed Nov 04, 2009 9:18 pm

Paul B wrote:
Oh, and you wouldn't believe it, I came home after having the mother-outlaw looking after the kids for two frigging nights, to find the neck on my first guitar snapped at the heel block. She denied knowledge, but my daughter blabbed.
Trade both those women in on some tonewood.....they sound like very dangerous people. :?

Post Reply

Who is online

Users browsing this forum: No registered users and 85 guests