Could someone post a side bending form, and how to make one?

Talk about musical instrument construction, setup and repair.

Moderators: kiwigeo, Jeremy D

Post Reply
User avatar
Cam
Myrtle
Posts: 95
Joined: Sat Feb 28, 2009 3:37 pm
Location: Townsville

Could someone post a side bending form, and how to make one?

Post by Cam » Tue May 12, 2009 6:54 pm

So I'm relatively new both to here and acoustic guitar building.

I've seen some of your guys side bending forms and I wondered how you make them and what they consist of?

Do you need heat or are they just solid timber?


I will delete this when/ if someone posts up another thread so i don't spam up the forum :wink:
Previously known as "guitarcam" :D

User avatar
Kim
Admin
Posts: 4372
Joined: Wed Sep 26, 2007 8:32 pm
Location: South of Perth WA

Post by Kim » Tue May 12, 2009 7:29 pm

Cameron,

This post was moved into the main building forum from the tutorial and jig forum to keep that area focused on instructional material. By placing your topic here, it is more likely to attract more attention and invite discussion which may reveal more than one way to skin the cat for you.

Having said that I use a solid male form consisting of layered ply, the female form is made of the same material but is hinged. The forms are under cut a little at the end of the lower and upper bouts to allow for a little spring back. These images were taken when I had just screwed it together, later the male form was hit with a spade bit in a couple of places to accept the ends of clamps to pull everything down whilst the side cooled after being bent with a silicone heat blanket.


Image

Image

This is one way, but there are many more and I am sure others will post their own method.

Cheers

Kim
Last edited by Kim on Tue May 12, 2009 7:49 pm, edited 1 time in total.

User avatar
Cam
Myrtle
Posts: 95
Joined: Sat Feb 28, 2009 3:37 pm
Location: Townsville

Post by Cam » Tue May 12, 2009 7:48 pm

ok cool, i just thought that maybe it would be suited to the jigs forum :wink:

So with your form, you don't need heat?
Previously known as "guitarcam" :D

User avatar
Kim
Admin
Posts: 4372
Joined: Wed Sep 26, 2007 8:32 pm
Location: South of Perth WA

Post by Kim » Tue May 12, 2009 8:01 pm

guitarcam wrote: So with your form, you don't need heat?
Yes, heat is required for the bending forms that most of us use. You 'can' thin a number of sides right down and layer or laminate the pieces together into a cold form, but it is an expensive option and I would recommend that you start out by either bending on a hot pipe, or invest in a silicone heat blanket and build a form to match the shape guitar you wish to build.

Another bit of advice, read lots before you spend money chasing a number of different methods to build for there are many ways to do things and not all work with each other. Get a clear picture in your head of how you are going to do this, and then buy or build what is necessary to get the job done. But you are going to need to do some research so you can be solid on how you want to go and understand what YOU will need for the method you have settled on.

Cheers

Kim

User avatar
Allen
Blackwood
Posts: 5259
Joined: Thu Oct 11, 2007 5:39 pm
Location: Cairns, Australia
Contact:

Post by Allen » Wed May 13, 2009 5:39 am

I'll get a picture of my setup after work today, Still way too dark at 6 am. up on the top end for a photo op.
Allen R. McFarlen
https://www.brguitars.com
Facebook
Cairns, Australia

pat foster
Myrtle
Posts: 79
Joined: Tue Apr 14, 2009 8:41 am
Location: Eastern Washington, USA
Contact:

Post by pat foster » Wed May 13, 2009 6:31 am

I lean towards minimal on my bending forms. Not as convenient as the Fox style, but I can bang one out in a an hour or so. I use 3/4" ply, or about 20 mm. I make them a bit wider than the stainless steel slats I use, plus the roof flashing I get at the hardware store is that width. I don't use a screw for the waist press or springs, just f-clamps. Here's one I built a few years ago.

Image

It's shown with the waist caul in place, but I use sturdier f-clamps.

Image

Here's the inside. I cut all the cross-pieces to the same length on the tablesaw and glue them to one side at a time, then drill and put in the screws. The screws might be overkill; I've since built them without the screws. The sheetmetal is nailed to the form with sheetrock nails. I use the center crosspiece to clamp the form to my bench during use.

Here it is in use.

Image

Unlike many others, I prefer to clamp the tail first. At this point, the heating blanket has just started heating. The side has been wrapped in craft paper, the blanket is on the bottom, and the slats are the bread of the sandwich. As soon as it bends down far enough, I put on the waist caul with clamps, bend the waist about half way, bend the upper bout, then pull the waist the rest of the way. The upper bout clamps are kept a bit loose so everything can slide as needed.

Image

The bend is complete.

There's an excellent video on YouTube by Todd Stock on side bending. That should give you some ideas too.

Good luck,

Pat

User avatar
Allen
Blackwood
Posts: 5259
Joined: Thu Oct 11, 2007 5:39 pm
Location: Cairns, Australia
Contact:

Post by Allen » Wed May 13, 2009 5:21 pm

Here's my setup.

Image
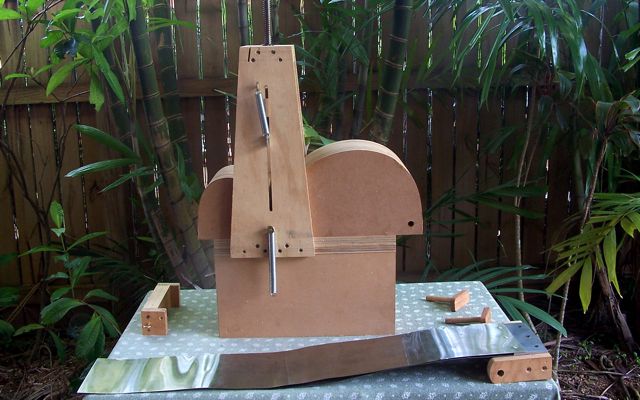
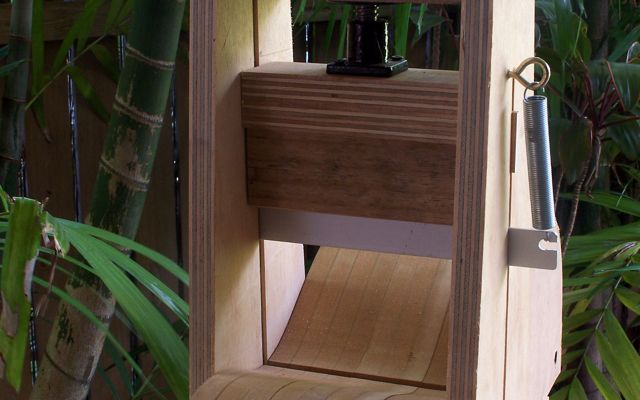
In the picture you can see a slightly modified Fox Style bender with my 000 bending form installed. The stainless slats that I use. The upper bout caul, and the wooden pegs that hold the lower bout in place.

Image
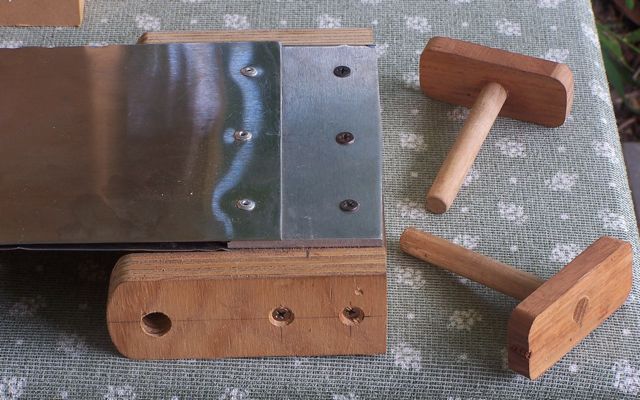
This is a close up of the butt end of the bending slats. I reference off of the butt, as it makes more sense to me to cut that square on the table saw, then cut the profile on my sides referenced from there. The sandwich of wood wrapped in craft paper and foil, along with heat blanket get slipped into the slats so that they end up tight and square against the spacer you can see holding the stainless slats apart. That spacer is positioned so that it's about 2 mm past the end of the bending form. That give me a little wiggle room with the thickness of the craft paper and alfoil that the sides are wrapped in.

Image
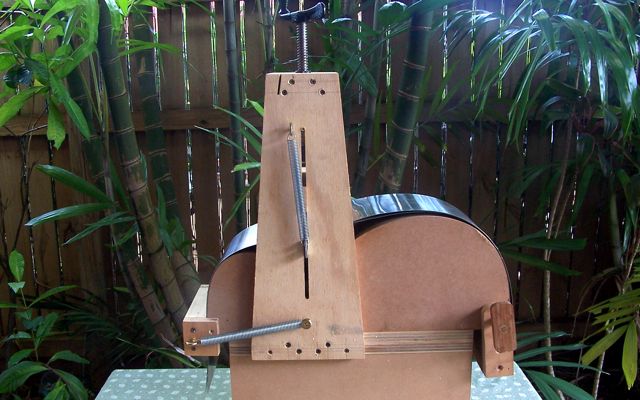
A detail shot of the tracks that are cut to guide the waist caul into the correct position. Veneer press screw to do the hard work.

Image
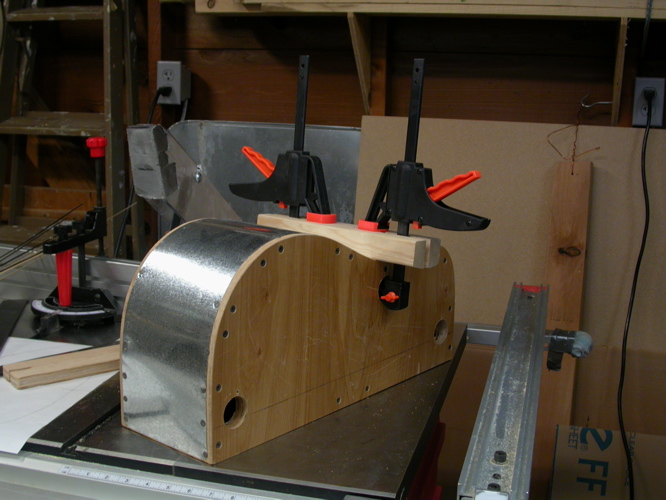
Heres the slats installed with the pegs to hold the butt in position, the upper bout caul in place. Now the only thing to do is screw down the waist caul.

Image
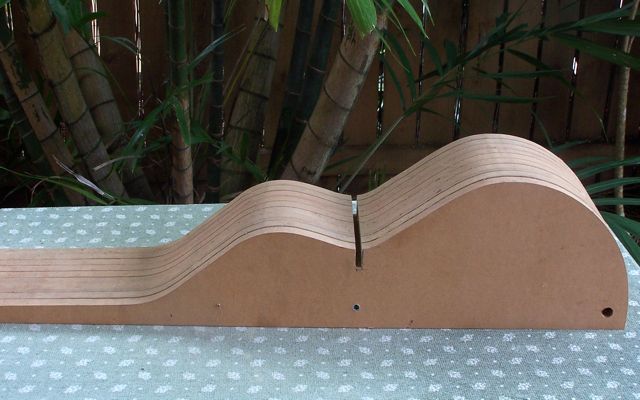
And finally a shot of my Weissenborn form. You can see a screw in insert at the lower waist position. There is one on each side of the form that the furniture screw with the spring that attaches to the upper bout caul hangs off of on the bender. This locates the bending form in the correct position, and stops things from moving around when your working.

From the time that the wood goes into the slats and is loaded into the bender, the entire process from there takes just 2 1/2 minutes. I turn on the heat blanket. Watch the digital themometer that I've slipped into the slats. 2 minutes later the temperature says 100 degrees C. I pull the lower bout down into position and push the wooden pegs in to hold it in place. Slide the upper bout caul around into position, then screw down the waist caul. All done in 30 seconds, and temperature reads around 150 - 160 degrees, so total is 2 1/2 minutes. I turn off the blanket and let everything cool down. I cycle the heat one more time to 150 degrees C. Let cool, then remove from bender.

Depending on the type of wood, their is some spring back, but all sides that I've done so far will slip into the mold. I like to get them in there without tension, so I usually give them a touch up on the bending iron. It's always been the waist that needs the extra attention. I suppose I could try and figure out how much I need to over bend this area but I'm too lazy to go to that much trouble. It's only a few minutes on the iron, and I still like doing that from time to time.
Allen R. McFarlen
https://www.brguitars.com
Facebook
Cairns, Australia

User avatar
rocket
Blackwood
Posts: 1210
Joined: Thu Apr 30, 2009 8:43 pm
Location: melbourne,, outer east
Contact:

side bending form

Post by rocket » Wed May 20, 2009 6:55 pm

Those units all look very effective, do you transfer the bent sides to a mould afterwards? I have been just using a mould to bend the sides after using the bending iron, is that what you do before using the bending form? i think i'm a bit confused now!

User avatar
Allen
Blackwood
Posts: 5259
Joined: Thu Oct 11, 2007 5:39 pm
Location: Cairns, Australia
Contact:

Post by Allen » Wed May 20, 2009 7:22 pm

The form that is in the my bender is sized smaller than my body mold by the thickness of the sides, plus the metal slat that is next to the bending form, so in real terms, approximately 3 - 3.5 mm. There is some wiggle room, so I don't think you have to stress over these measurements too much.

Once bent, the side is transfered to the building mold. I then assess whether it need to be touched up on the bending iron to fit the mold without any tension. As I said previously, most do require a touch up at the waist, and sometimes in the upper bout. All however will fit into the mold with some coaxing. I just don't like to have them in tension, so work them over a bit on the bending iron.

I place them top edge down onto a trued surface, as the bottom has been pre-cut to fit the radius dish. The edge that the top is to be attached to is left dead straight. This way I can be sure that everything is square when I glue in the butt and neck blocks. Radius on the top is done latter down the building process.
Allen R. McFarlen
https://www.brguitars.com
Facebook
Cairns, Australia

Post Reply

Who is online

Users browsing this forum: No registered users and 63 guests