Exceeding Expectations

Talk about musical instrument construction, setup and repair.

Moderators: kiwigeo, Jeremy D

Post Reply
User avatar
Clancy
Blackwood
Posts: 621
Joined: Wed Dec 17, 2008 10:26 am
Location: Canberra

Exceeding Expectations

Post by Clancy » Tue May 12, 2009 2:01 pm

Every now and then a project we start exceeds expectations.
This was one of those…….

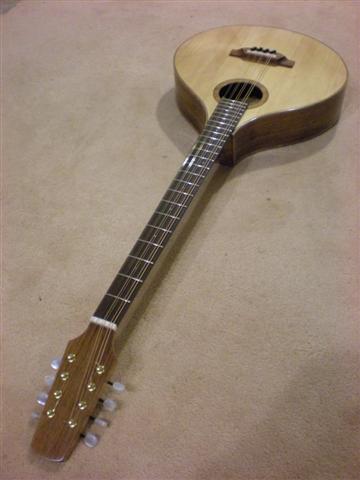
I present: Instrument #2 - irish bouzouki using Graham McDonalds book.

The aim of building the flat top irish bouzouki was to learn techniques that I hadn’t used building the carved archtop guitar, and practice & improve the common things like binding, fret work etc.

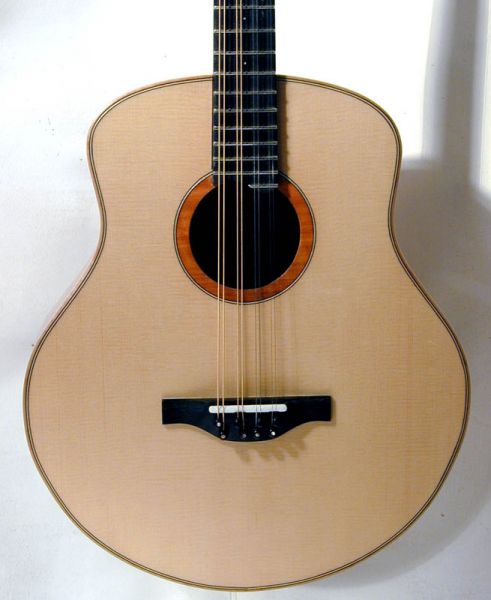
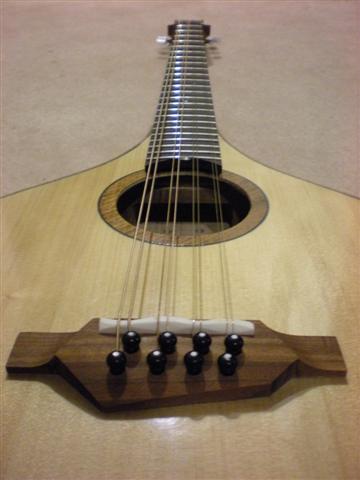
Here’s the (nearly) finished result.
B&S – Blackwood
Top – Bunya
Neck – Qld Maple
Binding – Qld Maple
Fretboard - Gidgee

Image
Image
Image
Image

As I said, this project exceeded expectations – in the ‘new techniques required’ area!?!

The side bending went well. (I still hand bend on a hot pipe & enjoy it)
The sides were clamped in an adjustable workbench instead of a mold.
Good results joining the top & back & inlaying sound-hole rosette.

The soundboard bracing looked a bit of a challenge.
I made the radius dishes as per Graham’s instructions, pre sanded the curves & everything glued up nicely

Image

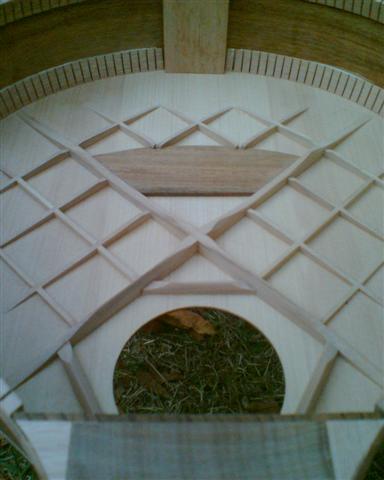
I had a few problems building the ‘hollow neck block’ for Graham’s removable neck design.
Got there in the end & put the body together. So far, so good.

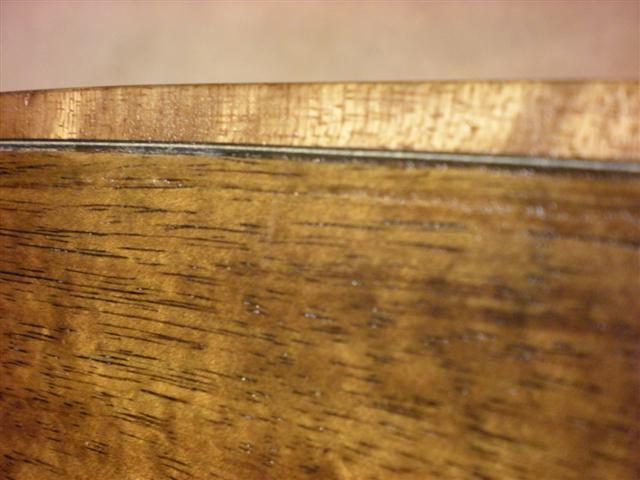
Next came the routing for the binding. This was a disaster.
As I mentioned in a previous thread, the Bunya chipped & the Blackwood grains tore out.
Also, where the neck joins there is a section where there is virtually only side wood.
Now there is only binding. I’ll have to bog it all up sometime.

Image

Unexpected New Technique #1:
I tried to tidy the binding channels up with a purfling knife & the brass cap compressed the wood outside the binding area. Sanded as much of that out as I dared.

Image

Unexpected New Technique #2:
Tried to invisibly fill the gaps with a mixture of epoxy & sanding dust.
This worked OK but the larger chips still show as different colour patches.

Image

Unexpected New Technique #3:
I had sprayed the archtop guitar with nitro c at the local college but was unable to gain access this time, so I had to do it at home.
The kid’s grandparents had given them a bloody jumping castle a few years ago, which meant I had to go and buy a small (& cheap) compressor. At the time the best (cheap) thing for the job was a GMC oil less 6cfm thing.
The jumping castle has since been binned (I didn’t put the holes in it with this knife I’m holding, honest).
Anyway, I saw in Bunnings a HVLP gun for $65 and thought it might work.
So the bouzouki became the test piece. And it worked good enough for a backyard builder like me.
I didn’t spend much time trying to get it perfect. The blackwood really needed more pore filing & I didn’t put much effort into sanding flat.
But I honed the spraying skills on the bouzouki & did everything right on the archtop mandolin I’d made for a client (previous post as instrument #3)

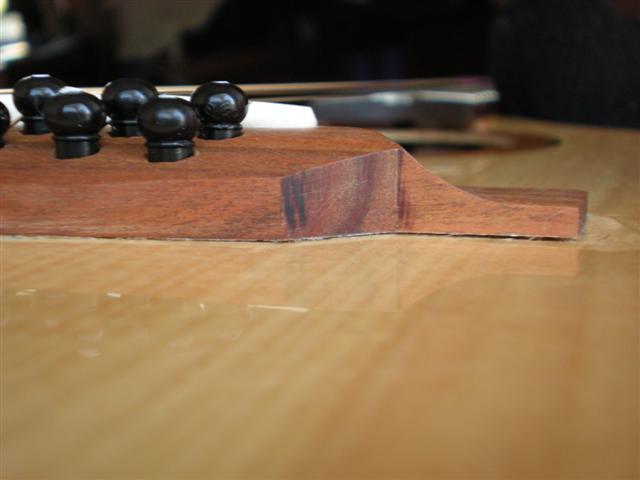
The neck building went well, never having done the neck-head scarf joint before.
Now I know how, I’ll always use this method – even for archtop guitars instaed of the one piece (tradition can go blow)

Unexpected New Technique #4:
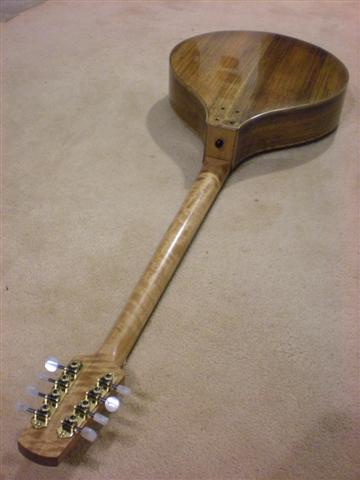
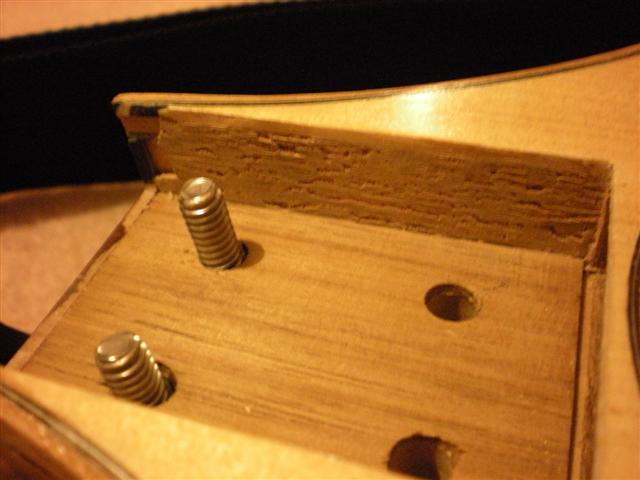
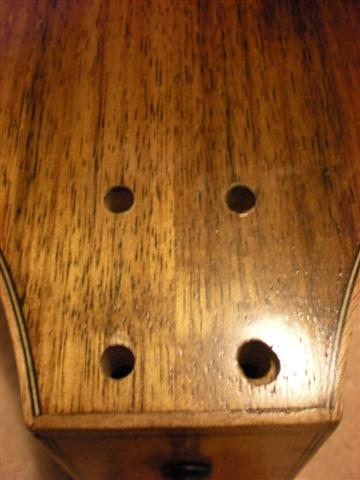
The neck is attached to the body via bolts that sit in the hollow neck block, aim upwards, & thread into inserts under the fingerboard.
Access to the bolts is from holes in the bouzouki back.
Not wanting to chip the back, I drill down until just the tip of the brad pint pocked out, turned the body over, & used the tiny point hole as my marker for drilling the other way.
Worked great for 3 of the 4 holes.
Oh, well. Now I get to practice my inlay techniques to tidy up the goof up.
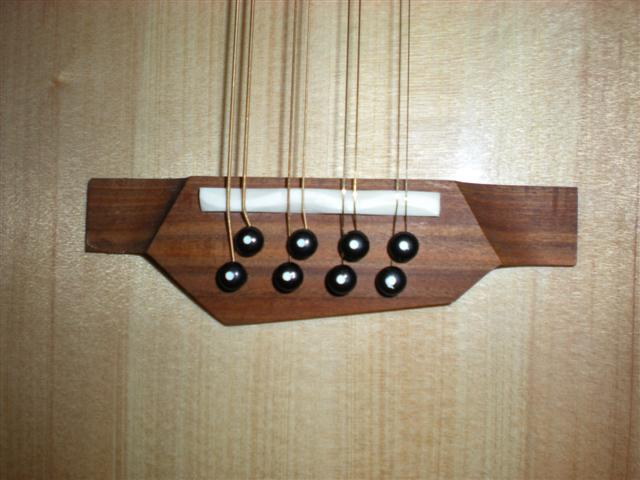
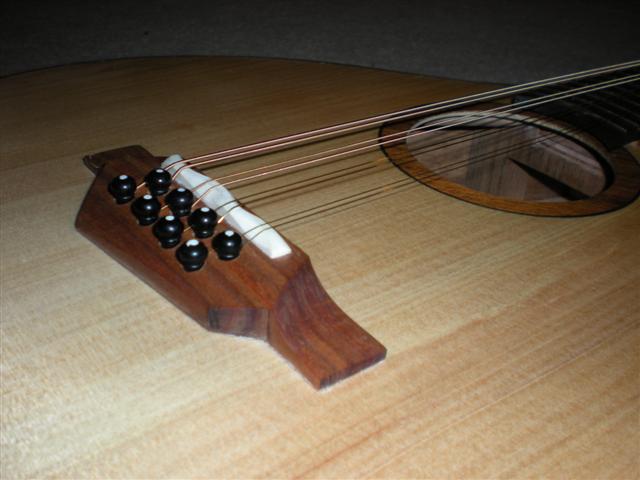
Image

Now for the Bridge.
First time for a pin bridge.
Was making it the same as in the book when I had one of those whim’s and did something else.
Some like the shape, some don’t.
Had another whim (& dremel in hand) & did an ‘S’ type of intonation on the bone.
Now I’m having fun again.

Image

Time to put it all together!
Neck installation easy & solid but needs to be angled?
Check dimensions of bridge height – correct. OK, angle the neck then with an insert.
All good.
String up, tune, set up.
Sounds nice.
But.
What a horrible thing to play sitting down (it doesn’t have a waist).
Just thinking that I’d better get a strap for it when ‘CRACK’.
What was that.
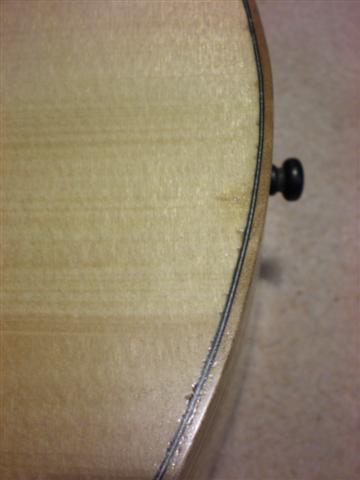
Huh, bridge wings are separating from the soundboard.
De-tune & figure out why.

Unexpected New Technique #5:
Starting looking at the string tension.
Used the string weight values in graham’s book (had to guesstimate (my wife hates that word) some of them.
Found that I had around 83kg of tension using the current strings (12 16 24w 42w)
Calculated that I could reduce that to around 70kg using lighter strings (11 16 24w 36w).
Tightened up the strings again to re-create the gaps from the lifting.
Worked Titebond under the bridge.
Released the strings & clamped the bridge.
Left it for 3 days.
Clamps off & re-strung with lighter strings.
Sound’s good.
All good.
Then……Crack.
Again!
Now what?

Image

Unexpected New Technique #5???
So what do I do now.
Re-try again with Titebond?
Re-try with epoxy or super glue?
Try to remove the bridge, roughen up both gluing surfaces & glue back on?
Same as above but sand an arch into the bridge to match the soundboard arch?
Your wisdom & best guesses required.

In the mean time I’m leaving it strung up to see if
1/ The separation doesn’t increase
2/ The separation does increase (making it easier to remove the bridge if I choose)
3/ I can post a lovely picture of a catastrophic failure for you all to enjoy

User avatar
DarwinStrings
Blackwood
Posts: 1877
Joined: Thu Nov 13, 2008 10:27 pm
Location: Darwin

Post by DarwinStrings » Tue May 12, 2009 3:25 pm

You say you used Grahams book Craig, best to blame any problems on him then so I won't help with the bridge separation. It is a beautifully elegant design. Is the bridge shape yours or Grahams, I love its geometric chunkiness. When Graham fixes the bridge for you could you record a bit of sound please. I would really love to hear it.

Jim

User avatar
Bob Connor
Admin
Posts: 3126
Joined: Mon Jul 09, 2007 9:43 pm
Location: Geelong, Australia
Contact:

Post by Bob Connor » Tue May 12, 2009 3:54 pm

Same as above but sand an arch into the bridge to match the soundboard arch?
would be my tip Craig.

Looks like a nice instrument though and it certainly has thrown you a few challenges.

I agree with the awkwardness of playing a bouzouki.

I've had a few people asking me to build a zouk with a small guitar shaped body for that very reason.
Bob, Geelong
_______________________________________

Mainwaring and Connor Guitars

User avatar
Clancy
Blackwood
Posts: 621
Joined: Wed Dec 17, 2008 10:26 am
Location: Canberra

Post by Clancy » Tue May 12, 2009 4:05 pm

Jim, the bridge shape is mine & I, too, like it's straight lines & chunkiness. Graham's design in the book was the same size but rounded and symetrical. I just had a mad moment.

I also forgot to mention that I used Danish Oil on the neck (New technique number something or other) and I really like the feel of it over the nitro c. neck on the archtop guitar.
This will also give me a chance to use some more of that shell I got from you and try a trickier inlay than I did on the mandolin.

And since the neck is removable, I can stick it on another (better made) body down the track if I so choose.

As it is, if it holds together, I expect I'll keep 'Old Ugly' as it is.
It's got a really nice sound and you pay a fortune for 'beat up' replicas these days. I may have found my niche!

User avatar
Clancy
Blackwood
Posts: 621
Joined: Wed Dec 17, 2008 10:26 am
Location: Canberra

Post by Clancy » Tue May 12, 2009 4:09 pm

Bob, if I made a bouzouki again I'd model the body on one of graham's with the waist.
He's certainly on the right track and they look good.

User avatar
graham mcdonald
Blackwood
Posts: 473
Joined: Thu Oct 25, 2007 11:57 am
Location: Canberra
Contact:

Post by graham mcdonald » Tue May 12, 2009 4:11 pm

Can't blame me for the bridge, though I do like the shape. I think it is a bit thick though (I told Craig that). The neck end of the body is a tricky bit, and I have yet to work out a really satisfactory solution. I try to convince customers into a small guitar-ish body, which is the same length and width as the teardrop, but with an upper bout. Rather Steve Klein in the look, but it does sit on the leg better

cheers
Image
Graham McDonald
http://www.mcdonaldstrings.com

User avatar
Nick
Blackwood
Posts: 3640
Joined: Thu Feb 26, 2009 11:20 am
Location: Christchurch, New Zealand
Contact:

Post by Nick » Tue May 12, 2009 4:14 pm

Has a nice shape to it Craig :D That neck looks really long but it's obviously the narrow width that gives it that appearance, and speaking of appearance, that's a gorgeous piece of Qld Maple you used. Congrats on your first "crack" at it.
Speaking of cracks I would say that your bridge problem is as you pointed out that it's contact wasn't stress free to begin with & I have found that dried Titebond leaves a non porous surface that the new Titebond won't key too. So if it was me I would be lifting the bridge off, scrape away any & all traces of the old glue then reshape the underside of the bridge to match the top using the same method as I use on archtops (tape sandpaper to the top and rub bridge over it 'til sandpaper cuts right across it's face). Then re-glue the bridge with the Titebond, if all is well then the joint should hold together for ages & ages & ages & ages and you could string it with power cables and the top would suffer before the joint seperated :lol:
"Jesus Loves You."
Nice to hear in church but not in a Mexican prison.

User avatar
Allen
Blackwood
Posts: 5259
Joined: Thu Oct 11, 2007 5:39 pm
Location: Cairns, Australia
Contact:

Post by Allen » Tue May 12, 2009 5:13 pm

Thanks for posting that Craig, along with the steep learning curve. Gives all of us pause to remember those instruments that just don't want to behave, even when you know how the procedures are suppose to work.

And as for bridges. If the soundboard has an radius to it, then the underside of the bridge needs one as well. I do as Nick describes with a bit of sandpaper taped down to the top. Witness pencil lines scratched on the bottom of the bridge, and sand away until they disappear.

And I wouldn't use the super glue for the bridge on bare wood. Likely to get into the grain and cause some staining.

Good luck, and great looking instrument mate.
Allen R. McFarlen
https://www.brguitars.com
Facebook
Cairns, Australia

User avatar
graham mcdonald
Blackwood
Posts: 473
Joined: Thu Oct 25, 2007 11:57 am
Location: Canberra
Contact:

Post by graham mcdonald » Tue May 12, 2009 5:23 pm

Craig

Chances are the bridge won't come off because the ball ends of the strings are holding it on. What will more likely happen is that because the bridge wings are not locking onto the X braces the soundboard will start to distort, and that will make it harder to glue it on when that time inevitably comes. I have a couple of 60W reflector bulbs on a stand which is what I use for removing bridges, so come and grab them on the way home from work one evening and you can more easily get the bridge off.

the rest of yez,

The bouzoukis are 17 frets to the body join, so it is a long and thin neck, and Craig has done a rather good job on all of it.

cheers

graham
Graham McDonald
http://www.mcdonaldstrings.com

User avatar
sebastiaan56
Blackwood
Posts: 1283
Joined: Sun Oct 28, 2007 5:23 am
Location: Blue Mountains

Post by sebastiaan56 » Tue May 12, 2009 5:25 pm

Hi Craig,

Great looking Zouk mate! I also appreciate you documenting all of your learning experiences. I have the same issues when building so you are not paddy there! I reckon blaming Graham is a fair cop as well :wink:

Tear out is a bitch. I love your saddle. And I agree that probably the best thing to do is rip the bridge off and get it fitting really really well before gluing. It also makes the instrument sound better and louder, how do I know :oops:
make mine fifths........

User avatar
Clancy
Blackwood
Posts: 621
Joined: Wed Dec 17, 2008 10:26 am
Location: Canberra

Post by Clancy » Tue May 12, 2009 5:44 pm

Thanks everyone, i think the general consensus is to remove the bridge.
I'll shape a radius in it (a procedure I'm very familiar with as both my other instruments have been carved archtops).

Graham, I love the shape of your bouzouki. Next time like that for sure.
I also think the bridge looks too thick, but when I check the dimensions it's right (11mm at the front & centre, radius at the top to the fingerboard) - even the curve from front to back is the same profile as in your book.
I thnk it's an illusion becuase after shaping the top curve I cut the angle across the back, making the back look thick on the teble side.
Anyway, if I get it off the soundboard I'm going to thin it down regardless.

Image
Image

Nick, I'd wondered about applyimg titebond to surface with dried titebond already on it. Thanks for answering my unspoken thoughts.
Also, the neck looks long because it is a 660 scale on a small body.
And the Qld Maple is from the same billet I made the mandolin from. (The bindings here are offcuts from the sides of the mando)

User avatar
Nick
Blackwood
Posts: 3640
Joined: Thu Feb 26, 2009 11:20 am
Location: Christchurch, New Zealand
Contact:

Post by Nick » Tue May 12, 2009 5:53 pm

Craig Clancy wrote:Also, the neck looks long because it is a 660 scale on a small body.
Yeah I thought it was an optical illusion! although 660 is a long neck & with the narrower width and small body it almost looks like a handle :D
Craig or Graham-Do they have a truss rod or what other form of reinforcing do you employ?
"Jesus Loves You."
Nice to hear in church but not in a Mexican prison.

User avatar
J.F. Custom
Blackwood
Posts: 779
Joined: Fri May 01, 2009 9:13 pm
Location: Brisbane
Contact:

Post by J.F. Custom » Tue May 12, 2009 6:46 pm

Hi Craig,

I agree with Bob and specifically Nick re - the solution.

Titebond is certainly sufficient to hold the bridge under tension but you do need well fitting, stress free and clean wood to wood surfaces. In fact, tests show that Epoxy is so marginally stronger in wood to wood application as to make it negligible in my opinion. This does depend on species etc but for the purposes of this thread, I don't think you would gain anything. Also if you did go down this track and it failed - the removal and clean up is a considerable nightmare. The only other consideration is the age and condition of the Titebond itself. If it is over 12 months old or even less if stored poorly, it may not have the strength it once had. Best to use a fresh bottle. Lastly on the bridge front, I'm not sure what species you are using there - by appearances possibly Mulga? In any case, the timber may glue better if wiped down with acetone prior to glue up (leave to dry well) as this will remove any oils or resins from the bonding face.

As for tear out in the binding channels, my suggestion would be to use a spiral router bit for a start - if you are not already. The shearing action they cut with as opposed to the chiseling action of a straight bit far reduces tear out in the first place. The cut is simply so much smoother. After that, direction of approach is a consideration but some species are just cranky.

I hope this helps and thumbs up for perseverance! Bouzoukis are wonderful instruments and Grahams book will certainly get you great results. Good job :)

Ah - just noticed that while I was writing this post, feeding cats, making dinner and bathing babies, you have had several other replies which may make this post redundant but, ho hum. I'm posting anyway!

Cheers,

Jeremy.

User avatar
Clancy
Blackwood
Posts: 621
Joined: Wed Dec 17, 2008 10:26 am
Location: Canberra

Post by Clancy » Tue May 12, 2009 6:59 pm

Jeremy, good guess. It' actually supposed to be gidgee which I expected to be the same colour as the fretboard (which was the same as the previous gidgee I used). It's much lighter in colour and I suspected on arrival it was mulga which they also sell (ALS).

Nick, there's a double action truss rod (ala Gilet) in the neck.
First time I've made one and it works great!

aussieadam
Wandoo
Posts: 14
Joined: Fri May 08, 2009 2:20 pm
Location: Shepparton, Vic

Post by aussieadam » Wed May 13, 2009 11:32 am

I can't offer any advice... but i'm full of encouragement ;)

first Irish bazouki i've ever seen... looks awesome! Taste is such a personal thing, but I think your bridge looks great!

Sounds like the exercise has served it's purpose as far as new techniques, and solving new problems is required... I look forward to seeing the finished product!

-Adam

User avatar
Dominic
Blackwood
Posts: 1098
Joined: Thu Jan 10, 2008 8:58 am
Location: Canberra

Post by Dominic » Wed May 13, 2009 6:14 pm

Hi Craig, this is the one you brought around isn't it? I'd love to hear it sometime.
Cheers
Dom
You can bomb the world to pieces,
but you can't bomb the world to peace!

User avatar
Clancy
Blackwood
Posts: 621
Joined: Wed Dec 17, 2008 10:26 am
Location: Canberra

Post by Clancy » Thu May 14, 2009 10:25 am

Thanks for the offer of the lights Graham.
I found myself with some spare time last night & removed the bridge with the help of an IXL-tastic heat lamp, a sheet of corrugated cardboard with the shape of the bridge cut out and an old putty knife.
Worked well.

While I've got it all apart I'll tidy up some of the goofs I listed.

Thanks all for all the advice offered.
Will advise how it all goes when done. :D

Post Reply

Who is online

Users browsing this forum: No registered users and 184 guests