
Nick, like everyone else I'm really enjoying this build progress.
Your ingenuity, creativity & tenacity are admirable, as is the instrument itself.
I have especially liked your explanations of aspects particular to this type of instrument (or the one it's based on at least) such as the top bracing.
And it's a shame those CF laminated outside back braces will be hidden.
Way cool mate.
Variations on a Macca.

-
Nick

- Blackwood
- Posts: 3642
- Joined: Thu Feb 26, 2009 11:20 am
- Location: Christchurch, New Zealand
- Contact:
Thanks Allen, the CF is from LMI, I couldn't find a NZ supplier and LMI had the 0.75"x18"x0.030" which suited my needs nicely so I went with that. If there is an Australian supplier that you recommend I will certainly prefer to use them in future (should I use CF again) as the exchange rate is better!
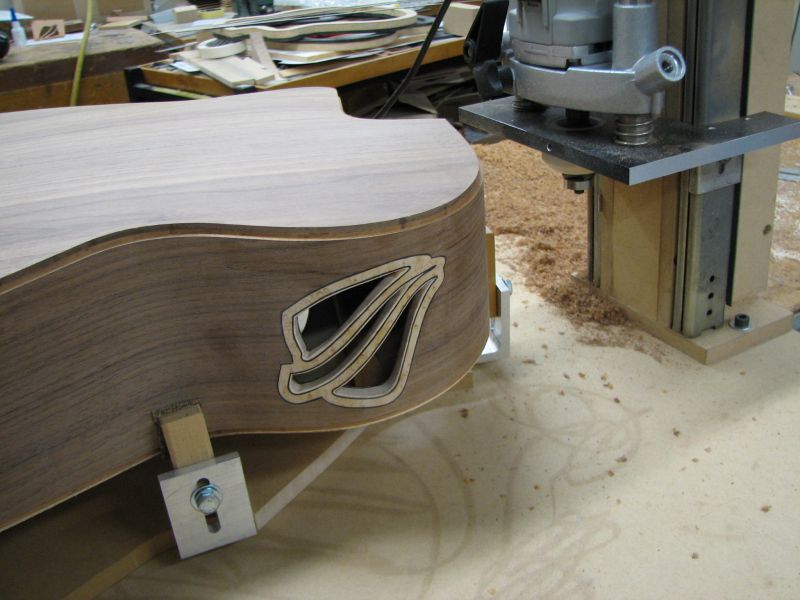
I stayed on after work tonight and did my purfling/binding ledges, took a few pictures of my homemade rig that,like Lillian's, is a copy of the Stew Mac style. For the upright slides I scored some 19" rack mount ball bearing runners from some old equipment our department was 'recycling' to the rubbish.
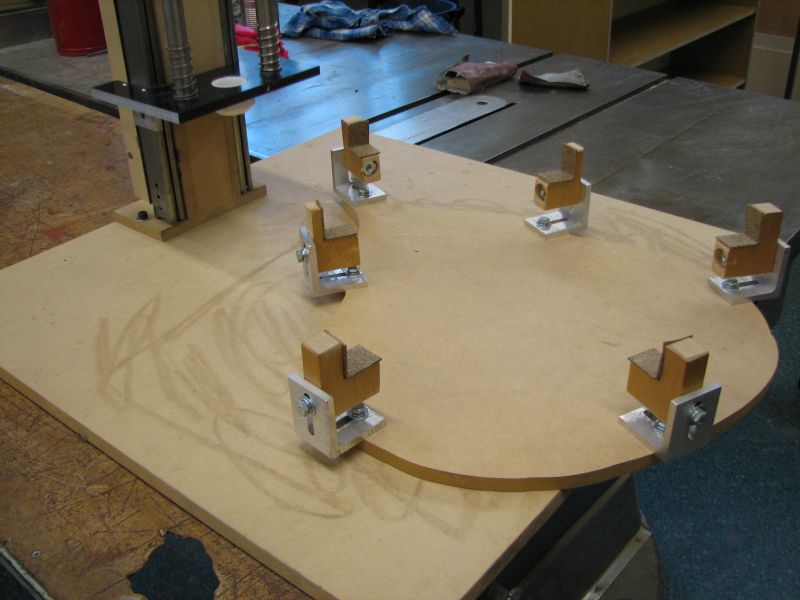
The router platform was some old Aluminium we had in the workshop so I just made some pillars that replicated the plunge router base it came with, to mount the router on. The white bush is Teflon with a chamfer on the bottom edge so the amount it contacts the top or back plates is minimal. With the router mounted, the 'head' has just the right amount of weight to keep the Teflon bush in contact with the guitar's face & provides enough down force that when climb cutting it doesn't try to rip the job away from you.
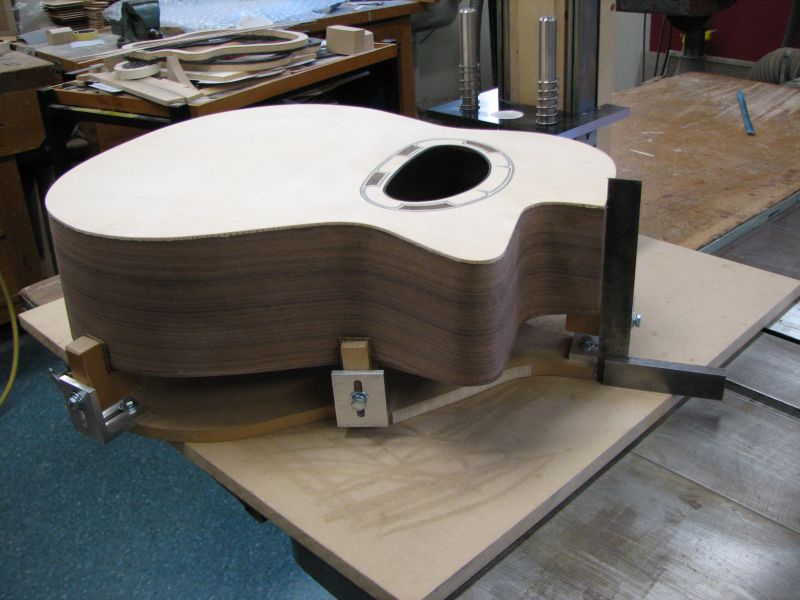
The holding jig is just right to hold both the Selmers and 17" archtops.
Body sitting in the jig, this part of the job always my bum twitch for some reason, until the cutter has cut at least 1/4 the way around
An out of focus image (close up objects anyway, camera obviously wanted to focus on the shelves in background!) but it gives you an idea of how the bush sits on the plate. With the ball bearing runners, the cutter follows the shape of the top really easily.
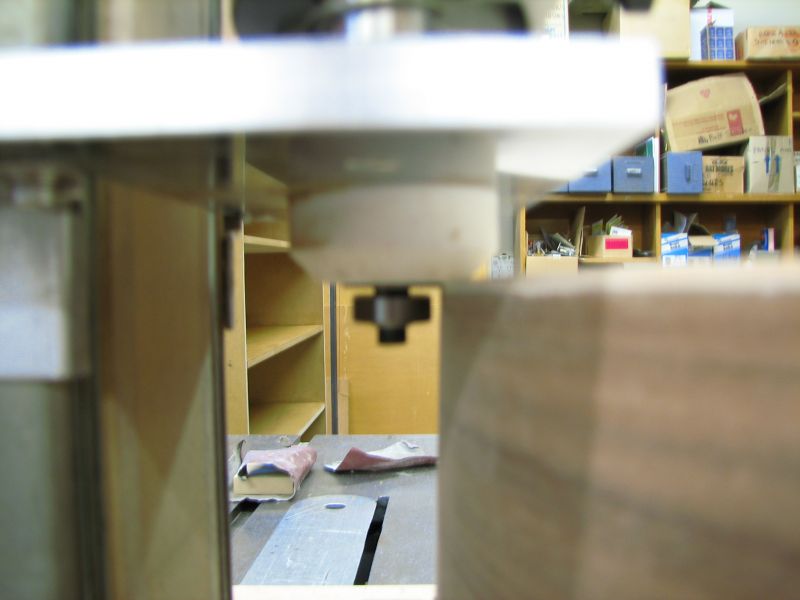
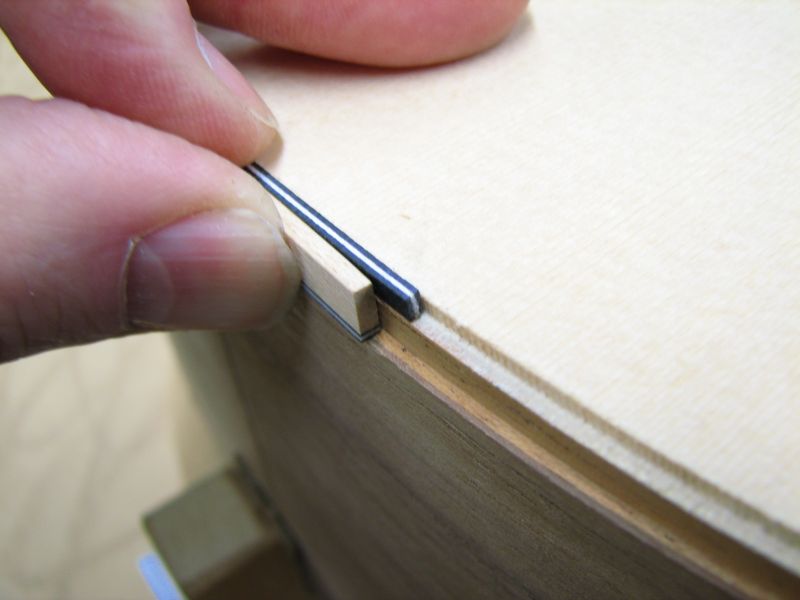
I use the cutter set that Stew Mac sells. On the top I wanted to run a purfling around the edge to match the BWB I used on my rosette so this has a double ledge.
Top ledge cut.
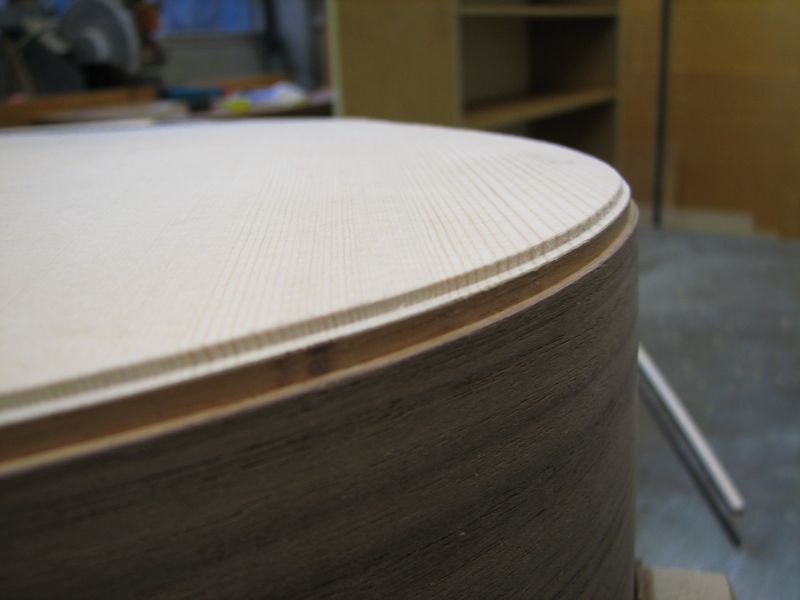
& a dry fit of the purfling and binding just to make sure I got my cuts right!
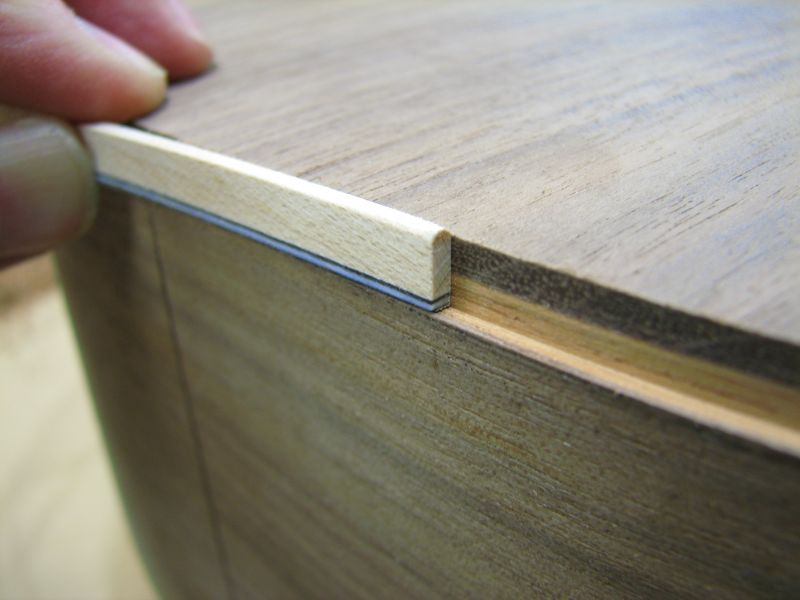
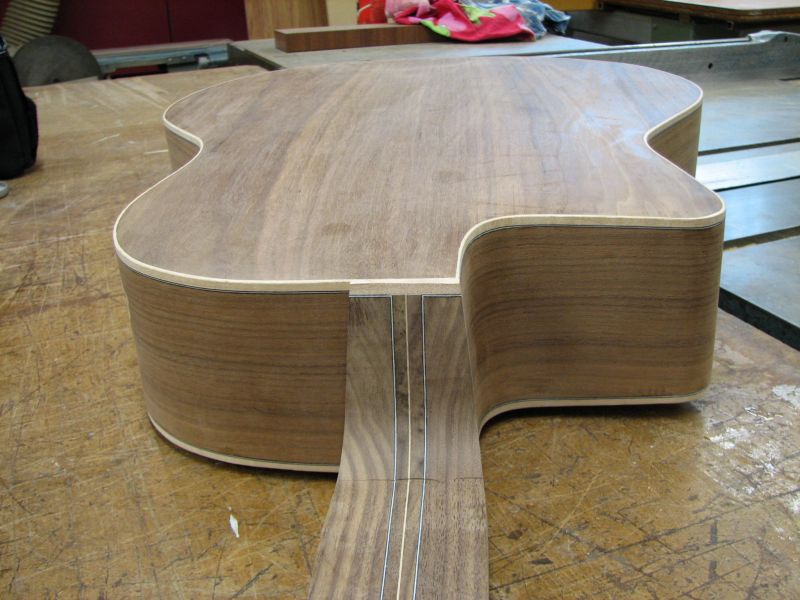
The back I just did a single ledge so the maple binding contrasts against the chocolate brown of the Walnut.
I stayed on after work tonight and did my purfling/binding ledges, took a few pictures of my homemade rig that,like Lillian's, is a copy of the Stew Mac style. For the upright slides I scored some 19" rack mount ball bearing runners from some old equipment our department was 'recycling' to the rubbish.
The router platform was some old Aluminium we had in the workshop so I just made some pillars that replicated the plunge router base it came with, to mount the router on. The white bush is Teflon with a chamfer on the bottom edge so the amount it contacts the top or back plates is minimal. With the router mounted, the 'head' has just the right amount of weight to keep the Teflon bush in contact with the guitar's face & provides enough down force that when climb cutting it doesn't try to rip the job away from you.
The holding jig is just right to hold both the Selmers and 17" archtops.
Body sitting in the jig, this part of the job always my bum twitch for some reason, until the cutter has cut at least 1/4 the way around
An out of focus image (close up objects anyway, camera obviously wanted to focus on the shelves in background!) but it gives you an idea of how the bush sits on the plate. With the ball bearing runners, the cutter follows the shape of the top really easily.
I use the cutter set that Stew Mac sells. On the top I wanted to run a purfling around the edge to match the BWB I used on my rosette so this has a double ledge.
Top ledge cut.
& a dry fit of the purfling and binding just to make sure I got my cuts right!
The back I just did a single ledge so the maple binding contrasts against the chocolate brown of the Walnut.
"Jesus Loves You."
Nice to hear in church but not in a Mexican prison.
Nice to hear in church but not in a Mexican prison.
-
Nick
- Blackwood
- Posts: 3642
- Joined: Thu Feb 26, 2009 11:20 am
- Location: Christchurch, New Zealand
- Contact:
Things have progressed steadily since the last post, my simple experiment is getting more & more detail added to it, just hope the sound lives up to the extra work I'm doing to it 
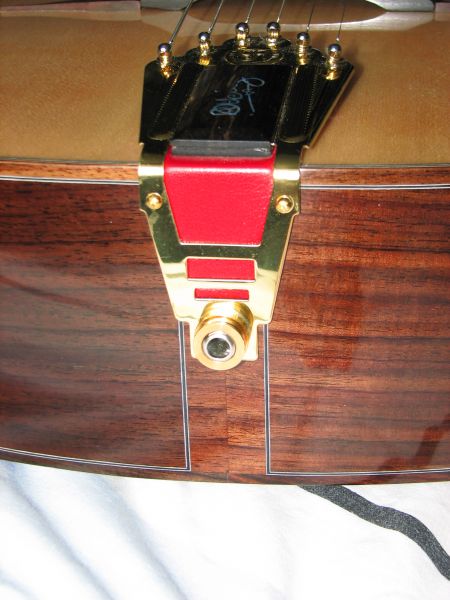
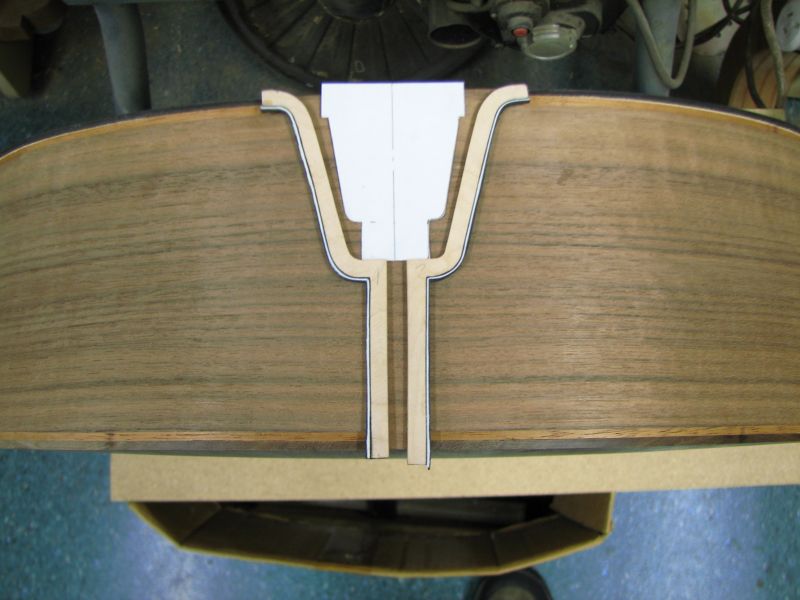
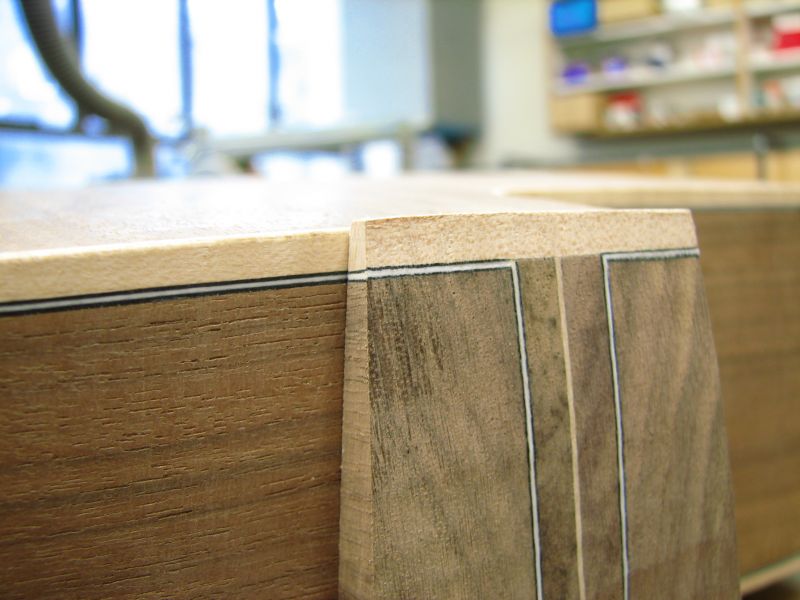
The end graft is the latest to receive some 'extra' thought from what I had originally planned. I decided that if the tailpiece tapers in then I'll make the graft taper also and have it seperated at the tail so it looked like two seperate binding runs.
Here's a picture (from my first Selmer build) of the tapered tailpiece just as a reminder of what shape I'm trying to follow.
I used some of the offcut from my inner back to make the vertical pieces for the graft and some fibre veneer sheet pieces to reproduce the purfling edge that the curly maple binding from Stew Macs came with.
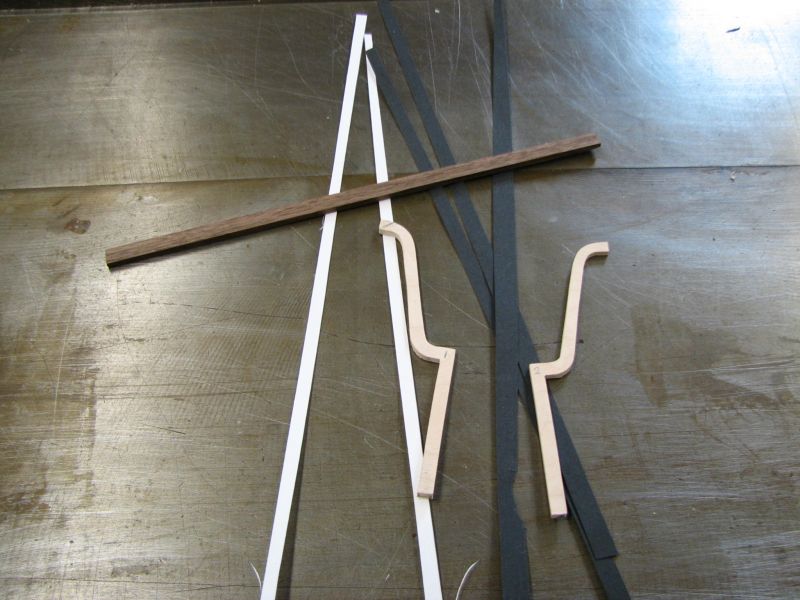
The maple graft pieces with fibre purfling glued on and sitting on the guitar to try and emulate the finished look. Complete with Chemistry dept Lino and my clogs
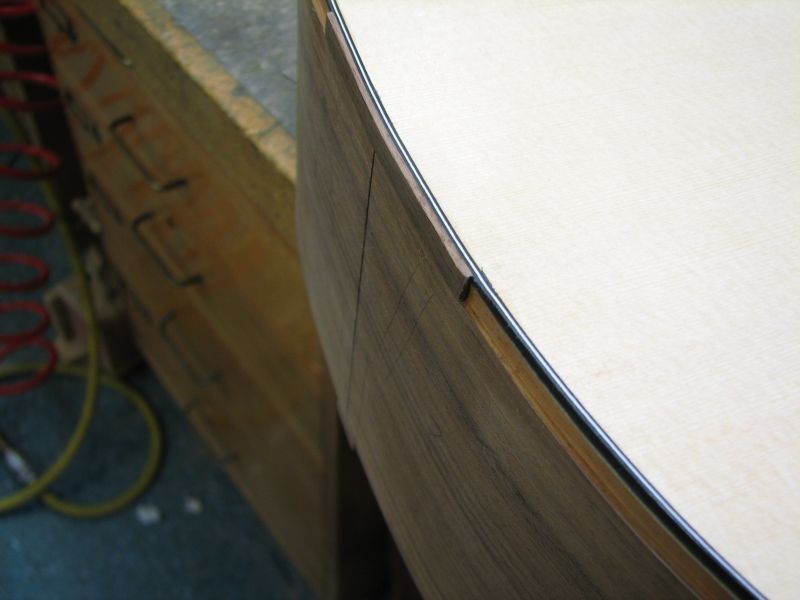
Once I'd glued my B/W/B purfling around the top I marked the graft pieces position and glued Walnut pieces in the binding channels top & bottom so the final Walnut face veneer had something to sit on & match.
If you are wondering from my driveling text what exactly I'm trying to do, stick with it... the pictures should help & it will eventually become clear....I promise!
I then routed the thickness of the Walnut veneer so I could inlet the face piece, accuracy wasn't paramount as the grafts will cover the bad joins!!
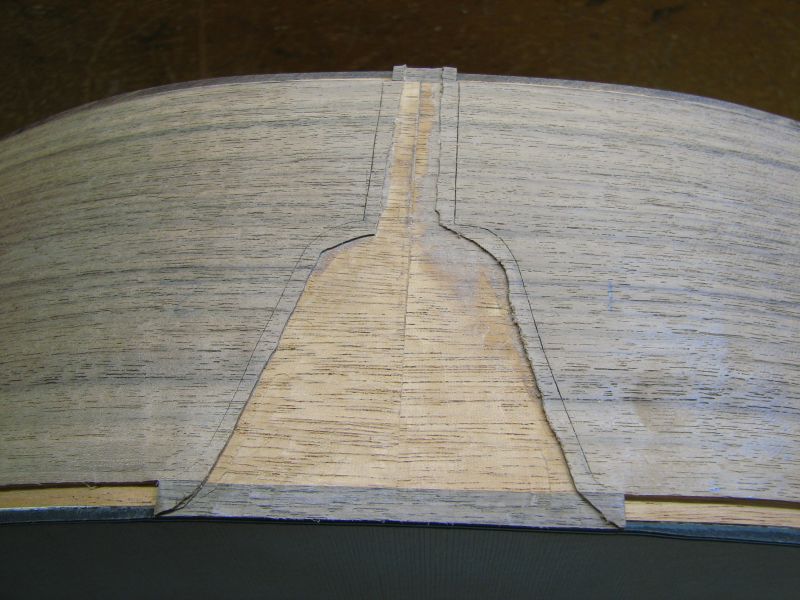
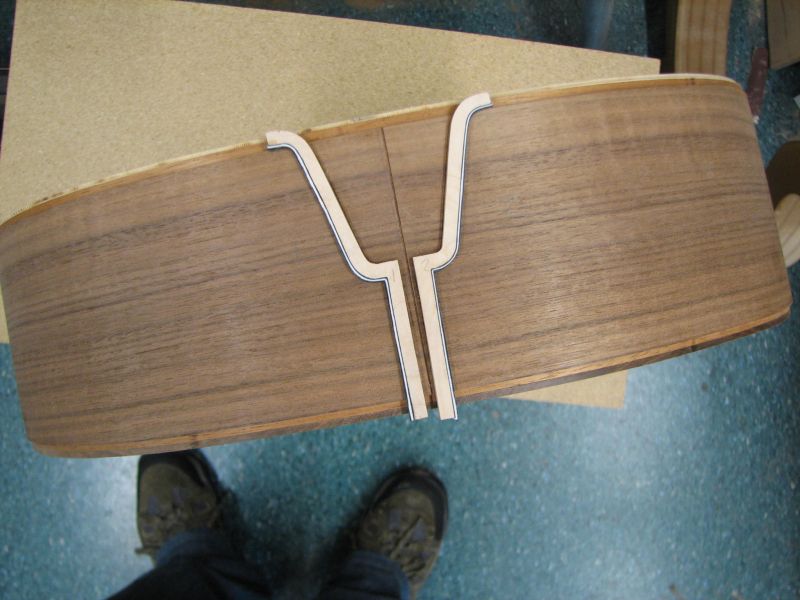
I glued the Veneer in to cover where the two sides come together then set about cutting a channel for the two grafts to sit in. Here the pieces are just sitting on the end and a "paper" tailpiece to give an impression of what I am trying to achieve.
Finally I glued in the bindings, I think if I did it again I wouldn't bother with the top rounds on the graft, I'd just mitre the same as I did at the bottom, the joins weren't quite as invisible as I had hoped simply because the grain directions I think.A 'normal' mitre and the eye expects to see a change in grain and so it doesn't look quite so out of place.
A few pics of what I've ended up with.


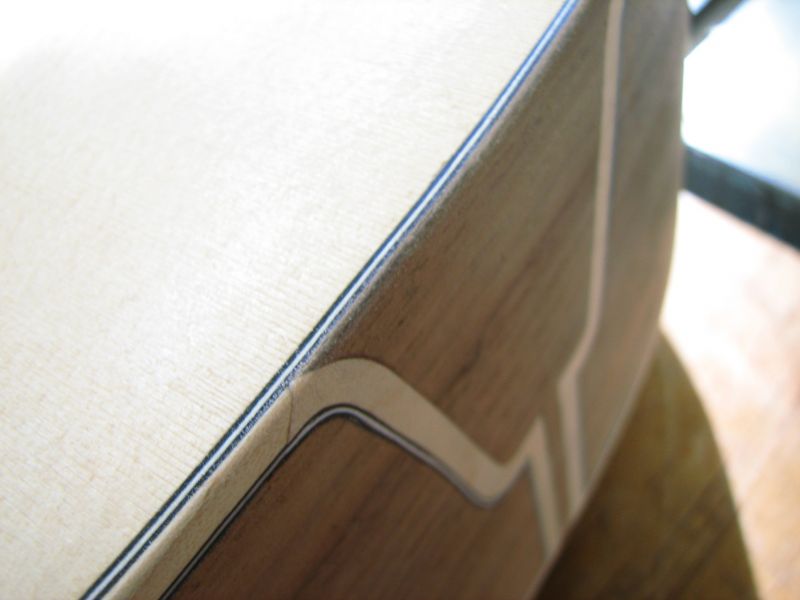
Whoops! forgot to blow the sawdust off before pushing the button...nevermind, you get the general idea.
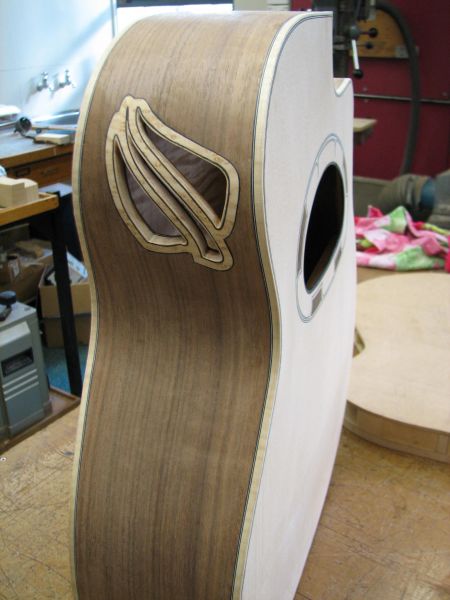
And finally just a shot of the soundport with the bindings running past it.
Time to make a start on the neck but even this has got me in re-think mode, I'm now thinking of a bolt on or adjustable neck so I won't cut the body mortise until this idea has been run up the flag pole and had a chance to flutter in the wind for a bit  Anybody got any ideas about this feel free to add your input, it's either that or my original thought of a fixed neck with cantilevered fingerboard.
The end graft is the latest to receive some 'extra' thought from what I had originally planned. I decided that if the tailpiece tapers in then I'll make the graft taper also and have it seperated at the tail so it looked like two seperate binding runs.
Here's a picture (from my first Selmer build) of the tapered tailpiece just as a reminder of what shape I'm trying to follow.
I used some of the offcut from my inner back to make the vertical pieces for the graft and some fibre veneer sheet pieces to reproduce the purfling edge that the curly maple binding from Stew Macs came with.
The maple graft pieces with fibre purfling glued on and sitting on the guitar to try and emulate the finished look. Complete with Chemistry dept Lino and my clogs
Once I'd glued my B/W/B purfling around the top I marked the graft pieces position and glued Walnut pieces in the binding channels top & bottom so the final Walnut face veneer had something to sit on & match.
If you are wondering from my driveling text what exactly I'm trying to do, stick with it... the pictures should help & it will eventually become clear....I promise!
I then routed the thickness of the Walnut veneer so I could inlet the face piece, accuracy wasn't paramount as the grafts will cover the bad joins!!
I glued the Veneer in to cover where the two sides come together then set about cutting a channel for the two grafts to sit in. Here the pieces are just sitting on the end and a "paper" tailpiece to give an impression of what I am trying to achieve.
Finally I glued in the bindings, I think if I did it again I wouldn't bother with the top rounds on the graft, I'd just mitre the same as I did at the bottom, the joins weren't quite as invisible as I had hoped simply because the grain directions I think.A 'normal' mitre and the eye expects to see a change in grain and so it doesn't look quite so out of place.
A few pics of what I've ended up with.
Whoops! forgot to blow the sawdust off before pushing the button...nevermind, you get the general idea.
And finally just a shot of the soundport with the bindings running past it.
Time to make a start on the neck but even this has got me in re-think mode, I'm now thinking of a bolt on or adjustable neck
"Jesus Loves You."
Nice to hear in church but not in a Mexican prison.
Nice to hear in church but not in a Mexican prison.

Wow. Mate i am just gob smacked as to everything that is going on with this build. Its an absolute inspiration. Those bindings look unreal running past the soundport and i love that you can see the maple through that port also.
I wish my praise carried more value, but for what its worth
Austen
I wish my praise carried more value, but for what its worth
Austen
The smallest deed is far greater than the greatest intention.

-
Nick
- Blackwood
- Posts: 3642
- Joined: Thu Feb 26, 2009 11:20 am
- Location: Christchurch, New Zealand
- Contact:
Progress has been slow since I last posted on this build, other things have come along that have required more attention
I'll post where I'm at so far for anybody that has been watching the build and thought I'd fallen off the face of the planet!
I'd like to add that I hope this isn't coming across as a tutorial type of build on how to do things, that's not my intention! I want to hopefully show & describe the steps I took to arrive at the end result, if I'm coming across like your crusty old high school instructor, forgive me.
I wanted to run some B/W/B laminate that matches my body purflings down the neck but being the, difficult and creating work for myself bastard that I am, I wasn't content with just two parallel lines down the neck. I wanted to have two lines of purfling that gradually taper in toward each other as they go down the neck (to sort of match the tapering effect of the neck) plus I didn't want them to go right to the end, they were to stop under headstock veneers so that they didn't show up when looking at the end of the headstock (to hopefully induce a head scratching moment for anybody that thought they would see the B/W/B at the end).
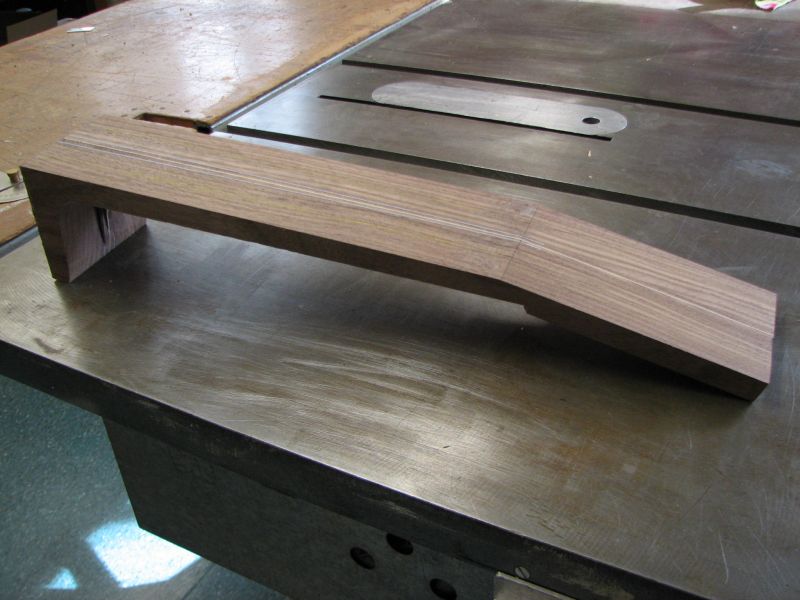
To do this I laminated a central strip up (with a maple veneer running between walnut sides) then tapered it with the Safe-T-Planer and stopping at a shoulder that gives me somewhere to terminate the purfling sheets.
I superglued (just a spot on each) different thickness packers in to give me the correct taper.
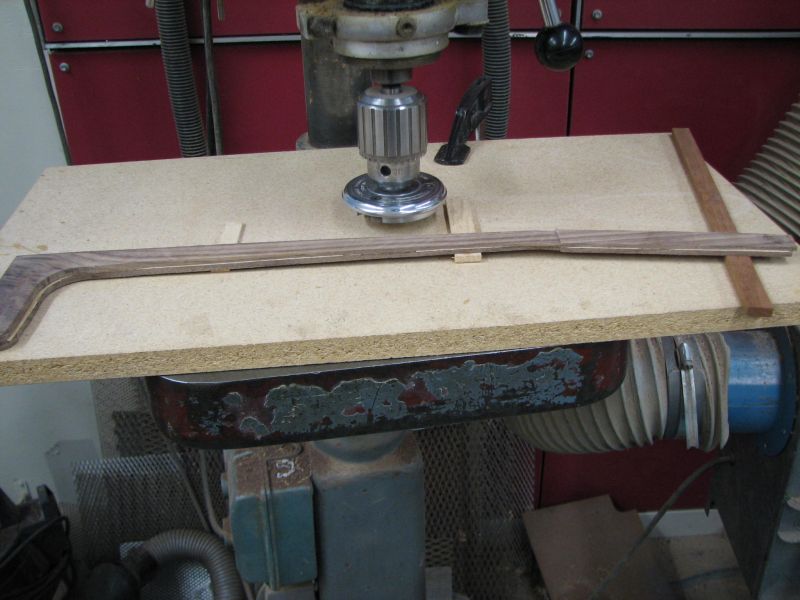
I made my purfling up from the fibre sheets LMI supply and made them the same outline as my neck blank & laminated everything up.
The neck blank all laminated up, important faces planed flat and square and Safe-T-Planed to give the taper of the rear.
And a shot showing the subtle taper of the purfling lines, although it was that subtle that the picture doesn't really show it! looks more like the natural perspective of the photo. Also shows how the purfling stops just as it flows into the headstock area.
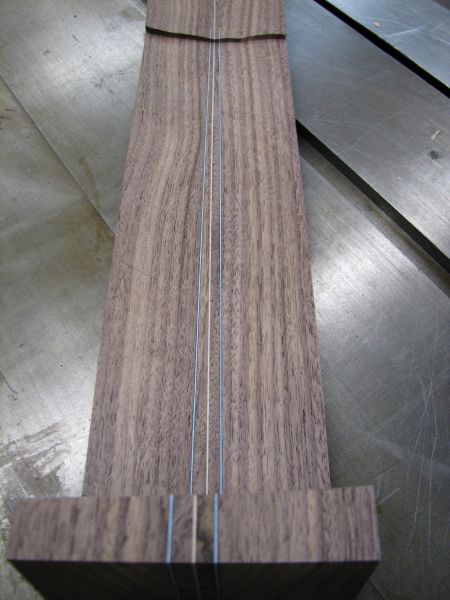
Here's a closer picture showing the 'stopped' purfling
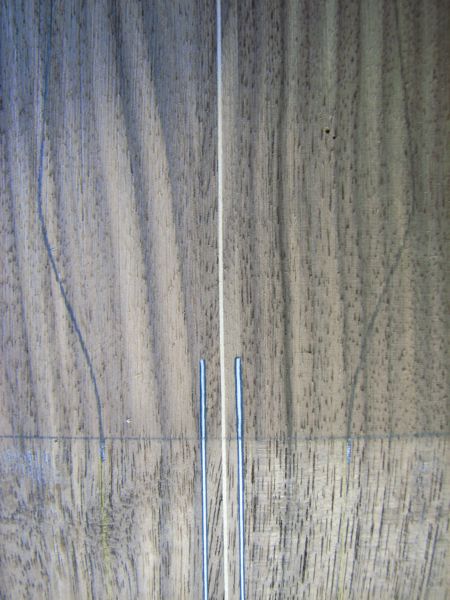
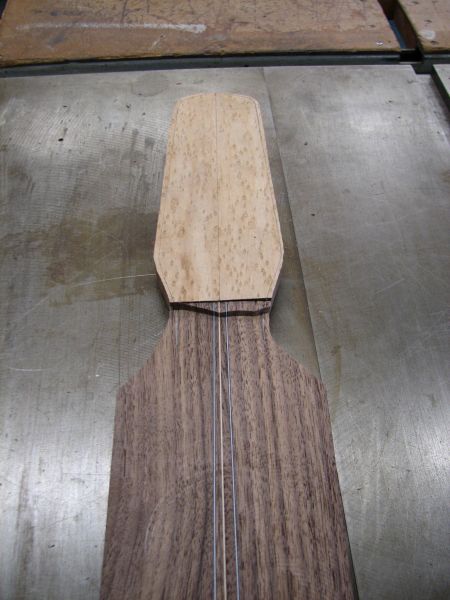
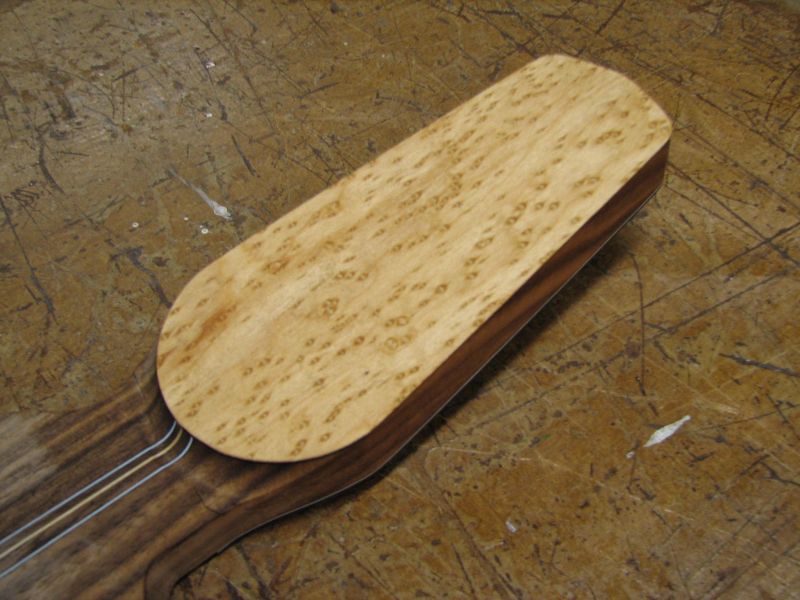
For the headstock veneers I decided to revist the veneers I'd used on the body & carry the theme through so I went with Birdseye on the rear (The same that I used around the soundport) and Imbuya I had used in my rosette, for the headstock face.
Headstock rough shaped and purfling ends hidden under the birdseye.
With the face, as I intend to bind the fingerboard with the curly maple of the body which has the B/W/B purfling on it. I made up more layers of fibre to match this & glued these on before the layer of Imbuya. The idea being that when looking at the edge of the neck (similar to one of Bob Benedetto's little 'touches') the purfling ends up being a continuous line from fingerboard onto headstock.
Imbuya Face before tuner slots are cut and trussrod cover is cut. The two screw holes are to hold my router template I use to route the final shape, they are removed when I cut the string/tuner slots.
Here's a shot of the purfling continuation theory (Binding was just a bit of scrap and not trimmed, so it doesn't match in perfectly......yet!).
& a shot of the rear once the characteristic Maccaferri radius has been cut in.
Finally a shot of the headstock with the tuner slots cut, tuners roughly sitting in and truss rod cover in (went with the magnet hold down system that some of you are employing now) when finished this will sit flush with the face.

Next on the adgenda will be to cut the body and neck dovetails, do another little 'touch' for the heel I have planned and make up my fingerboard.
I'll post where I'm at so far for anybody that has been watching the build and thought I'd fallen off the face of the planet!
I'd like to add that I hope this isn't coming across as a tutorial type of build on how to do things, that's not my intention! I want to hopefully show & describe the steps I took to arrive at the end result, if I'm coming across like your crusty old high school instructor, forgive me.
I wanted to run some B/W/B laminate that matches my body purflings down the neck but being the, difficult and creating work for myself bastard that I am, I wasn't content with just two parallel lines down the neck. I wanted to have two lines of purfling that gradually taper in toward each other as they go down the neck (to sort of match the tapering effect of the neck) plus I didn't want them to go right to the end, they were to stop under headstock veneers so that they didn't show up when looking at the end of the headstock (to hopefully induce a head scratching moment for anybody that thought they would see the B/W/B at the end).
To do this I laminated a central strip up (with a maple veneer running between walnut sides) then tapered it with the Safe-T-Planer and stopping at a shoulder that gives me somewhere to terminate the purfling sheets.
I superglued (just a spot on each) different thickness packers in to give me the correct taper.
I made my purfling up from the fibre sheets LMI supply and made them the same outline as my neck blank & laminated everything up.
The neck blank all laminated up, important faces planed flat and square and Safe-T-Planed to give the taper of the rear.
And a shot showing the subtle taper of the purfling lines, although it was that subtle that the picture doesn't really show it! looks more like the natural perspective of the photo. Also shows how the purfling stops just as it flows into the headstock area.
Here's a closer picture showing the 'stopped' purfling
For the headstock veneers I decided to revist the veneers I'd used on the body & carry the theme through so I went with Birdseye on the rear (The same that I used around the soundport) and Imbuya I had used in my rosette, for the headstock face.
Headstock rough shaped and purfling ends hidden under the birdseye.
With the face, as I intend to bind the fingerboard with the curly maple of the body which has the B/W/B purfling on it. I made up more layers of fibre to match this & glued these on before the layer of Imbuya. The idea being that when looking at the edge of the neck (similar to one of Bob Benedetto's little 'touches') the purfling ends up being a continuous line from fingerboard onto headstock.
Imbuya Face before tuner slots are cut and trussrod cover is cut. The two screw holes are to hold my router template I use to route the final shape, they are removed when I cut the string/tuner slots.
Here's a shot of the purfling continuation theory (Binding was just a bit of scrap and not trimmed, so it doesn't match in perfectly......yet!).
& a shot of the rear once the characteristic Maccaferri radius has been cut in.
Finally a shot of the headstock with the tuner slots cut, tuners roughly sitting in and truss rod cover in (went with the magnet hold down system that some of you are employing now) when finished this will sit flush with the face.
Next on the adgenda will be to cut the body and neck dovetails, do another little 'touch' for the heel I have planned and make up my fingerboard.
"Jesus Loves You."
Nice to hear in church but not in a Mexican prison.
Nice to hear in church but not in a Mexican prison.
-
John Steele
- Blackwood
- Posts: 152
- Joined: Fri Mar 06, 2009 4:58 pm
- Location: Wilson, NY. 14172
- Contact:

Hot stuff Nick......looking really good. I love the lines on that instrument.
Hey Im probablly going to be over in Chch around September 17th. I have to visit my old man whos not in good shape. If I can Id love to catch up with you and talk guitars. Will PM you when I get travel plans finalised.
Cheers Martin
Hey Im probablly going to be over in Chch around September 17th. I have to visit my old man whos not in good shape. If I can Id love to catch up with you and talk guitars. Will PM you when I get travel plans finalised.
Cheers Martin

-
J.F. Custom

- Blackwood
- Posts: 779
- Joined: Fri May 01, 2009 9:13 pm
- Location: Brisbane
- Contact:
I believe Kim's even got a highly collectable Maton he'd be willing to swap you tooKim wrote:... Can I have it when u'r done??:D
Cheers
Kim
High spec work Nick - glad you've found the time to do some more and post it. Speaking for myself, I'm enjoying the process let alone anticipating the finish. Great work.
You and I seem to share some similar thoughts in our approach to building and perhaps aesthetics; you've incorporated a couple of other 'features' on this build very similar to some I'm working on. Obviously, you have good taste
Look forward to more.
Cheers,
Jeremy.
-
Nick
- Blackwood
- Posts: 3642
- Joined: Thu Feb 26, 2009 11:20 am
- Location: Christchurch, New Zealand
- Contact:
Thanks Chaps A collectable (*cough*) Maton for a non original Macca, sounds like a deal to me Jeremy  Thanks for your words & glad I share good taste with somebody
And I'll keep you in mind Kim if it sits around the house for too long & I've just tripped over it for the 10,000th time
I'd look forward to that Martin, even though the circumstances could be better! It'd be my pleasure to shout you a couple of pints at my local watering hole if your into english styled beers.
"Jesus Loves You."
Nice to hear in church but not in a Mexican prison.
Nice to hear in church but not in a Mexican prison.

-
Nick
- Blackwood
- Posts: 3642
- Joined: Thu Feb 26, 2009 11:20 am
- Location: Christchurch, New Zealand
- Contact:
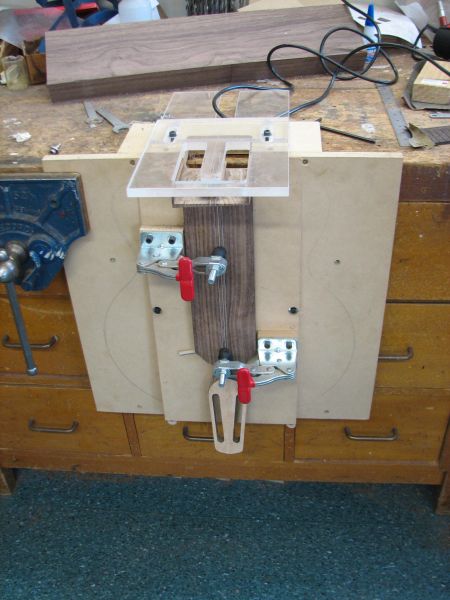
Ok work on the Macca continues at snail's pace but I'll post some progress pickies just to keep the build in the "current" section of the forum I'll split the posts into two so you can skip the first Jig post if you dont want to see my jigs and second post will be build progress.
So here are a few I took of my home made dovetail jig just to give the jig-a-holics a fix and show how I tackle this part of the build, although it doesn't differ from anybody else's methods I suspect so I won't labour the point of "I did this and then I did that"
The body being held in the jig to do it's dovetail. I made the jig first for my archtops but built a bit of "variability" into it so I could do a variety of body styles. I just pack the different bodies (using scrap spruce) so the dovetail face is flat against my Perspex patterns.
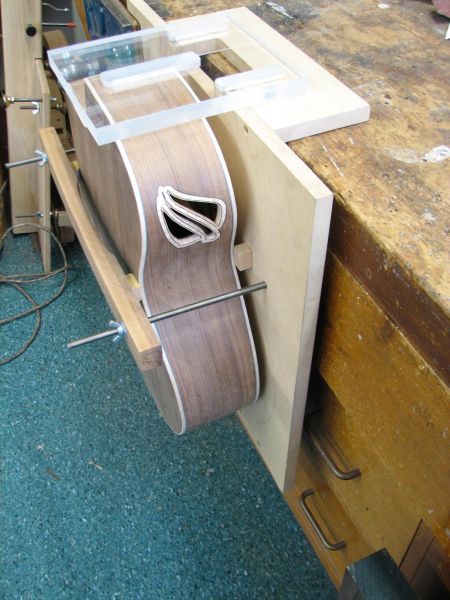
The pattern I've used on this build is a copy of the Bob Benedetto 'straight' dovetail, the neck dovetail is cut straight and the body dovetail has a 1/16th taper so that the neck slides in easy and snugs up almost in position, just needs a little skim on the sides of the dovetail to get it to sit home. I also made up some patterns to cut the "Martin" style wedged dovetail (which I've used for the past two Selmer builds).
Pattern set to give the right depth and all ready for cutting. (sphincter puckering time for me! I know the body is clamped in tight but still makes me bum twitch as I bring the spinning router bit up to the body)
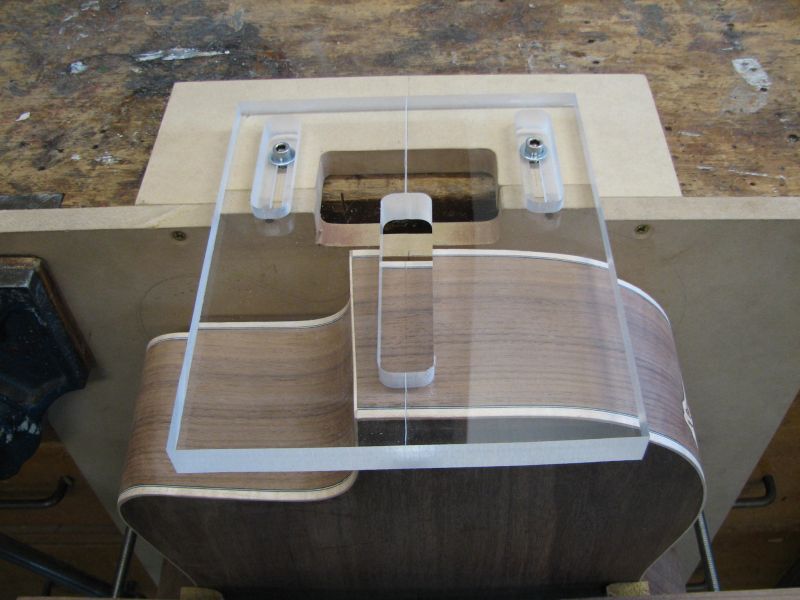
And body dovetail cut.

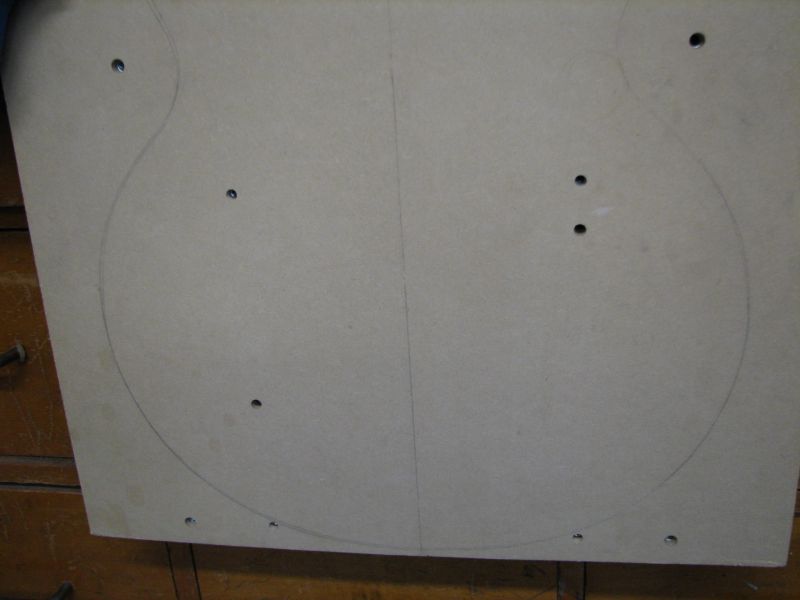
The 'body' plate has various holes drilled in it, some are fitted with tee nuts and others are for locating dowels for the neck wedge that fits onto it.
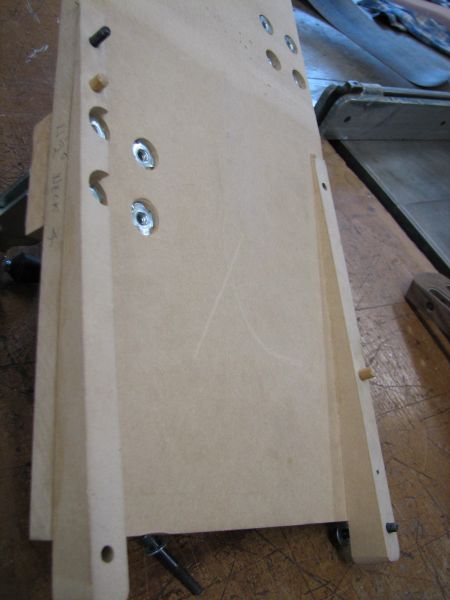
And the neck section has corresponding screws and dowels so it is always lined up with the centerline & perpendicular with the cutting patterns. The side rails also are wedge shaped to give the correct neck angle. (in this case 4 1/2 degrees) Different neck angle and I use a different wedge but still locates in the same holes.
And from the front.

The smaller (lower) maple 'keys' locate any necks I've routed for a 1/4" truss rod (also includes StewMacs dual action with a masking tape packing in the slot) and the upper Mahogany (and removable) keys locate the neck for the wider Martin style truss rods I have been using for these Selmer builds.
And from the side to show the 'neck' angle set.

So here are a few I took of my home made dovetail jig just to give the jig-a-holics a fix and show how I tackle this part of the build, although it doesn't differ from anybody else's methods I suspect so I won't labour the point of "I did this and then I did that"
The body being held in the jig to do it's dovetail. I made the jig first for my archtops but built a bit of "variability" into it so I could do a variety of body styles. I just pack the different bodies (using scrap spruce) so the dovetail face is flat against my Perspex patterns.
The pattern I've used on this build is a copy of the Bob Benedetto 'straight' dovetail, the neck dovetail is cut straight and the body dovetail has a 1/16th taper so that the neck slides in easy and snugs up almost in position, just needs a little skim on the sides of the dovetail to get it to sit home. I also made up some patterns to cut the "Martin" style wedged dovetail (which I've used for the past two Selmer builds).
Pattern set to give the right depth and all ready for cutting. (sphincter puckering time for me! I know the body is clamped in tight but still makes me bum twitch as I bring the spinning router bit up to the body)
And body dovetail cut.
The 'body' plate has various holes drilled in it, some are fitted with tee nuts and others are for locating dowels for the neck wedge that fits onto it.
And the neck section has corresponding screws and dowels so it is always lined up with the centerline & perpendicular with the cutting patterns. The side rails also are wedge shaped to give the correct neck angle. (in this case 4 1/2 degrees) Different neck angle and I use a different wedge but still locates in the same holes.
And from the front.
The smaller (lower) maple 'keys' locate any necks I've routed for a 1/4" truss rod (also includes StewMacs dual action with a masking tape packing in the slot) and the upper Mahogany (and removable) keys locate the neck for the wider Martin style truss rods I have been using for these Selmer builds.
And from the side to show the 'neck' angle set.
"Jesus Loves You."
Nice to hear in church but not in a Mexican prison.
Nice to hear in church but not in a Mexican prison.
-
Nick
- Blackwood
- Posts: 3642
- Joined: Thu Feb 26, 2009 11:20 am
- Location: Christchurch, New Zealand
- Contact:
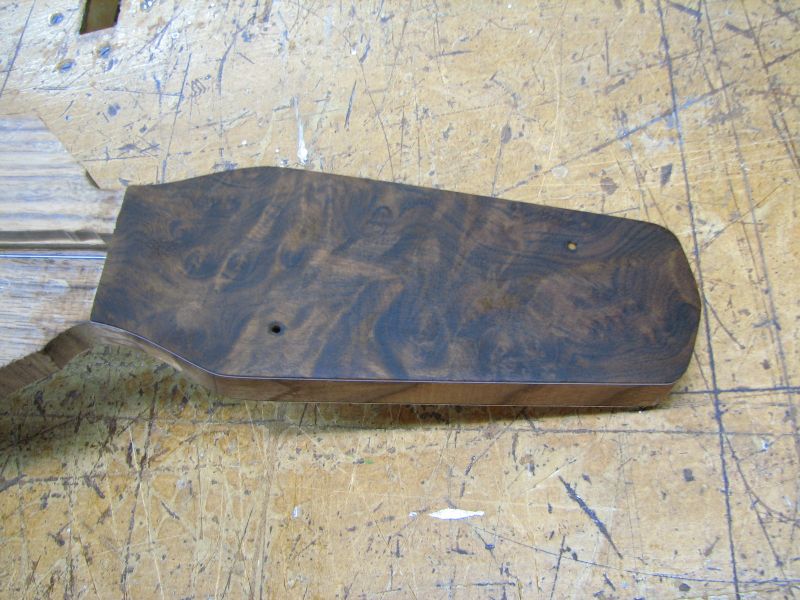
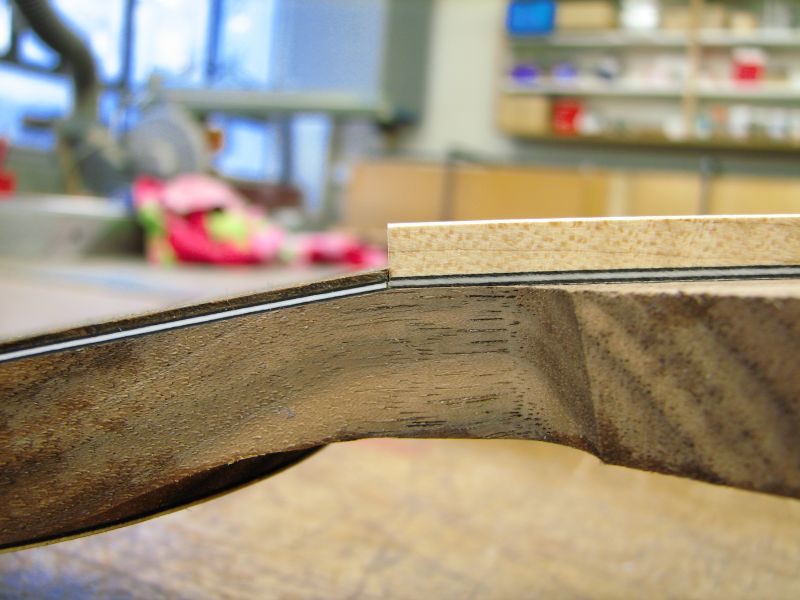
Right, second part of the post is to show progress so far on the neck. I wanted the B/W/B and Curly Maple lines on the body to continue onto the neck heel....with a twist I decided when making the neck to have the B/W/B lines running down the length of the neck so that they met up with the lines on the heel cap but instead of just running the lines across the cap, I'd have them "turn the corner" and run up the neck 
First a pic just to show the dovetail.
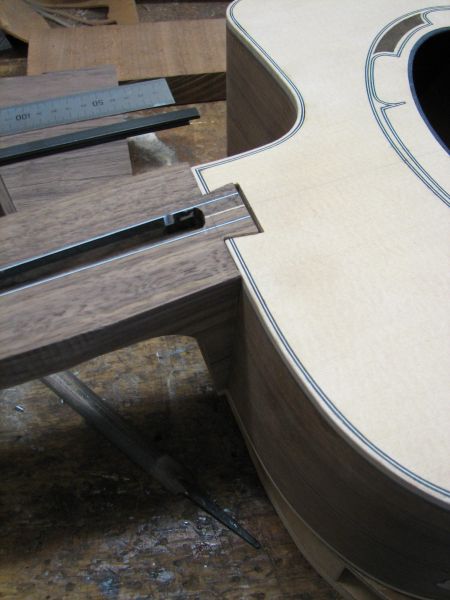
So after cutting the neck dovetail and fitting it so that I had a slight protrudance at the top (2mm) to allow for the cantilevered fingerboard, I marked where my various binding/purfling lines came on the heel and trimmed the neck back with my Safe-T-Plane. Cutting the 'outsides' 1mm lower to allow for the purfling I was going to glue on. I then trimmed the purfling to 45 degrees so it would match up with the cross pieces.
I made up some B/W/B to match the body purfling (the StewMac Curly Maple Binding comes with 10/20/10 thou lines) and trimmed it to match up to my longitudinal purfling lines then cut a piece of Curly Maple to match my side bindings and glued it all on.
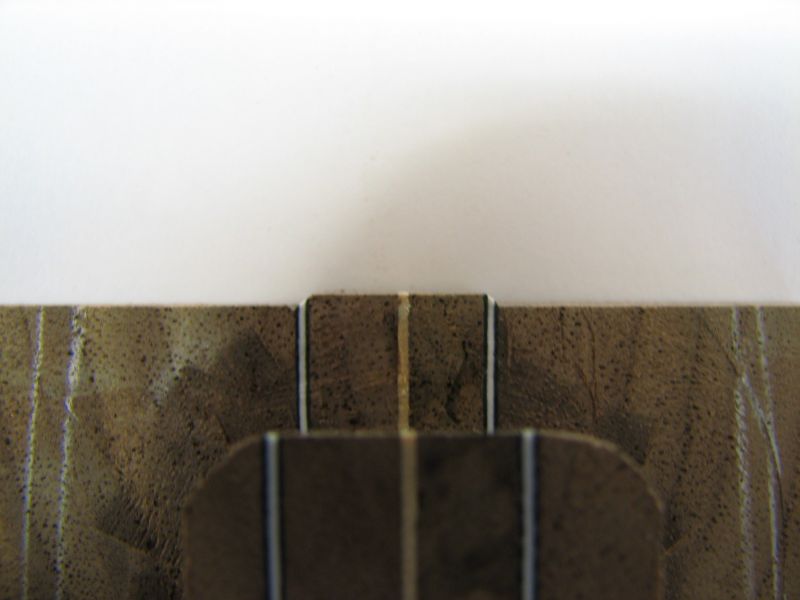
Here are a few pics to give the effect of what I'm trying to achieve, the neck is just 'in the rough' and all the corners will be rounded off in it's final guise.
Head on.
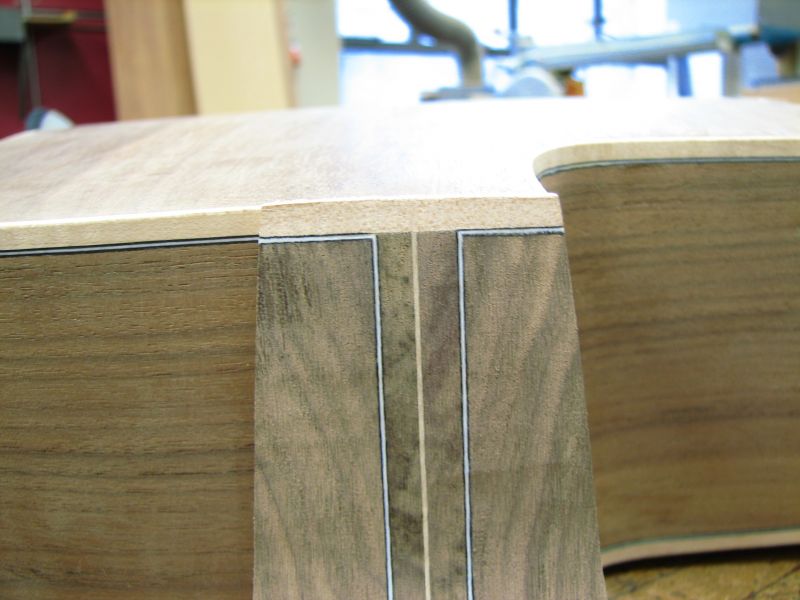
Side on to show the 'flow' of purfling
And Finally a slightly wider shot to give the overall effect.
I've just started on the fingerboard so will add some more as 'points of interest' crop up.Hope people are enjoying my ramblings
First a pic just to show the dovetail.
So after cutting the neck dovetail and fitting it so that I had a slight protrudance at the top (2mm) to allow for the cantilevered fingerboard, I marked where my various binding/purfling lines came on the heel and trimmed the neck back with my Safe-T-Plane. Cutting the 'outsides' 1mm lower to allow for the purfling I was going to glue on. I then trimmed the purfling to 45 degrees so it would match up with the cross pieces.
I made up some B/W/B to match the body purfling (the StewMac Curly Maple Binding comes with 10/20/10 thou lines) and trimmed it to match up to my longitudinal purfling lines then cut a piece of Curly Maple to match my side bindings and glued it all on.
Here are a few pics to give the effect of what I'm trying to achieve, the neck is just 'in the rough' and all the corners will be rounded off in it's final guise.
Head on.
Side on to show the 'flow' of purfling
And Finally a slightly wider shot to give the overall effect.
I've just started on the fingerboard so will add some more as 'points of interest' crop up.Hope people are enjoying my ramblings
"Jesus Loves You."
Nice to hear in church but not in a Mexican prison.
Nice to hear in church but not in a Mexican prison.
-
Nick
- Blackwood
- Posts: 3642
- Joined: Thu Feb 26, 2009 11:20 am
- Location: Christchurch, New Zealand
- Contact:
Shucks Thanks guys, means alot seeing the quality of work you chaps put out.
Liam this project is growing indeed! I think the only parts of the original intent that remain are the shape and the double back. This has grown like the proverbial beast with two heads or should that be backs?
Liam this project is growing indeed! I think the only parts of the original intent that remain are the shape and the double back. This has grown like the proverbial beast with two heads or should that be backs?
"Jesus Loves You."
Nice to hear in church but not in a Mexican prison.
Nice to hear in church but not in a Mexican prison.
-
J.F. Custom
- Blackwood
- Posts: 779
- Joined: Fri May 01, 2009 9:13 pm
- Location: Brisbane
- Contact:
Who is online
Users browsing this forum: Google and 209 guests