My latest rosette - Thanks Ron Wisdom!

Talk about musical instrument construction, setup and repair.

Moderators: kiwigeo, Jeremy D

Post Reply
User avatar
Rod True
Siberian Tiger
Posts: 234
Joined: Thu Sep 27, 2007 10:18 am
Location: Abbotsford, BC Canada

My latest rosette - Thanks Ron Wisdom!

Post by Rod True » Thu Apr 23, 2009 2:52 pm

Well, this might very well be the longest it's ever taken anyone to successfully install a rosette.

I started this guitar 3 years ago and I screwed up two separate tops and rosettes (all of the same design). I gave up on it for well over a year and I finally got the courage up to give it one last try.

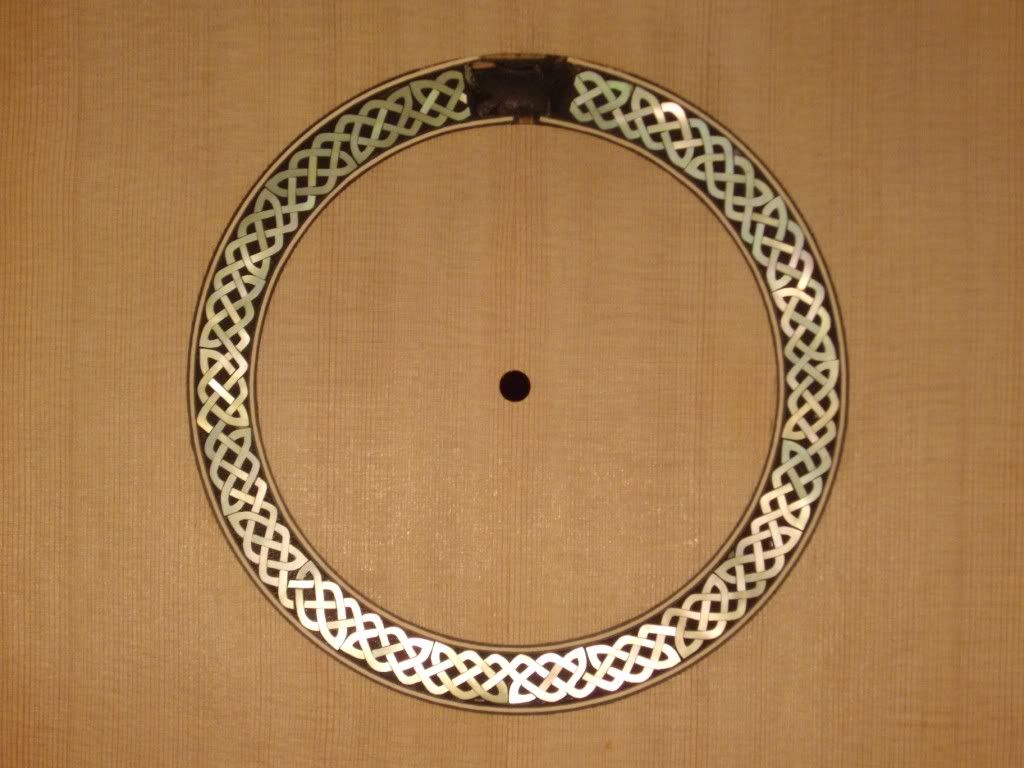
The guitar that this is part of has a lot of Celtic inlays on it and the rosette for some reason really gave me grief. First time out, I sanded it down to far and most of it was not Gold MOP anymore :x strike 1. Second time I tried filling the gaps with ebony dust and CA. Well, that was a disaster and that was the first time I threw a piece at the wall (it didn't make it).

I finally asked someone who has done this rosette before how he did it. Now that I know, I'm sort of [headinwall] but it was a good lesson for me and in the end, it turned out great. It's not totally finished, I still have a few pin holes to fill (I better not screw that up :shock: )

A huge thank you to Ron Wisdom (AKA: Old Man) for helping me out with this rosette. I really appreciate it.

Oh, and if anyone is wondering, this rosette has about (guessing here) 250 pieces and they are all hand cut. It is supplied by Andy DePaule at DePaule Supply.

Thanks for looking.

Image
"I wish one of the voices in your head would tell you to shut the hell up." - Warren De Montegue

User avatar
Nick
Blackwood
Posts: 3640
Joined: Thu Feb 26, 2009 11:20 am
Location: Christchurch, New Zealand
Contact:

Post by Nick » Thu Apr 23, 2009 3:01 pm

What a gorgeous Rosette, well done Rod :cl :cl :cl and Ron. I'm loving it so hope it finishes well, especially after 3 years, 2 tops and much frustration has gone into it.
"Jesus Loves You."
Nice to hear in church but not in a Mexican prison.

User avatar
PHANTOM
Blackwood
Posts: 147
Joined: Sat Aug 23, 2008 7:00 pm
Location: gladstone qld

Post by PHANTOM » Thu Apr 23, 2009 3:44 pm

That looks great mate.
Carpe Diem

User avatar
DarwinStrings
Blackwood
Posts: 1877
Joined: Thu Nov 13, 2008 10:27 pm
Location: Darwin

Post by DarwinStrings » Thu Apr 23, 2009 4:42 pm

Well done Rod with the perseverance and obviously worth it in the end, that is a brilliant looking knot rosette. What is it that you used as the dark infill between the shell in the end?

Jim

User avatar
Mark McLean
Blackwood
Posts: 1161
Joined: Thu Apr 10, 2008 2:03 pm
Location: Sydney

Post by Mark McLean » Thu Apr 23, 2009 5:00 pm

Only 3 attempts to get something as beautiful as that? Sounds like time well spent, experience well gained.
Mark

User avatar
Allen
Blackwood
Posts: 5259
Joined: Thu Oct 11, 2007 5:39 pm
Location: Cairns, Australia
Contact:

Post by Allen » Thu Apr 23, 2009 5:38 pm

Oh so lovely Rod. I've looked at this on Andy's site, and thought I'd love to use that one day.

So, are you going to let us in on the trick to get this to work out?
Allen R. McFarlen
https://www.brguitars.com
Facebook
Cairns, Australia

User avatar
Lillian
Blackwood
Posts: 1702
Joined: Fri Sep 28, 2007 10:31 pm
Location: New Mexico, USA
Contact:

Post by Lillian » Thu Apr 23, 2009 10:55 pm

Beautiful Rod. And good on you for not giving up. It turned out great and I know you learned gobs while getting there.

User avatar
Kim
Admin
Posts: 4372
Joined: Wed Sep 26, 2007 8:32 pm
Location: South of Perth WA

Post by Kim » Thu Apr 23, 2009 11:25 pm

Beautiful Rod, well done! 8)

So what's the trick??? Super glue in position in the trench and then fill with black epoxy mastic???

Cheers

Kim

User avatar
Rod True
Siberian Tiger
Posts: 234
Joined: Thu Sep 27, 2007 10:18 am
Location: Abbotsford, BC Canada

Post by Rod True » Thu Apr 23, 2009 11:59 pm

Thanks folks. I'm really pleased with how its turned out.

Here's the way to install it.

First to remove the inlay from the backing board, put clear packing tape over top of the inlay and push it on as hard as possible. Than, cut the tape out so that only the inlay is covered. Even the gap at the top of the rosette. This of course helps to ensure it stays together right.

Next, take a pie plate or similar container (a deep plate would work fine) and put the inlay on the backing board in it. Pour hot water over top and let the white glue soften and the inlay will all lift right off the backing board, yet the packing tape will stay put.

Now the rosette is free to inlay.

Leave the top plate thicker than need be by 0.010-0.020". When cutting the channel, cut it deeper than the shell by 0.005-0.010", this way the shell will sit down in the channel and you can than level the top plate without sanding through the color of the inlay (that was my problem on the first try).

The first channel I cut was for the inner and outer purflings. I than installed the purfling lines, B/W/B. This inside black purfling line helps to make the black matrix around the shell 'even'. That's the best I can describe it.

After the purfling line is set, cut the rest of the channel, up to the inside black purfling line. Again, cut the channel for the shell deeper than the thickest piece of shell by 0.005-0.010". Now dry fit the shell.

Once happy with the fit, I filled the channel with black epoxy. I used ebony dust and a few drops of ink to make the epoxy black. Don't put to much epoxy in the channel, it's easier to fill the voids versus cleaning up a lot of dried epoxy.

Place the shell into the channel and press it down. I put a piece of wax paper over the shell, than a piece of plywood over top of that and clamped it in the go-bar deck.

When the epoxy is cured, scrape or sand to make it flat, but don't take to much of the top plate off. You don't want to sand down to the shell yet.

Than I masked around the entire purfling lines, both inside and outside and extending about 2" radius outside of the purfling line. This ensures I don't get epoxy all over the top.

Blow out the shell and fill the voids with more black epoxy. I used a piece of spruce cut to an edge as a trowel to spread the epoxy. Try not to leave much if any on the top of the shell. This will make clean up and leveling easier.

When the epoxy is set and hard, pull the tape off and level down to the shell.

That's it (sounds way more complicated than it is really).
"I wish one of the voices in your head would tell you to shut the hell up." - Warren De Montegue

User avatar
Nick
Blackwood
Posts: 3640
Joined: Thu Feb 26, 2009 11:20 am
Location: Christchurch, New Zealand
Contact:

Post by Nick » Fri Apr 24, 2009 5:43 am

Excellent, thanks for that Tut Rod. The inlay is a credit to you and thanks for passing on your technique. I'm inspired now and thinking of a guitar I could build around that rosette!
"Jesus Loves You."
Nice to hear in church but not in a Mexican prison.

User avatar
sebastiaan56
Blackwood
Posts: 1283
Joined: Sun Oct 28, 2007 5:23 am
Location: Blue Mountains

Post by sebastiaan56 » Fri Apr 24, 2009 5:46 am

Spectacular Rod,

I have no other word for this rosette,
make mine fifths........

User avatar
Ron Wisdom
Blackwood
Posts: 420
Joined: Sat Sep 29, 2007 1:18 am
Location: Arkansas, USA

Post by Ron Wisdom » Fri Apr 24, 2009 12:20 pm

You sure nailed it on the third try, Rod. It looks extremely good. Are you using Celtic knots for the FB?

Ron

User avatar
Rod True
Siberian Tiger
Posts: 234
Joined: Thu Sep 27, 2007 10:18 am
Location: Abbotsford, BC Canada

Post by Rod True » Fri Apr 24, 2009 12:48 pm

Hi Ron,

Yes, the fretboard will have the trinity symbol at the usual locations with a double at the 7th and 12th.

The headstock will have this celtic cross (this is actually the one Andy sent me, based on my design)

Image
"I wish one of the voices in your head would tell you to shut the hell up." - Warren De Montegue

User avatar
Kim
Admin
Posts: 4372
Joined: Wed Sep 26, 2007 8:32 pm
Location: South of Perth WA

Post by Kim » Fri Apr 24, 2009 4:35 pm

Thanks for that Rod, and Ron of course.

Cheers

Kim

User avatar
Ron Wisdom
Blackwood
Posts: 420
Joined: Sat Sep 29, 2007 1:18 am
Location: Arkansas, USA

Post by Ron Wisdom » Sat Apr 25, 2009 12:34 pm

Yeah, I can't wait to see the finished guitar. I really love the cross.

Ron

User avatar
matthew
Blackwood
Posts: 1200
Joined: Mon Oct 08, 2007 1:16 pm
Location: Sydney, Inner West
Contact:

Post by matthew » Sat Apr 25, 2009 12:42 pm

Very impressive. pretty, too. Do you cut each piece of MOP individually or do you make a sandwich and cut a bunch at the same time?

User avatar
Rod True
Siberian Tiger
Posts: 234
Joined: Thu Sep 27, 2007 10:18 am
Location: Abbotsford, BC Canada

Post by Rod True » Sat Apr 25, 2009 1:26 pm

Matthew, I use my credit card to cut the shell 8)

Purchased as an entire inlay from DePaule Supply
"I wish one of the voices in your head would tell you to shut the hell up." - Warren De Montegue

User avatar
Rod True
Siberian Tiger
Posts: 234
Joined: Thu Sep 27, 2007 10:18 am
Location: Abbotsford, BC Canada

Post by Rod True » Sat Apr 25, 2009 1:27 pm

Ron Wisdom wrote:Yeah, I can't wait to see the finished guitar. I really love the cross.

Ron
Thanks Ron. I'm looking forward to seeing the whole thing too. About 6-8 weeks away (I hope)
"I wish one of the voices in your head would tell you to shut the hell up." - Warren De Montegue

User avatar
Stephen Kinnaird
Blackwood
Posts: 287
Joined: Sun Oct 14, 2007 1:45 pm
Location: Texas, USA

Post by Stephen Kinnaird » Sat Apr 25, 2009 2:27 pm

Rod that is stunning.

Steve
There are some great woods, down under!

User avatar
Dave Anderson
Blackwood
Posts: 260
Joined: Sun Sep 30, 2007 2:38 pm
Location: Florida, USA

Post by Dave Anderson » Wed Apr 29, 2009 12:46 pm

Very nice rosette Rod.
And your design on the cross is awesome !
Dave Anderson
Port Richey,Florida

User avatar
Rod True
Siberian Tiger
Posts: 234
Joined: Thu Sep 27, 2007 10:18 am
Location: Abbotsford, BC Canada

Post by Rod True » Thu Apr 30, 2009 1:01 am

Thanks Dave 8)
"I wish one of the voices in your head would tell you to shut the hell up." - Warren De Montegue

Post Reply

Who is online

Users browsing this forum: No registered users and 117 guests