I've been doing a little research on workbench's suitable for lutherie and it seems mdr board can be used successfully for a top with a masonite cap. Solid wood is suggested for the rails and legs that are bolted together. Some like to use recycled wood for a top as well.
What do you all have as a main work bench?
Any plans, suggestions, web links and info greatfully received.
Cheers
Alan
Lutherier's Workbench
-
ozziebluesman

- Blackwood
- Posts: 1529
- Joined: Wed Oct 10, 2007 9:12 am
- Location: Townsville
- Contact:
-
DarwinStrings

- Blackwood
- Posts: 1877
- Joined: Thu Nov 13, 2008 10:27 pm
- Location: Darwin
Ok I'm a bit embarrassed Alen, at the moment I use a 820 x 2040 hollow core door on trestles so I can remove it if I need. I have owned quality benches in the past (long boring stories there) i have a solid core 820 x 2040 (free cause I replaced it and take the old ones away) that I will use sooner or later and probably cut it down to about 1400 x 820 although if I had more space would keep it full size. I have some old 100x100 hardwood posts for legs and a 180x50 for rails (also free from maintenance work)and I'll get to it sooner or later. A heavy bench is good for planing, sawing etc as it sits still. Draws and shelves under your bench can be very handy.
http://www.plansnow.com/ these guys have lots of useful plans for all sorts of stuff, at least worth a look.
Jim
http://www.plansnow.com/ these guys have lots of useful plans for all sorts of stuff, at least worth a look.
Jim

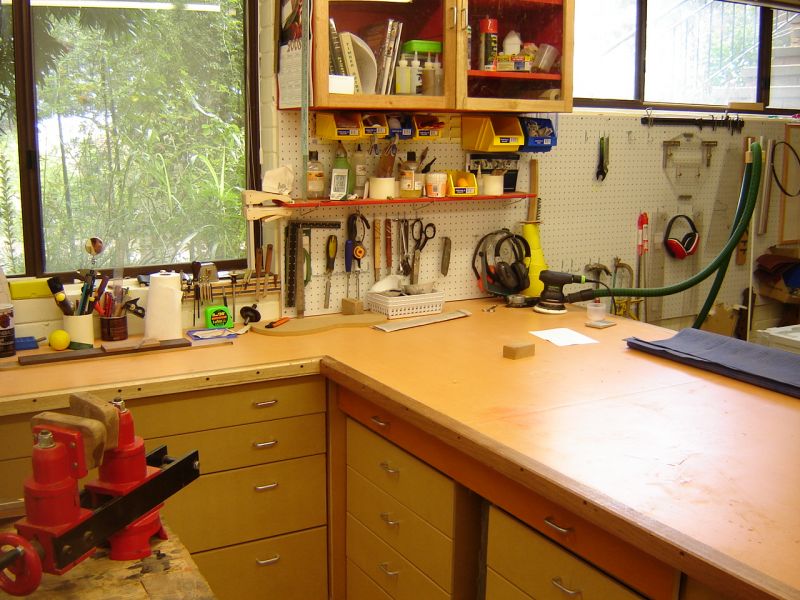
Alan, I used bench bolts for the base. http://www.highlandwoodworking.com/inde ... rodID=7580 They were very easy to use and you can really crank them down. I have two layers of MDF for a top. I was planning on three with a removable hardboard layer, but I never got around to picking up more MDF. I was more focused on building. Once this guitar gets finished, I will finish the bench.
There is some good information here.
http://www.user.dccnet.com/cedwards/bench/bench.htm
I plan on drilling the top for round bench dogs and hold downs. I picked up some sort hard plastic rod, I can't remember what though, that I can tap and screw thin pieces of hardwood to for stops. They'll fit into the holes for the bench dogs. The idea came from The Bull Dog Bench Stop. Seems the company went out of business. I like the concept, but thought the original was way to short at an inch and a quarter. I plan on making mine 3" deep. If I can find the camera I'll post a picture of the Bull Dog.

Pine flooring ply for the top. The light colour contrasts with items like small drill bits. I think mine is 24mm thick. Waist high or a bit higher is a comfortable working height. Ideally, anchor the base to the floor so it doesn't move at all but you can move around it as necessary. Mine is fixed to the wall because I don't have enough room for anything else.
Cheers,

Cheers,

I've got 2 layers of 19 mm ply that are glued together, with 2 X 6 Red Gum wrapped around the outside. Very heavy and solid. I just have it resting on a couple of steel saw horses.
The idea was to keep it easy to break down and move as we are in a rental house. I had a real beauty of a work bench back in Canada, but it proved to be far too large and difficult to transport 1/2 way around the world.
I recall Hesh posting some pictures of his new workbenches. You can try and find the tread he had for his work shop, of contact him. They looked to do the job very well.
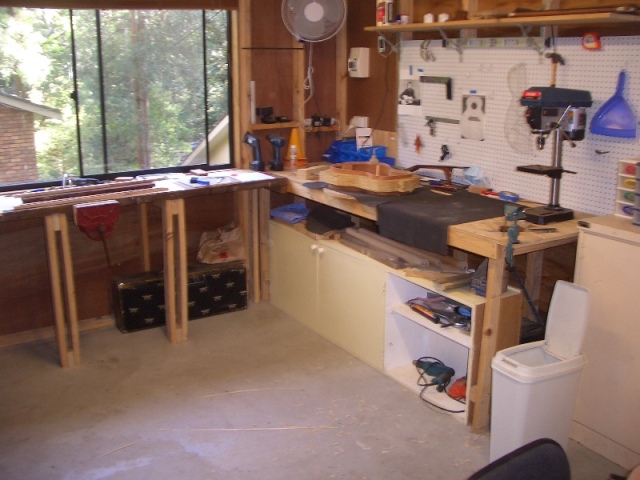
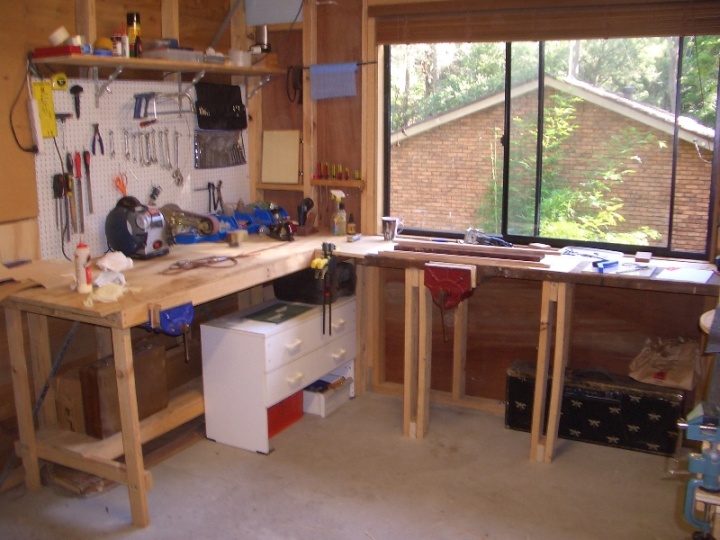
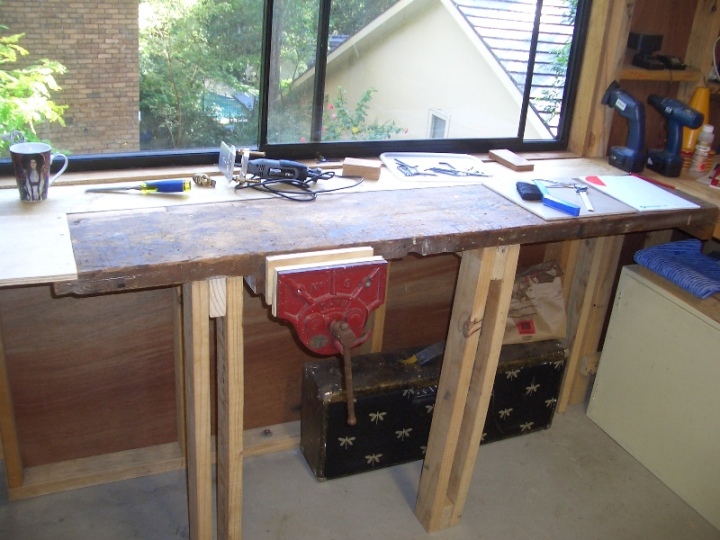
Great timing Alan! I have been working on my main bench all day and still don't have it done but it's getting close....
The ideas that I am using come from working in David Collin's shop and using his benches which I really, really like. So I am working to duplicate what he uses with some mods for my own height and building guitars not just repairing them.
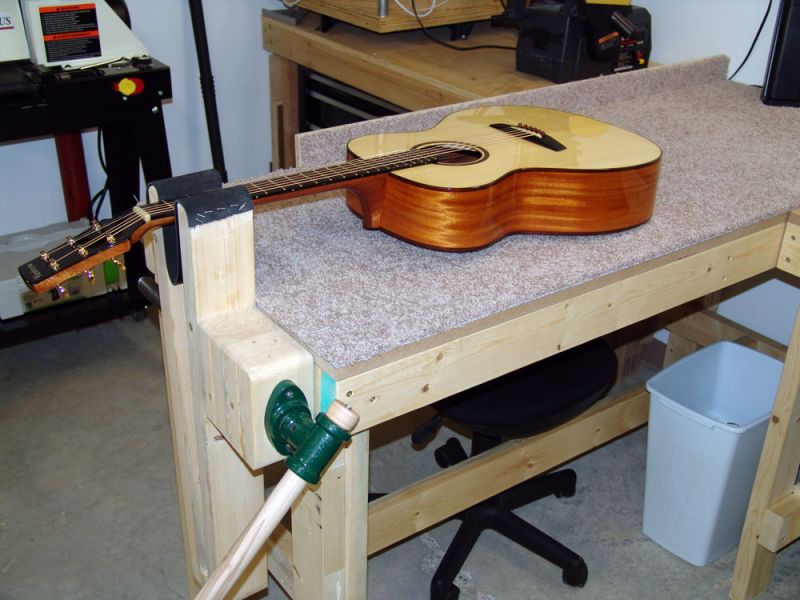
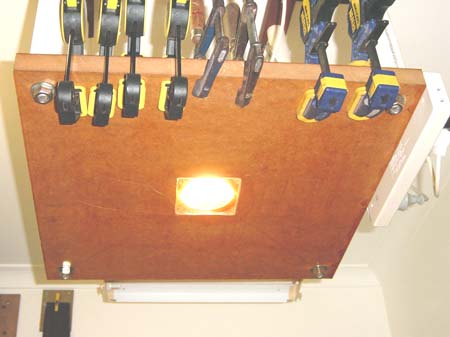
Here are some pics. What is not shown because I still have to get a few things is a adjustable drafting table light that I plan on sticking one of those fat-ass Al Gore 26/100 watt light bulbs in. There will be a block with a hole in it for the light on the end of the bench with the guitar vice. This will give me great light when doing nut work, fret work, installing tuners, stringing, etc. I also plan on building in a tuner to the bench as well.
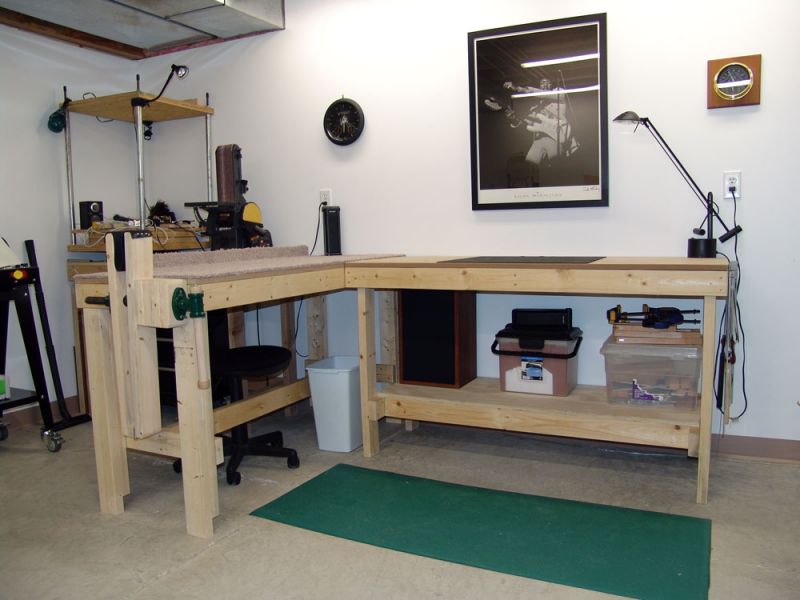
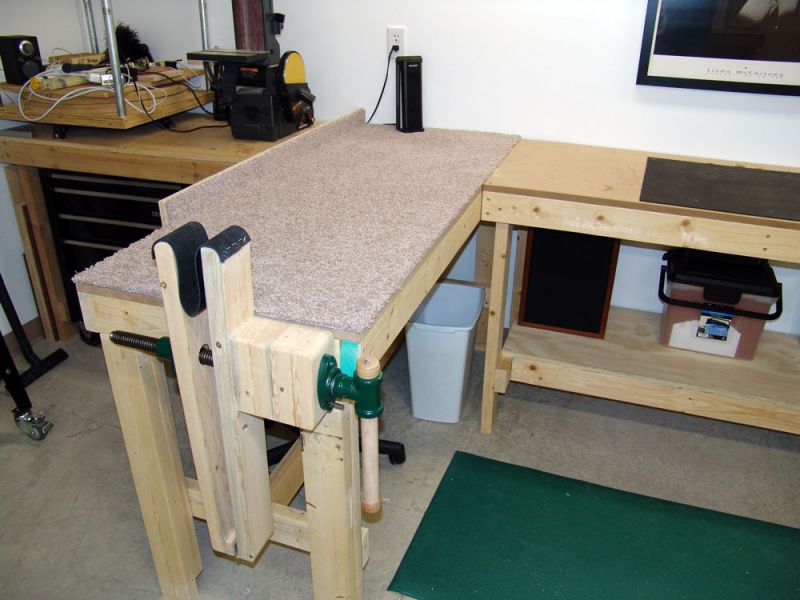
Now I think that you are asking about more of a proper workbench that is designed for beating the crap out of things, using a plane, etc. The bench above is not intended for that and has 3/4" MDF tops. My plan is to build a heavy duty bench and have it be an island in my shop. So much to do and so little time....
The ideas that I am using come from working in David Collin's shop and using his benches which I really, really like. So I am working to duplicate what he uses with some mods for my own height and building guitars not just repairing them.
Here are some pics. What is not shown because I still have to get a few things is a adjustable drafting table light that I plan on sticking one of those fat-ass Al Gore 26/100 watt light bulbs in. There will be a block with a hole in it for the light on the end of the bench with the guitar vice. This will give me great light when doing nut work, fret work, installing tuners, stringing, etc. I also plan on building in a tuner to the bench as well.
Now I think that you are asking about more of a proper workbench that is designed for beating the crap out of things, using a plane, etc. The bench above is not intended for that and has 3/4" MDF tops. My plan is to build a heavy duty bench and have it be an island in my shop. So much to do and so little time....

My heavy bench is 150x50mm pine glued and bolted together. It is very solid although basic. It also doubles as the base for my Go-bar deck above.
My other benches are like everyone else’s, 2 sheets of 18mm mdf wrapped in hardwood. But I have filled in underneath with drawers and cupboards and enclosed it to keep dust out.
I also got some laminex off-cuts for the tops to protect them from glue and wear.
I have found the Shop-Notes woodworking mags really great for ideas to improve organisation and safety around the workshop.
Cheers
Dom
You can bomb the world to pieces,
but you can't bomb the world to peace!
but you can't bomb the world to peace!
-
Mark McLean

- Blackwood
- Posts: 1088
- Joined: Thu Apr 10, 2008 2:03 pm
- Location: Sydney
Hesh, that is way to clean and ordered. I know it is new, but couldn't you have designed some clutter and scattered some junk. At least a dirty coffee cup. And Dominic - it looks as if whoever built your benches actually had some joinery skills!
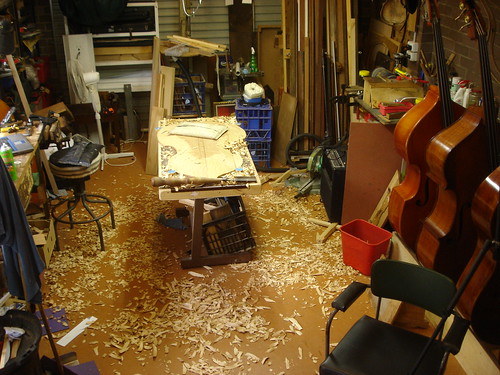
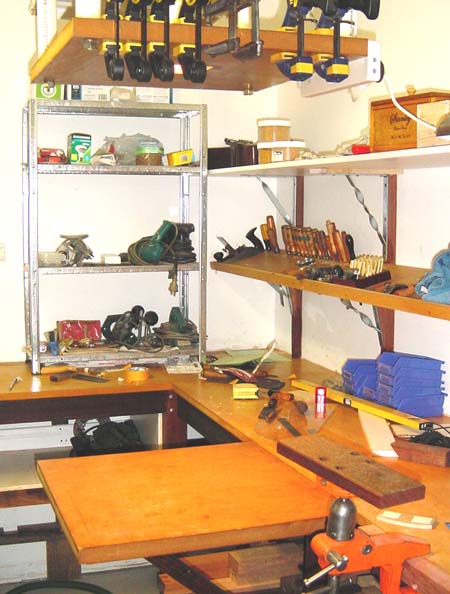
So now to a workshop where randomness and entropy rule. Here are my benches. I knocked them up in a weekend from structural pine and 19mm ply tops. The overall design is similar to Hesh's benches, just not so nicely finished. I had one on each opposite wall. They have an open shelf underneath and another overhead wall shelf. But I found that they got really messy and everything got covered with dust. You need drawers or cupboards if you are going to keep stuff organized and clean. Dominic has got the perfect design in that regard. I just wish I could have something so well made and purpose designed.
My workshop is almost entirely from found and scrounged components. I went around at council clean-up time and picked up some cupboards and drawers that people were throwing out. Not pretty, but much more effective than the open shelves that I had. I will think of overhead cupboards (kitchen style) later of I can get hold of some.
More recently I found a nice chunky old bench-top with a great pre-war Dawn #9 vice attached. It was at a garage sale and I got the bench/vice, a set of golf clubs, a wetsuit and a fire extinguisher all for $65. That bench now joins the other two to make a U-shape, and it is nice to be able to work in front of the window. I need to get better light over the other two.
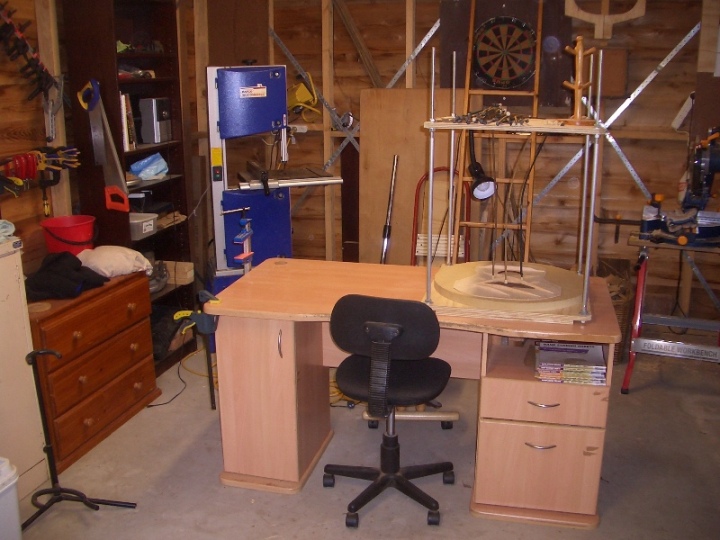
Finally, at the other end of the workshop I have an old desk which makes a good island workbench. It could use some bench dog stops like Lillian mentioned, but the top has overhang at the front and back which is handy for clamping stuff.
I love seeing the spaces where everybody works.
Mark
So now to a workshop where randomness and entropy rule. Here are my benches. I knocked them up in a weekend from structural pine and 19mm ply tops. The overall design is similar to Hesh's benches, just not so nicely finished. I had one on each opposite wall. They have an open shelf underneath and another overhead wall shelf. But I found that they got really messy and everything got covered with dust. You need drawers or cupboards if you are going to keep stuff organized and clean. Dominic has got the perfect design in that regard. I just wish I could have something so well made and purpose designed.
My workshop is almost entirely from found and scrounged components. I went around at council clean-up time and picked up some cupboards and drawers that people were throwing out. Not pretty, but much more effective than the open shelves that I had. I will think of overhead cupboards (kitchen style) later of I can get hold of some.
More recently I found a nice chunky old bench-top with a great pre-war Dawn #9 vice attached. It was at a garage sale and I got the bench/vice, a set of golf clubs, a wetsuit and a fire extinguisher all for $65. That bench now joins the other two to make a U-shape, and it is nice to be able to work in front of the window. I need to get better light over the other two.
Finally, at the other end of the workshop I have an old desk which makes a good island workbench. It could use some bench dog stops like Lillian mentioned, but the top has overhang at the front and back which is handy for clamping stuff.
I love seeing the spaces where everybody works.
Mark


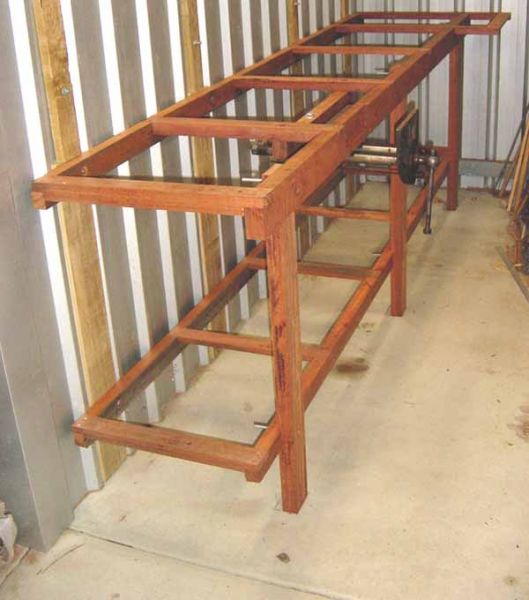
I framed all my benches with demolition jarrah squared up to dimensions and lap jointed. It was a big job but it is so stable it will withstand anything bar fire, no nails, no glue just galvanized bolts as I wanted all of these benches to be 'knock down' for the very same reasons that Allen mentioned.
Like Allen I ripped a 3000x1200 sheet of 19mm MDF down the middle and layered them on top of these frames making a top 38mm thick, it is rock solid. I did not glue the MDF together and instead fastened the first sheet to the frame with a few screws and then the top sheet to the bottom with a few more. When the top layer gets too messed up, I can simply undo a few chipboard screws and flip it over or replace it at half the cost.
If you look at the front rail or apron of the bench frame you will notice that the vice has been installed with the rear jaw flush to the apron. Mounting a vice this way allows you to use the full length of the apron as the rear jaw so that long material can be easily held secure with the vice and a few clamps. The only trade off with this mounting method is that you will loose the thickness of the apron in vice jaw travel, the solution? Buy a big vice to start with
This bench and the CCA pine boards you can see standing vertically fitted into the corrugations of the spandeck sheeting in the image above are used to support shelving above the bench and this configuration is mirrored on the apposite side of the spandeck wall inside the RH controlled 'glue room' which is lined with gyprock and has the cavity insulated.
This 'sandwiching' allows these benches to support each other with double the footprint and the overhead shelving being secured through the flimsy spandeck and gyprock wall then pretty much support each other via the cantilever effect with the bench frames gaining even more rigidity in supporting their weight.
That galvanized shelf was only there for construction, I do not generally find use for the makita planer and hammer drill in guitar building If you are wondering about the small bench surface propped out from the main bench in the above image, yes it is the base of my gobar deck. It is hinged and can be dropped down with the removal of a single angled prop which can be seen clearly in this image.
Here the prop has been removed and the leaf swung down and out of the way.
The overhead section of the gobar deck is suspended from the ceiling by strong joists which extend out past that first bench shown on the outer wall to support over-bench lighting and a pine rail on which to hang clamps and other light weight stuff. ( The ceiling of the glue room also provides a good storage area for that 'stuff' like plastic xmas trees and whatnot that normally hang around all year just getting in the way.
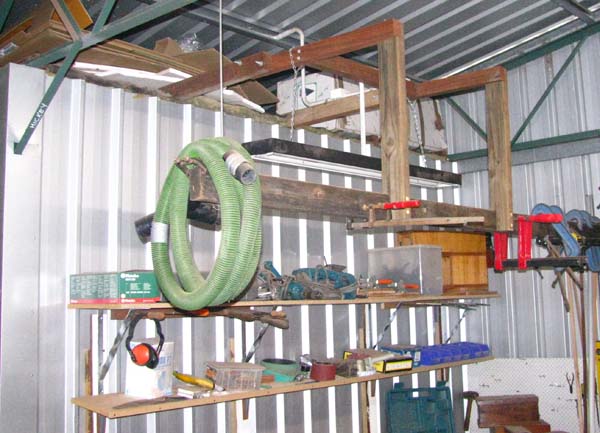
The overhead section of the gobar deck is also fitted with a down light and power pack and provides storage for molds and clamps etc.
It was a bit more effort thinking this out and setting it up from the start but I am happy I put in the effort now. The RH controlled glue room seems extravagant when you first think about it but the reality is that it only took 1 x 3 metre length of 50mmx50mmx5mm angle iron dropped down from the roof truss and dyna-bolted to the concrete floor to create the anchor point to frame out from the existing shed walls. The biggest job would have been building in the entry door and the spaghetti required to power the room up.
The benefits of this arrangement are not restricted to the dehumidifier in the glue room now only needing to control a limited amount of air space and the extra wall the room created in the shed allowing for more benches. I know it all may look pretty rough, but because all the components were carefully lap jointed and numbered, the whole thing, aside from the easily rebuilt walls of the 3 x 2.4 metre room can be packed down with only a fresh battery in cordless drill screwdriver, and ratchet drive with socket and a spanner, and reassembled in a new location. None of us know what our future holds or how our situations may change, so for anyone thinking of setting up a workshop, making things well 'once' so they can be moved is a worthy consideration.
Cheers
Kim
Like Allen I ripped a 3000x1200 sheet of 19mm MDF down the middle and layered them on top of these frames making a top 38mm thick, it is rock solid. I did not glue the MDF together and instead fastened the first sheet to the frame with a few screws and then the top sheet to the bottom with a few more. When the top layer gets too messed up, I can simply undo a few chipboard screws and flip it over or replace it at half the cost.
If you look at the front rail or apron of the bench frame you will notice that the vice has been installed with the rear jaw flush to the apron. Mounting a vice this way allows you to use the full length of the apron as the rear jaw so that long material can be easily held secure with the vice and a few clamps. The only trade off with this mounting method is that you will loose the thickness of the apron in vice jaw travel, the solution? Buy a big vice to start with
This bench and the CCA pine boards you can see standing vertically fitted into the corrugations of the spandeck sheeting in the image above are used to support shelving above the bench and this configuration is mirrored on the apposite side of the spandeck wall inside the RH controlled 'glue room' which is lined with gyprock and has the cavity insulated.
This 'sandwiching' allows these benches to support each other with double the footprint and the overhead shelving being secured through the flimsy spandeck and gyprock wall then pretty much support each other via the cantilever effect with the bench frames gaining even more rigidity in supporting their weight.
That galvanized shelf was only there for construction, I do not generally find use for the makita planer and hammer drill in guitar building
Here the prop has been removed and the leaf swung down and out of the way.
The overhead section of the gobar deck is suspended from the ceiling by strong joists which extend out past that first bench shown on the outer wall to support over-bench lighting and a pine rail on which to hang clamps and other light weight stuff. (
The overhead section of the gobar deck is also fitted with a down light and power pack and provides storage for molds and clamps etc.
It was a bit more effort thinking this out and setting it up from the start but I am happy I put in the effort now. The RH controlled glue room seems extravagant when you first think about it but the reality is that it only took 1 x 3 metre length of 50mmx50mmx5mm angle iron dropped down from the roof truss and dyna-bolted to the concrete floor to create the anchor point to frame out from the existing shed walls. The biggest job would have been building in the entry door and the spaghetti required to power the room up.
The benefits of this arrangement are not restricted to the dehumidifier in the glue room now only needing to control a limited amount of air space and the extra wall the room created in the shed allowing for more benches. I know it all may look pretty rough, but because all the components were carefully lap jointed and numbered, the whole thing, aside from the easily rebuilt walls of the 3 x 2.4 metre room can be packed down with only a fresh battery in cordless drill screwdriver, and ratchet drive with socket and a spanner, and reassembled in a new location. None of us know what our future holds or how our situations may change, so for anyone thinking of setting up a workshop, making things well 'once' so they can be moved is a worthy consideration.
Cheers
Kim
Last edited by Kim on Sun Mar 22, 2009 1:01 pm, edited 3 times in total.

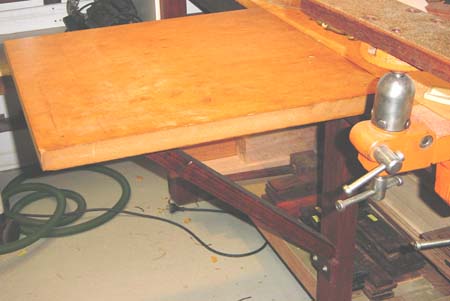
Here's my main work bench. It is a pretty large island type bench that has a solid beech counter top (inexpensive, from Ikea) and a base made from recycled office furniture and construction lumber. It is quite heavy and stable, more than adequate for the type of work I do at it. I also have a traditional Scandinavian woodworking bench for planing etc, as well as benches along a couple of walls with a dedicated area for sharpening.
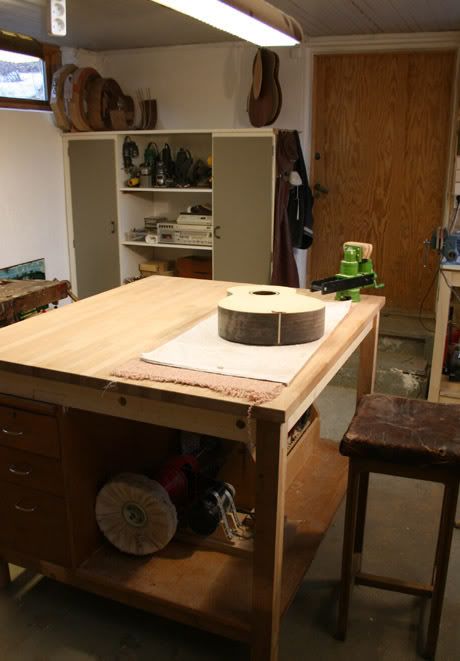
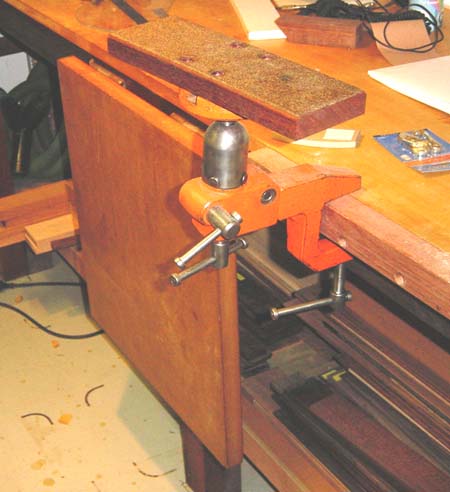
I like the island bench for its access on all sides, and it gives me lots of clamping options. The holes in its side are for a bar clamp guitar body vise, and the overhanging table top makes it easy to clamp items to it. I threw in some shavings, just for you Matthew!
<edit> BTW, like Kim's bench, mine also has a lap jointed frame (if I understand the terminoligy right. Nice bench, Kim!). It really helps make the frame rigid and sturdy. About the solid wood top, I don't baby it or anything. I fill holes and scars that bother me when I have some left over epoxy, and I scrape it level. I also used som Danish oil on it, it makes it easier to scrape off glue blobs.
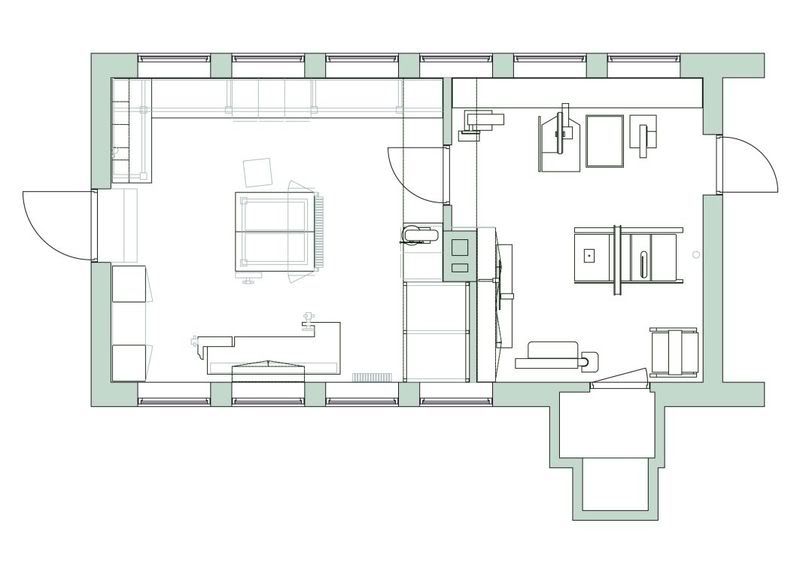
This is a plan of my shop. As you can see, there are two rooms, and the island bench is in the center of the largest one. The idea was that the main bench would be the assembly table and the parts would be fabricated at 'stations' around it, in in practice I find I do almost everything at the main bench. I do like having the machines in another room though, makes it easier to keep the bench room, which is where I spend most of my time, tidy. That's the theory, anyways...
I like the island bench for its access on all sides, and it gives me lots of clamping options. The holes in its side are for a bar clamp guitar body vise, and the overhanging table top makes it easy to clamp items to it. I threw in some shavings, just for you Matthew!
<edit> BTW, like Kim's bench, mine also has a lap jointed frame (if I understand the terminoligy right. Nice bench, Kim!). It really helps make the frame rigid and sturdy. About the solid wood top, I don't baby it or anything. I fill holes and scars that bother me when I have some left over epoxy, and I scrape it level. I also used som Danish oil on it, it makes it easier to scrape off glue blobs.
This is a plan of my shop. As you can see, there are two rooms, and the island bench is in the center of the largest one. The idea was that the main bench would be the assembly table and the parts would be fabricated at 'stations' around it, in in practice I find I do almost everything at the main bench. I do like having the machines in another room though, makes it easier to keep the bench room, which is where I spend most of my time, tidy. That's the theory, anyways...
Arnt Rian,
Norway
Norway
Mark, thanks for the compliment but it was a lot easier to do than making a guitar. The hardest part is to decide to slow down a bit and think it through, then do the best job I could and not just knock something up. After all, I would see it everytime I worked right?Mark McLean wrote: You need drawers or cupboards if you are going to keep stuff organized and clean. Dominic has got the perfect design in that regard. I just wish I could have something so well made and purpose designed.
I used pocket hole joinery for the cases and box jointed draws cut on the table saw for added strength. Mostly 18mm mdf.
It all works great.
Dom
You can bomb the world to pieces,
but you can't bomb the world to peace!
but you can't bomb the world to peace!

-
ozziebluesman
- Blackwood
- Posts: 1529
- Joined: Wed Oct 10, 2007 9:12 am
- Location: Townsville
- Contact:
Thanks so much everyone for your input here! Some great ideas for me to chew over.
Lillian and Jim the sites you posted has all the info i need!
Hesh it is the heavy duty benck that I want to build. It will be an island bench too! I like to stand when I work on my guitars so height is important to me.
Looks like I need to keep any eye out for some recycled hardwood to use for the planned wall bench.
Kim thats a great tip to use two pieces of mdf board fo the tops and just screw together so they can be swapped at anytime. I like that!!!
My workshop will take shape very soon. It will be a long 8 meters by a thin 3.5 meter area. I will be able to have glass about 600mm around three walls of the shop so that will provide good natural light as well. I have a good wall bench out in the patio just off the back door of the shop.
Cheers again for all your pics, thoughts, advice and info.
Alan
Hello Alan,
Prior to finding how much fun instrument building is, this is the last bench I built for a customer in Melbourne.Dimensions are 2300mm X 930mm X 950mm high. Top was 80mm thick and weighed about 120kgs without the vice.Vice was a special build to have 600mm jaws.All finished with a HNT hand plane .Should have cut that front board up for guitar sets.Cost aside it is worth putting some work into the main tool in your shed.Everything you build on the bench is made easier by making it a tool of good design and purpose.
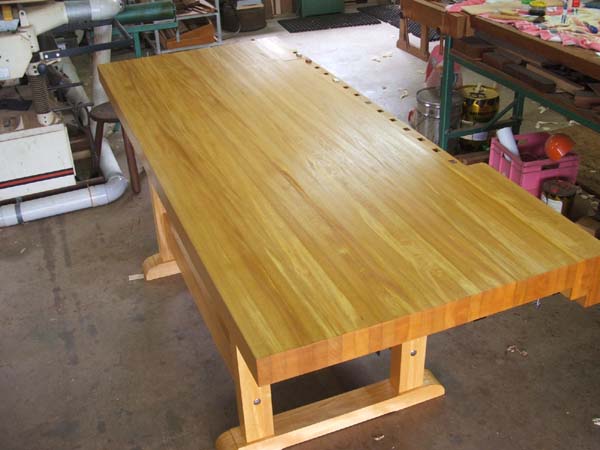
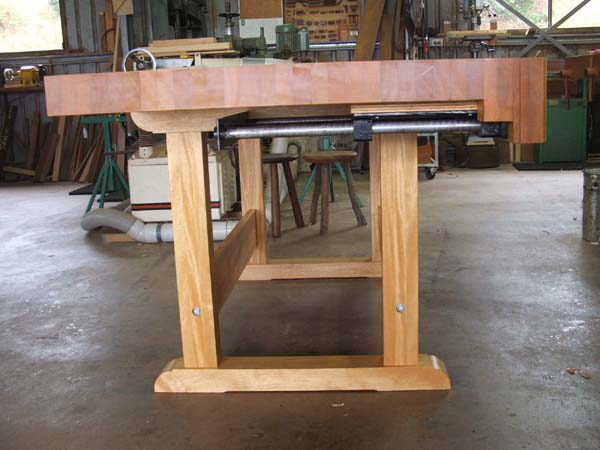
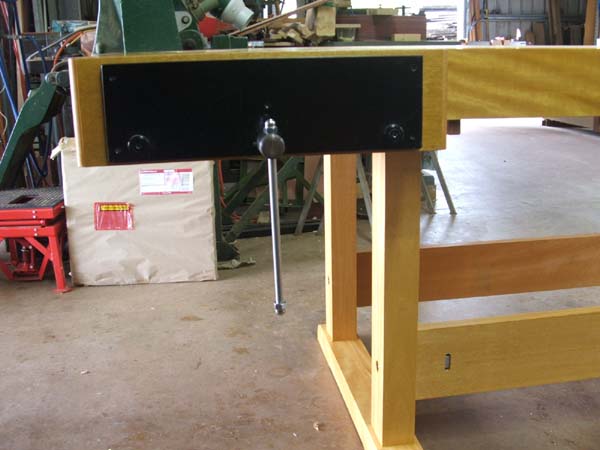
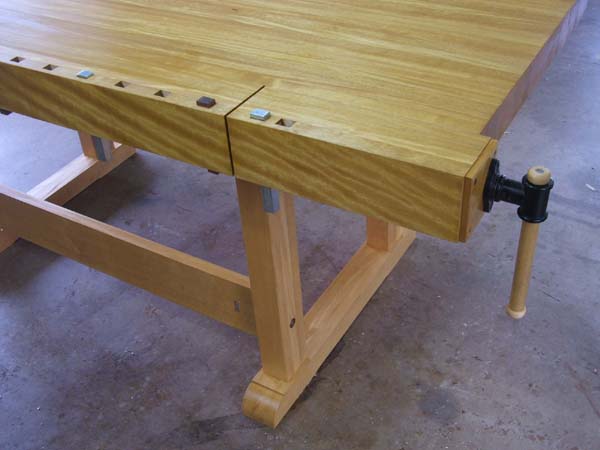
Prior to finding how much fun instrument building is, this is the last bench I built for a customer in Melbourne.Dimensions are 2300mm X 930mm X 950mm high. Top was 80mm thick and weighed about 120kgs without the vice.Vice was a special build to have 600mm jaws.All finished with a HNT hand plane .Should have cut that front board up for guitar sets.Cost aside it is worth putting some work into the main tool in your shed.Everything you build on the bench is made easier by making it a tool of good design and purpose.
Cheers from Micheal.
Remember the "5P Rule".
Preparation Prevents Piss Poor Performance.
Remember the "5P Rule".
Preparation Prevents Piss Poor Performance.
-
Mark McLean
- Blackwood
- Posts: 1088
- Joined: Thu Apr 10, 2008 2:03 pm
- Location: Sydney
-
ozziebluesman
- Blackwood
- Posts: 1529
- Joined: Wed Oct 10, 2007 9:12 am
- Location: Townsville
- Contact:
G'day Micheal,
Yep, good advice there mate! I want to build a solid, main work bench. That is a beautiful piece of workmanship there! Thanks for the pics.
In future builds I would like to use chisels and planes rather than the belt sander. A solid bench will give me the foundation I need to do that. The big vice, small vice and dog holes are also essential accessories!
Cheers
Alan

I don't know who, but the bolt is on the wrong side!kiwigeo wrote:Hey...who the **** has *****ed with my Avatar??!!!!
Waddy
Build Albums 12 done - 1 in process
Clip for #1 Barrios' "Una Limosna por el Amor de Dios" - Not me playing
Build Albums 12 done - 1 in process
Clip for #1 Barrios' "Una Limosna por el Amor de Dios" - Not me playing
I use 2 pipe clamps that have some light weight ply as the jaws. These are lined with foam. The work bench can have either some threaded bases attached so the pipe from the clamp will thread on, or in my case, some longer pipe and I just drilled holes through the rail on one end of my bench. Very easy to use, and hold the guitar body better than anything else I've come across.Mark McLean wrote:Now that is a serious workbench. Too beautiful to gouge with a chisel or drive nails into.
How can I find or design that kind of large vise, also seen in Arnt's workshop, to hold an entire guitar body?
Mark
Mark , Here is a link to a simple vise to hold guitars. I don't have one but the concept looks good.
http://wellsguitars.com/Articles/Guitar_Holder.php
http://wellsguitars.com/Articles/Guitar_Holder.php
Cheers from Micheal.
Remember the "5P Rule".
Preparation Prevents Piss Poor Performance.
Remember the "5P Rule".
Preparation Prevents Piss Poor Performance.
-
Mark McLean
- Blackwood
- Posts: 1088
- Joined: Thu Apr 10, 2008 2:03 pm
- Location: Sydney
Who is online
Users browsing this forum: No registered users and 283 guests