Hi everyone,
as I am just starting to make my first neck I have been doing a bit of reading up on what order to do things. I can see the merits of shaping the neck before the fingerboard goes on, so that neck movement that may occur while removing timber has happened prior to fingerboard gluing.
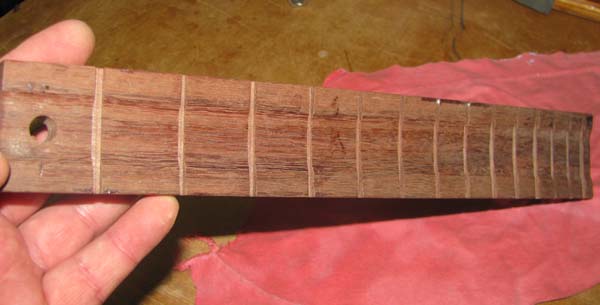
Then it seems most people glue on the fingerboard before fretting. But then I noticed a picture on this forum of a fretted fingerboard before being glued to the neck. What would the pros & cons be?
There would be a nice flat base to work with while fretting, without the need for a special neck support. Would there be more chance of splitting/cracking the fingerboard?
Any of your views would be appreciated,
cheers,
PJ
neck construction
-
Rick Turner
- Blackwood
- Posts: 311
- Joined: Sun Jan 13, 2008 10:22 am
- Location: Santa Cruz, Ca.
- Contact:
I work that both ways, and sometimes the issue is not wanting to have to deal with finish around frets. It's easier to sand and rub out a guitar neck with no frets in it. We often fret right before final rubout or if we're doing a satin finish, we'll fret right before the satin coats which are very thin and easy to deal with when we pull the masking tape.
I do always rough shape the necks before gluing on fingerboards so we can do a final truing of the glue surface if need be. Then we use WEST epoxy with a bit of thickener to glue on the 'board so as not to induce moisture into the neck.
I do always rough shape the necks before gluing on fingerboards so we can do a final truing of the glue surface if need be. Then we use WEST epoxy with a bit of thickener to glue on the 'board so as not to induce moisture into the neck.
Rick Turner
Guitar Maker, Experimenter, Diviner
www.renaissanceguitars.com
www.d-tar.com
Guitar Maker, Experimenter, Diviner
www.renaissanceguitars.com
www.d-tar.com

Hi PJ, welcome to the ANZLF. 
Aside from those advantages you already pointed out of it being much easier to work on the fretboard and install the frets while it is off the neck, another thing I find attractive about this method is that you also have the opportunity to relieve some of the stresses that get introduced into the neck by the wedging affect of the fret tangs.
When first installed, even with the correct size slots having been cut for the tang of the wire at hand, this 'wedging' will naturally force some backbow into the fretboard. I find in laying the fretted board 'fret side up' upon a slightly elevated veneer which is only supported at each end, and leaving a moderate weight in the centre of the fretboard to reverse the bow, the fretted board will lay much flatter when gluing up the next day.
This may not seem much of an advantage in it self, however as with all things lutherical, it is the sum of the little things that add up to the success of the whole. If you pay attention to detail during initial construction, you should more than make up the investment when it comes to setting up and playing the instrument.
That said, there are many building really great instruments who only ever fret with the board already glued, you just need to choose the method which works best for you. What ever you decide, in the end one constant remains. You need to pay careful attention to detail if you wish to make it work right.
One last point, I for one would be thanking my lucky stars if I seen a fretboard split or crack while I was fretting it off the guitar. For this to happen, the board would need to be structurally unsound and I wouldn't want it near my instrument no matter how pretty it looked.
Cheers
Kim
-
Rick Turner
- Blackwood
- Posts: 311
- Joined: Sun Jan 13, 2008 10:22 am
- Location: Santa Cruz, Ca.
- Contact:
Just don't forget to breath and then cut wood. Too many beginning luthiers get so all up in their heads that they spend more time thinking of reasons not to get to work than in just getting to it. You don't have to build the ultimate guitar the first time out, and each you build will teach you more than days of thinking about it all. Not to say "don't think", but let your hands get experience; soon they'll do the thinking for you.
Rick Turner
Guitar Maker, Experimenter, Diviner
www.renaissanceguitars.com
www.d-tar.com
Guitar Maker, Experimenter, Diviner
www.renaissanceguitars.com
www.d-tar.com

I always fret off the neck. I use an arbor press and it really sets the frets in nice and level. I don't ever notice a back bow when using this method. When I use to hammer them in I would notice some. I think the arbor press really seats the barbs on the fret tang deep into the fret slots, where hammering them in may not do this as well when the fret board isn't glued down to the neck.
-
DarwinStrings

- Blackwood
- Posts: 1877
- Joined: Thu Nov 13, 2008 10:27 pm
- Location: Darwin
I can't fret off the neck as its all one piece but I fret after i shape the neck I just sit the neck in a caul lined with cork to sit the shaped neck in. I then press the frets in with a small drill press and a fret press caul I made out of a old bolt and a piece of teak. If you are interested in pressing the frets in on the cheap just ask and I'll take some pics of the caul. Also I have never had back bow problems in this type of neck.
I think a "against" for glueing a board after fretting is you should use a caul and it needs to be a complicated caul that sits on the fret board and not on the frets, it should also be contoured to the fret board to get even clamping pressure across the board. Having said that once you make it you have it for good. Using the rubber band method only adds clamping pressure to the edges if you don't use a caul with the band and I don't trust the band alone on such a important joint.
Jim
Someone turn the Tele up please
I find these different techniques interesting but must confess
I do my frets post fretboard glue-up onto neck.
I've always preferred glue-up before radiussing and fretting
for my own piece of mind. This could very well be narrow-minded thoughts on my behalf and I really should try other methods prior to sprouting my thoughts, I know this.
I do wonder which method has more chance of unwanted movement,though.
I know some builders prefer compression fretting as a more natural
approach to combatting neck bow stresses. I wonder which method
works best for this, fret before glue-up or after ?
I fret the board before installation.
But before fretting I drill through 1st and 13th frets into the neck surface and install plastic pins which I trim so they only protude about 2mm.
For the glueup (using epoxy), I use a simple caul with strips along the sides so that it rests ON the frets along both edges.
This works absolutely fine in my experience, no need for complicated cauls resting on the fingerboard rather than the frets, and pressure on the edges is where you need it
-
Bob Connor

- Admin
- Posts: 3132
- Joined: Mon Jul 09, 2007 9:43 pm
- Location: Geelong, Australia
- Contact:
I've done both and am currently fretting after the fingerboard is glued on.
It gives me one last look at the fingerboard to unsure there are no bumps or humps in it before I whack the frets in.
I usually stick the Stewmac radius caul in the vice, put some witness lines on the fingerboard and give it a sand to see where the fingerboard is really at.
It gives me one last look at the fingerboard to unsure there are no bumps or humps in it before I whack the frets in.
I usually stick the Stewmac radius caul in the vice, put some witness lines on the fingerboard and give it a sand to see where the fingerboard is really at.
-
Nick

- Blackwood
- Posts: 3642
- Joined: Thu Feb 26, 2009 11:20 am
- Location: Christchurch, New Zealand
- Contact:
I've done both also. When I was making electric necks I used to install the frets last by hammering them in. Since going into the acoustic side of the force, I have started to press the frets in with the already radiused fingerboard off the neck. I only started doing that because my first guitar was an archtop & I noticed that my nice, once flat neck had a bow, or 'drop-off' on the cantilevered section (the piece that hangs over the top but doesn't touch it) after hammering the frets in.
So now not only do I press them in but I run the tangs through a fret barber so that there is only a slight interference with the slot, end result is a fretted fingerboard that is pretty flat before glue-up & imparts no extra stresses to neck or soundboard. This is the same as Kim's reasoning.
Once glued on, then I'll do all my shaping of the neck.
"Jesus Loves You."
Nice to hear in church but not in a Mexican prison.
Nice to hear in church but not in a Mexican prison.
do I cut the red wire or the green?!!! ha ha.
I think I'll give this first one a go before I glue it on to the neck. I'm using a pre-radiused board, & have a press caul to match which I'll try with my drill press. Then a trip to Carbatec to grab some West epoxy for the gluing!
I've got a bunch of things that I could probably make up for a neck support (for the other way) along with some thin cork sheeting, but I might leave that for another neck.
Thanks again,
PJ
-
DarwinStrings
- Blackwood
- Posts: 1877
- Joined: Thu Nov 13, 2008 10:27 pm
- Location: Darwin
Hmm ok Fair enough Jeff. As an apprentice Joiner we were taught that the best glue joint is one that has a caul that applies even pressure across the work piece, this is still taught today but admittedly it is using white glue and I know you can have less wood to wood to contact with epoxy, in fact you can afford to be slack with your joinery and still have firm joints.jeffhigh wrote: This works absolutely fine in my experience, no need for complicated cauls resting on the fingerboard rather than the frets, and pressure on the edges is where you need it
Jim

Woah! That pretty much describes me for the last few months.Rick Turner wrote:Too many beginning luthiers get so all up in their heads that they spend more time thinking of reasons not to get to work than in just getting to it.
The neck is the next thing I want to do so this thread has been very enlightening. Thanks guys.
- If God had intended us to drink beer, He would have given us stomachs. - David Daye.
- The mouth of a happy man is filled with beer. -
- The mouth of a happy man is filled with beer. -
As mentioned I fret the board off the neck. The gluing cauls are not overly complicated to make. I used my fretboard radius jig to cut the desired radius onto a 20mm bit of jarrah (a hand plane could be used here) and then sanded this with a Stewmac sanding beam with matching radius to make sure it was smooth. I then fitted a strip of PSA abrasive from the sanding beam to the surface of this newly shaped board.
Taking another piece of jarrah I will use for the caul, I tapper it to roughly match the fretboard and run it over a router table spinning a tray, or dish cutter bit removing material from the centre of the board. This is so the finished caul will only be applying pressure to the outer 12mm or so along the sides of the fretboard. Doing so allows for an invisible joint along the edges yet ensures enough epoxy is left under the centre of the board to avoid a staved joint.
I take this piece and using the first piece of jarrah I shaped as a 'reverse' sanding beams, I sand the desired radius into the outer edges. So that the caul will clear the frets, I mark their location on the caul with a pencil and run shallow cuts across the caul with the table saw.
Here's all the bits,
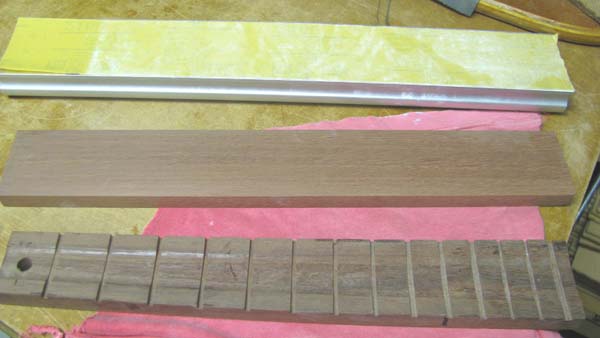
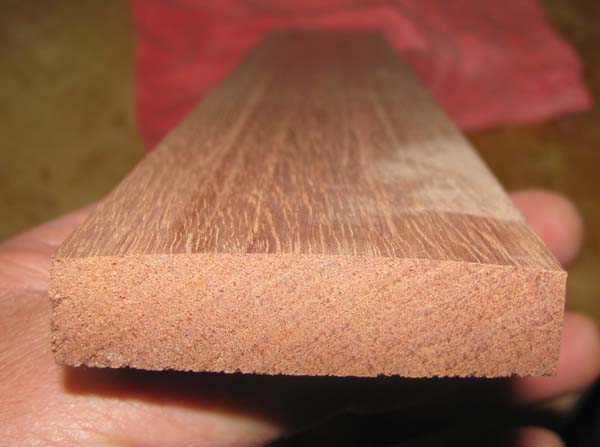
This is the fist bit of jarrah showing the radius, I will use this as a reverse radius sanding beam.
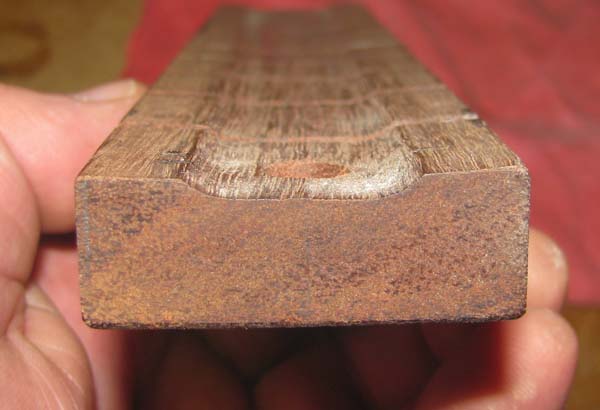
Here is the caul all done with the radius shaped into the edges, and the next shot showing the fret clearance slots.
It probably took me as long to make this post as it did to make the caul
Just to be clear on my earlier comment regarding back bow of the fretboard. I was not suggesting that you 'will' have a back bow in the neck if you do not suspend the fretted board after fretting prior to gluing it up. What I was suggesting is, that if your slots have been cut to offer enough friction interference to prevent the frets from possibly lifting at a later date, you 'should' have some back bow apparent in the fretted board that is yet to be glued to the neck.
My suggestion to suspend and weigh down the board was made to reduce some of the stress that this back bow could introduce into the neck once glued. The idea here being that I feel it is yet another small detail worthy of attention because it should help the initial set up to remain accurate insomuch that the less stresses introduced into the neck whilst under construction, the more stable it is likely to remain once strung up.
Cheers
Kim
Taking another piece of jarrah I will use for the caul, I tapper it to roughly match the fretboard and run it over a router table spinning a tray, or dish cutter bit removing material from the centre of the board. This is so the finished caul will only be applying pressure to the outer 12mm or so along the sides of the fretboard. Doing so allows for an invisible joint along the edges yet ensures enough epoxy is left under the centre of the board to avoid a staved joint.
I take this piece and using the first piece of jarrah I shaped as a 'reverse' sanding beams, I sand the desired radius into the outer edges. So that the caul will clear the frets, I mark their location on the caul with a pencil and run shallow cuts across the caul with the table saw.
Here's all the bits,
This is the fist bit of jarrah showing the radius, I will use this as a reverse radius sanding beam.
Here is the caul all done with the radius shaped into the edges, and the next shot showing the fret clearance slots.
It probably took me as long to make this post as it did to make the caul
Just to be clear on my earlier comment regarding back bow of the fretboard. I was not suggesting that you 'will' have a back bow in the neck if you do not suspend the fretted board after fretting prior to gluing it up. What I was suggesting is, that if your slots have been cut to offer enough friction interference to prevent the frets from possibly lifting at a later date, you 'should' have some back bow apparent in the fretted board that is yet to be glued to the neck.
My suggestion to suspend and weigh down the board was made to reduce some of the stress that this back bow could introduce into the neck once glued. The idea here being that I feel it is yet another small detail worthy of attention because it should help the initial set up to remain accurate insomuch that the less stresses introduced into the neck whilst under construction, the more stable it is likely to remain once strung up.
Cheers
Kim

-
Paul B
That's some great advice. I think it's safe for all newbies to assume your first is'nt going to be perfect, or even close. Unless you happen to be our very own Craig Lawrence, who's first guitar is featured in the latest LMI catalog.Rick Turner wrote:Just don't forget to breath and then cut wood. Too many beginning luthiers get so all up in their heads that they spend more time thinking of reasons not to get to work than in just getting to it. You don't have to build the ultimate guitar the first time out, and each you build will teach you more than days of thinking about it all. Not to say "don't think", but let your hands get experience; soon they'll do the thinking for you.
Don't over-think things just jump in with both feet and get busy.

Who is online
Users browsing this forum: No registered users and 53 guests