Very cool. Cheers Allen. Its hard to believe Purple heart is wood sometimes.
Jim
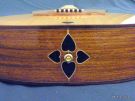
Norman Blake style 000

-
Mark McLean

- Blackwood
- Posts: 1086
- Joined: Thu Apr 10, 2008 2:03 pm
- Location: Sydney
Thanks for the comments on the bracing, Allen. That makes sense. I am keeping your bracing pictures as a reference to work off for my own. You are right that I certainly will err on the side of stronger bracing after the experience of my last guitar (but it seems to be doing OK for now with the Bridge Doctor in place). That maple and purple heart combination is gorgeous BTW.
-
Dave White

- Blackwood
- Posts: 452
- Joined: Mon Nov 12, 2007 3:10 am
- Location: Hughenden Valley, England
- Contact:
-
Dennis Leahy

- Blackwood
- Posts: 872
- Joined: Wed Oct 10, 2007 12:32 am
- Location: Duluth, MN, US
- Contact:
-
Taffy Evans
- Blackwood
- Posts: 997
- Joined: Wed Apr 30, 2008 6:54 pm
- Location: Charters Towers North Queensland
Thanks everyone. I'm working on the neck right now, as well as trying to get a soprano uke finished so I can take it to Albany. Then there is this Raintree 000 that has been sitting around for months that is just about ready for buffing as assembly.
Progress is probably going to slow down a bit, as I'm waiting for some supplies. Gives me some time to think though, and thats sometimes a good thing.
Progress is probably going to slow down a bit, as I'm waiting for some supplies. Gives me some time to think though, and thats sometimes a good thing.

Hi Allen,
Thanks for posting about this - a very interesting topic. I've built 3 guitars - another one on the go - based on the same or very similar idea: 13 frets to the body, bridge set further into the lower bout and more distance than usual between the bridge plate and X brace joint. I got the idea from looking closely at the cover of Jim Williams' book, A Guitar Maker's Manual. Here's the difference: The mid (lowest) point of Jim's scollops are in front of the bridge plate and the peak at the end of the scollop is near the center line of the bridge plate. He gets away with it! I've tried it and it works. I have had no problem at all. The tops have not deformed under string pressure. Tops are Lutz Spruce, pretty stiff, around .113" around the edges to around .117 or .119" in the center, and braces are Red spuce .7" high + X-brace patch. Lower bout is 16" across.
Strung up the last one about 3 months ago, medium guage strings, but took the bridge patch a bit futher back in an arc to reinforce the area behind the bridge. Sorry I don't have a photo of that one (camera stuffed up), but here's a photo of the one before that.
Siminoff tests demonstrated that the bridge rocks minutely back and forth as the guitar is played so the peaks in the X-braces probably act like a fulcrum being near the center line of the bridge - clever approach, IHMO.
Don't skimp on the length of the bridge. make sure all of it straddles the X-braces. You will love the tone, trust me
Thanks for posting that bracing pattern Alfred, all good things to consider.
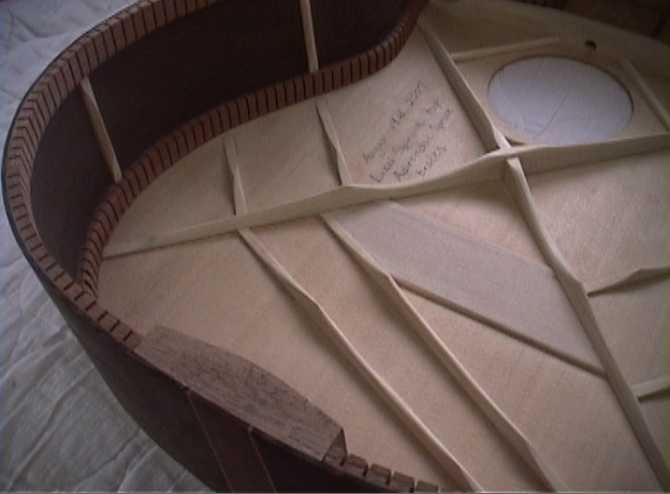
This top is Engelman and is .110 right now, and it'll get thinned around the perimeter of the lower bout.
Do you have the legs of the x-brace exiting the sides of the bridge, or out the back. The Norman Blake model, and all other guitars that I've built have them exiting through the sides, not the back. This is an interesting topic. Lets here from others about their ideas on this.

The back corner of the bridge just clears the X-brace. Also the front edge of the bridge straddles a finger brace for a bit of extra support.Allen wrote:Thanks for posting that bracing pattern Alfred, all good things to consider.
This top is Engelman and is .110 right now, and it'll get thinned around the perimeter of the lower bout.
Do you have the legs of the x-brace exiting the sides of the bridge, or out the back. The Norman Blake model, and all other guitars that I've built have them exiting through the sides, not the back. This is an interesting topic. Lets here from others about their ideas on this.
I didn't mean to imply that this would have much effect on the tone. Having the bridge further away from the X-brace joint takes it into the most resonant part of the top and scolloping the braces helps. I love the full, rich but balanced sound. Trebles are bell-like, not twangy and the bass is deep but surprisingly focussed. Yours should sound incredible with that engleman top. That's my next project after I get the current one out of the way, a smaller bodied guitar something like the Norman blake model.
Cheers,
I got Grit Laskins book not long ago, and I got the bug to try some more elaborate inlay, so this head stock is going to get the treatment. I'm hoping that I've got the patience and skill not to stuff it up.
I wasn't going to post any of this, as I'm just starting out learning this, but my wife convinced me that it would be of interest to some of you, so I didn't get all the photo's that I would have, had I planned on documenting it.
Coming up with a design is much more difficult that I had anticipated, but I settled on an Orchid theme. The materials are Gold MOP, that I thought would tie in with the birdseye maple, and Pink Muscle Shell, hopefully tieing in with the purpleheart, and some of David's Hawian Koa.
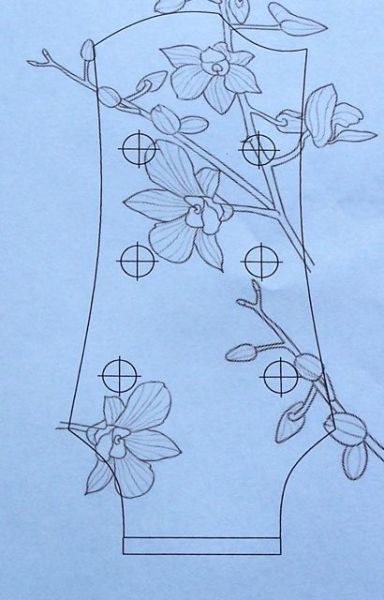
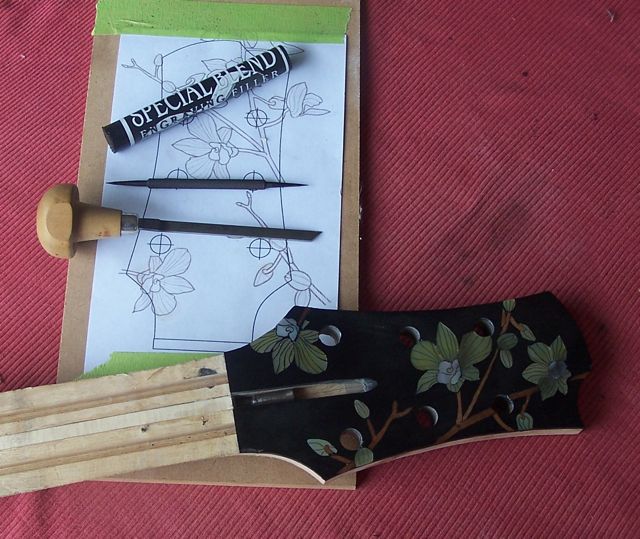
I laid things out in Adobe Illustrator. Easy to move, size, rotate in different layers. Then when I was happy I printed out about 10 copies. You need lots of copies, as you'll be cutting them up in order to glue the pattern onto your inlay material.

This is my cutting set up and some of the supplies. I just use a glue stick to hold the template to the pearl and wood. The blades are size 1, and they seem to work well cutting both wood and pearl. I've got some 3/0's but I find it more difficult to hold the line with these, and they are really fragile. Grit Laskin, and Craig Lavin both say that they prefer the size 1, and they should know.
Then it's just many hours of cutting, and a bit of filing here and there to adjust for fit. If you're careful there will not be much to file. I found that the only place that required some was near the center of the petal.
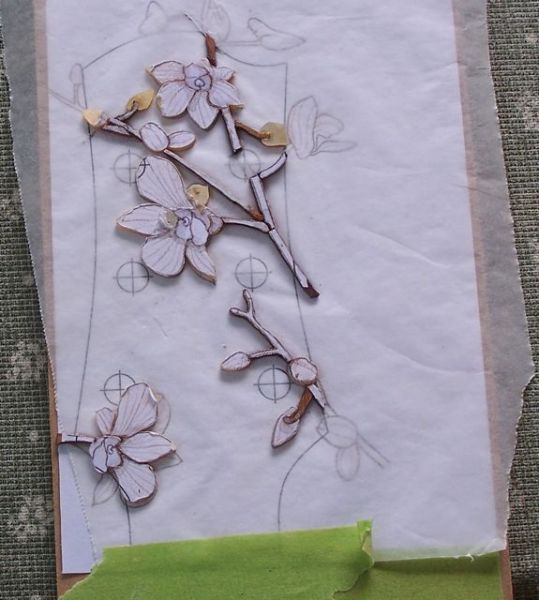
Then I assembled the pieces on some baking paper overlaid on one of the patterns that I printed out. Tacking together with some CA Glue. Laskin lays out his on some masking tape, sticky side out, then tacks together with some epoxy tinted black. I think that this procedure is the way I'll go next time, as this wasn't the most user friendly way that I can see.
Then remove them from the baking paper as carefully as possible. This wasn't easy at all, that's why I think I'll try the masking tape method next time. Then glue them to the appropriate spot that will receive the inlay. I don't have any of the duco glue that they say to use, but I do have some spray adhesive, so I sprayed some scrap paper with the glue, then dunked the inlay into the glue, then place on the headstock. You need to use a glue that Acetone or similar will dissolve, Don't use CA or epoxy.
Leave to dry overnight before scribing.
I wasn't going to post any of this, as I'm just starting out learning this, but my wife convinced me that it would be of interest to some of you, so I didn't get all the photo's that I would have, had I planned on documenting it.
Coming up with a design is much more difficult that I had anticipated, but I settled on an Orchid theme. The materials are Gold MOP, that I thought would tie in with the birdseye maple, and Pink Muscle Shell, hopefully tieing in with the purpleheart, and some of David's Hawian Koa.
I laid things out in Adobe Illustrator. Easy to move, size, rotate in different layers. Then when I was happy I printed out about 10 copies. You need lots of copies, as you'll be cutting them up in order to glue the pattern onto your inlay material.
This is my cutting set up and some of the supplies. I just use a glue stick to hold the template to the pearl and wood. The blades are size 1, and they seem to work well cutting both wood and pearl. I've got some 3/0's but I find it more difficult to hold the line with these, and they are really fragile. Grit Laskin, and Craig Lavin both say that they prefer the size 1, and they should know.
Then it's just many hours of cutting, and a bit of filing here and there to adjust for fit. If you're careful there will not be much to file. I found that the only place that required some was near the center of the petal.
Then I assembled the pieces on some baking paper overlaid on one of the patterns that I printed out. Tacking together with some CA Glue. Laskin lays out his on some masking tape, sticky side out, then tacks together with some epoxy tinted black. I think that this procedure is the way I'll go next time, as this wasn't the most user friendly way that I can see.
Then remove them from the baking paper as carefully as possible. This wasn't easy at all, that's why I think I'll try the masking tape method next time. Then glue them to the appropriate spot that will receive the inlay. I don't have any of the duco glue that they say to use, but I do have some spray adhesive, so I sprayed some scrap paper with the glue, then dunked the inlay into the glue, then place on the headstock. You need to use a glue that Acetone or similar will dissolve, Don't use CA or epoxy.
Leave to dry overnight before scribing.
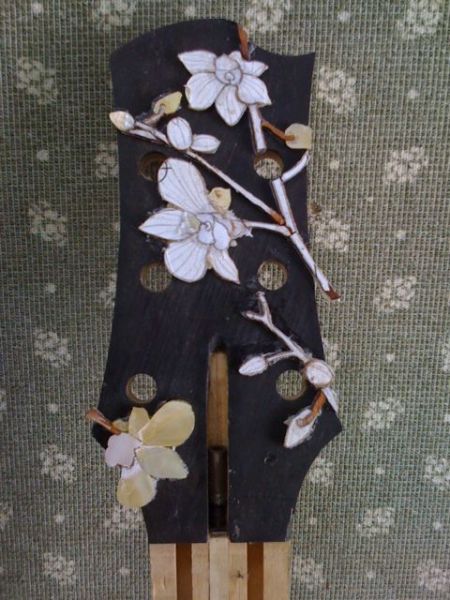
One good and dry, scribe around the outside. I used an Exacto blade where I could, and a very sharp scribe in areas that it was too difficult to get the blade into.
Then I dunked the pallet knife into some acetone and let it moisten the glue between the inlay and head stock. Gently work the pallet knife under the inlay and move to a safe spot. I laid mine out on another copy of the template.
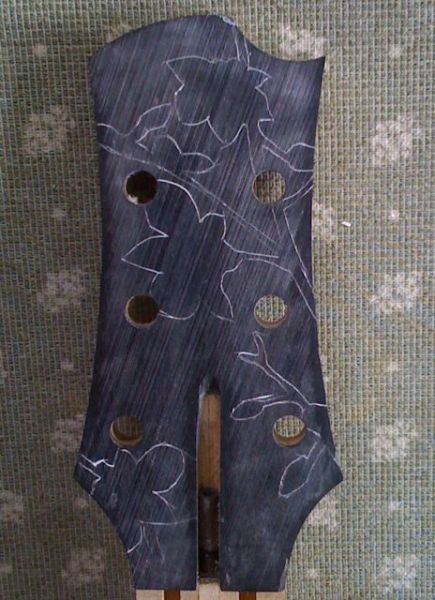
Then clean off excess glue with more acetone, and rub chalk into the scribed lines. Here's where I'm at now.
Then I dunked the pallet knife into some acetone and let it moisten the glue between the inlay and head stock. Gently work the pallet knife under the inlay and move to a safe spot. I laid mine out on another copy of the template.
Then clean off excess glue with more acetone, and rub chalk into the scribed lines. Here's where I'm at now.

Looks fantastic Allen, I just love the design
When I have done inlay in the past, not a great deal mind, I have followed a similar procedure to what you describe above. For my scribe I found that a small jeweler's phillips head screwdriver that has been cold honed to a fine slender point works very well. This allows you to get in close and will not follow the grain as easy as a blade. You just need to be careful to judge between fine, and too fine but if you get it right, it's a grand tool.
Cheers
Kim
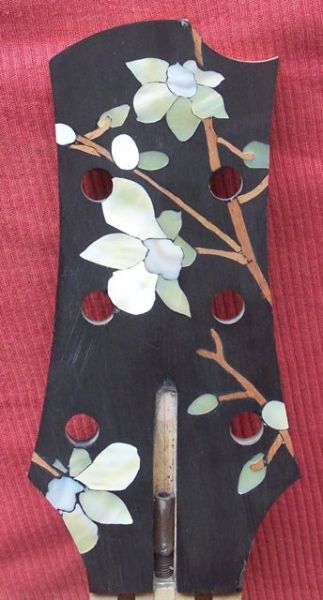
Got a bit more done after work during the week with just a few pictures. Sorry about the quality, photographing pearl is really quite difficult.
Routed out the cavities for the inlay, and got them glued in with epoxy, tinted black with some Colortone analine dye, and some ebony dust. No pictures of that, but it's pretty straight forward stuff.
Sanded the peghead back to P320 grit. My wife wanted me to stop there, because she liked it and didn't want me to stuff it up.
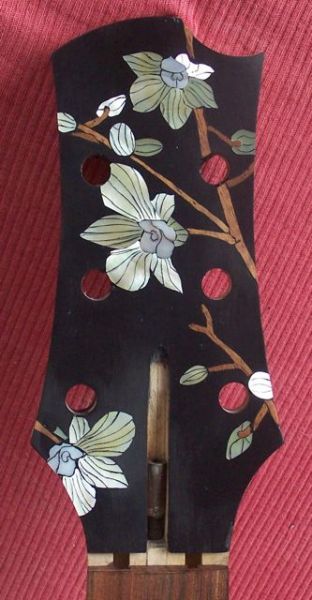
Being a man who's never afraid of stuffing something up, and shows occasional brilliance in the manner in which he stuffs things up, I proceeded in laying out the lines to engrave. These are penciled in freehand, using the pattern as a guide. You can see the tools that I'm using for the engraving. The scribe is used first. Lightly tracing the lines, then using the graver.
Here's the finished product. I'm pleased with it as my first attempt at anything this complicated, and my first go at engraving. I see lots of areas for improvement, and will persevere.
Routed out the cavities for the inlay, and got them glued in with epoxy, tinted black with some Colortone analine dye, and some ebony dust. No pictures of that, but it's pretty straight forward stuff.
Sanded the peghead back to P320 grit. My wife wanted me to stop there, because she liked it and didn't want me to stuff it up.
Being a man who's never afraid of stuffing something up, and shows occasional brilliance in the manner in which he stuffs things up, I proceeded in laying out the lines to engrave. These are penciled in freehand, using the pattern as a guide. You can see the tools that I'm using for the engraving. The scribe is used first. Lightly tracing the lines, then using the graver.
Here's the finished product. I'm pleased with it as my first attempt at anything this complicated, and my first go at engraving. I see lots of areas for improvement, and will persevere.

-
DarwinStrings

- Blackwood
- Posts: 1877
- Joined: Thu Nov 13, 2008 10:27 pm
- Location: Darwin

Thanks Lillian.
Initially I hadn't intended to. I've cut a Minneritchi fret board for this guitar. It's pretty much the same color as the stems in the orchids, so isn't going to work with this inlay. I don't have an Ebony board on hand right now, so I'll get back to binding the body, and then rough assemble things and have a look at the whole package to see where I want to go with this.
Initially I hadn't intended to. I've cut a Minneritchi fret board for this guitar. It's pretty much the same color as the stems in the orchids, so isn't going to work with this inlay. I don't have an Ebony board on hand right now, so I'll get back to binding the body, and then rough assemble things and have a look at the whole package to see where I want to go with this.

Who is online
Users browsing this forum: No registered users and 108 guests