To be clear...I cannot match (yet ) the beautiful workmanship that has been presented on this forum... I wish I could .
But it gives me the impetus to strive on.
I am full of mistakes but see them as learning curves.
" I have been successful in proving certain aspects of build do not work!!!"...Eddisson I believe.
You guys make stunning guitars which are a lot bigger than what I am dealing with.
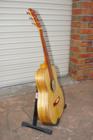
I am currently making a Soprano Uke to my own design ( shapewise)....but Martin strong points.
As you can see I am trying out the " old " method.
I think there is a lot to say about this as the neck is held perfectly flat to the body by way of the mould.
Or is it?.
I have watched the old time video ( and they deliberately hide vital points of construction) and also purposely mislead because they are protecting their business.
Ken Timms has portrayed an exhaustive account on how to make these Ukuleles in the " Old fashioned way ".
I have followed these principles and in particular I like the way the neck is held dead straight in the mould and slits cut out in the neck for the ribs....A LA Spanish heel.
But.........
I have made " the step " at the neck to cater for the front plate thickness and have ended up with a bowed ribbed body.
The Uke is not unusable but nonetheless annoyingly out of shape.
What was not mentioned was....that the same difference must be added to to the tail end of the instrument.
I have redesigned my mould by....
1 Having one straight length to cater for neck straightness instead of two halves.
2 By inserting shims at the tail end as well as the front to compensate for Top board thickness.
3 The shims are off a known thickness...ie 2mm Polystyrene sheet epoxied on.
I hope the following photos make it clear...
To sum up... the "step " at the front needs replicating at the rear or else a bowed structure will occur.
Maybe it should be a violin?
On one of the photos you will see that I have put in a very thin dowel pin to locate the front plate exactly in line with the centre line.
Although it is not exactly on the centre line doesn't matter but the centre line does.
This gives me a reference when it comes to glueing
the front plate on as it will be upside down.
With it located within its pin , all I have to do is line up the rear of the plate to the centre line.
In theory this should work.
It did with violins!
Sorry about the crap workmanship.
I aim to improve.
I had to add thickness to the linings by inserting extra
Kurfed strips as I will be in laying herringbone and lining strips.
That will be fun with my newly acquired routing attire all good fun and lots to learn still.
Pete