Onto tuning of the bars! I won't go into the finer points of tuning the bars because A: I'm still only just coming to grips with the process myself so it would be wrong of me to say "do this & you must do that" & B: There's far more 'onto it' people than I that have researched this area and have published in various forms, one is James L Moore's Thesis paper entitled "Acoustics of bar percussion instruments" his thesis is available (& of which I bought a copy (yes US$ are exchanged!) & I got it to work in conjunction with Jim McCarthy's package). But for those of you that would like to know/read about the technicalities of shaping bars & where to remove material e.t.c. There's a really good paper written on the subject by a guy called Jeff La Favre
here. It's about tuning Rosewood Marimba bars (he makes Marimbas for a living) but the theory is virtually identical, material is removed from certain area's of the underside of the bar to tune the various notes.
For those that don't want to dive into a 20+ page article

, the basics are (from what I've read, remember, like I say I'm far from an expert!

): The lower Vibe bars up to C4 are tuned to a fundamental & the first harmonic (2 octaves above the fundamental) & a 3rd harmonic (2 octaves and a major third above the fundamental), middle bars are tuned to the fundamental & the first harmonic, my middle is in the D4-F5 range, I found that once I got to G5 it really starts getting harder to hear the harmonic. The upper range (G5-F6) are tuned to the fundamental only, any first harmonic would be so weak that you wouldn't hear it anyway! The arch is formed and by removing material from specific area's of the arch, I can tune the various modes. The fundamental is lowered by removing material from the central area of the bar, the first harmonic is lowered by removing material from the end radius's of the arch & the second harmonic is lowered by removing material from the side of the same radius.
I was chatting to Jim McCarthy (via email) who was wondering why, when I have access to all this equipment, I was going to do the arch's essentially by hand (Drill press & belt sander). I wanted to do this first set by hand, not only to get a feel for the process but also as this was the first time ever I've done a set of bars I have no baseline figures for the various sizes/dimensions but as I'm doing each of these bars I am taking various measurements so that if I have to ever do another set of bars or even another complete set of vibes I'll have all the numbers that I can 'rough out' the bars on a mill & just fine tune the last little bits by hand. I've left each bar a few cents sharp too as I'm not sure what effect anodizing will have on the tuning of the bars so at least I'll have a little elbow room to bring them down should the anodizing not alter anything. I noticed even Musser's have little 'patches' sanded on the arch to get everything smack on.
So enough drivel!

lets throw a few pictures in

First I drilled the cross holes for the Nylon support line to pass through, each hole has to be drilled on an angle as the bar frames taper.
- IMG_2114.JPG (79.25 KiB) Viewed 19261 times
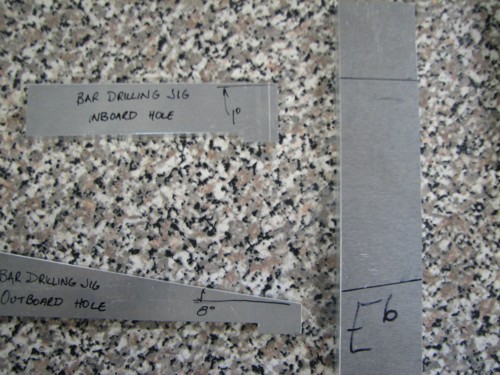
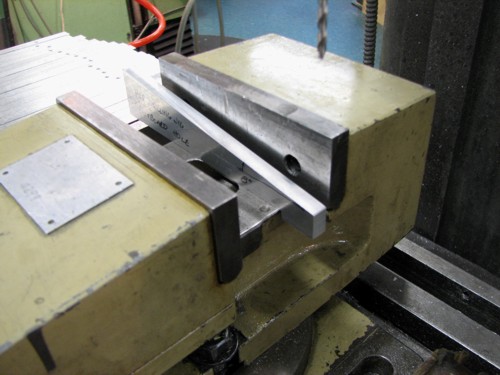
The little 'wedge' shaped bits of plate on the left are my drilling jigs/guides, these sit in my mill vice & the bar is placed onto them holding the bar on the right angle for drilling. The 'inboard' hole (nearest the centreline of the vibes) is drilled at a much lesser angle than the outboard hole so each bar required two jigs. I set one jig/guide up and drilled all of those holes then put the second one in & drilled the remaining holes.
- IMG_2124.JPG (54.6 KiB) Viewed 19261 times
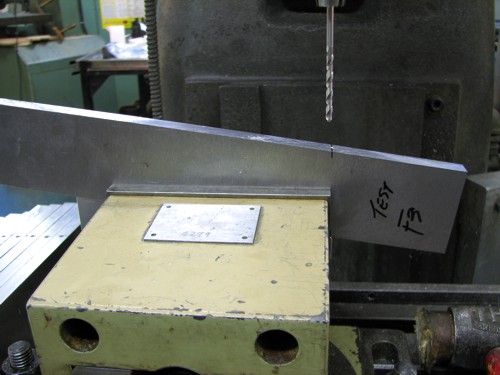
And drilling the much steeper 'outboard' hole.
- IMG_2126.JPG (51.55 KiB) Viewed 19261 times
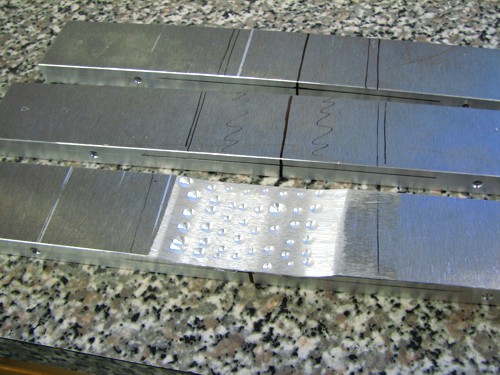
Once all my cross holes were done I removed excess material from the centre of each bar by drilling holes similar to drilling the interior of an Archtop plate! I wasn't sure how far the drill out from the centreline so this was very much a drill abit, sand to remove the drill marks, check the tuning & drill a little more as needed sort of an operation. I over cooked a couple of the longer bars and had to remake them


but that's what trial and error is all about I guess

Here are a few of the higher register bars either ready for drilling or semi-smoothed and ready for checking it's first tuning
- IMG_2133.JPG (72.24 KiB) Viewed 19261 times
A selection of the lower register bars, I've sanded the arch to a semitone higher than the finished tone. After getting them to this stage I sanded the whole bar to 120 grit smoothness. Checked the tuning (I forgot to mention I use Peterson's excellent "StroboSoft" software to get my readings but this can be done with any standard chromatic guitar tuner) & noted on the bar the pitch ready for final sanding the arch.
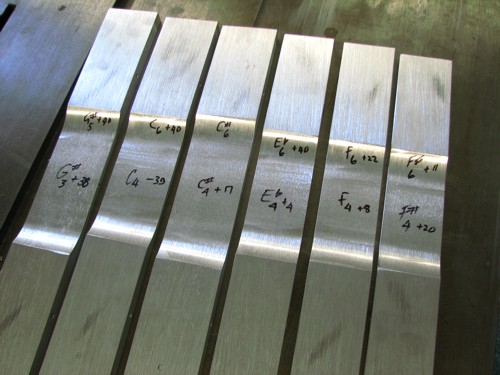
- IMG_2127.JPG (59.19 KiB) Viewed 19261 times
The notation I wrote on each bar is pretty simple (has to be for me to understand it!

)
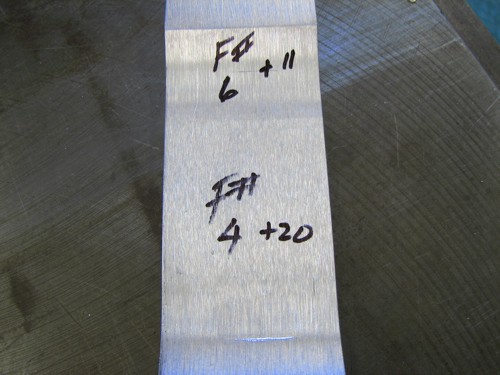
- IMG_2129.JPG (51.38 KiB) Viewed 19261 times
I noted the pitch in the bar's first two positions, on this bar (F4) the fundamental is sitting in the F# range in the fourth octave and is 20 cents above the F#. The first harmonic is F# in the 6th octave & 11 cents high. I didn't worry about notating the second harmonic as this was pretty close to the first already & only needed a little tweaking.
Back to the belt sander (I love that tool!


) and brought the bar down to within 3-4 cents of it's final pitch using 120grit.
Bar all but finished
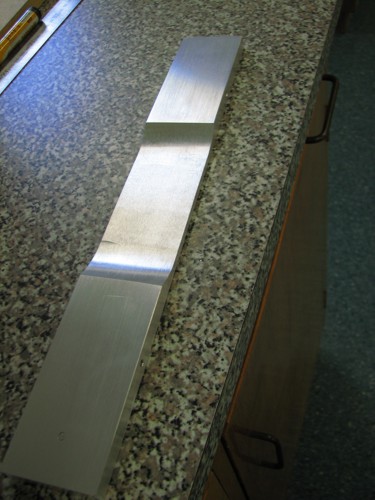
- IMG_2134.JPG (58.31 KiB) Viewed 19261 times
and a view from the side showing the arch
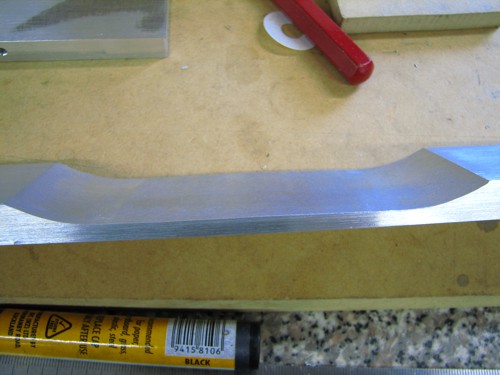
- IMG_2135.JPG (48.83 KiB) Viewed 19261 times
I was quite surprised but the arch changes quite dramatically depending on the bar's width (the narrower bars get quite thick through the middle compared to this lower register one) and length, my upper register bars will essentially be just a radius, very little flat/straight area in the centre.
As I say, I'll check these & tweak them once they've come back from anodizing, hopefully they won't alter radically or I may find I have to use my bar measurements sooner than I thought!
I'm still doing the last few naturals & will do the sharps in the next few days then they can go for anodizing.
So while that's going on I'll go back to fix up an old problem I'm
still not entirely happy with.......fan timing! The two main drive pulleys are timed perfectly now but the O ring drive up to the respective fan shafts are still varying (O ring is either slipping or stretching & compressing) so I've sourced some posi-drive belt & pulleys which will not allow the shafts to get out of sync with each other! I'll go over this bit in a future post when I've worked out the mechanics of it (smallest posi-drive belt available is longer than my shaft/pulley spacing so I have to work in some sort of easily adjustable tension/slop remover without introducing extra drag).
. Or also a welded solid machined rigid hook if you like this more. But at the moment I don't grab it why it must be 90°-turnable and removable.


