Ideas?: Executing the side stripe on this Martin & Coupa

Talk about musical instrument construction, setup and repair.

Moderators: kiwigeo, Jeremy D

Post Reply
User avatar
n~dl
Myrtle
Posts: 69
Joined: Sat Jan 12, 2013 4:04 am
Location: Minneapolis

Ideas?: Executing the side stripe on this Martin & Coupa

Post by n~dl » Sat Jan 26, 2013 8:06 am

This one's got me stumped, I'm hopin' some of you could spitball some ideas and we can figure this out! http://www.vintagemartin.com/MartinCoupaSpanish.html

Image

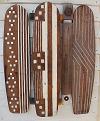
Join the sides before bending? They'll just come apart under heat and moisture. Join (or at least glue) them after? Gluing bent ribs to bent marquetry sounds like an impossible nightmare. You can see in this picture here that they're at least three separate pieces with some extra reinforcement in the way of hefty side braces:

Image

Inlaying them like a back strip would probably leave the ribs too weakened for bending.

I putzed with the idea of doing it like this with a layered up sheet of veneers...

Image

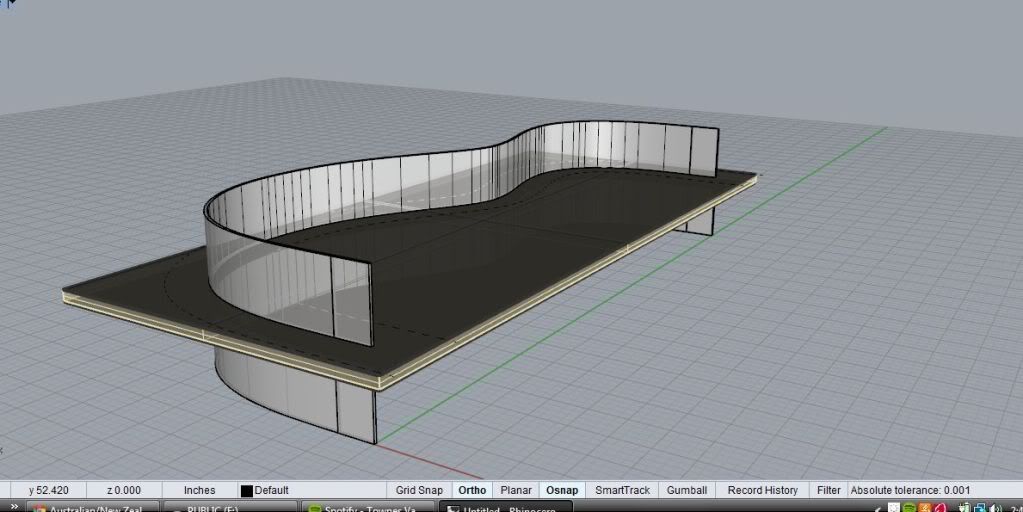
...but it would require some kind of elaborate jig or something to keep the ribs in line, and would result in lots of weird variation between end grain and quarter surfaces on the stripe, and just seems too elaborate and insane an idea to work and...i don't know!

Thoughts?
-Nate L

User avatar
P Bill
Blackwood
Posts: 521
Joined: Mon Oct 18, 2010 8:31 am
Location: Cedar Vale, Qld Australia

Re: Ideas?: Executing the side stripe on this Martin & Coupa

Post by P Bill » Sat Jan 26, 2013 8:52 am

I think the easiest way would be to groove the sides before bending and inlay after closing the box. A few tests wouldn't hurt.
Alignment at the tail block gets more precise.
"Were you drying your nails or waving me good bye?" Tom Waits

Bill

User avatar
n~dl
Myrtle
Posts: 69
Joined: Sat Jan 12, 2013 4:04 am
Location: Minneapolis

Re: Ideas?: Executing the side stripe on this Martin & Coupa

Post by n~dl » Sat Jan 26, 2013 9:13 am

P Bill wrote:I think the easiest way would be to groove the sides before bending and inlay after closing the box. A few tests wouldn't hurt.
Alignment at the tail block gets more precise.
Yeah, the more I think about it this seems like the most viable option, given that the long with-the-grain channel routed out doesn't just split on you when you bend or glue it. And then still I worry about sanding the veneer thin enough to see through after you've leveled out the sides for the binding routes, and finally finish sanded all of it. I'm still impressed at this being pulled off the way it was in those photos; those old builders must have been born with chisels and planes in their hands.

All the building I'm doing now is for school and I unfortunately don't have much time in the course for trial and error, so this one will ultimately have to wait.
-Nate L

User avatar
P Bill
Blackwood
Posts: 521
Joined: Mon Oct 18, 2010 8:31 am
Location: Cedar Vale, Qld Australia

Re: Ideas?: Executing the side stripe on this Martin & Coupa

Post by P Bill » Sat Jan 26, 2013 9:22 am

It looks like one of those things a builder wouldn't want to repeat very often. All your stars in alignment. :cl
"Were you drying your nails or waving me good bye?" Tom Waits

Bill

User avatar
Bob Connor
Admin
Posts: 3115
Joined: Mon Jul 09, 2007 9:43 pm
Location: Geelong, Australia
Contact:

Re: Ideas?: Executing the side stripe on this Martin & Coupa

Post by Bob Connor » Sat Jan 26, 2013 9:33 am

Send an email to Howard Klepper. He does this sort of stuff and more. You can find him with a Google search. He used to hang out on the OLF but I haven't seen him around there for a while.

Regards
rougeetnoir1.jpg
Bob, Geelong
_______________________________________

Mainwaring and Connor Guitars

User avatar
n~dl
Myrtle
Posts: 69
Joined: Sat Jan 12, 2013 4:04 am
Location: Minneapolis

Re: Ideas?: Executing the side stripe on this Martin & Coupa

Post by n~dl » Sat Jan 26, 2013 9:50 am

Ah yeah! I've seen his guitars with the crazy dovetailed tops before. I'll definitely sending him an e-mail since I don't think C.F. Martin is checking his these days.
-Nate L

User avatar
kiwigeo
Admin
Posts: 10841
Joined: Sat Sep 29, 2007 5:57 pm
Location: Adelaide, Sth Australia

Re: Ideas?: Executing the side stripe on this Martin & Coupa

Post by kiwigeo » Sat Jan 26, 2013 2:56 pm

If the stripe is to be purely decorative then keep it simple and do it as an inlay. Id do the inlay the same way I'd do an inlay along a back join. The channel would be routed and inlay glued in while the side is flat and then bent with the side. If heat from bending was a potential problem I'd bend the side after cutting the channel and then glue in the inlay.....same process as doing a purfling glue in.
Martin

User avatar
Allen
Blackwood
Posts: 5255
Joined: Thu Oct 11, 2007 5:39 pm
Location: Cairns, Australia
Contact:

Re: Ideas?: Executing the side stripe on this Martin & Coupa

Post by Allen » Sat Jan 26, 2013 6:07 pm

My first thought is to rout it out and inlay it with HHG as a flat. Then bend it.

I bend bindings with purflings glued on with HHG all the time. Never had a worry doing this.
Allen R. McFarlen
https://www.brguitars.com
Facebook
Cairns, Australia

simso
Blackwood
Posts: 1769
Joined: Mon Apr 25, 2011 10:36 pm
Location: Perth WA

Re: Ideas?: Executing the side stripe on this Martin & Coupa

Post by simso » Sat Jan 26, 2013 8:17 pm

Looking at the picture, it definetly looks like two different pieces of rosewood, you could cheat by routing and inlaying the centre and then simply egg white the bottom rosewood and z-poxy the top this will give the appearance of two different pieces of rosewood being utilised, the egg white will give a very light natural colour and the z-poxy will give the darker almost indian rosewood colour

Or just bend up the sides and put a couple of veneers over the top, wouldnt surprise me if thats actually what they had done at manufacture


All tricks to the eye
Steve
Master of nothing,

Do your own repairs - http://www.mirwa.com.au/How_to_Series.html

simonm
Blackwood
Posts: 176
Joined: Mon Sep 07, 2009 7:09 am

Re: Ideas?: Executing the side stripe on this Martin & Coupa

Post by simonm » Sun Jan 27, 2013 12:05 am

Both the construction picture and the first shiny picture clearly show two sets of wood being used. Most likely the whole idea is a case of need being the mother of invention. The need for deep sides with narrow boards. The construction image shows a large number of particularly solid side reinforcements no doubt to ensure the whole thing holds together.

I imagine that if you use a full outside mould, and a fox type bender, it shouldn't be too difficult to build this up piece by piece.

User avatar
Nick
Blackwood
Posts: 3627
Joined: Thu Feb 26, 2009 11:20 am
Location: Christchurch, New Zealand
Contact:

Re: Ideas?: Executing the side stripe on this Martin & Coupa

Post by Nick » Mon Jan 28, 2013 6:03 am

With the advent of side forms and heating blankets, repeating the shape accurately is a lot easier these days, it wouldn't be altogether impossible to form the side. Doing a channel and inlaying is definitely a good safe way of doing it but if I was to attempt it I would have a go by making up a side by taping all the pieces up side by side 'dry' then wrapping them up and bending them with a form and blanket. I would imagine that they would come out close enough that once glued up, a quick scraping would flush everything up?
"Jesus Loves You."
Nice to hear in church but not in a Mexican prison.

User avatar
kiwigeo
Admin
Posts: 10841
Joined: Sat Sep 29, 2007 5:57 pm
Location: Adelaide, Sth Australia

Re: Ideas?: Executing the side stripe on this Martin & Coupa

Post by kiwigeo » Mon Jan 28, 2013 7:44 am

Nick wrote:With the advent of side forms and heating blankets, repeating the shape accurately is a lot easier these days, it wouldn't be altogether impossible to form the side. Doing a channel and inlaying is definitely a good safe way of doing it but if I was to attempt it I would have a go by making up a side by taping all the pieces up side by side 'dry' then wrapping them up and bending them with a form and blanket. I would imagine that they would come out close enough that once glued up, a quick scraping would flush everything up?
There is a similarity between what you describe above and what happens when you build up the body of a lute. In the case of a lute the ribs and intervening strips are individually bent and then glued up over an internal mold. Once out of the mold paper reinforcing strips are glued along the inside of the rib joins.
Attachments
IMGP4456.JPG
Martin

User avatar
Trevor Gore
Blackwood
Posts: 1638
Joined: Mon Jun 20, 2011 8:11 pm

Re: Ideas?: Executing the side stripe on this Martin & Coupa

Post by Trevor Gore » Mon Jan 28, 2013 9:24 am

Check out the side inlays on the Torres FE08. (Just google it - lots of images). Quite a few replicas of this guitar have been made and at least one (the only one I know how it was done) was inlayed flat, then bent. That maker bent the sides by hand on a pipe and said it went quite easily. So, given the relative simplicity of this side inlay, I don't think that it would be too difficult to inlay first, then bend.

User avatar
n~dl
Myrtle
Posts: 69
Joined: Sat Jan 12, 2013 4:04 am
Location: Minneapolis

Re: Ideas?: Executing the side stripe on this Martin & Coupa

Post by n~dl » Tue Jan 29, 2013 2:00 am

Thanks everybody, some great ideas. Time permitting I ~might~ actually try this seeing as I have a billet I can cut out some more side wood if the first attempt fails. Now I just need something long as straight enough to act as a guide for the laminate trimmer...
-Nate L

Crafty Fox
Blackwood
Posts: 146
Joined: Sun Mar 06, 2011 3:09 pm
Location: Perth, WA

Re: Ideas?: Executing the side stripe on this Martin & Coupa

Post by Crafty Fox » Sun Feb 03, 2013 12:44 pm

This is all assuming that the sides have to be made from solid; would it not be simpler to make a male/female mould and build the ribs from (2 or 3) veneers, inlaying the stripe between the external veneers as you go? The 3 external pieces can be held in place with veneer tape.
I've built a few resonators by laminating the ribs. I suppose it depends on whether you are looking primarily for the appearance of the stripe or for the tone of the instrument?
Ken

hutton99
Gidgee
Posts: 2
Joined: Mon Dec 16, 2013 10:29 pm

Re: Ideas?: Executing the side stripe on this Martin & Coupa

Post by hutton99 » Tue Dec 17, 2013 6:43 am

Sorry for my late response to the thread, I saw it for the first time yesterday.

I have actually seen this particular guitar and a number of other Martin & Coupa guitars with the two piece sides.

The sides are in TWO pieces, the purfling is not inlaid into the side. The sides are sometimes book matched so there can be little doubt that the sides are in two pieces. The joint is supported by a silk "gimp" strip glued over the joint. As well there are a number of elegant "wishbone" braces around the inside periphery of the guitar that tie into either the top or back (but not both) braces and keep the sides in place.

I have some interior photos if someone can explain how I can download them.

The two-piece side Martin & Coupa guitars seem to be from the 1842 to 1846 period. I have no idea how Martin assembled them. It would seem, however, that the back or top was used as a template to build up the sides (otherwise I can't see how Martin could have installed the "wishbone" braces).

User avatar
auscab
Blackwood
Posts: 650
Joined: Wed Jan 12, 2011 1:12 am
Location: Melbourne Australia

Re: Ideas?: Executing the side stripe on this Martin & Coupa

Post by auscab » Tue Dec 17, 2013 12:08 pm

We would Like to see your pictures ,thanks .
There is a thread in the tutorials section that describes the photo loading . It was started in 2008 and the last post was in 2012 down the bottom of the page. I'm pretty sure the early posts are out dated and the later ones down the bottom are right .

viewtopic.php?f=5&t=669

hutton99
Gidgee
Posts: 2
Joined: Mon Dec 16, 2013 10:29 pm

Re: Ideas?: Executing the side stripe on this Martin & Coupa

Post by hutton99 » Sat Dec 21, 2013 2:14 pm

Attached is a photo of the interior of a Renaissance-shaped Martin & Coupa period guitar sold by Gryphon Guitar in the last couple of years.

The shot of the interior (also by Gryphon) is the best I have encountered (mine are not nearly as good) so I thought I would use it as an example.

This guitar has a 5-strut fan brace that probably places it in the 1842-1843 period. It does not have a Martin & Coupa label (only those
Martin guitars sold in New York received the M & C label).

You may notice that the kerfing is made of individual blocks, not a strip of kerfing. I understand this is a typical feature of Spanish guitar construction from the period. Other Martin guitars have quite crude-looking kerfing blocks (widely spaced and of irregular size and shape).
Attachments
2756964a.jpg
2756964a.jpg (36.63 KiB) Viewed 16870 times

Post Reply

Who is online

Users browsing this forum: No registered users and 60 guests