Finished My First Head Carving
-
chris paulick

- Myrtle
- Posts: 63
- Joined: Fri Oct 09, 2009 1:23 pm
- Location: Tampa, Florida, USA
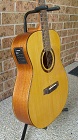
Finished My First Head Carving
Just finished it up. Low relief in the influence of Weissgerber Guitars carvings by Paul Uhlemann.
- Attachments
-
- Finished back head.jpg (239.16 KiB) Viewed 26156 times
Chris
-
Tod Gilding
- Blackwood
- Posts: 838
- Joined: Thu Mar 10, 2011 7:32 pm
- Location: South West Rocks NSW
Re: Finished My First Head Carving
So did you break your camera Chris 
Tod
Music is everyone's posession. It's only publishers who think that people own it.
John Lennon
Music is everyone's posession. It's only publishers who think that people own it.
John Lennon
-
steve roberts

- Blackwood
- Posts: 154
- Joined: Thu May 24, 2012 5:15 pm
- Location: coffs harbour
Re: Finished My First Head Carving
Wow! Chris
Realy nice job do i dare ask how many hours work there.
Regards Steve
Realy nice job do i dare ask how many hours work there.
Regards Steve
-
chris paulick
- Myrtle
- Posts: 63
- Joined: Fri Oct 09, 2009 1:23 pm
- Location: Tampa, Florida, USA
Re: Finished My First Head Carving
Don't really know to tell you the truth. I worked on it mainly on the weekends and not every weekend. Spend a lot of time looking at stuff for design ideas and watching carving videos and getting tools together and etc. Maybe 50 hr. or more carving but you have to understand I'm pretty much learning as I go.
Chris
Re: Finished My First Head Carving
Cheers
Col
-
peter.coombe
- Blackwood
- Posts: 746
- Joined: Fri Oct 15, 2010 2:52 pm
- Location: Bega, NSW
- Contact:
Re: Finished My First Head Carving
Wow, nice.
Peter
Peter
Peter Coombe - mandolin, mandola and guitar maker
http://www.petercoombe.com
http://www.petercoombe.com

Re: Finished My First Head Carving
That's an absolute cracker Chris. What are you going to do on the other side?
-
Tod Gilding
- Blackwood
- Posts: 838
- Joined: Thu Mar 10, 2011 7:32 pm
- Location: South West Rocks NSW
Re: Finished My First Head Carving
Allen wrote:That's an absolute cracker Chris. What are you going to do on the other side?
I thought the other side was done, that's why I asked Chris if he had Brocken his camera.
Tod
Music is everyone's posession. It's only publishers who think that people own it.
John Lennon
Music is everyone's posession. It's only publishers who think that people own it.
John Lennon
-
charangohabsburg

- Blackwood
- Posts: 1818
- Joined: Sat Oct 16, 2010 1:25 am
- Location: Switzerland
Re: Finished My First Head Carving
Looks so great as if you never had done something else than carving headstocks. 
Markus
To be stupid is like to be dead. Oneself will not be aware of it.
It's only the others who suffer.
To be stupid is like to be dead. Oneself will not be aware of it.
It's only the others who suffer.
-
chris paulick
- Myrtle
- Posts: 63
- Joined: Fri Oct 09, 2009 1:23 pm
- Location: Tampa, Florida, USA
Re: Finished My First Head Carving
Thanks all, if you are interested in seeing the influences for this type of carvings check out these links.
http://www.guitarsalon.com/p4002-master ... erber.html
https://www.facebook.com/chris.paulick? ... 731&type=1
https://www.facebook.com/chris.paulick? ... 731&type=1
Amazing work by Luthier Christian as well who did the Photos for the book and has done repairs/resto on the Weissgerber Guitars.
I'm hoping others will give carving ago as well.
Chris
-
Dave Anderson
- Blackwood
- Posts: 260
- Joined: Sun Sep 30, 2007 2:38 pm
- Location: Florida, USA
-
Nick

- Blackwood
- Posts: 3628
- Joined: Thu Feb 26, 2009 11:20 am
- Location: Christchurch, New Zealand
- Contact:
Re: Finished My First Head Carving
Nice work Chris, very even and neat carving. I'm sure you are justifiably proud of it.
"Jesus Loves You."
Nice to hear in church but not in a Mexican prison.
Nice to hear in church but not in a Mexican prison.

Re: Finished My First Head Carving
That is very well done. I'm sure you're very proud. Great work
-
DarwinStrings

- Blackwood
- Posts: 1873
- Joined: Thu Nov 13, 2008 10:27 pm
- Location: Darwin
Re: Finished My First Head Carving
That looks great Chris. A spectacular aesthetic work of patients and care lurking on the back of the headstock. Like understated craftsmanship. Inspiring.
Jim
Jim
Life is good when you are amongst the wood.
Jim Schofield
Jim Schofield

Re: Finished My First Head Carving
That is fantastic! Can I ask a little advice on reference materials for someone wanting to learn as well? Any books, or just youtube and stuff?
-Nate L
-
chris paulick
- Myrtle
- Posts: 63
- Joined: Fri Oct 09, 2009 1:23 pm
- Location: Tampa, Florida, USA
Re: Finished My First Head Carving
Well there are the links above and the book. Chris Pye and Mary May have $10 a month video lessons on carving and sharpening . Drawing and Understanding Scroll Designs by Ron Smith is good to read. Look at youtube on engraving and gunstock carving is interesting. There are a couple of carving demos on the Woodwright Shop . But most of the youtube videos are about power carving or chip carving not too much out there on low relief or Bas carving. You pretty much have too see how they do the larger stuff and scale it back for this smaller stuff. the power carving videos will give you an idea on laying some things out but not the use of hand tools. What ever you can pickup from a video you pickup. I've looked at examples of all periods of art carving and stone Bas art too. But the Weissgerber Book has the best examples of the direction I want to go towards now. I'm trying to start off a little simple and plan to get a little more detailed as I get better with the carving technic and hopefully design. I feel like I'm coming along and learning ok. I decovered that laying out the design is pretty important and designing around the tools and gouges you have at hand is important. That one of the tips I've gotten from Christian Koehn. I guess its good to get the research done and then just start to carve. Good to watch Chris Pye and Mary May carve and explain about slicing cut and etc. so at least you have some idea about it. I wouldn't suggest practicing on the back of a head though. I did practice about 20" total of the modified thumbnail pattern on some walnut first to figure it out some . Then I went to the head but that's me. Lucky for me I took my time and didn't screw up too much. I also learned to stop and walk away for a while. Look it over think about it and touch it up or move on some and come back later with fresh eyes and touch up. Hope this was some help.
Chris
-
chris paulick
- Myrtle
- Posts: 63
- Joined: Fri Oct 09, 2009 1:23 pm
- Location: Tampa, Florida, USA
Re: Finished My First Head Carving
Some of these are interesting to watch too.
http://www.youtube.com/user/rodotallador?feature=watch
He's pretty fast even at sharpening a gouge old school.
youtu.be/
http://www.youtube.com/user/rodotallador?feature=watch
He's pretty fast even at sharpening a gouge old school.
youtu.be/
Chris
-
charangohabsburg
- Blackwood
- Posts: 1818
- Joined: Sat Oct 16, 2010 1:25 am
- Location: Switzerland
Re: Finished My First Head Carving
Hi Chris,
I have looked now a few times at your carved headstock and keep wondering how you did create the "field", the stippled area. Of course (or at least I assume that) you have used some kind of punch, or a shaped nail or similar, but how does the point of this tool look like, and how do you use it? I'd like to learn more about the direction of pressure you applied, and how you advanced over the area - in rows, or by small squares or circles, a mix of all, none of all... . I'd appreciate a close-up of the tool's point if it is not a trade secret or too much of a hassle to take the photo.
I am asking because I really like how the stippled area looks: not too homogeneous but still not distracting, and it has a considerable "visual depth" (hard to tell from the photo how deep it really is).
Cheers,
I have looked now a few times at your carved headstock and keep wondering how you did create the "field", the stippled area. Of course (or at least I assume that) you have used some kind of punch, or a shaped nail or similar, but how does the point of this tool look like, and how do you use it? I'd like to learn more about the direction of pressure you applied, and how you advanced over the area - in rows, or by small squares or circles, a mix of all, none of all...
I am asking because I really like how the stippled area looks: not too homogeneous but still not distracting, and it has a considerable "visual depth" (hard to tell from the photo how deep it really is).
Cheers,
Markus
To be stupid is like to be dead. Oneself will not be aware of it.
It's only the others who suffer.
To be stupid is like to be dead. Oneself will not be aware of it.
It's only the others who suffer.
-
chris paulick
- Myrtle
- Posts: 63
- Joined: Fri Oct 09, 2009 1:23 pm
- Location: Tampa, Florida, USA
Re: Finished My First Head Carving
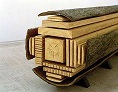
Traditionally the background would be randomly just punched with a nail or some type of punch or a specially shaped stippling tool. Sometimes the background would have been grounded or leveled to a depth to make the shapes proud and then stippled.
But I have a pneumatic 400K rpm dentist type drill that is also used for power carving and engraving that I use with a very small carbide ball end bit to do the stippling. Much faster then traditional stippling but I have seen some stamped stippling that I'm assuming was done with a special stippling tool that looked like leather grain, really nice. I use traditional gouges and hand tools for the rest of the carving. I also use some gunstock checkering tools for the straight lines .
But I have a pneumatic 400K rpm dentist type drill that is also used for power carving and engraving that I use with a very small carbide ball end bit to do the stippling. Much faster then traditional stippling but I have seen some stamped stippling that I'm assuming was done with a special stippling tool that looked like leather grain, really nice. I use traditional gouges and hand tools for the rest of the carving. I also use some gunstock checkering tools for the straight lines .
- Attachments
-
Chris
-
charangohabsburg
- Blackwood
- Posts: 1818
- Joined: Sat Oct 16, 2010 1:25 am
- Location: Switzerland
Re: Finished My First Head Carving
Wow, that's some really great info,, thank you Chris. The dentist's tool sounds really almost like a trade secret! 
I have to say that your headstock reminds my of those by Francisco Simplicio: he also made the "field areas" in a way that does not look much like stippled with an ordinary nail, he gave these areas a rather fine texture, even less coarse and more homogeneous than yours.
Thanks again for sharing!
I have to say that your headstock reminds my of those by Francisco Simplicio: he also made the "field areas" in a way that does not look much like stippled with an ordinary nail, he gave these areas a rather fine texture, even less coarse and more homogeneous than yours.
Thanks again for sharing!
Markus
To be stupid is like to be dead. Oneself will not be aware of it.
It's only the others who suffer.
To be stupid is like to be dead. Oneself will not be aware of it.
It's only the others who suffer.
Who is online
Users browsing this forum: No registered users and 65 guests