finger patch

Talk about musical instrument construction, setup and repair.

Moderators: kiwigeo, Jeremy D

Post Reply
User avatar
matthew
Blackwood
Posts: 1193
Joined: Mon Oct 08, 2007 1:16 pm
Location: Sydney, Inner West
Contact:

finger patch

Post by matthew » Mon Dec 06, 2010 9:36 am

There is a long crack running very close to the edges of the bass and hard to glue up, but it will eventually crack all the way end to end. gotta fix it now.

Image

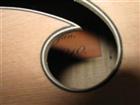
After glueing the crack as best I can by flexing and working-in the hot hide glue, I start carving the bed for an inlaid "finger" patch

Image

Image

You can see the original crack running through the bed in the next picture. It had been open for some time, so a fair bit of dirt was in there, making it almost impossible to just glue successfully.

Image

I fit the patch using the chalk method and glue with hide glue.

Image

Image

Image

Image

Image

User avatar
Nick
Blackwood
Posts: 3627
Joined: Thu Feb 26, 2009 11:20 am
Location: Christchurch, New Zealand
Contact:

Re: finger patch

Post by Nick » Mon Dec 06, 2010 10:43 am

Your skill never ceases to amaze me Matthew, a true artiste. :cl If this bass was of some value before it arrived in your shop, it's going to leave being 10 times the value I'd say, it certainly won't be devalued!
"Jesus Loves You."
Nice to hear in church but not in a Mexican prison.

User avatar
rocket
Blackwood
Posts: 1210
Joined: Thu Apr 30, 2009 8:43 pm
Location: melbourne,, outer east
Contact:

Re: finger patch

Post by rocket » Mon Dec 06, 2010 2:42 pm

Love your work Mathew.
Cheers,,, Rod.
Like I said before the crash, " Hit the bloody thing, it won't hit ya back

www.octiganguitars.com

User avatar
matthew
Blackwood
Posts: 1193
Joined: Mon Oct 08, 2007 1:16 pm
Location: Sydney, Inner West
Contact:

Re: finger patch

Post by matthew » Mon Dec 06, 2010 3:06 pm

Not so sure the instrument will go UP in value, it's more a case of making sure it doesn't implode in the future. There were a number of other things to do on this bass, too. One of which is straightening the neck/FB alignment which (I think) was set badly the last time it was opened and closed.

By the way that's a bit of your arsewipe spruce in that patch, Martin.

User avatar
kiwigeo
Admin
Posts: 10845
Joined: Sat Sep 29, 2007 5:57 pm
Location: Adelaide, Sth Australia

Re: finger patch

Post by kiwigeo » Mon Dec 06, 2010 3:08 pm

matthew wrote:
By the way that's a bit of your arsewipe spruce in that patch, Martin.
I thought so. Patching up holes and cracks is about all that wood is good for. Good to see the stuff is of use to somebody.

Nice job on that patch...
Martin

User avatar
Allen
Blackwood
Posts: 5255
Joined: Thu Oct 11, 2007 5:39 pm
Location: Cairns, Australia
Contact:

Re: finger patch

Post by Allen » Mon Dec 06, 2010 8:56 pm

I'm curious Matthew as to which you modify the shape of when using the chalk method. Is it the patch that you shape to fit, or is it the cavity that you've cut into the top (or back for that matter)?
Allen R. McFarlen
https://www.brguitars.com
Facebook
Cairns, Australia

User avatar
matthew
Blackwood
Posts: 1193
Joined: Mon Oct 08, 2007 1:16 pm
Location: Sydney, Inner West
Contact:

Re: finger patch

Post by matthew » Mon Dec 06, 2010 9:47 pm

1. choose the shape of the patch and cut a piece of spruce with grain about 10 degrees to the original wood.
2. trace around the patch and mark where it lines up
3. scoop out the bed first, this way you can gauge the depth as you go, making sure you don't break through the varnish on the other side!
4. fine sand and polish the bed, keep the edges crisp
5. chamfer off the edges of the patch - get a rough shape first.
6. rub bed with chalk
7. place in the bed and grind a little side to side (that sounds x rated)
8. remove wood from the patch where the chalk touches
9. go to step 6 and repeat until there's chalk marks all over the patch.

the you just dust off the chalk and glue it in.

I suppose you could shape the patch first, but you'd risk needing to take too much wood off the top to get a good fit.

User avatar
Nick
Blackwood
Posts: 3627
Joined: Thu Feb 26, 2009 11:20 am
Location: Christchurch, New Zealand
Contact:

Re: finger patch

Post by Nick » Tue Dec 07, 2010 5:48 am

matthew wrote:3. scoop out the bed first, this way you can gauge the depth as you go, making sure you don't break through the varnish on the other side!
Why do I get the feeling from that statement that it's coming from of a voice of experience? :lol: :wink:
What sort of plate thickness are we talking Matthew? It looks about 5-6mm.
"Jesus Loves You."
Nice to hear in church but not in a Mexican prison.

User avatar
matthew
Blackwood
Posts: 1193
Joined: Mon Oct 08, 2007 1:16 pm
Location: Sydney, Inner West
Contact:

Re: finger patch

Post by matthew » Tue Dec 07, 2010 7:57 am

about 8mm. And no, I have never "broken through" :shock:

A finger patch is exactly the same process as this sound post patch viewtopic.php?p=29373#p29373 but actually for some reason a little easier to fit.

Post Reply

Who is online

Users browsing this forum: No registered users and 60 guests