
I've been thinking quite alot about this step, and I've got a few ideas. But I want to draw on the wealth of experience that lurks deep within the cold blue exterior of the ANZLF, the way a school of piranha lurks beneath the calm surface of an Amazonian river.
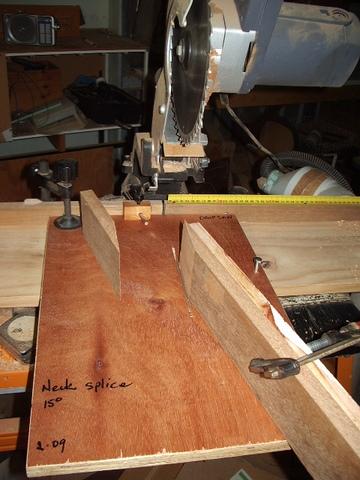
So. What are some of the hand saw methods that you experienced guys have used to make that 15 degree cut that you're happy with and that a complete novice should be able to perform reliably?
Best method for hand cutting headstock angle?
Best method for hand cutting headstock angle?
- If God had intended us to drink beer, He would have given us stomachs. - David Daye.
- The mouth of a happy man is filled with beer. -
- The mouth of a happy man is filled with beer. -
-
woodrat
- Blackwood
- Posts: 1154
- Joined: Tue Nov 25, 2008 6:31 am
- Location: Hastings River, NSW.
- Contact:
Hi Joel, This is a fairly straightforward operation. Firstly if you dont already have it Wm Cumpianos Guitarmaking Tradition and Technology is a must have reference book. Although I have moved on from the guitar built in this book the first principles as described in this book are still very much what I use and this technique is described well in it. Basically the sawing is not the important thing but the layout and subsequent planing of the mating surfaces are.A properly squared neck blank is essential for proper layout of the line. Once the line is laid out at the prescribed angle then sawing accurately down one side of the line can be accomplished. This is technically a rough cut but by performing it as accurately as possible it will save you work on the planing stage. Once the headstock is separated, flip it over and pair it up so that you can plane the two together like planing down a ramp. To do this clamp it together onto a solid surface so that you can plane the two surfaces in one continuous plane. This is where a sharp finely set plane will smooth the joint so as to produce a true and flat gluing surface. Check for squareness and for flatness across the gluing surface i.e. you don't want a bump here but very slight concavity is acceptable. When you have the surfaces ready for gluing reduce the headstock part of the blank to 1/2 inch or 13mm and then glue them together. This is a bit tricky as they want to slide past each other but they can be clamped to a flat true surface in their correct orientation and then glued. As I said this and lots of other first principles are covered in great depth in the Cumpiano book.It is definitely worth having on the shelf. I hope that this is helpful and you are successful in your endeavours.
"It's never too late to be what you might have been " - George Eliot

I have used a jap pull saw and like woodrat followed grumpy Bill Cump's method as well.  Just make sure you have a well tuned block plane and accurate square and go to it. Take ur time and it's a pretty forgiving and enjoyable process. If ur unsure, practice on some radiata and you will be up to speed in no time.
Cheers
Kim
Cheers
Kim
-
vandenboom
- Blackwood
- Posts: 414
- Joined: Sun Oct 26, 2008 2:27 pm
- Location: Melbourne (Ringwood), Australia
I too use the Cumpiano method. However, I was recently reading the
Jonathan Kinkead book "Build your own acoustic guitar" and he has a different approach in which he stacks pieces and then cuts the headstock on a bandsaw, but you could do it was a handsaw. Depending on your handtools skills, this might be easier than the other way. I am not at home so can't check the book to see how many pieces he stacked though it obviously depends on thickness of your wood, but the following diagram gives you the idea.

Frank
Jonathan Kinkead book "Build your own acoustic guitar" and he has a different approach in which he stacks pieces and then cuts the headstock on a bandsaw, but you could do it was a handsaw. Depending on your handtools skills, this might be easier than the other way. I am not at home so can't check the book to see how many pieces he stacked though it obviously depends on thickness of your wood, but the following diagram gives you the idea.
Frank
-
Joe Sustaire
- Myrtle
- Posts: 92
- Joined: Sun Nov 23, 2008 1:23 am
- Location: Talihina Oklahoma
- Contact:
I'm not so sure about simpler. I started building with Kinkead's book and build my necks his way, just stack your surfaced stock and glue, then knock out the neck on the bandsaw. No perfect cut/planed 15 degree angles needed, which can be pretty intimidating if you're not used to working with planes.
Now I think the stacked method wastes a bit more wood and developing your sawing/planing skills is just good sense, but for starting out, I think stacking is less intimidating.
Joe
Now I think the stacked method wastes a bit more wood and developing your sawing/planing skills is just good sense, but for starting out, I think stacking is less intimidating.
Joe
The only safe thing to do, is to take a chance! Mike Nichols
-
J.F. Custom

- Blackwood
- Posts: 778
- Joined: Fri May 01, 2009 9:13 pm
- Location: Brisbane
- Contact:
I prefer the angled scarf joint too.
I don't think it is a difficult joint to construct and when done properly, is very strong. I can see that the Kinkead method there may seem less daunting to the new builder, but either should be simple enough to execute with patience.
My only thoughts re the Kinkead method is that you have exposed end grain for the back of the peg head. Front too, but this is usually covered by veneers. You could veneer the back too or accept the different appearance, but the angled Scarf joint provides more uniform grain continuity. When done well, it can be difficult to see the join at all. I'd also personally have strength concerns with the Kinkead method but I'm sure that was considered and tested in his years experience so either should provide enough strength.
My 2 c.
Jeremy.
-
Taffy Evans
- Blackwood
- Posts: 1080
- Joined: Wed Apr 30, 2008 6:54 pm
- Location: Charters Towers North Queensland
-
vandenboom
- Blackwood
- Posts: 414
- Joined: Sun Oct 26, 2008 2:27 pm
- Location: Melbourne (Ringwood), Australia
..this was my reason for suggesting it, even though I use & prefer the Cumpiano method myself for the reasons stated above. It all depends on the skills and tools you have at present. I was hopeless with use of hand planes, scrapers let alone sharpening when I did this the first time.Joe Sustaire wrote:..... but for starting out, I think stacking is less intimidating.
Joe
Frank
-
Onlinekiwigeo

- Admin
- Posts: 10874
- Joined: Sat Sep 29, 2007 5:57 pm
- Location: Adelaide, Sth Australia
There are alot of Kincaid's methods which dont set me on fire. His method of clamping up the top using a large thin cauls and screws while glue is setting is overly complicated and for me it simply didnt work as well as my normal method using bias binding tape and cam clamps. His method of locating the bridge isnt as simple and well explained as Campiano et al and ditto for a few other things.
IN all honesty the one book that gathers cobwebs in my library is Kincaid while Campy and co is falling apart from constant useage.
IN all honesty the one book that gathers cobwebs in my library is Kincaid while Campy and co is falling apart from constant useage.
Hi guys (or should I say piranha?),
Thanks for jumping in and providing some good discussion about this.
I've got those two books, read them thoroughly and generally followed their advice, where I didn't follow advice on forums like this one and the OLF.
Basically I wanted to see if there were an super simple wizz-bang method out there. For some reason this step and the actual carving of the neck itself are freaking me out. I had no troubles hand planing the top, back and sides to thickness, bending the sides, or making the rosette (although I'm not 100% happy with it, and may end up re-doing it a third time). In all probability I'll do fine with this as well. I guess that with a young family, work and part time uni getting the time to get out and actually build is difficult to say the least. Consequently, I absolutely loathe stuffing up something and having to waste time (and precious tone wood. No Martin-esque drool-worthy wood stash here!) to do it again.
I'm reluctant to build more jigs. I've spent more time making jigs than the guitar, and I've run out of room to store the things. Besides I don't think my tiny three wheel hobby bandsaw could accomodate the width of a neck blank. It's good for roughing out brace blanks though.
Kim,
I've got jap pull saws too and will be using them. I reckon I'll use your suggestion of practicing on some scrap pine. As for the well tuned block plane... I still need to get a good one that's worth tuning properly. I've been eyeing off one of the LN block planes. I'll kick off another thread asking some questions about these.
Thanks guys!
- If God had intended us to drink beer, He would have given us stomachs. - David Daye.
- The mouth of a happy man is filled with beer. -
- The mouth of a happy man is filled with beer. -

Joel, I understand your frustration. It seems that in the beginning all we do for the first guitar is build jigs. At one point I was ready to give up because I was tried of making nothing but jigs. I didn't have the money to buy what I needed or thought I needed to go to the next step in building, heck to even begin building. I almost quit before I began.
You have three choices in building your neck.
1) buy one/ have one made for you
2) cut it out with a hand saw and clean it up with a plane
3) cut it with a hand saw and clean it up with a router
The router is a simple, quick, sort of, way to clean up the scarf joint. But it does mean another jig. The jig is easy to put together from scraps and if you use inserts, it can be disassembled for flat storage. http://www.buildyourguitar.com/resource ... arfjnt.htm You might have to go back to the resource page, then to tips. It doesn't seem to want to load for me.
I have started gluing the binding on tonight after I put together a double tape holder that would allow me to pull a doubled piece of tape. I can use cheap painter's tape instead of buying rolls of binding tape. In a bit I will have to decide to either make my own neck or to use one I bought off of eBay. Either way I will end up making another couple of jigs so I can cut the angle on the neck and cut the mortise. I will probably pick up some poplar and give it a go just to see what I can do. Poplar is cheap and really easy to carve.
The joy of making jigs is once you have one that works for you, you're set. Hang in there, there is light at the end of the tunnel.
-
vandenboom
- Blackwood
- Posts: 414
- Joined: Sun Oct 26, 2008 2:27 pm
- Location: Melbourne (Ringwood), Australia
I have similar space & time constraints, but this is part of the journey. I have found myself constantly changing and improving my jigs in the first 7 guitars. It's just part of the process of improving efficiency and quality. Yes some jigs are 'stable' at the moment, but I already have ideas for others that need to change. Just unavoidable, but also very satisfying to me.joel wrote:I'm reluctant to build more jigs.
Frank
The best way to get in step with your plane is to go to the shed with just that in mind.Don't worry about the neck but get some timber and have a practice with the plane. Get it sharp and well tuned and then practice.When you get to the stage of taking off gossamer thin shavings you will be amazed at how accurate your simple 15 deg. planing exercise becomes.So head to the shed with the sole intention of coming to grips with what becomes a very simple tool.It is worth a couple of hours to gain a skill that gives back so much.
Cheers from Micheal.
Remember the "5P Rule".
Preparation Prevents Piss Poor Performance.
Remember the "5P Rule".
Preparation Prevents Piss Poor Performance.
-
J.F. Custom
- Blackwood
- Posts: 778
- Joined: Fri May 01, 2009 9:13 pm
- Location: Brisbane
- Contact:
It must be Martin because I think you'll find it's Kinkadekiwigeo wrote:In all honesty the one book that gathers cobwebs in my library is Kincaid...
Welcome to the wonderful world of Luthiery...joel wrote:...I've spent more time making jigs than the guitar...
J.F.
-
Onlinekiwigeo
- Admin
- Posts: 10874
- Joined: Sat Sep 29, 2007 5:57 pm
- Location: Adelaide, Sth Australia
Get the Veritas LA block plane...IMHO its better value for money than the LN.joel wrote: As for the well tuned block plane... I still need to get a good one that's worth tuning properly. I've been eyeing off one of the LN block planes. I'll kick off another thread asking some questions about these.
Thanks guys!
-
J.F. Custom
- Blackwood
- Posts: 778
- Joined: Fri May 01, 2009 9:13 pm
- Location: Brisbane
- Contact:
kiwigeo wrote:Mate try and build a lute and see how your spelling and general sanity start to suffer.
Just for the record...ya spelt the guys name "Kinkead" in an earlier post but you came clean on ya massive faux pas so youre off the hook.
He he he... Lutes eh? It's my lack of lutes or any other stringed instrument progress that's doing me in presently. Damn slow builders.
Lute's looking good btw.
For the record, was it in fact an A: misspell, or B: typo or C: dyslexia? Answer - either D: All of the above or E: Who gives a...*whistle*
Agreed as detailed in the other thread on the matter.kiwigeo wrote:Get the Veritas LA block plane...IMHO its better value for money than the LN.
Jeremy.
-
Joe Sustaire
- Myrtle
- Posts: 92
- Joined: Sun Nov 23, 2008 1:23 am
- Location: Talihina Oklahoma
- Contact:
Kiwigeo wrote-
There are alot of Kincaid's methods which dont set me on fire. His method of clamping up the top using a large thin cauls and screws while glue is setting is overly complicated and for me it simply didnt work as well as my normal method using bias binding tape and cam clamps.
And that's the beauty of these books, and even more so, the forums. There are so many ways to get to the same place. I'm really not promoting Kinkead here, but his unique clamping method was a blessing when I started, because the alternative, as I saw it from watching Frank Finocchio's dvd's, was having 40 to 50 cam clamps, which is how he closes a box. Needless to say that was so daunting Kinkead's ring and screw system was a big relief.
So give me options, it may confuse me, but hopefully I'll find a method that'll work for me.
Joe
The only safe thing to do, is to take a chance! Mike Nichols
-
Onlinekiwigeo
- Admin
- Posts: 10874
- Joined: Sat Sep 29, 2007 5:57 pm
- Location: Adelaide, Sth Australia
One danger of Kinkcaides ring and screw clamping system is you can exert pressure on the whole back or top rather than just the peripheral gluing area and with this comes the risk of collapsing the arch in your back or top. The method also requires a different caul for each type of guitar. Bias binding tape fits any guitar.
Horses for courses like you say...Ive tried alot of different methods and always find myself going back to the method I started out with.
Cheers Martin
Horses for courses like you say...Ive tried alot of different methods and always find myself going back to the method I started out with.
Cheers Martin
Who is online
Users browsing this forum: kiwigeo and 184 guests