Serving up number 3 for your perusal

Talk about musical instrument construction, setup and repair.

Moderators: kiwigeo, Jeremy D

Post Reply
User avatar
Clancy
Blackwood
Posts: 621
Joined: Wed Dec 17, 2008 10:26 am
Location: Canberra

Serving up number 3 for your perusal

Post by Clancy » Thu Apr 09, 2009 8:30 am

Following the completion of my first instrument, a carved 17" archtop, I was asked by a friend to make her a carved mandolin to replace her cheap chinese one.

We struck a deal where she would pay for materials and I would do the build for free, thereby gaining more experience without too much overhead costs (of course I had to make new molds and get a couple of new tools).

I don't know much about mandolins so I used Graham's new mandolin book as my guide and consulted him occassionally (thanks graham, I'll be phoning you tonight to see if your free for me to bring the mandolin around)

I've taken the mandolin to the local music shop for a real try out and was told it sounds lovely and plays very nicely (but will rely on Graham's opinion as my benchmark).

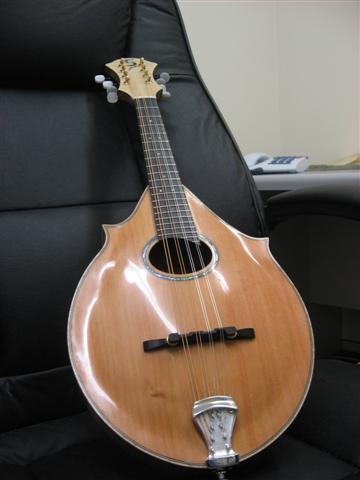
Enough gabbing - here's the pics

oh yeah
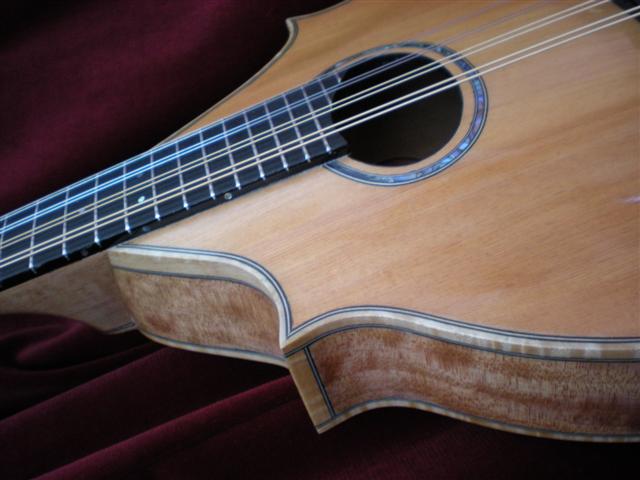
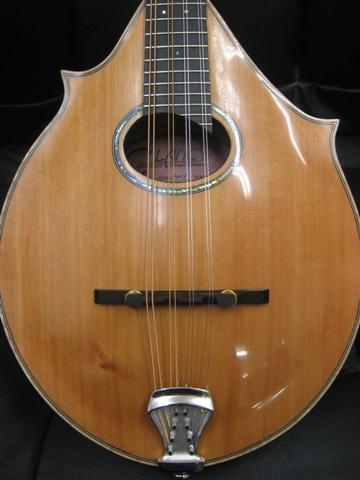
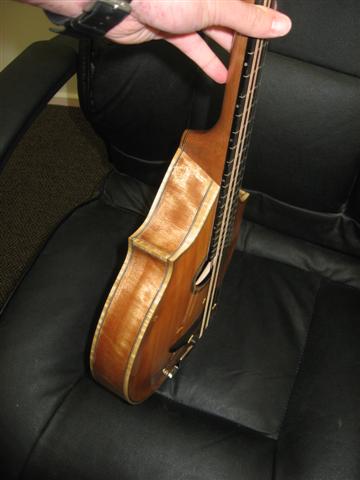
top - King Billy (from Gilet)
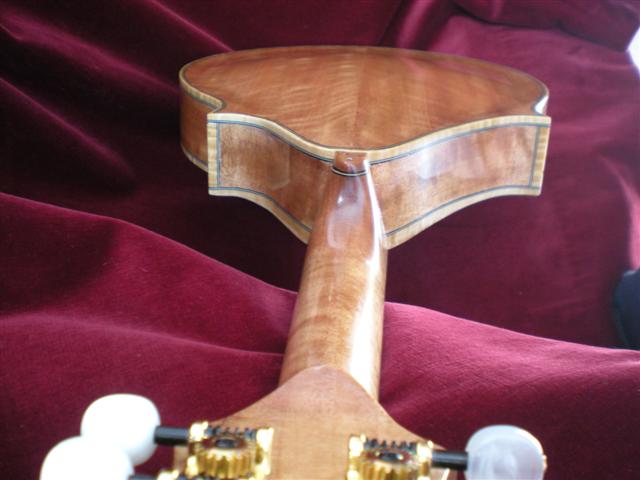
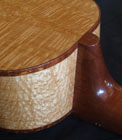
back, sides, neck - Qld Maple (from a local timber yard - right place, right time)
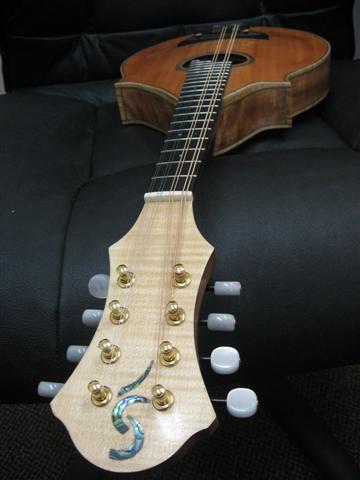
fretboard - ebony
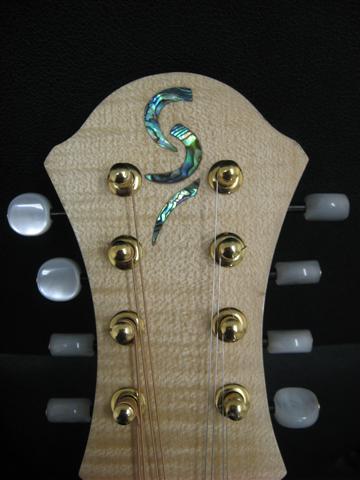
binding & headstock - figured maple
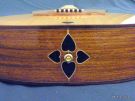
Headstock inlay - from jim (cheers mate, first inlay attempt went well, nothing flash on my part but looks good)

Image
Image
Image
Image
Image
Image

Also,
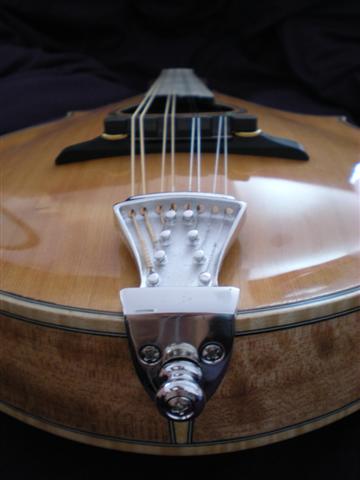
Wanted to use a gold tailpiece but couldn't afford it.
This is a 2nd that was cheaper again on the Allen website's 'Deal of the Day'.

Cheers
Craig

User avatar
Taffy Evans
Blackwood
Posts: 1067
Joined: Wed Apr 30, 2008 6:54 pm
Location: Charters Towers North Queensland

Post by Taffy Evans » Thu Apr 09, 2009 9:01 am

Very, very nice Craig. Your first time efforts are very impressive with good detail and clean workmanship, I like this one.
Taff

User avatar
Clancy
Blackwood
Posts: 621
Joined: Wed Dec 17, 2008 10:26 am
Location: Canberra

Post by Clancy » Thu Apr 09, 2009 9:21 am

Thanks Taff.
I appreciate the complements, but have to admit that I could spend another month tidying up the 'detailing'. I wont have the chance since the owner is coming down from sydney this weekend to collect it, so it is what it is.

These pics were taken by at work and I didn't get any close ups. I'll try to add them tonight at home (only the best angles of course!).

I should add that number 2 (flat top irish bouzouki) is almost completed but had to be put aside while I built number 3. Should have pics of that in month or so.

Then I have to decide what the next project will be? It always seems to be a surprise what I choose or am asked to do!

User avatar
ozziebluesman
Blackwood
Posts: 1550
Joined: Wed Oct 10, 2007 9:12 am
Location: Townsville
Contact:

Post by ozziebluesman » Thu Apr 09, 2009 9:54 am

Very nice indeed Craig. Thanks for the pics. King Billy pine seems to be popping up in a few builds lately. I have to agree your first inlay job looks great and adds class to the instrument.

Yeah you don't know what is going to be the next build. I have a guy who wants me to build him a twin neck lap steel. This is going to be an interesting project. I have two concert size guitars on the go and a Ukulele so I think that will be enough woodworking projects for this year.

Thanks for sharing you build. Looks absolutely all class.

Cheers

Alan

User avatar
DarwinStrings
Blackwood
Posts: 1877
Joined: Thu Nov 13, 2008 10:27 pm
Location: Darwin

Post by DarwinStrings » Thu Apr 09, 2009 10:56 am

Looks like you've made a mistake Craig, do you realise what will happen when Martin sees this. Once again your work is very nice and the headstock inlay is just the sort of thing I like to see.

Jim

User avatar
Ron Wisdom
Blackwood
Posts: 420
Joined: Sat Sep 29, 2007 1:18 am
Location: Arkansas, USA

Post by Ron Wisdom » Thu Apr 09, 2009 12:38 pm

Really nice!! That inlay is really clean in that light colored headstock. Great job.

Ron

User avatar
Stephen Kinnaird
Blackwood
Posts: 287
Joined: Sun Oct 14, 2007 1:45 pm
Location: Texas, USA

Post by Stephen Kinnaird » Thu Apr 09, 2009 12:49 pm

Craig, you've got a really nice sense of design.
I like everything about this.
Now, tell us your experience w/ the Q'd walnut--does it smell sweet and spicy to you? And how was it to carve?

Steve
There are some great woods, down under!

User avatar
Clancy
Blackwood
Posts: 621
Joined: Wed Dec 17, 2008 10:26 am
Location: Canberra

Post by Clancy » Thu Apr 09, 2009 3:39 pm

Thanks everyone.
Got home early so here's some pics from other angles.

Steve, believe everything you hear about Queensland Maple.
It's a joy to carve, sand and scrape.

Image
Image
Image
Image

User avatar
Allen
Blackwood
Posts: 5259
Joined: Thu Oct 11, 2007 5:39 pm
Location: Cairns, Australia
Contact:

Post by Allen » Thu Apr 09, 2009 5:17 pm

Craig, you're setting the bar pretty darn high for just your 3rd build. And it's a really great looking instrument. Perfect opportunity to try something new, when you've got people willing to pay for materials. Wish I had a few of them on my first few instruments.

Looking forward to seeing #2.
Allen R. McFarlen
https://www.brguitars.com
Facebook
Cairns, Australia

User avatar
Localele
Moderator
Posts: 367
Joined: Tue Aug 12, 2008 6:54 am
Location: Corndale,NSW
Contact:

Post by Localele » Thu Apr 09, 2009 6:31 pm

Beautiful Mandolin Craig.The maple looks great as always.It is literally one of the best cabinet timbers in the world and as you say it carves and planes to a lovely finish,If needed it will also take stain very well.Ages to a better look as well.Cheers.
Cheers from Micheal.

Remember the "5P Rule".
Preparation Prevents Piss Poor Performance.

User avatar
Mark McLean
Blackwood
Posts: 1161
Joined: Thu Apr 10, 2008 2:03 pm
Location: Sydney

Post by Mark McLean » Sat Apr 11, 2009 3:30 pm

That is a beautiful instrument Craig. It is hard to believe that it is your first mandolin.
What is the secret to routing a rosette channel and cutting a soundhole that are oval, not round?
cheers
Mark

User avatar
Clancy
Blackwood
Posts: 621
Joined: Wed Dec 17, 2008 10:26 am
Location: Canberra

Post by Clancy » Sat Apr 11, 2009 9:20 pm

Mark, I pretty much did the sound hole as per Grahams instructions in his book.
Cut out an oval template and trace onto the soundboard.
Drill holes at least a couple of mil inside the drawn line.
Rough cut out the inside.
Sand to line with sand paper wrapped around a piece of inch thick dowel.
Then I cut the rosette channel with a purfling cutter, doing inside & outside cuts at once by using both blades (sharpened again before use - the cuts across the grain can be tricky!)
Then I got one of my old electrician's Terminal Screwdiver's and ground the end sharp. This made a reasonable chisel to remove the wood between the cuts (I only used hand pressure).

By the way, I made some basic recordings of the mandolin today using the Edirol. does anyone know how to post them?

User avatar
Kim
Admin
Posts: 4372
Joined: Wed Sep 26, 2007 8:32 pm
Location: South of Perth WA

Post by Kim » Sat Apr 11, 2009 9:26 pm

Craig,

For some reason ? I missed this post earlier. My loss M8, what a great effort, the workmanship looks first class and with Graham as a guide I am certain she sounds every bit as good as she looks.

Well Done!

Kim

Hesh1956
Blackwood
Posts: 1418
Joined: Thu Sep 27, 2007 9:58 am

Post by Hesh1956 » Sat Apr 11, 2009 10:41 pm

Very nice Mando Craig my friend - you should be very, very proud!!! :cl :cl :cl :cl :cl :cl

User avatar
Bob Connor
Admin
Posts: 3126
Joined: Mon Jul 09, 2007 9:43 pm
Location: Geelong, Australia
Contact:

Post by Bob Connor » Sun Apr 12, 2009 9:05 am

Lovely work Craig. Looks like a nice piece of King Billy too. It's certainly getting harder to find.

The binding scheme sets the instrument off very nicely.

It really is an elegant instrument.
Bob, Geelong
_______________________________________

Mainwaring and Connor Guitars

Post Reply

Who is online

Users browsing this forum: No registered users and 168 guests