Wet weather non guitar making

Talk about musical instrument construction, setup and repair.

Moderators: kiwigeo, Jeremy D

Post Reply
User avatar
DarwinStrings
Blackwood
Posts: 1877
Joined: Thu Nov 13, 2008 10:27 pm
Location: Darwin

Wet weather non guitar making

Post by DarwinStrings » Sun Feb 01, 2009 1:06 pm

As I make practically all necks now in the same style as Leo Fender made them I have been meaning to make this for ages and finally got to it.

One part I find a bit slow is the transition from headstock to neck. So far I have band sawed the shape, that is the front flat part of the headstock then into the curve that ramps up to the fret board and then sanded it by hand to level the face and clean up the curved transition.

With this drum sander I'll again band saw the shape but then just feed the headstock into the drum which will thickness and level it and also the drum is the same radius as the curved transition so it will give me a nice even curve sanded smooth.

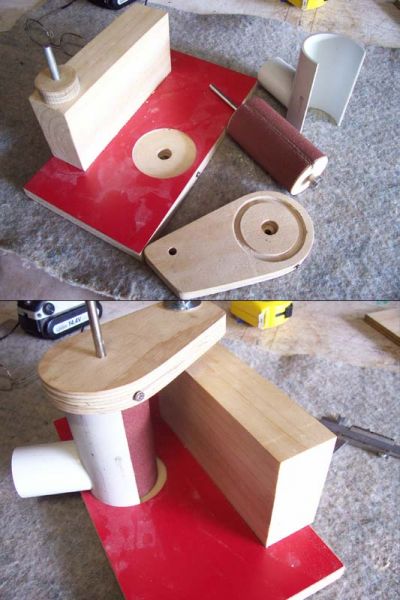
The feed table is pivoted and adjusts the thickness so it can also do other sanding/thicknessing jobs. All the parts are from offcuts I already have except the two bearings which cost $20.

In the end it was also a challenging wet weather project.

Image

Jim

User avatar
Lillian
Blackwood
Posts: 1702
Joined: Fri Sep 28, 2007 10:31 pm
Location: New Mexico, USA
Contact:

Post by Lillian » Mon Feb 02, 2009 1:46 am

Jim, did you construct the dust shroud or borrow it from something else? Nicely done.

User avatar
ap404
Myrtle
Posts: 99
Joined: Mon Feb 25, 2008 1:33 am
Location: Brisbane
Contact:

Post by ap404 » Mon Feb 02, 2009 2:38 pm

Gold Jim,

I don't do the fender shape often, but I know the feeling of looking around the workshop for the right radius on a bottle of stain or a chisel handle to do concave curves when sanding. I usually head for the curved end of the belt sander and wiggle back and forth to adjust radius :)

I was thinking of something similar for thickness sanding bindings/small parts etc.

Elegant.

Cheers AP
i got a hot rod ford and a two dollar bill, and i know a place right over the hill ...

www.flickr.com/photos/harvesterworks

User avatar
DarwinStrings
Blackwood
Posts: 1877
Joined: Thu Nov 13, 2008 10:27 pm
Location: Darwin

Post by DarwinStrings » Tue Feb 03, 2009 12:41 am

Cheers AP. Yep same, the belt sander is a trusted friend.

I made the shroud Lillian. It was just a matter of wrapping a piece of 80grit around the larger piece of plastic pipe and sanding the smaller one against it till it matched neatly. Then drilled a hole in the large pipe, cut the opening out of the other side, glued the small one over the hole with CA glue, dig a little jig and that was it, minimal dust.

Jim

User avatar
Lillian
Blackwood
Posts: 1702
Joined: Fri Sep 28, 2007 10:31 pm
Location: New Mexico, USA
Contact:

Post by Lillian » Tue Feb 03, 2009 2:26 pm

Thanks Jim.

User avatar
Dennis Leahy
Blackwood
Posts: 872
Joined: Wed Oct 10, 2007 12:32 am
Location: Duluth, MN, US
Contact:

Post by Dennis Leahy » Tue Feb 03, 2009 4:43 pm

Slick jig, er um tool, Jim. I guess it's really more of a tool than a jig. Good engineering ideas there. You got the gears spinning in my head too!

Dennis
Another damn Yank!

Post Reply

Who is online

Users browsing this forum: No registered users and 110 guests