
New Contraption Tryout
-
Hippety Hop

- Blackwood
- Posts: 174
- Joined: Wed Apr 30, 2008 11:18 am
- Location: Moorabbin
New Contraption Tryout
Virtual CNC
-
DarwinStrings

- Blackwood
- Posts: 1873
- Joined: Thu Nov 13, 2008 10:27 pm
- Location: Darwin

I like the concept Hip . Thanks for posting this . Which do you move/swing ,, the table or the drill head ? A truly flat surface isn't easy to achieve. This looks like it may do the job . As the proof is in the pudding , how flat did it end up ?
I use a plane with a very fine setting , constantly candlining with a straight edge.As a final , I place it on a thick glass block that has a fine grit sanpaper double taped to it . I don't overdo it here , as too much time on the glass block will end up with a slight convex to the surface if you're not careful. Your set up may make this process a whole lot easier !
B.T.W . I notice the 1 " pattern makers ply you're using as hold down cauls . I bought an 8' X4 ' sheet a few years ago . Fantastic stuff , but unfortunatley I've used the bloody lot ! . If I remember correctly I got it from Mr. Ply in Sydney ? , but my memory may be failing me here. Where did you get yours ?
Innovative work here Hip . ,, very good of you sharing it with us all.
Cheers
Craig Lawrence
-
Hippety Hop
- Blackwood
- Posts: 174
- Joined: Wed Apr 30, 2008 11:18 am
- Location: Moorabbin
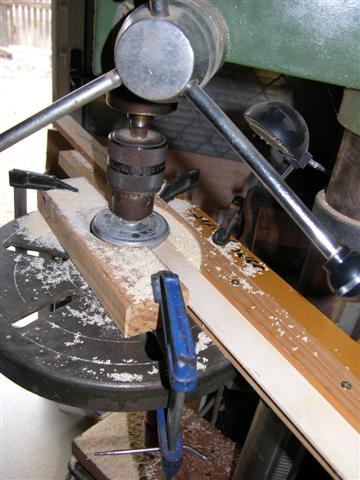
Craig. That's in my laundry, and I wasn't game to make a mess in there. That's just where I put the drill after I assembled it because of the concrete floor.
It has since moved into the back porch, where I still need to overcome some other problems like lack of space and an un-level floor. Some unused hoardings like crates of beer bottles are headed for the nature strip.
The idea is to swivel the drill head. Loosening the table drops it down slightly, which probably also tilts it. Soon as I get the machine level and stable I can do the job.
The plywood is 3/4" or 19mm marine which I bought from Gunnersens who delivered free. It cost $234 (I think) for a 2400mm x 1200mm sheet. I've still got more than half of it.
Cheers Hip.
-
Taffy Evans
- Blackwood
- Posts: 1079
- Joined: Wed Apr 30, 2008 6:54 pm
- Location: Charters Towers North Queensland

Hip, I see your set-up as more a virtual milling machine rather than CNC. You'd want to hope the drill head swivels in a very parallel way ,and very smoothly. I have my doubts somehow.
You may be better off fixing a reliably flat table to you drill press. Check that the table is at a true 90 degree to the machine. Rather than move the drill head ,have the neck make passes under the fixed cutter by sliding it along the flat table.
Here's my fixture which I'm hoping may help
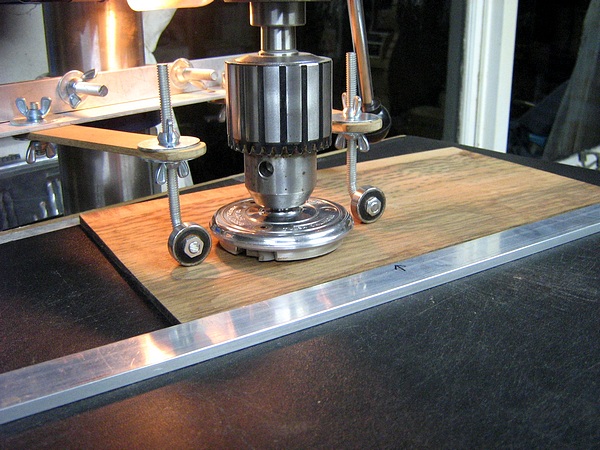
The table is made from 1 " pattern makers ply ( as mentioned earlier) ,topped with MDF, and finally a durable thin work surface. This flush bolts to the press table with wing nuts underneath
Have the chuck locked up in the fixed position to avoid any play in the quil. For the final fine cut , adjust the hieght of the material by placing a sheet/s of paper beneath the wood to be thicknessed.
You may be better off fixing a reliably flat table to you drill press. Check that the table is at a true 90 degree to the machine. Rather than move the drill head ,have the neck make passes under the fixed cutter by sliding it along the flat table.
Here's my fixture which I'm hoping may help
The table is made from 1 " pattern makers ply ( as mentioned earlier) ,topped with MDF, and finally a durable thin work surface. This flush bolts to the press table with wing nuts underneath
Have the chuck locked up in the fixed position to avoid any play in the quil. For the final fine cut , adjust the hieght of the material by placing a sheet/s of paper beneath the wood to be thicknessed.
Craig Lawrence
-
DarwinStrings
- Blackwood
- Posts: 1873
- Joined: Thu Nov 13, 2008 10:27 pm
- Location: Darwin
Looks very sound Craig. A little bit of flex in that set up with the bearings looks like they will hold it down a uneven surface well. I am curious about the material that you describe as "a durable thin work surface". I use modern Laminex/Formica with its textured surface as it provides a slippery surface and because of the sheet sizes I always end up with offcuts when I do a job with it.
Jim
Jim
-
Hippety Hop
- Blackwood
- Posts: 174
- Joined: Wed Apr 30, 2008 11:18 am
- Location: Moorabbin

Bah! where's the pearl? U'r really gett'in shonky in your old age whiskersCraig wrote: The table is made from 1 " pattern makers ply ( as mentioned earlier) ,topped with MDF, and finally a durable thin work surface. This flush bolts to the press table with wing nuts underneath
Hip,
Craig is spot on, you really do want to concentrate on setting up a level auxiliary table that can be quickly and easily fitted on to on you drill press table. It is worth the effort as it will come in handy for much more than just the Wagner Finger Dicer (just kidding, I love the Wagners).
I have a hole in my auxiliary table so a drum sanding arbor can be fed into it. Because I know the table is level and at right angles to the quill, I can be confident that anything I sand will have a square edge. Here is an image of how my auxiliary table clamps to the drill press. If you look careful you will see the locating dowels in the table, these ensure the table goes back exactly where it belongs when re-positioning. It can be fitted in around 10 seconds which means even a slack bugger like me will take the time to use it when needed.
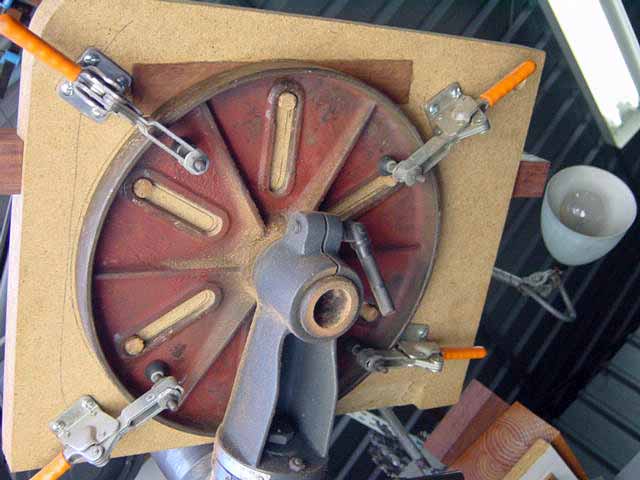
And here is a link to the Stewmac page which shows how to set up and level the auxiliary table. The info is at the bottom of the page.
http://www.stewmac.com/shop/Tools/Plane ... ml#details
Hope this helps.
Cheers
Kim
-
Hippety Hop
- Blackwood
- Posts: 174
- Joined: Wed Apr 30, 2008 11:18 am
- Location: Moorabbin
No sooner said than done. Thanks for that picture Kim. I spent $75 at Bunnings when I went to get the dowel. I only wanted 6". Oh well, it's Christmas. I already had the toggle clamps. Bought them off ebay @ $22.90 a pair.


As you can probably see, the drill press is a little unsteady on it's feet. Especially on that saggy floor. I'll look around for a hardwood pallet, and make something more solid.
Cooch grows up through the floor, and also out of the window sills.
Cheers Hip.
As you can probably see, the drill press is a little unsteady on it's feet. Especially on that saggy floor. I'll look around for a hardwood pallet, and make something more solid.
Cooch grows up through the floor, and also out of the window sills.
Cheers Hip.
[img]http://planetsmilies.net/not-tagged-smiley-10140.gif[/img][img]http://planetsmilies.net/person-smiley-1062.gif[/img]
Hippus Erectus
Hippus Erectus

Hip, while you are making your drill press more user friendly, ditch those three little black knobs and replace them with wooden balls. I think the ones I used are an inch and three-quarters. Ideally you would use what ever fits in the palm of your hand best. Its a really easy modification. You just drill a hole slightly smaller than the shaft and screw them on in place of those little black things. For a few dollars, it makes the drill press more comfortable to use. I ended up getting 10 off of eBay a few years ago for about a dollar a piece. I'm glad that I did. I've give two other sets away to friends.

-
Hippety Hop
- Blackwood
- Posts: 174
- Joined: Wed Apr 30, 2008 11:18 am
- Location: Moorabbin


Who is online
Users browsing this forum: No registered users and 161 guests